Clear Cache Partition Complete Guide for Samsung and Android Users

Jun 11, 2026 • Filed to: Data Recovery Solutions • Proven solutions
 TL;DR:
Wiping the Android cache partition is a safe procedure that deletes temporary system files to resolve overall performance slowdowns and post-update glitches without erasing personal data, passwords, or settings.
● Use a cache partition wipe for system-wide bugs, but opt for clearing an individual app's cache in the settings if only a single application is crashing or loading slowly.
● Ensure your device has at least 30 to 40 percent battery before beginning; newer Samsung models, including the S24, S23, and Tab series, specifically require connecting a USB-C cable to a computer while holding the Volume Up and Power buttons to access Recovery Mode.
● The wipe cache partition feature is absent on Google Pixel phones and newer OnePlus devices running OxygenOS 12 or later, meaning these users must instead rely on clearing specific app caches or using Safe Mode to troubleshoot.
Ask AI for a summary
 ChatGPT
 Perplexity
 Gemini
 Claude
 Grok
Grok
A slow or buggy Android phone or tablet can be annoying, especially after updates or heavy use. Many users are advised to fix this by using the wipe cache partition option. While the term may sound technical, it is safe and simple. It removes temporary system files that often trigger glitches, app crashes, or overheating issues.
In this guide, you will understand the real wipe cache partition meaning, whether it deletes passwords or personal data, and how to use it on different devices. We cover how to wipe the cache partition on Samsung. You will also see when clearing the app cache is a better choice than a full Android wipe cache partition.
- Part 1. What Does "Wipe Cache Partition" Mean?
- Part 2. Clearing Up Misconceptions: Cache Wipe vs. App Cache vs. Factory Reset
- Part 3. What to Do Before You Start a Cache Wipe
- 3.1 Wipe Cache Partition on Android Using the Settings App
- 3.2 How to Wipe Cache Partition on Samsung Devices
- 3.3 How to Wipe Cache on OnePlus (OxygenOS)
- 3.4 How to Wipe Cache Partition on Motorola Phones
- 3.5 When Your Phone Doesn’t Offer “Wipe Cache Partition” (Pixels, New OnePlus)
- Part 4. After a Cache Wipe: What to Expect
- Part 5. Bonus Tip: Recover Data with Dr.Fone Data Recovery (Android)

Part 1. What Does "Wipe Cache Partition" Mean?
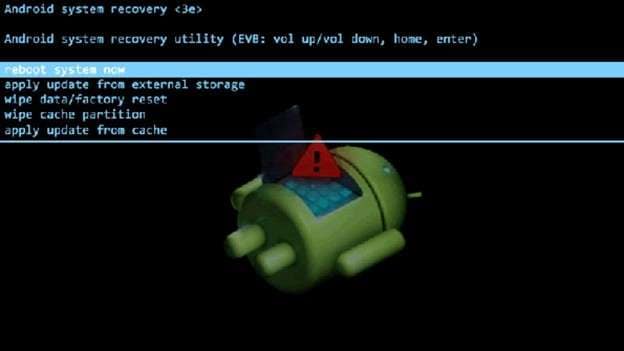
When we talk about the wipe cache partition, we mean a hidden feature inside Android Recovery Mode. It clears system-level temporary files such as old logs and compiled data caches created by the device. The purpose is to improve performance through Recovery Mode.
It does not include or affect your photos, messages, or settings, unlike deleting app data or performing a factory reset. It's like cleaning a storeroom to make your new home airy again. This simple step often resolves misbehaviour after system updates without risk.
1.1 What Changes After You Wipe the Cache Partition?
When Android detects a trigger, it deletes duplicate cache files and then creates new ones.
The main benefits are:
- Improved overall processing
- Faster app openings
- Fewer random glitches
After the first wipe cache partition, the next boot may feel slower. This is completely normal because Android is rebuilding its cache.
Once the rebuild is complete, the device usually becomes more stable, similar to how a computer runs better after updating software and clearing temporary files.
1.2 Will It Remove Passwords or Delete Your Data?
Executing wipe cache partition doesn’t delete your PIN, pattern lock, biometric credentials, or any personal files. It targets only the system cache. Community feedback and official support from Samsung users confirm that it does not delete saved passwords or personal information.
1.3 When Should You Use It and When Should You Skip It?
Use the wipe cache partition if your device is extremely slow after a big update or is crashing frequently with an application. However, when it is only a single app that is misbehaving, clearing its cache is faster, and here is how this can be done:
Step 1. Launch the Settings application on your mobile device.
Step 2. Wipe and then tap on the "Apps" (or "Apps & notifications" on some devices) heading.
Step 3. Select the application whose cache you want to remove by tapping on it.
Step 4. Tap Storage & cache.
Step 5. Tap Clear cache.
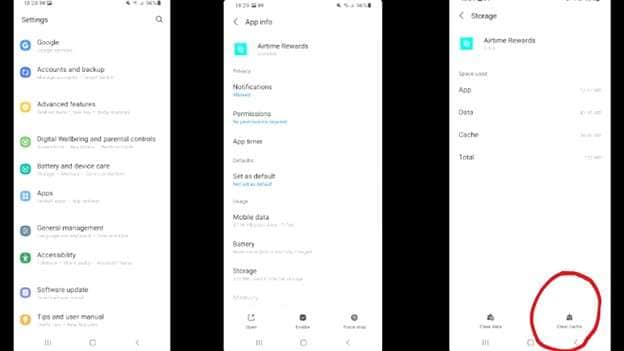
That’s often faster and less invasive. Save the complete system cache wipe for deeper issues affecting overall system behaviour.
Part 2. Clearing Up Misconceptions: Cache Wipe vs. App Cache vs. Factory Reset
Let’s break down some common confusion:
|
Action |
What It Affects |
What It Deletes |
Risk Level |
Best For |
| Wipe Cache Partition | System cache files (Recovery) | Temporary system files | Very Low, no personal data affected | Post-update problems or system-wide glitches |
| Clear App Cache | One app’s cache files | Temporary data of that app | Very Low, app settings intact | One misbehaving or slow-loading app |
| Factory Reset (Wipe Data) | Entire user data partition | Apps, accounts, settings, files | High, erases everything | Severe corruption, major system errors, or prepping to sell |
Through this table, you can see the difference, which helps prevent accidental data loss when you're troubleshooting performance issues.
Part 3. What to Do Before You Start a Cache Wipe
It is good to ensure that you set up your phone accordingly before trying a wipe cache partition to make the process simpler. The following are the key points to remember:
- Ensure your device has at least 30–40% battery before starting.
- Know your brand’s recovery key combination (varies by manufacturer).
- In newer Samsung models, you may require the use of a USB-C cable to a PC to enter the Recovery Mode.
- Have your screen lock pin or pattern on hand, too, because you will need it when the phone reboots.
- Do not run out of charge in the middle of the process, as this may lead to boot problems.
3.1 Wipe Cache Partition on Android Using the Settings App
Even on certain versions of the Android operating system, it is possible to clear cached data without entering Recovery Mode by accessing the Settings app. This is what to do:
Step 1. Swipe the home screen and open the Settings app.
Step 2. Tap Storage (scroll down).
Step 3. Search the Cached data and tap it.
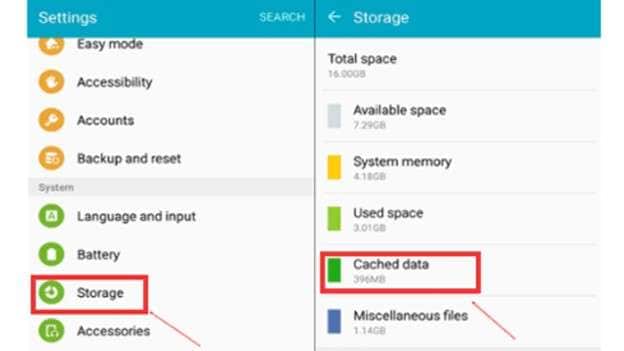
Step 4. When a pop-up window appears and asks you whether you would like to clear it, tap the OK button.
These easy steps will be useful to clear all the cache data on Android phones, but remember that this option might not be supported in the new versions of Android, and there is a chance that the feature will not be useful to any phones.
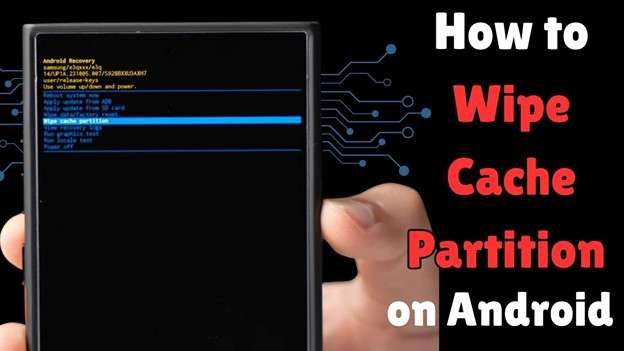
3.2 How to Wipe Cache Partition on Samsung Devices
If you’ve got a Galaxy phone or tablet, here’s the friendly workflow:
Step 1. Switch off your device.
Step 2. Hold both Volume Up + Power buttons. These models of Samsung (e.g., S24, S23, Tab series) may require plugging in a USB-C cable to a Computer to enter Recovery Mode.

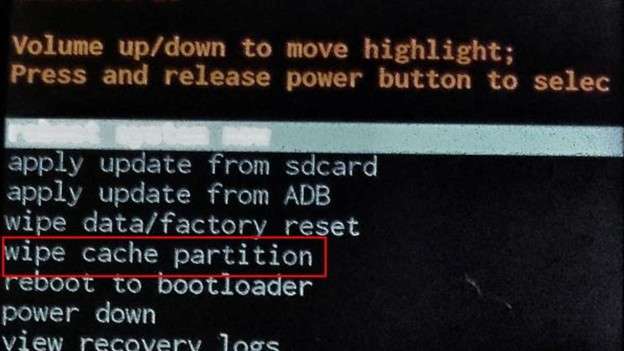
Step 3. When Recovery Mode is launched, you can use the volume keys to select the Wipe cache partition, press Power to confirm it, then press Yes, and reboot the system now.
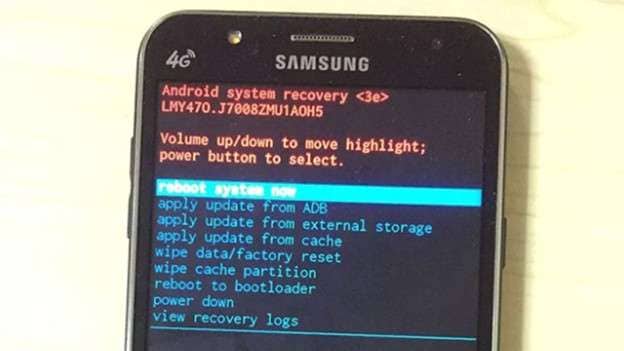
Step 4. You may notice your device restarting a little slower this time; it's just simply rebuilding. When it starts up, you will frequently experience smoother and faster performance.
3.3 How to Wipe Cache on OnePlus (OxygenOS)
Earlier, OnePlus devices included a wipe cache option. If your model still shows this feature, here is how you can use it:
Step 1. Switch off your phone.
Step 2. Press and hold Power + Volume Down until the OnePlus recovery screen appears.
Step 3. Choose language (English is the generic default).
Step 4. Select Wipe data & cache and Wipe cache.
Step 5. Agree and reboot.
When such a selection is not possible (as in OOS 12 and later), simply clear the single application cache or use the built-in storage cleaner.
3.4 How to Wipe Cache Partition on Motorola Phones
For Moto devices, follow these steps:
Step 1. Switch off the device.
Step 2. Hold Volume Down + Power to enter the bootloader.
Step 3. Navigate to Recovery Mode, then press Power to enter.
Step 4. When the Android robot appears, hold Power and tap Volume Up once to reveal the full menu.
Step 5. Select 'Wipe cache partition', Then Click 'Yes', select 'Reboot system now.'
3.5 When Your Phone Doesn’t Offer “Wipe Cache Partition” (Pixels, New OnePlus)
If you have a Google Pixel or a newer OnePlus phone that lacks the recovery option, you can still troubleshoot through these:
- Clear caches for problematic apps.
- Use Safe Mode to detect misbehaving third-party apps.
- Clear some space on your device and go to system updates.
These steps can be useful even if it is not an official wipe of a cache partition.
Part 4. After a Cache Wipe: What to Expect
Your device may boot slowly at first; that’s normal, as Android is rebuilding its cache. Battery behaviour might vary for a productive charge cycle or two, and apps like Google Play Services may ask to reopen to rebuild their caches. All of this is entirely normal; simply be patient and allow your device to settle in.
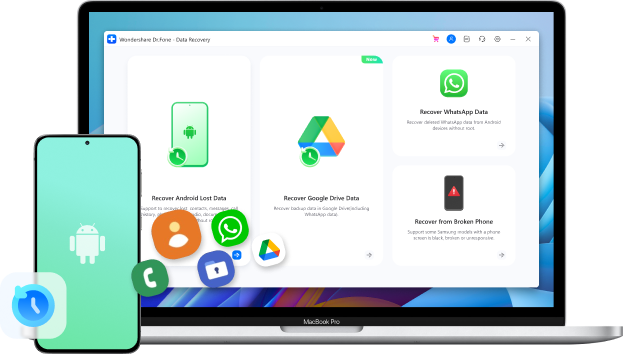
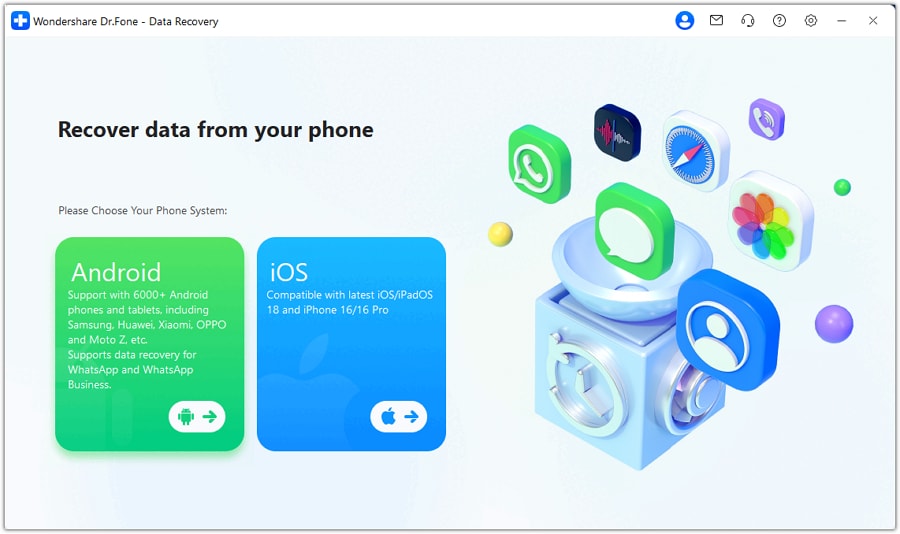
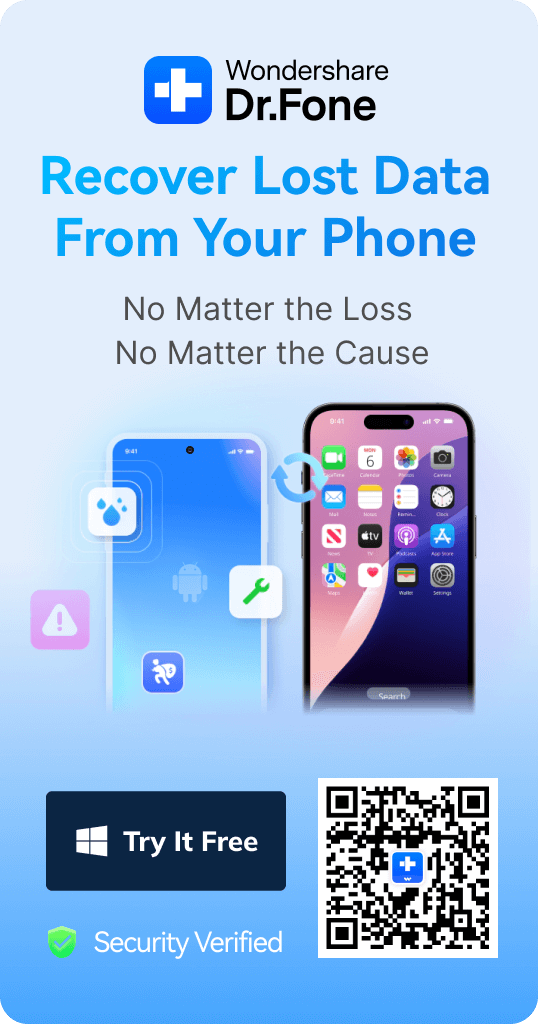
Part 5. Bonus Tip: Recover Data with Dr.Fone Data Recovery (Android)
After a cache wipe, your device should usually return to smooth performance. But sometimes users may take the wrong step, like performing a factory reset instead of a cache clear, or face unexpected data loss. In such situations, a recovery tool becomes essential.
Dr.Fone - Data Recovery (Android) is a convenient desktop application that enables you to connect your device, scan it, and restore data, such as photos, messages, and WhatsApp chat history. With support for over 6000+ Android devices, it offers one of the most reliable ways to recover your critical data safely.
Key Features:
- Restores photos, videos, contacts, messages, and documents.
- Recovers lost WhatsApp and WhatsApp Business messages after deleting without root.
- Downloads files that are in damaged Samsung phones or on Google Drive.
- Delivers best-in-industry recovery rates.
- Simple connect-scan-recover; simple enough for any user
Dr.Fone - Data Recovery (Android)
Recover Lost Data on Samsung & Android Phones.
- Recover Android data by scanning your Android phone & tablet directly.
- Preview and selectively recover what you want from your Android phone & tablet.
- Supports various file types, including WhatsApp, Messages & Contacts & Photos & Videos & Audio & Document.
- Supports 6000+ Android Device Models & Various Android OS.


Here’s a step-by-step process:
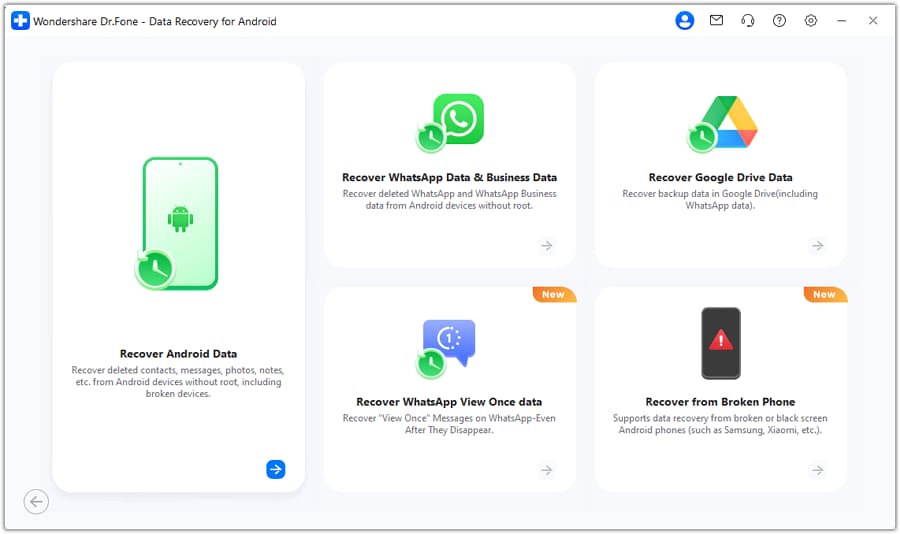
Step 1: Launch Dr.Fone and Select Device Type
Install Dr.Fone on your PC and select "Toolbox"> "Data Recovery". Select the Android option on the display.
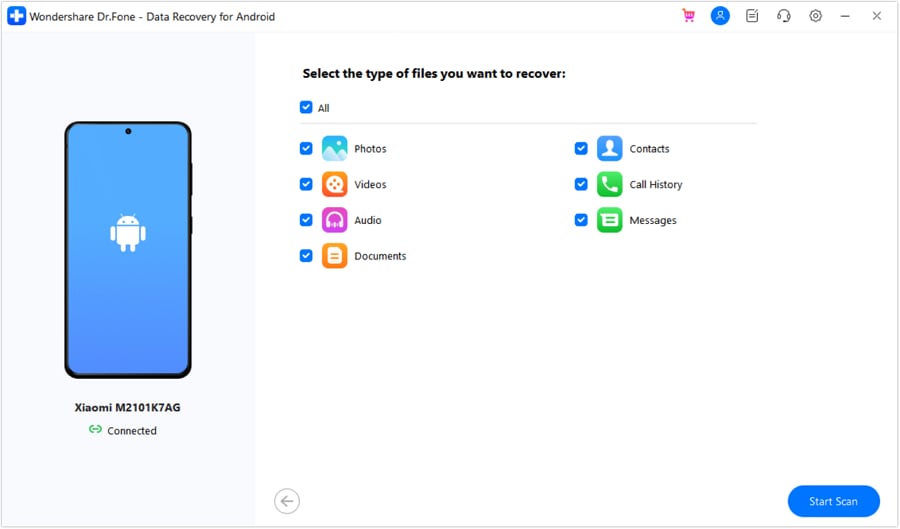
Step 2: Select Recovery Option
The following screen will show you an option that reads Recover Android Data, Choose that to proceed further.
Step 3. Connect the Phone to the Computer and Pick the File Types
Connect the Android phone to the computer using a USB and simply wait for Dr.Fone to see it. Select the type of files you want to recover (e.g., photos, messages, videos) and then click the Start Scan button.
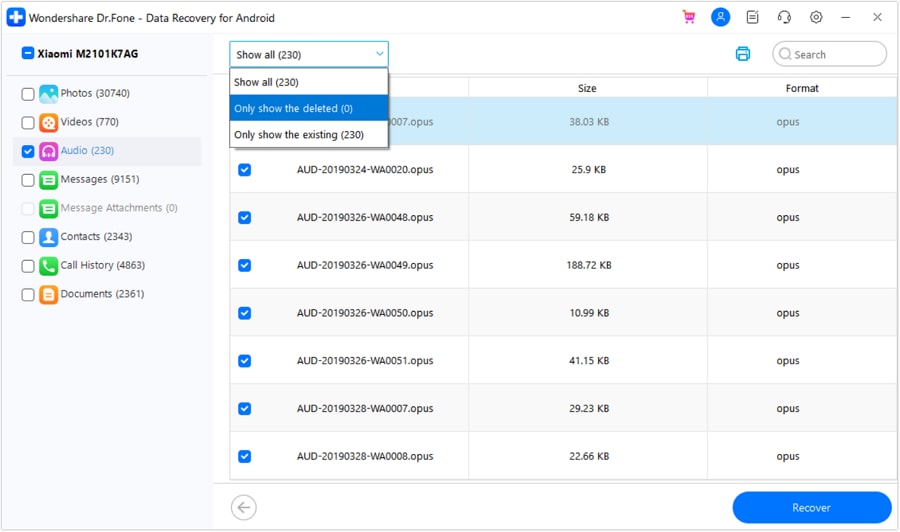
Step 4. Recovered Files preview and Select Your Data
Dr.Fone will scan your device and provide a preview of the files that can be recovered. View the search results, filter as necessary, and choose what you prefer to have returned.
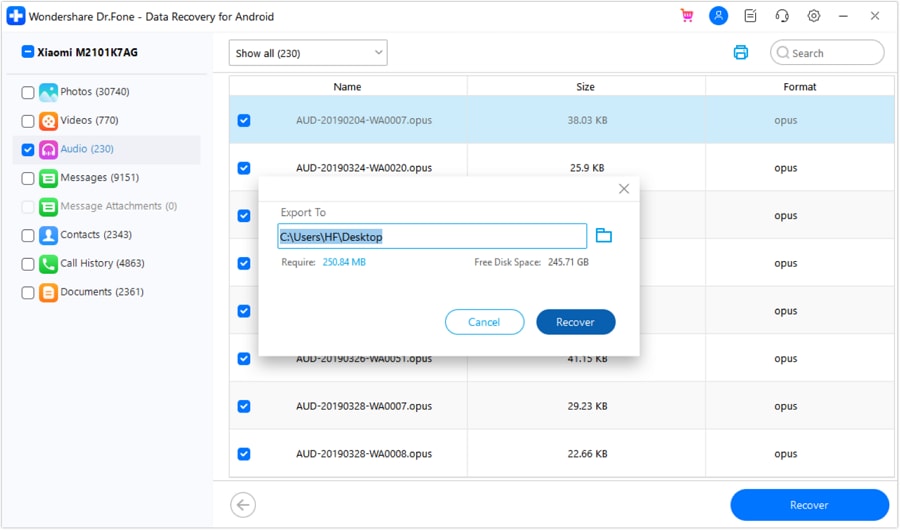
Step 5. Saving Your Recovered Files
Now, you can recover by clicking the Recover option and saving your recovered files in the desired location of your choice on the computer.
Conclusion
The risk-free system cleansing only wipes the cache partition and deletes specific old temporary files. It doesn't change your programs, photographs, or personal info. It works best when Android runs slowly after updating.
From Samsung to Motorola, the steps may vary, but the outcome is the same: smoother performance and fewer glitches. And while a clear cache partition is safe, mistakes like a full reset can still happen. In such cases, reliable recovery solutions like Dr.Fone help ensure your important data is never lost, giving you both performance and peace of mind.
4,624,541 people have downloaded it
FAQs


Android Recover
- Recover Apps
- 1. Data Recovery Software for Android
- 2. Top 4 Android Data Recovery Tools
- 3. Restore Deleted Files on Android
- 4. Coolmuster Android Data Recovery
- 5. Guide of Disk Drill for Android
- 6. Android Data Recovery Software
- 7. Gihosoft Android Data Recovery
- 8. Jihosoft Android Phone Recovery
- 9. Minitool Android Mobile Recovery
- 10. Recover Android Data from Fucosoft
- 11. Best Mobile Forensics Tools to Recover Data
- 12. PhotoRec Review
- 13. FoneDog Toolkit
- 14. TWRP Recovery
- Contacts Recover
- 1. Recover Contacts from Stolen phone
- 2. Recover Contacts from Android
- 3. Retrieve Contacts Without Backup
- Files Recover
- 1. Recover Files from Internal Memory
- 2. Recover Miscellaneous Files
- 3. Recover Android's Hidden Files
- 4. Recover Deleted Files from Android
- 4. Recover Deleted Files Without Root
- 5. Recover Files from SD Card
- 6. Undelete Files on Android
- Messages Recover
- Music/Videos Recover
- Photos Recover
- 1. DiskDigger Photo Recover Review
- 2. Recover Deleted Photos from Android
- 3. Recover Photo from Internal Storage
- 4. Recover Photos from Lost Phone
- 5. Restore Android Deleted Photos
- Broken Android Recover
- 1. View Files from Broken Phone Screen
- 2. Recover Data from Dead Phone
- 3. Recover Contacts with Broken Screen
- 4. Recover Text Messages from Android
- 5. Recover Data from Internal Memory
- Social Apps Recover
- 1. Recover Facebook Messages
- 2. Recover WhatsApp Messages
- 3. Recover WhatsApp Messages
- 4. Restore Deleted WhatsApp Messages
- Android Recover Tips
- 1. SD Card Recovery Tools
- 2. Fix Recovery Mode Not Working
- 3. Enter Recovery Mode on Android
- 4. Recover Calendar from Android
- 5. Recover Deleted Call Log on Android
- 6. Clear Cache Partition
- 7. Repair a USB Stick
- 8. USB Repair Tools
- Cloud Storage Tips
- ● Manage/transfer/recover data
- ● Unlock screen/activate/FRP lock
- ● Fix most iOS and Android issues
- Free Download Free Download Free Download

James Davis
staff Editor