100% Security Verified | No Subscription Required | No Malware

 :
: 
 ChatGPT
 Perplexity
 Gemini
 Claude
 Grok
Grok

My USB flash drive suddenly stopped reading when I plugged it into my computer. Is there a reliable flash drive repair method to fix it and recover my lost data?
Anonymous User
A USB drive that suddenly becomes unreadable or corrupted can immediately halt your workflow and prevent you from accessing critical files. Fortunately, the vast majority of these frustrating issues can be resolved with straightforward flash drive repair methods. Whether it requires a simple driver update, running detailed CHKDSK scans, or carefully formatting the device to rebuild its file system, you often have the power to restore functionality without professional help.
This comprehensive 2026 guide explains precisely how to fix a USB drive step by step. You will learn to properly identify common software corruption symptoms, perform an effective broken flash drive repair, and most importantly, attempt broken USB stick data recovery before permanent data damage occurs. If you desperately want to recover your content before attempting any complex repair procedures, you can use a free data recovery software to safely retrieve your files instantly.
If your USB drive is not reading, you can usually fix the issue using built-in Windows repair tools. The most effective solutions include updating your computer's USB drivers, scanning the flash drive with the CHKDSK utility, formatting the device to rebuild its structure, or entirely resetting it using the Diskpart command line tool.
These logical repair methods help resolve common issues such as corrupted file systems, bad sectors, or driver conflicts. However, if the USB device is physically snapped or severely damaged, professional flash drive repair or dedicated data recovery services may be required.
In this article
Part 1. Can You Repair a USB Stick or Flash Drive?
Yes, in the majority of everyday scenarios, you can successfully repair a USB flash drive as long as the host computer still detects the hardware when it is plugged in. Many widespread issues—such as suddenly corrupted file systems, outdated or conflicting driver errors, or minor bad sectors—can be completely fixed using built-in Windows utilities specifically designed for flash drive repair.
However, your overall success rate heavily depends on whether the core damage is logical (software-based) or physical (hardware-based). Logical problems can often be repaired with a few clicks and may even allow you to seamlessly recover a USB drive and rescue its precious files. Physical damage, conversely, usually requires highly specialized repair equipment, cleanrooms, or costly professional data recovery services.
Logical corruption directly affects the software and internal file structure. It may frequently appear as random system errors, RAW file system prompts, or conflicting driver issues; these can often be fixed if the drive is still technically readable by the operating system. In many cases, completely free diagnostic tools can heavily assist with these fixes. For instance, you should check out these free SD card recovery tools, which notoriously also work wonders for standard USB flash drives.

Part 2. How to Tell if a USB Stick Is Corrupted
A corrupted USB drive typically displays highly obvious signs of digital manipulation or structural failure. Identifying these symptoms early can drastically help you confirm that your device is compromised before the data becomes permanently irrecoverable. The most common and recognizable signs are the obvious system error messages, such as "The directory is corrupted and unreadable," or "The disk is write-protected." These aggressive notifications usually appear when you actively try to edit, delete, or move the core content of the flash drive. Alternatively, they might pop up when you attempt to transfer photos from Android to a USB drive.
But sometimes, these blatant error messages simply won’t appear even if the storage device is massively faulty. In this precarious situation, you must proactively look for the following hidden indications of deep corruption before blindly trying to fix a thumb drive:
- Vital files or entire master folders are suddenly missing without explanation.
- Existing files or folders are mysteriously appearing as mere 1KB shortcuts.
- The operating system is completely unable to open or preview the USB content.
- You experience a sudden, severe lag or freezing in the performance of the flash drive during read/write operations.
- The USB is falsely showing up as having an incorrect or 0-byte storage capacity.
- Your computer or laptop is stubbornly not detecting the drive at all, even in Disk Management.
If these distinct signs indicate logical damage rather than a snapped circuit, you might have a high chance to recover your data first. Read our comprehensive PhotoRec software review for file recovery from heavily corrupted drives before hastily proceeding with irreversible repairs.
Part 3. How to Fix a USB Drive Not Reading (Flash Drive Repair Guide)
An completely unreadable USB drive is surprisingly easy to fix once you decisively know if the underlying issues are related to its physical hardware components or its internal software file system. Below, I’ve meticulously listed simple, actionable steps that can strongly help you correctly identify the core problem and fix it efficiently without losing your sanity.
-
Step 1 Check Physical Connections and USB Ports
Before you hastily assume that the technical problem is software-based, take a step back and visually look at the USB stick itself. Physical corruption can physically appear in many tangible ways on your beloved flash drive. Typical, undeniable signs of physical damage are a notably loose connection and constantly interrupted data communication between your computer's motherboard and the pen drive. The absolute best way to accurately identify the issue is to meticulously inspect it physically under good lighting.
When thoroughly examining the device, keenly look for these physical indications of severe damage:
- A noticeably bent, skewed, or highly unstable metal USB connector.
- Deep hairline cracks in the external plastic or metal protective casing.
- Dangerous exposed internal micro-components or green circuitry boards.
- Ominous burn marks, melting, or strange discoloration near the main connector.
- Parts of the USB chip are literally separating from the main casing.
- Heavily rusty or oxidized metal contact pins in the connector or the computer's ports.
-
Step 2 Update or Reinstall USB Device Drivers
If the flash drive does not show any apparent physical damage, it heavily indicates a purely software or operating system problem. The smartest initial action to effectively tackle this logical issue is to verify your Windows system drivers. The computer fundamentally utilizes USB drivers to digitally identify and interact with the external device. Outdated or malfunctioning drivers will heavily impact this vital communication process. Thus, you can either update or cleanly reinstall the main drivers to completely repair the USB flash disk. Below are the precise steps to do so in Windows.
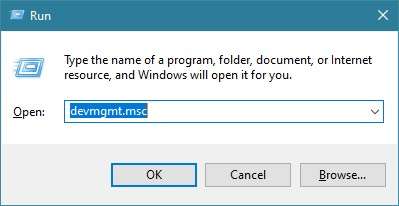
Press the "Windows + R" keys at the exact same time. This will instantly open the standard Run command dialogue box. Type "devmgmt.msc" directly into the empty text box and confidently click "OK." This action will promptly open the robust Device Manager tool.
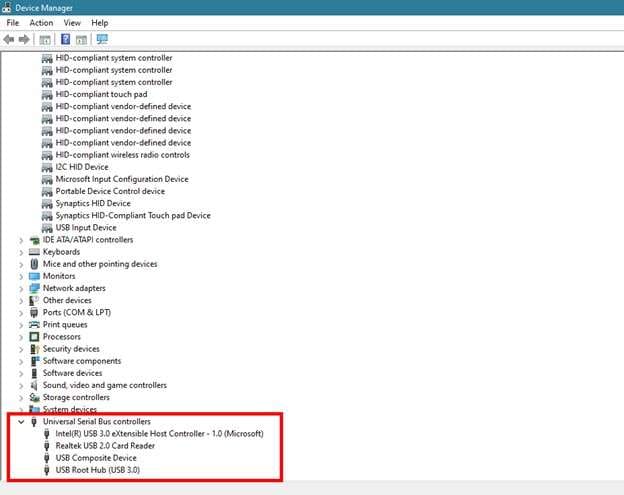
From the newly opened window, carefully scroll and expand the "Universal Serial Bus controllers" menu branch. This simple expansion will reveal a comprehensive list of currently installed USB devices.
Right-click systematically one by one on each listed driver component and thoughtfully select "Update driver" or "Uninstall device" depending on your troubleshooting needs.
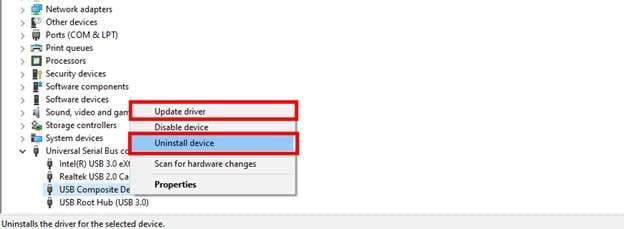
Finally, manually restart your PC. Once rebooted, connect the USB device again. The Windows OS will automatically detect the missing hardware and reinstall the required default drivers to rapidly fix the pen drive.
-
Step 3 Run CHKDSK to Repair File System Errors
CHKDSK, also famously known as Check Disk, is a highly powerful built-in Windows repair utility. It meticulously scans a target USB drive for complex file system errors, dangerous bad sectors, and deeply hidden digital corruption.
Running CHKDSK via command line or GUI is often the absolute fastest way to intelligently fix a USB drive that has become totally unreadable. In many dire situations, this utility can also flawlessly help restore normal access to hidden files long before you desperately attempt USB data recovery or a full, destructive format.
When you aggressively run it on a faulty USB stick, it thoroughly checks for physically damaged sectors, totally corrupted file cluster structures, and other frustrating logical issues that can forcefully stop the drive from opening in File Explorer. A massive amount of so-called "unreadable" USB sticks simply have these kinds of easily fixable hidden data inconsistencies. CHKDSK can systematically clear these out in minutes. As a direct result, your portable storage drive becomes fully readable again.
Here is exactly how to safely fix a corrupted flash drive using the graphical CHKDSK interface:
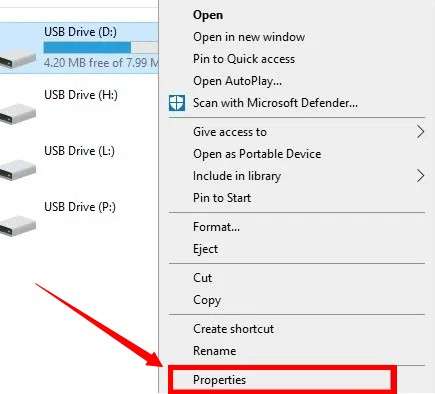
Securely connect your USB stick and open Windows File Explorer. Firmly select "This PC" from the left navigation pane. Find your specific USB drive name listed prominently under "Devices and drives." Right-click directly on its icon and patiently select "Properties" from the dropdown list.
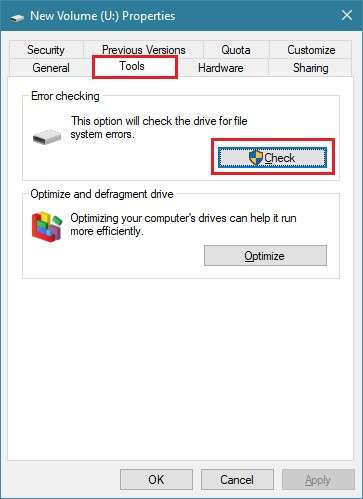
A small, detailed properties window will swiftly appear. Select the "Tools" tab located at the top from here. Then, decisively click the "Check" button prominently displayed under the Error checking section.
The intelligent CHKDSK tool will now check the drive for any underlying errors. The standard message "You don't need to scan this drive" merely shows there are no blatantly obvious errors right now. However, if you want to strictly recheck and force a scan, click "Scan drive."
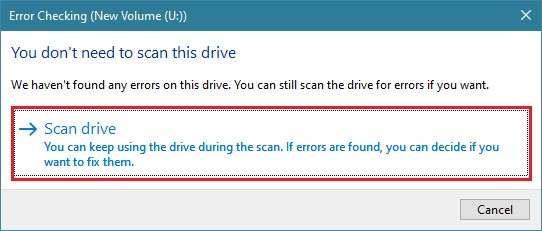
Wait patiently for the comprehensive scan to completely finish. Then, enthusiastically click "Show Details" to view the specific repaired issues in the Windows Event Viewer.
Pro Tip: You can also execute a much deeper CHKDSK using the advanced Command Prompt. Open the prompt strictly as an administrator. Then, carefully type `chkdsk /X /f H:` and strongly hit Enter. Here, you must strictly replace the letter "H" with your own flash drive's actual assigned letter. The powerful Check Disk utility will rigorously scan and automatically fix severe issues on its own. -
Step 4 Format the USB Stick as a Last Resort
Unfortunately, the USB stick may stubbornly stay unreadable even after you meticulously run multiple USB repair tools and driver updates. At this dismal point, the only viable option left to salvage the hardware is to completely format the device. Formatting is essentially the destructive process of actively creating a brand new, clean file system (like exFAT or FAT32) that rigidly organizes your future data and gives you back the necessary blank space for safely storing your new files.
Here is exactly how to format and fully repair a deeply corrupted USB drive from scratch:
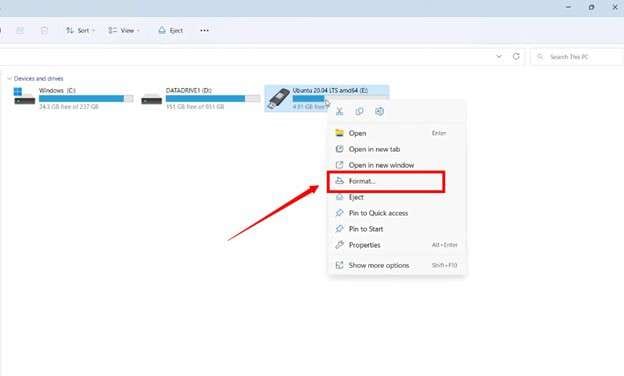
Navigate directly to "This PC" and closely head over to the "Devices and drives" main section. Right-click purposefully on your unresponsive USB drive icon. Then, carefully choose "Format" from the context menu.
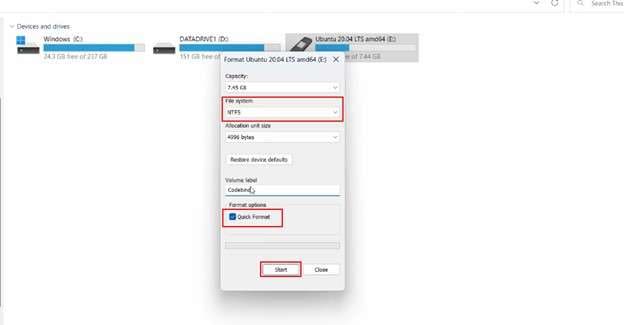
Click the critical "File System" dropdown menu and strategically select the desired option (exFAT is highly recommended for cross-platform compatibility). Be absolutely sure to check "Quick Format" if you just need a fast wipe, or deliberately uncheck it for a much slower, more rigorous complete format that checks for bad sectors. Finally, click the "Start" button to forcefully format the device and wipe it clean.
Part 4. How to Reset a USB Stick Completely
It is important to note that a basic Windows formatting does not completely and securely remove all deep data traces on your drive, nor does it fix severe partition table corruption. To completely wipe incredibly faulty partitions and rigidly restore the problematic drive to its absolute original factory capacity, you fundamentally need to reset it to a true factory-like state. The advanced command-line tool known as Diskpart offers the absolute most reliable and aggressive way to accomplish this feat.
Here is a step-by-step technical guide on how to repair a heavily corrupted flash disk using Diskpart safely.
-
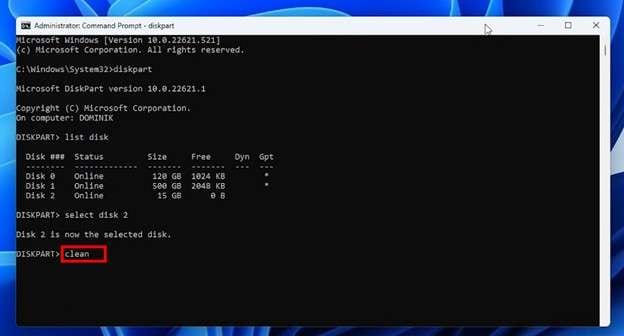
Step 1 Launch Diskpart Utility
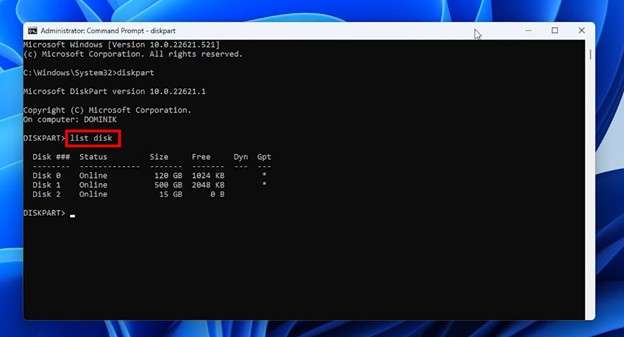
Securely connect your malfunctioning thumb drive to a stable port. Go directly to the main Windows "Start" menu and quickly open the Run command dialogue. Accurately type in "diskpart" and forcefully hit "Enter." You will likely need to grant administrator permissions.
-
Step 2 List Connected Disks
Carefully enter "list disk" into the ominous black Command Prompt window. You will instantly see a numbered, comprehensive list of all active storage drives physically connected to your computer. Cautiously find the specific number of your USB drive based purely on its known storage capacity (e.g., 14GB for a 16GB drive).
-
Step 3 Select Your USB Drive
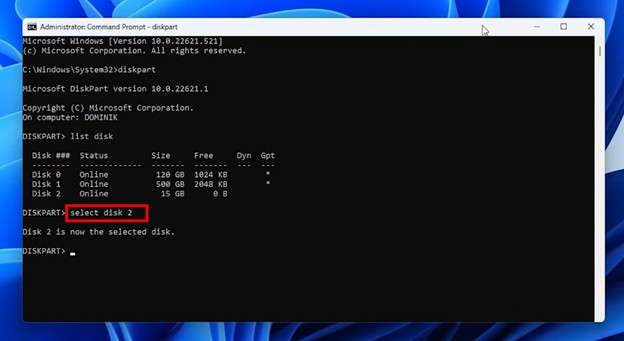
Accurately type "select disk 2" (you absolutely must replace "disk 2" with the specific number of your own pen drive) and press "Enter." Selecting the wrong disk here will result in catastrophic data loss on your main hard drive, so proceed with extreme caution.
-
Step 4 Clean the Drive Data
Deliberately type the command "clean" and press "Enter" to completely wipe all underlying partition data, volume data, and hidden structures on the drive.
-
Step 5 Create a New Primary Partition
Next, carefully write the command "create partition primary" and decisively hit the "Enter" key once again. This critical step will successfully restore the raw drive by establishing a brand new primary partition structure.
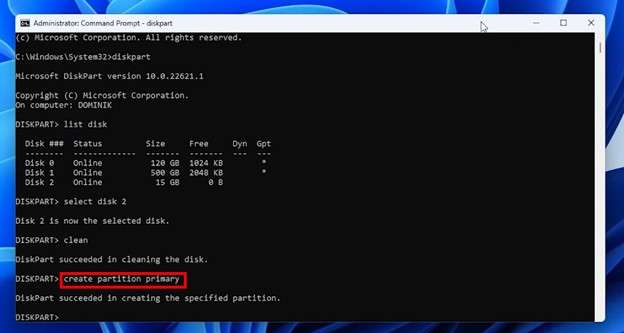
Now, safely close the black command prompt window and proceed to normally format your drive via File Explorer (as shown in Part 3) to easily restore its full, usable storage capacity.
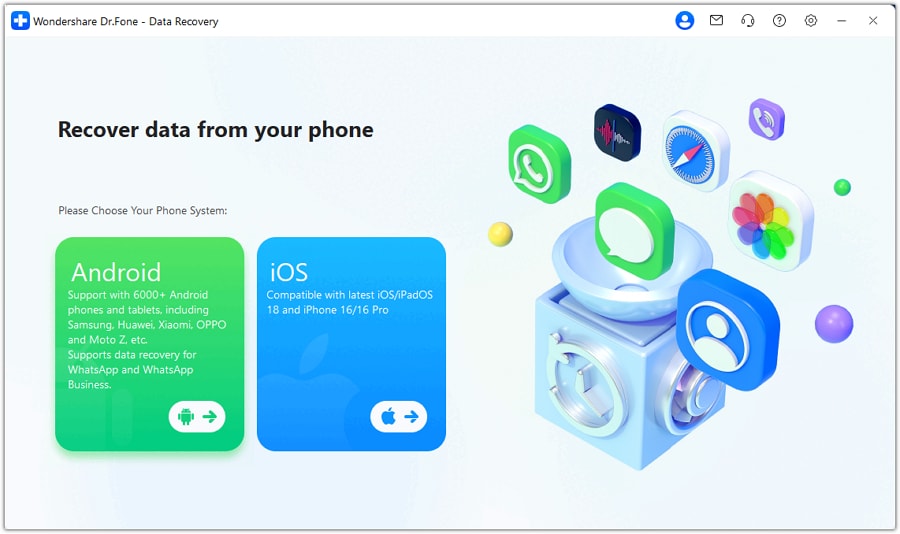
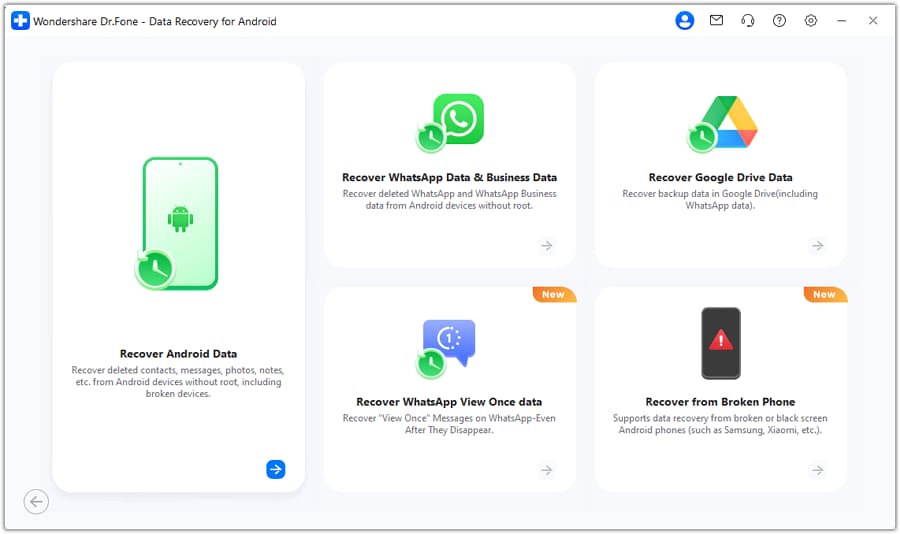
Part 5. Bonus Tip: Easily Recover Lost Data on Android with Dr.Fone - Data Recovery
Apart from a standard pen drive or basic USB flash disk, modern smartphones seamlessly store a massive amount of incredibly valuable data that, if suddenly lost, can feel utterly nerve-racking. You might accidentally delete crucial work files, or tragically lose your memories due to a sudden, catastrophic system crash or failed update. Recovering these permanently lost files from a smartphone might initially seem technically impossible without expert intervention.
But with the advanced power of Dr.Fone - Data Recovery (Android), you can independently bring back your lost files instantly from the comfort of your home. It possesses the incredible ability to deeply retrieve virtually all types of raw Android data, no matter exactly how you tragically lost it. It even brilliantly helps you recover a water-damaged Samsung flagship phone, as well as heavily retrieve vital information from a totally broken, black-screen, or utterly unresponsive mobile device.
Moreover, you can reliably bring back an expansive array of file types. Precious camera photos, high-resolution videos, intimate chat logs, massive contacts lists, and sprawling WhatsApp data packed with attachments are all fully compatible for extraction. After the intelligent software rapidly detects the hidden files to be recovered, you can leisurely examine them via a crystal-clear preview mode and deliberately select precisely which individual items you'd like to retain permanently.
The most undeniably advantageous aspect of this industry-leading tool is that it is globally compatible with all leading Android brands currently dominating the 2026 market. Devices from Samsung, Vivo, Huawei, Xiaomi, and OPPO are all fully supported out of the box. The entire internal recovery process is incredibly quick, surprisingly simple, and safely guided with visual step-by-step instructions.
 Scan Android phones and tablets directly.
- Preview and recover only what you want.
- Supports WhatsApp, photos, videos, contacts, and more.
- Works with 6000+ Android devices.
Steps to Intelligently Recover Data with Dr.Fone - Data Recovery
-
Step 1 Launch the Data Recovery Tool
First, fully download and securely install the latest version of Wondershare Dr.Fone onto your PC or Mac. Actively launch the main application interface and navigate to select "Toolbox" prominently displayed on the left panel. From that robust menu, confidently choose the "Data Recovery" module.

-
Step 2 Choose the Android Ecosystem
Carefully select "Android" as the primary operating system environment of your currently connected mobile device.
-
Step 3 Opt for Core Android Data Recovery
Decisively select "Recover Android Data" from the multiple comprehensive options presented in the seamlessly transitioning next window.
-
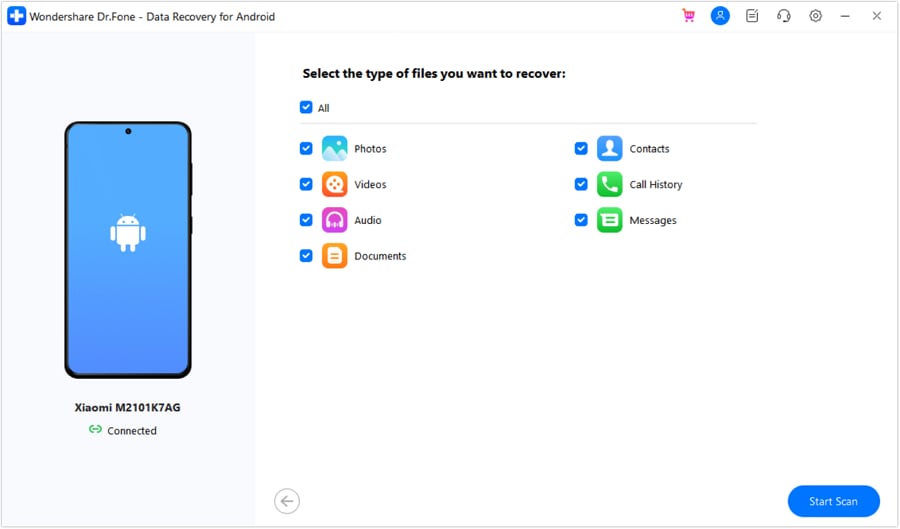
Step 4 Connect and Initiate the Deep Scan
Firmly connect your handphone to your PC via a high-quality, stable USB cable (or through a functional USB hub). Then, meticulously select the exact file types you desperately want to restore and confidently click "Start Scan."
-
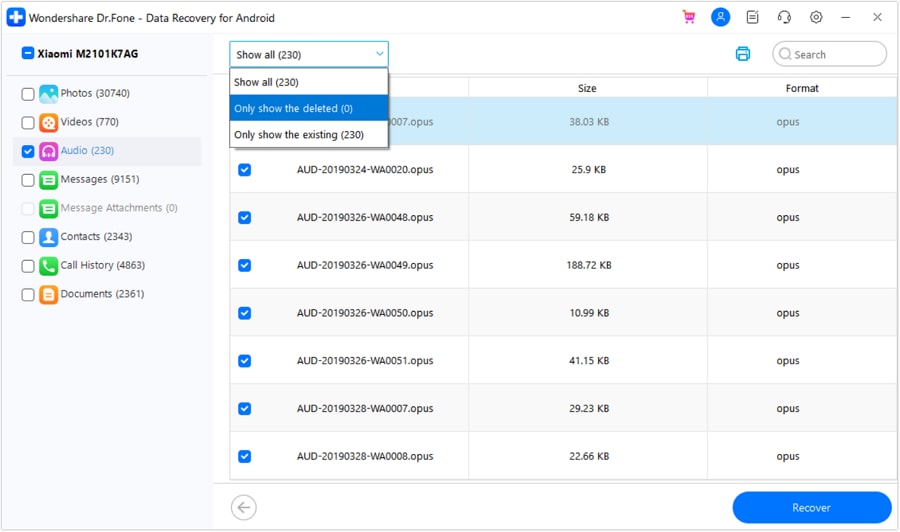
Step 5 Preview and Filter the Rescue Data
Dr.Fone will aggressively search the device sectors for highly recoverable data. Once the intensive process is done, smoothly use the intuitive dropdown menu located at the top to intelligently filter the massive results and visually select the precise files you need to save. Then, eagerly click "Recover."
-
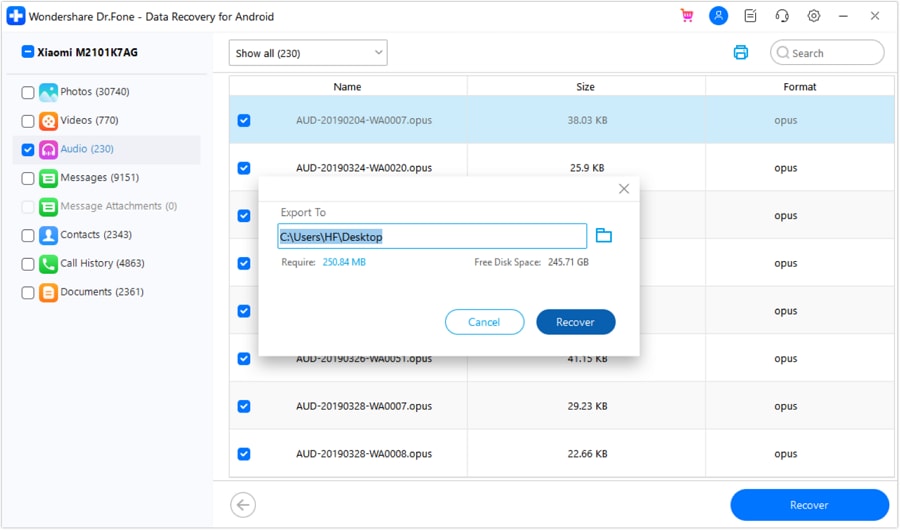
Step 6 Finalize the Data Restoration
A neat pop-up window will instantly appear on your monitor. From here, carefully select a secure local folder on your computer's hard drive to safely store the newly extracted files. Finally, proudly click "Recover" to instantly retrieve them back into your total control.
Conclusion
In most frustrating scenarios, you can successfully repair a USB stick directly from home using the powerful built-in Windows repair tools like CHKDSK and Diskpart. However, your very first step must always be to visually eliminate any signs of catastrophic physical hardware damage. Afterwards, meticulously make sure your system drivers are working correctly and are fully up to date. Only cautiously proceed to format or factory reset the device if absolutely all other logical repair options fail to restore access. For any unexpectedly lost Android data encountered during these transfer processes, Dr.Fone - Data Recovery (Android) seamlessly helps you completely restore all critical file types with incredibly easy, visually guided steps. Download it today to confidently and securely recover your lost data before it's gone forever!


FAQ
-
1. How do you definitively fix a USB drive that is not reading?
You can efficiently fix a USB drive not reading by methodically checking the physical USB port for damage, fully updating outdated Windows drivers, running a deep CHKDSK command scan, or completely formatting the drive structure. These reliable flash drive repair methods swiftly solve the vast majority of software-related access problems. -
2. Can you realistically recover lost data from a severely broken USB stick?
Yes, absolutely. If the problematic USB drive still successfully appears within your computer's File Explorer or Disk Management tool, you can rapidly attempt broken USB stick data recovery using highly professional recovery software long before attempting to repair or permanently format the fragile drive. -
3. What secretly causes a standard flash drive to suddenly become corrupted?
Flash drive corruption is extremely commonly caused by the unsafe physical removal of the drive during read/write cycles, violently interrupted file transfers, malicious malware or virus infections, or underlying logical file system errors. These persistent problems often explicitly require specialized flash drive repair tools to fully restore normal user access. -
4. What is the absolute best software method to repair a corrupted flash drive?
The definitive best repair method heavily depends on the specific core issue. Running a robust CHKDSK command reliably fixes minor file system errors without data loss, while a full formatting process completely rebuilds the entire drive structure from scratch. If the USB is physically and severely damaged, expensive professional flash drive repair services in a cleanroom may be absolutely necessary.
 Add Wondershare Dr.Fone as a preferred source on Google