 Recover photos, messages, WhatsApp, and more — no backup
needed.
Recover photos, messages, WhatsApp, and more — no backup
needed.

 100% Security Verified | No Subscription Required | No Malware

 :
: 
 ChatGPT
 Perplexity
 Gemini
 Claude
 Grok
Grok
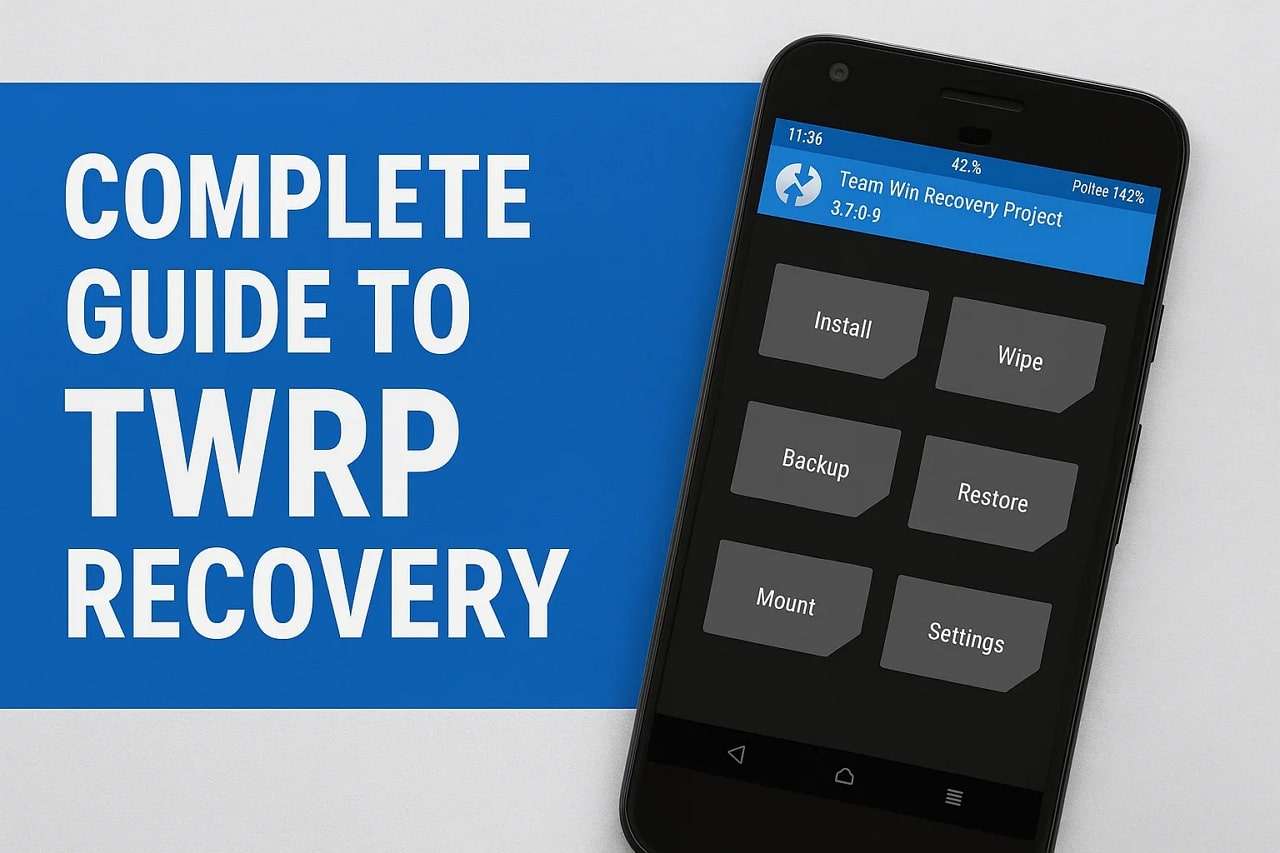
Many Android enthusiasts and everyday users often look for comprehensive ways to take full control over their mobile devices. Sometimes, the native phone settings and stock recovery environments are simply not powerful enough to fix deep system issues, remove bloatware, or unlock the hidden potential of the hardware. In such intricate scenarios, specialized utilities like TWRP recovery become an incredibly valuable asset for handling advanced software tasks. By deploying this tool, users can manage full-system backups, install custom software, and seamlessly recover from critical system failures.
For those who are entirely new to the Android modding community, understanding how a custom recovery tool functions may seem somewhat confusing or even intimidating at first. However, with the right step-by-step guidance, anyone can learn how to download TWRP and use it without difficulty. This comprehensive review will explain what the Team Win Recovery Project does, detail the core purpose of its robust features, and walk you through safe installation methods. Furthermore, since not everyone feels comfortable navigating command-line interfaces or advanced bootloader steps, we will also introduce a much easier and risk-free alternative for data retrieval.
In this article
Part 1. What Does TWRP Do? Quick Insights
TWRP, which stands for Team Win Recovery Project, is an open-source, custom recovery tool uniquely designed for Android-based devices. Unlike the default stock recovery that comes pre-installed on your phone—which usually limits you to simple factory resets or official OTA updates—this platform offers a modern, fully touch-based UI that is exceptionally intuitive to navigate. With it, users are empowered to perform tasks that push far beyond the strict limitations set by original equipment manufacturers (OEMs).
The most important and celebrated function of TWRP recovery is its capability to create full "Nandroid" device backups. This means you can save an exact image of your phone's current state—capturing multiple data types like installed apps, system settings, call logs, and partition data—safely in one go.
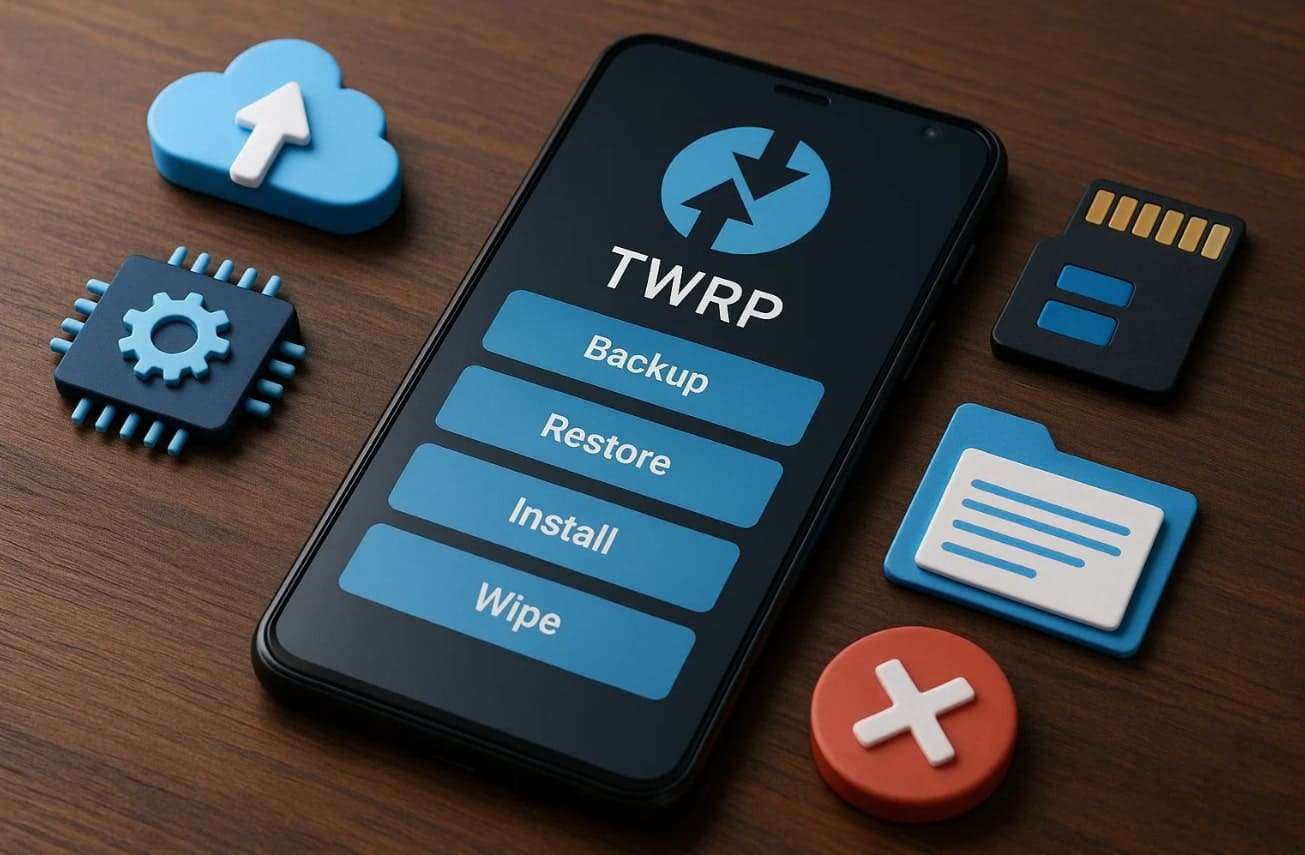
In situations where a system tweak goes wrong or an update causes a boot loop, this complete backup can be restored swiftly to get the phone back to its flawless starting point. Additionally, users can utilize it to flash new custom ROMs, unique kernels, or performance mods to unlock faster processing speeds or entirely fresh features. It even allows for deep wiping of specific partitions like the Dalvik cache, which drastically helps when troubleshooting errors or preparing the device for a pristine new system installation. Ultimately, it makes deep-level repairs, OS upgrades, and file management far easier while keeping the actual execution straightforward.
Part 2. What Does Each TWRP Feature Do? Exploring Possibilities
By installing the Team Win Recovery Project, Android users can dive into a myriad of advanced options that dramatically improve administrative control and overall device management. Below, we outline a few of the standout capabilities that make this custom recovery tool highly sought after:
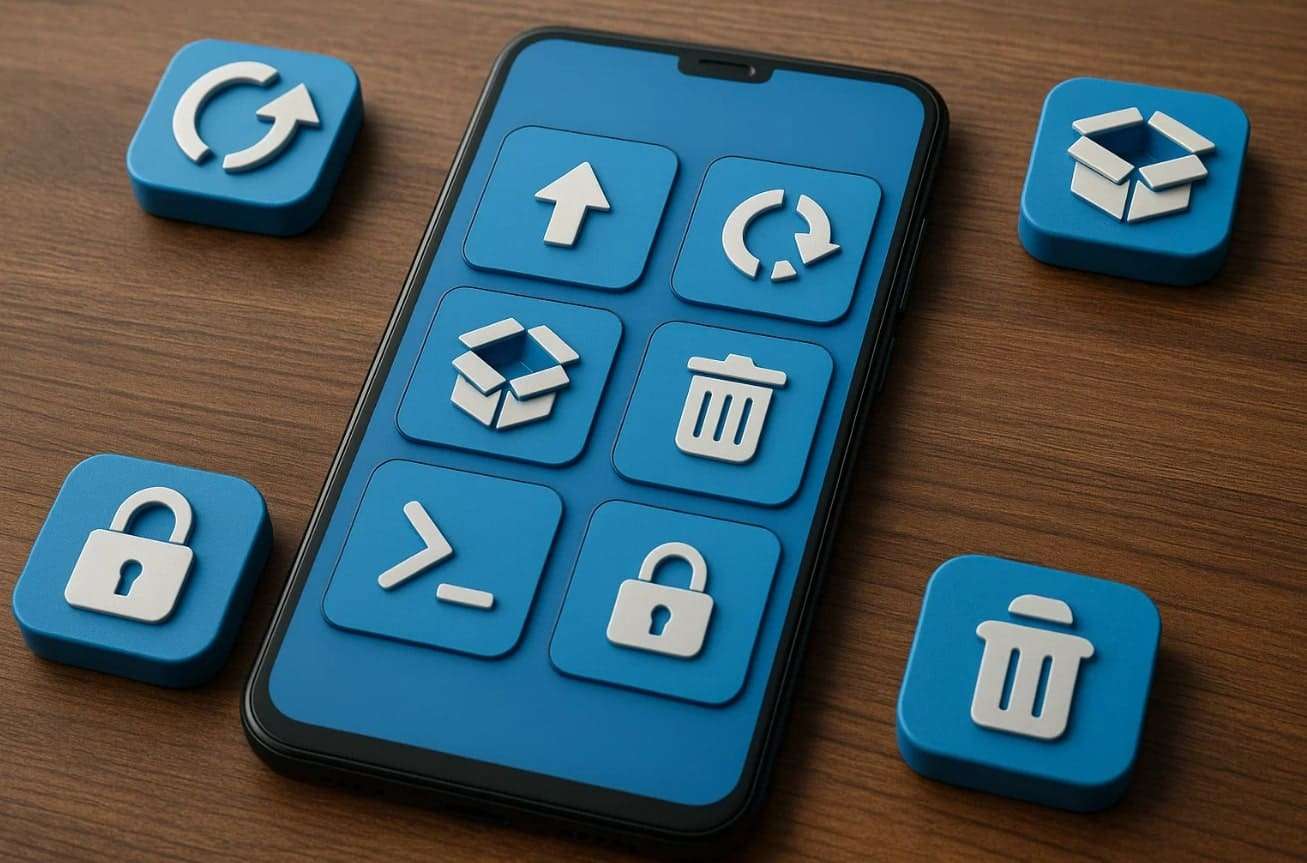
- Comprehensive Nandroid Backups: It permits the creation of complete, bit-by-bit device backups, ensuring that your customized apps, personal data, and system configurations are securely preserved at any given moment.
- Versatile Restoration Options: You can quickly restore saved backup files from internal storage, a micro SD card, or even externally connected USB OTG drives.
- Custom Firmware Flashing: The environment fully supports flashing custom ROMs (like LineageOS) or modified kernels, thereby unlocking newer Android versions, extended features, and superior battery or performance tuning.
- Granular Partition Wiping: TWRP lets you selectively wipe data, cache, Dalvik cache, or system partitions. This is a critical step to prevent software conflicts before writing new custom software to the device.
- Built-in Terminal Emulator: For highly technical users, it grants direct access to a terminal emulator. This allows you to execute complex Linux commands directly from the recovery environment without needing to boot into the main Android OS.
Part 3. Can TWRP Be Installed Without Root?
One of the most common misconceptions in the Android community is the prerequisite of root access for custom modifications. The reality is that you can install the TWRP APK or its recovery image without having to root your Android phone first. However, there are very strict technical conditions involved. Foremost, your device's bootloader must be completely unlocked. Unlocking the bootloader is a distinct and separate procedure that removes the manufacturer's security lock on the boot partition.

Because root access itself is not required to flash the image, anyone with a supported device can achieve this via a computer. Most traditional installations are seamlessly executed using ADB (Android Debug Bridge) and Fastboot tools. Keep in mind that specific unlock methods and commands can vary significantly depending on the phone manufacturer and specific device model.
Part 4. How to Install & Use TWRP Tool on Android Devices
Successfully installing and navigating TWRP equips Android users with a highly capable suite of features to maintain, control, and repair their smartphones. By utilizing this interface, generating system snapshots, retrieving corrupted data, or injecting custom modifications to fix software glitches becomes a highly streamlined process.
While a dedicated application exists to help manage updates if you already have root, the initial installation for most modern users involves a computer. Follow this comprehensive, step-by-step tutorial to learn exactly how you can install and deploy this powerful recovery platform:
Crucial Pre-Requirements
- Unlocked Bootloader: Your phone’s bootloader must absolutely be unlocked; otherwise, the system will block TWRP from being installed.
- USB Debugging Enabled: You must activate USB debugging within the Android Developer Options menu to permit secure communication between your phone and your computer.
- Correct TWRP Image File: You must download the exact TWRP image (.img) file tailored specifically for your device's model or codename. Using the wrong image can brick your phone.
- ADB and Fastboot Environment: Install the official Android SDK Platform-Tools on your PC to successfully send Fastboot commands.
Step-by-Step Guide to Install & Use TWRP
-
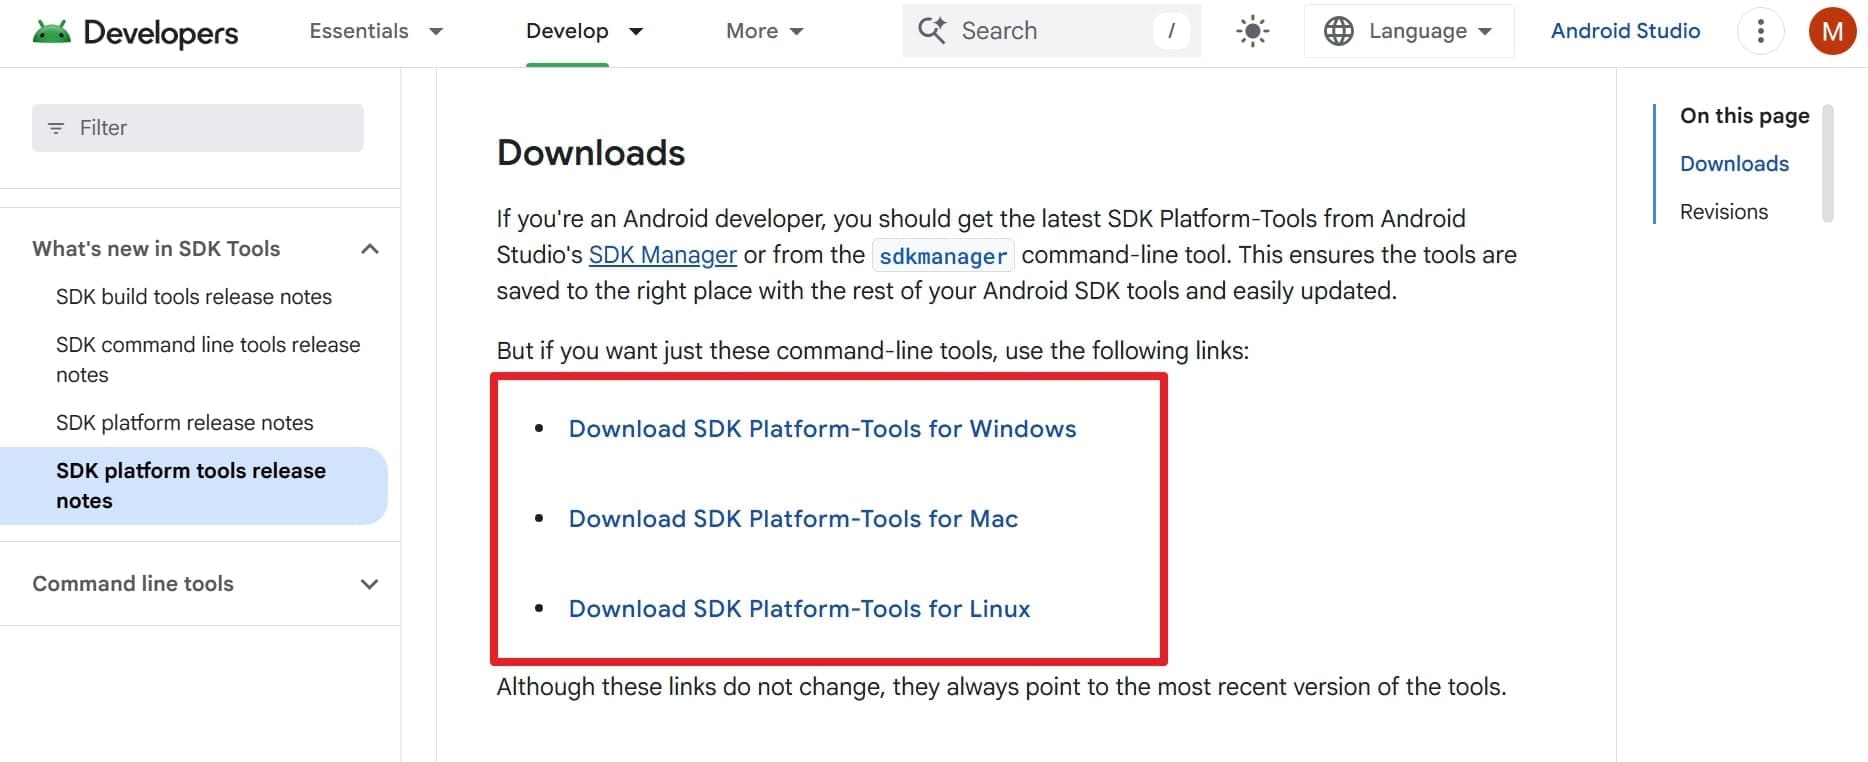
Step 1 Download the SDK Platform Tools
Initially, navigate to the official "Android Developer’s SDK Platforms" webpage. Download the correct ZIP package corresponding to your computer's OS (Windows, macOS, or Linux) and extract it to a convenient location.
-
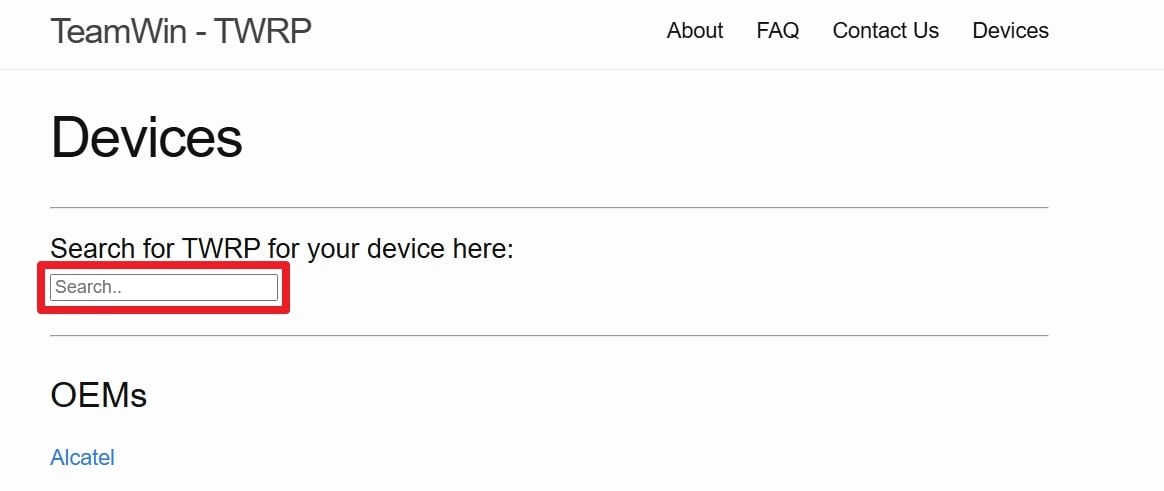
Step 2 Obtain the Appropriate Recovery File
Next, visit the official "TeamWin Devices" portal. Search carefully for your exact smartphone model or hardware codename, and download the latest available TWRP `.img` file.
-
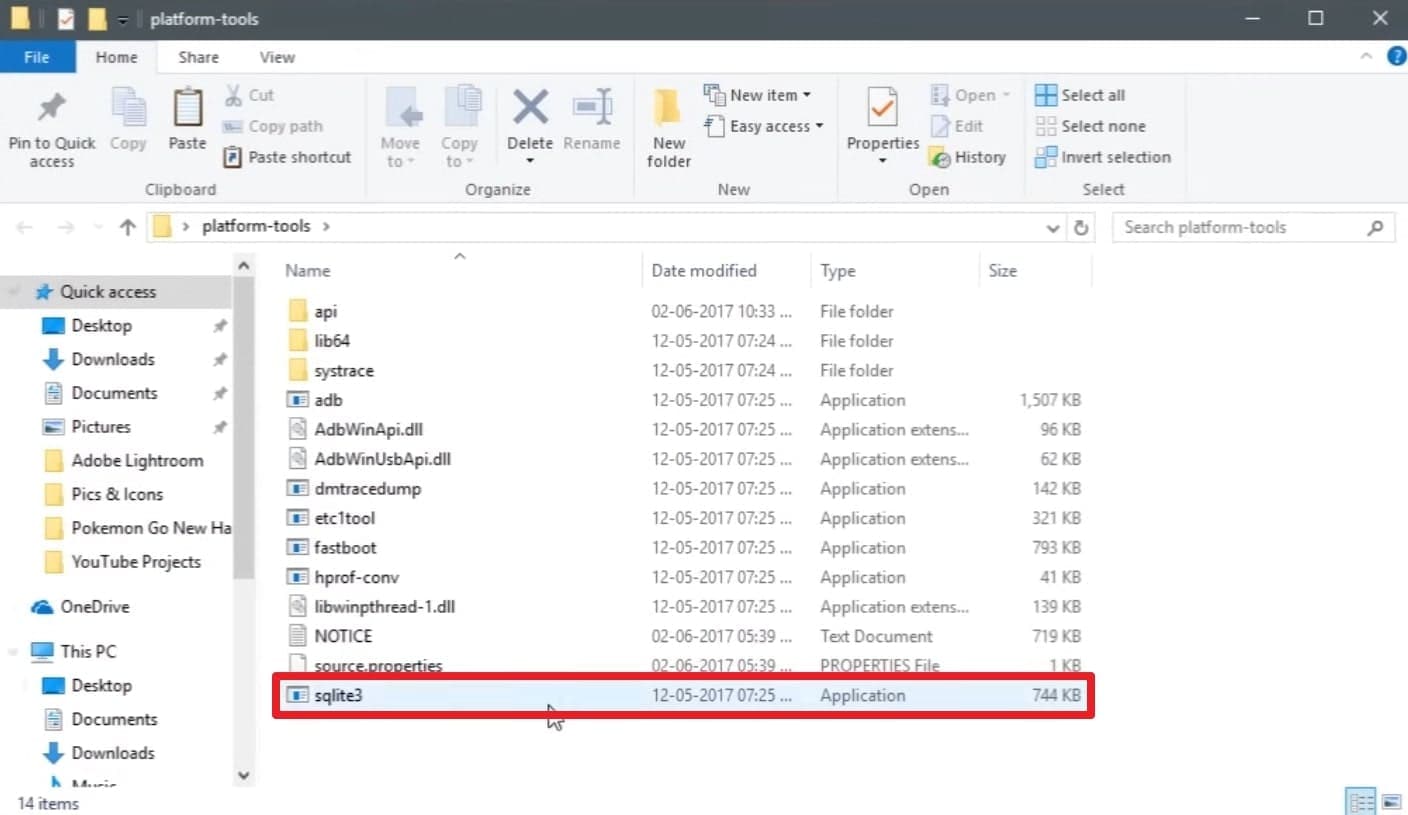
Step 3 Prepare Your Working Folder
After acquiring the file, rename it simply to "twrp.img" for easier typing later. Then, copy or paste this renamed file directly into the extracted Platform-Tools folder on your computer.
-
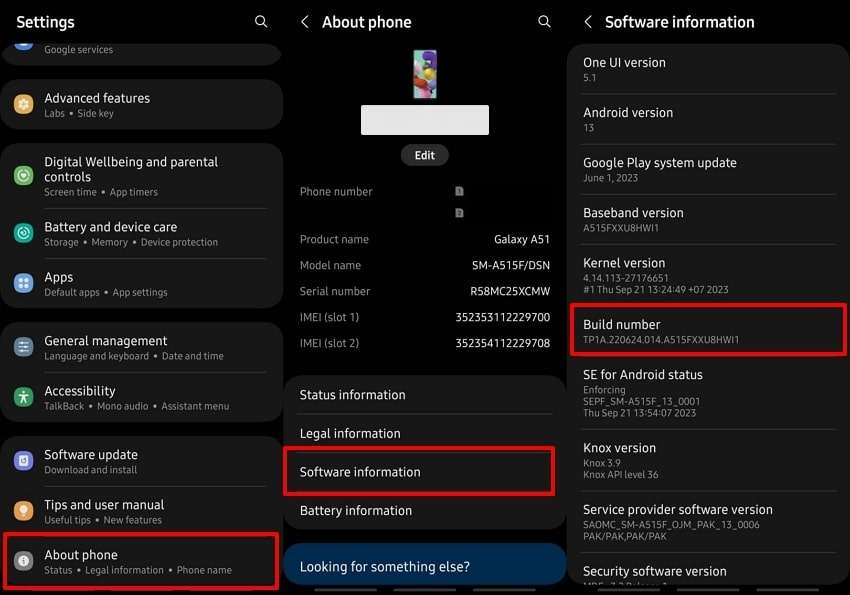
Step 4 Unlock Developer Options on Android
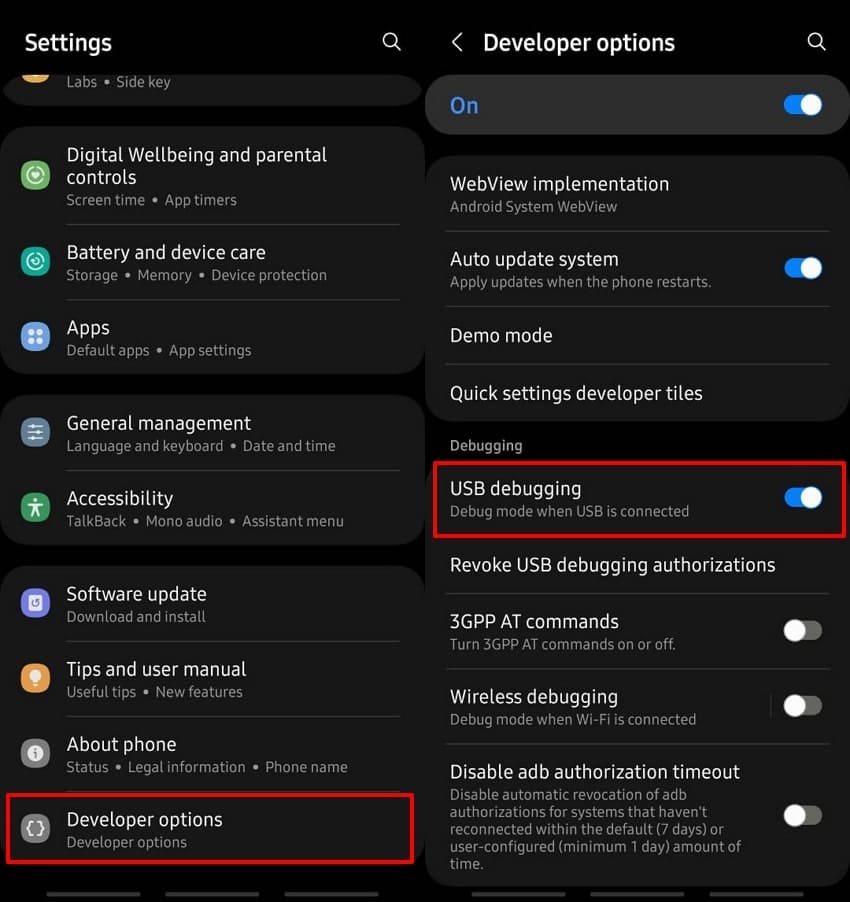
Take your Android device and open the Settings app. Scroll down to "About Phone" and locate "Software Information." Tap rapidly 7 times on the "Build Number" text until you see a prompt confirming you are a developer.
-
Step 5 Enable the USB Debugging Mode
Return to the main settings menu and open the newly visible “Developer Options.” Toggle the switch for “USB Debugging” to the on position. Now, securely connect your Android phone to your PC using a high-quality data USB cable.
-
Step 6 Launch the Command Window
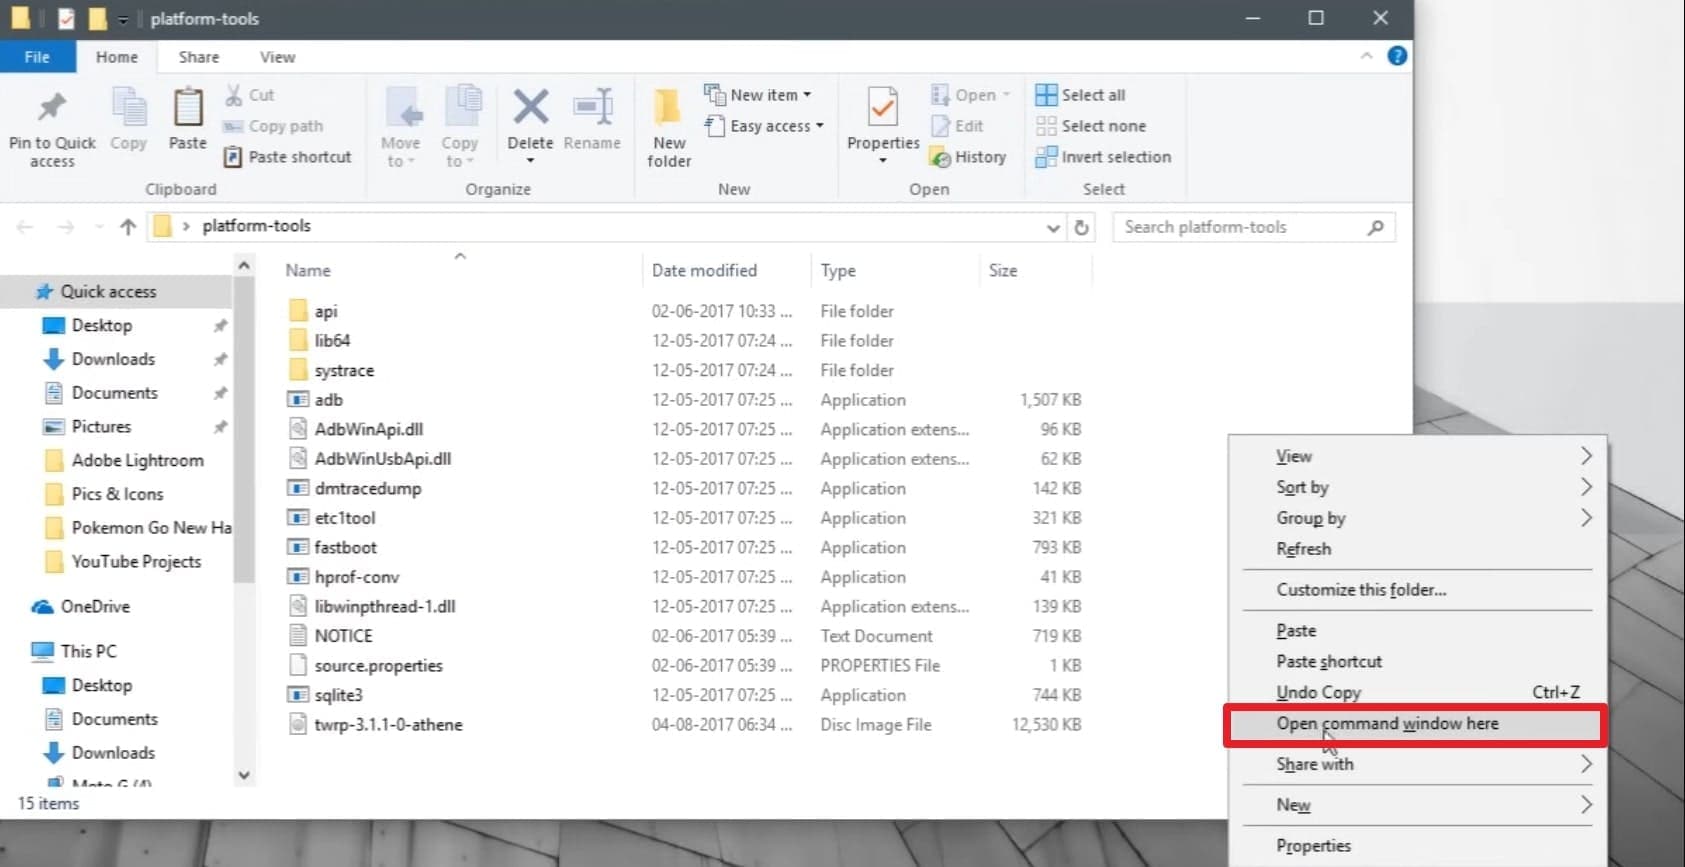
Navigate back to your PC. Open the Platform-Tools folder, hold down the "SHIFT" key on your keyboard, right-click on an empty space inside the folder, and select "Open PowerShell window here" or "Open Command Prompt here."
-
Step 7 Boot Your Device into Fastboot Mode
In the command terminal, type
adb devicesand press "Enter" to ensure your PC detects the phone. Once confirmed, typeadb reboot bootloaderand hit "Enter." Your phone will immediately restart and enter the bootloader/fastboot interface.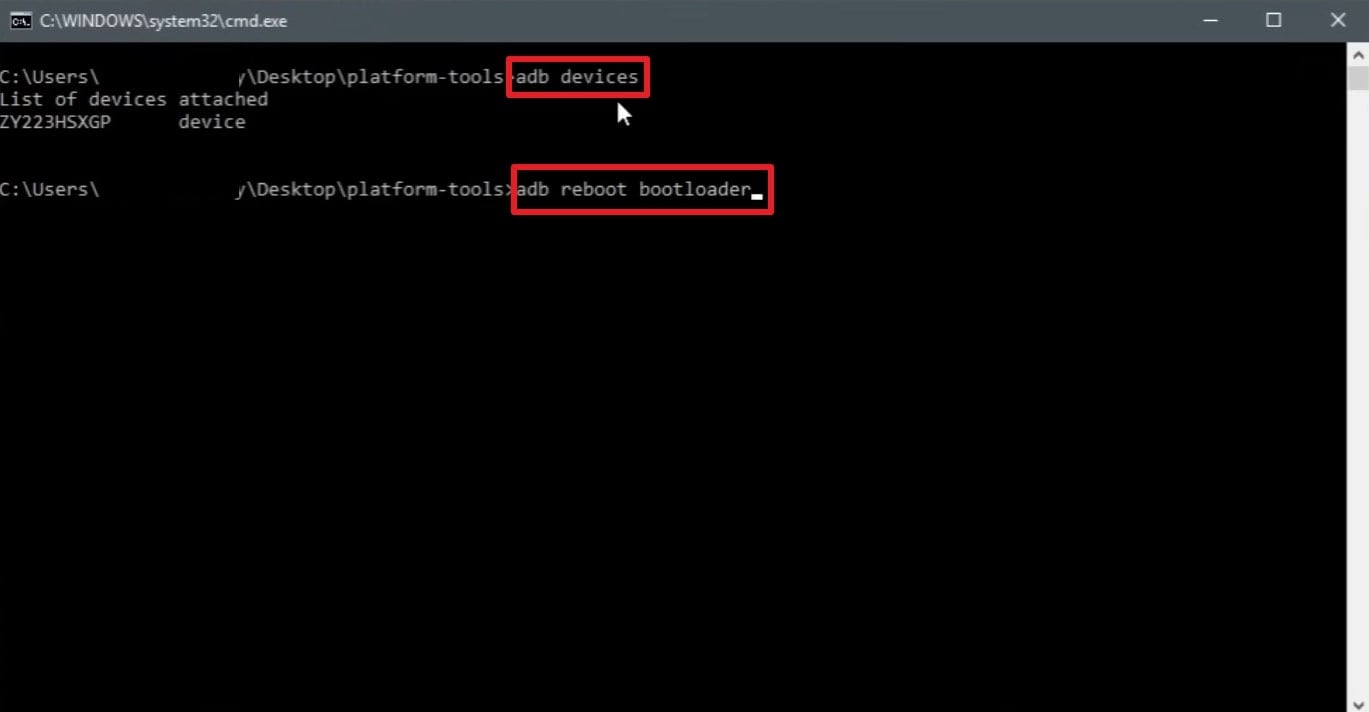
-
Step 8 Flash the Recovery Image
Once in the bootloader, verify communication by typing
fastboot devices. Next, type the flash command:fastboot flash recovery twrp.imgand press "Enter." The terminal will write the new recovery partition to your device.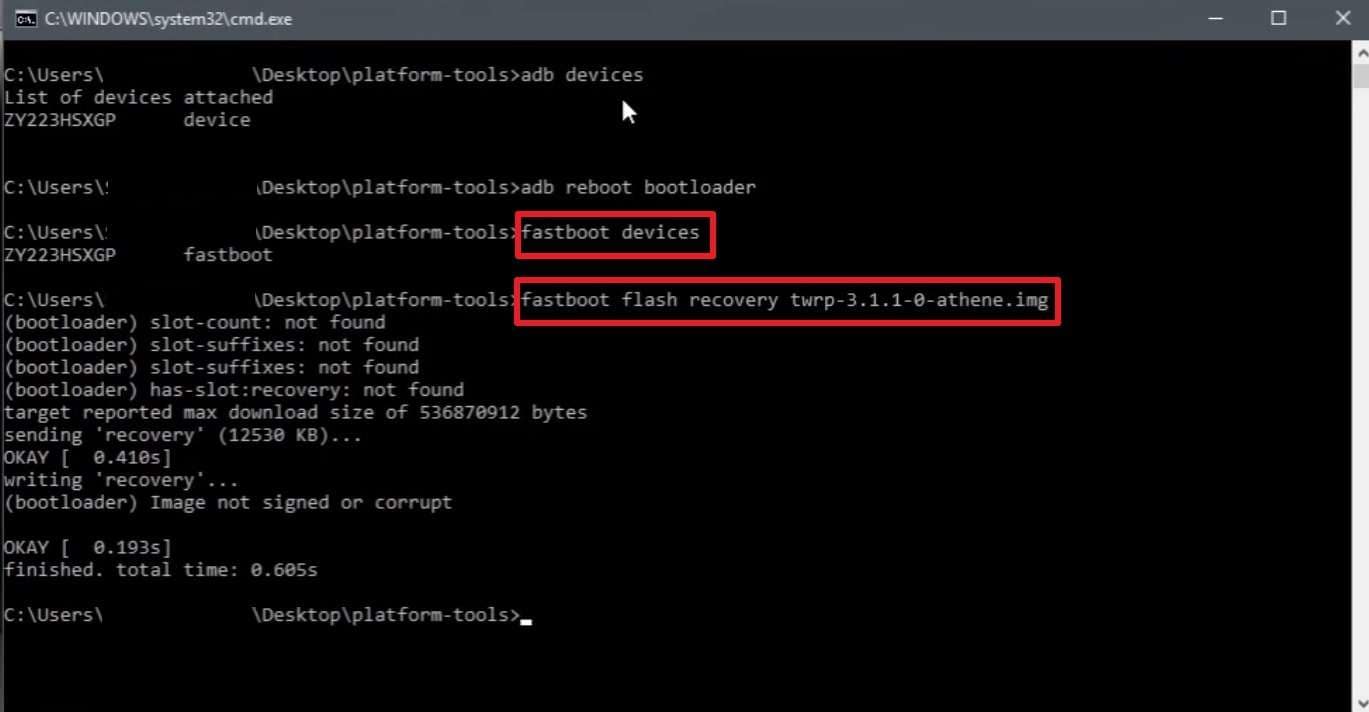
-
Step 9 Boot Directly into TWRP
Instead of restarting normally, command the phone to boot straight into the newly installed recovery by typing
fastboot boot twrp.imgand hitting "Enter." You have now successfully installed and launched TWRP on your Android.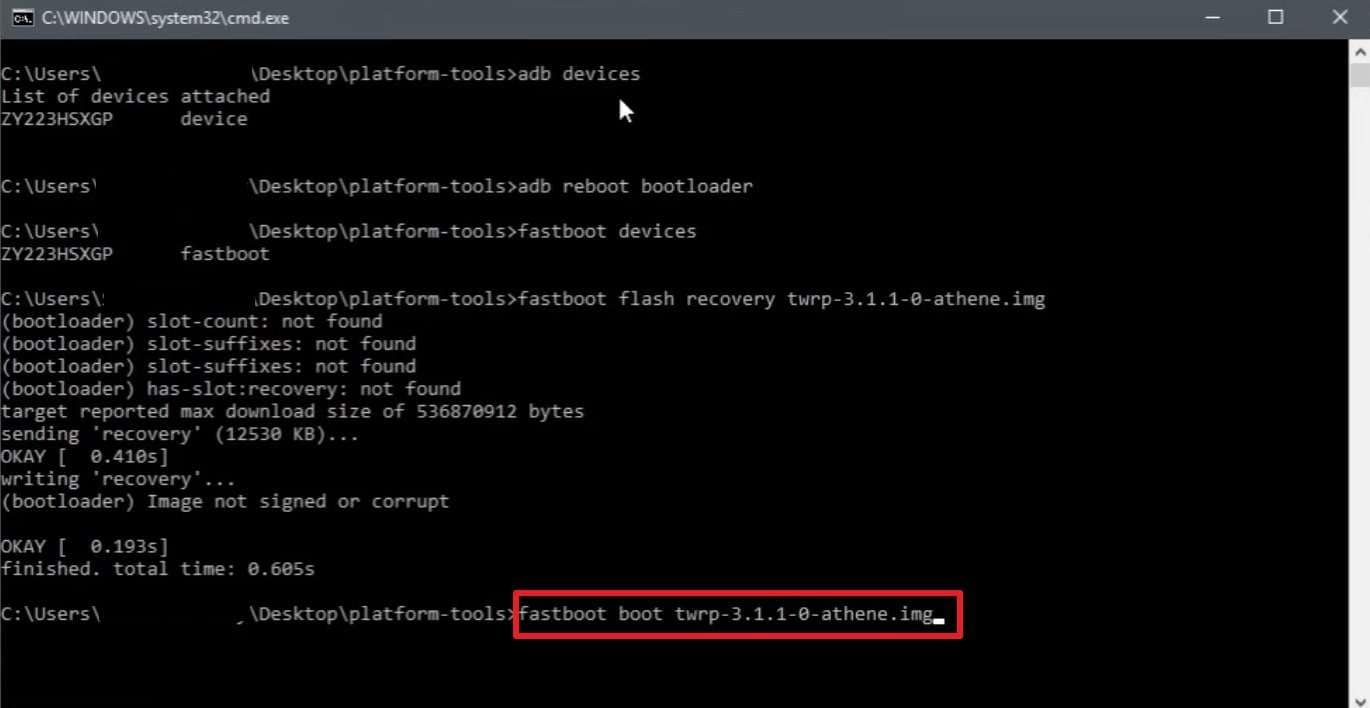
-
Step 10 Flash a Custom ZIP File
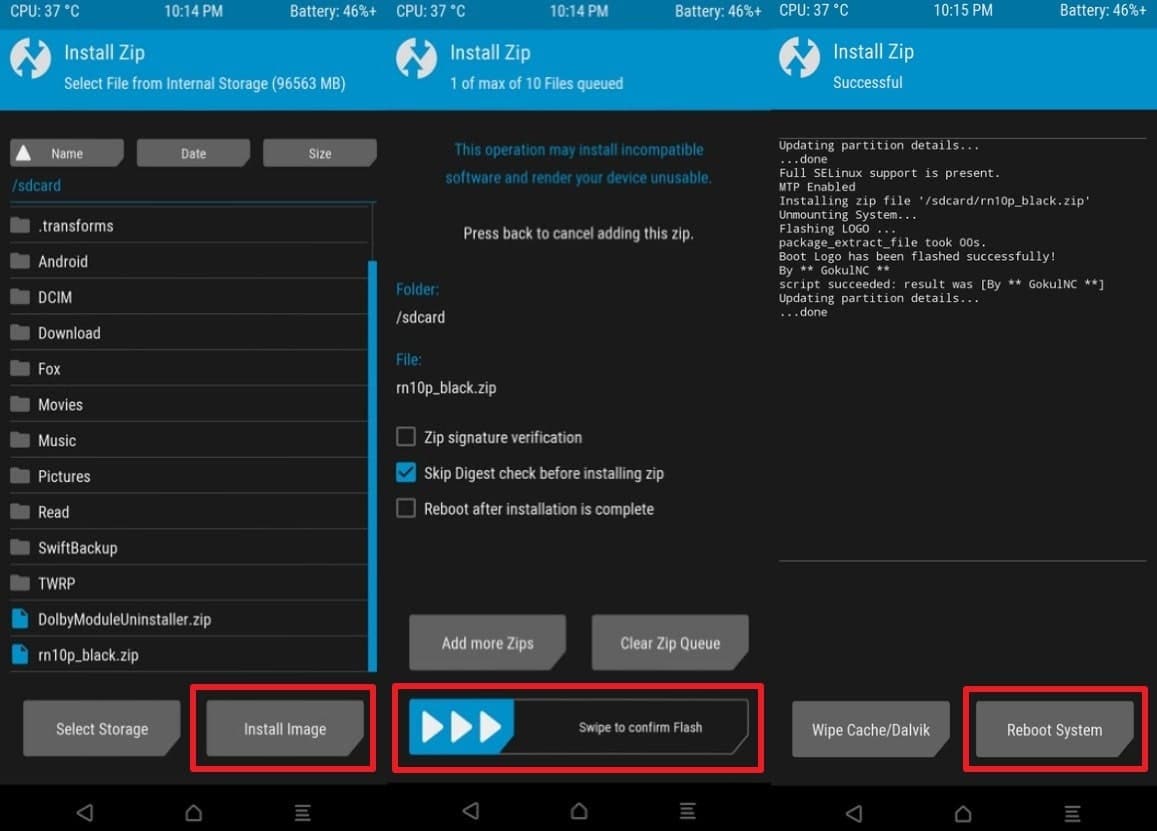
To put TWRP to use—like flashing a custom ROM or Magisk ZIP—copy the ZIP file to your phone's storage. In the TWRP main menu, tap "Install," browse for your file, select it, and execute the action by dragging the "Swipe to Confirm Flash" slider. Afterward, hit "Reboot System."
Part 5. Explore the Best Easy Alternative to TWRP: Dr.Fone - Data Recovery (Android)
When investigating recovery methods, many standard users quickly realize that advanced custom options like TWRP can be overly technical or potentially risky to implement. Not everyone feels confident executing Fastboot commands, modifying system partitions, or unlocking bootloaders—especially since a minor mistake could lead to a hard-bricked device or permanent data loss. If your primary objective is simply to salvage deleted files from your smartphone, relying on an easier, GUI-based alternative like Dr.Fone - Data Recovery (Android) is highly recommended.
Instead of struggling with complicated command-line setups or risking warranty voids, Dr.Fone provides a streamlined, professional path. Recognized as one of the most reliable desktop-based Android recovery software solutions, it is meticulously designed to scan deeply and bring back lost data securely. With just a few straightforward clicks, users can retrieve a diverse range of deleted data formats, including missing contacts, essential text messages, photos, and documents. Furthermore, it expertly restores critical WhatsApp and WhatsApp Business conversations, alongside media attachments, entirely without necessitating root access on most devices.
This resilient software boasts broad compatibility, officially supporting over 6,000 distinct Android smartphone models spanning leading brands such as Samsung, Google Pixel, Huawei, Oppo, and Motorola. Throughout the robust retrieval sequence, the interface permits you to fully preview the detected files in high quality, granting you the freedom to selectively choose exactly which items to restore. Capable of supporting Android OS versions stretching all the way back to Android 2.1 up to the most recent updates, Dr.Fone also empowers you to pull fragmented backup files directly from Google Drive repositories to your local computer.
 Scan Android phones and tablets directly.
- Preview and recover only what you want.
- Supports WhatsApp, photos, videos, contacts, and more.
- Works with 6000+ Android devices.

Guide to Use Dr.Fone - Data Recovery to Recover Android Deleted Data
If you prefer an automated, straightforward approach to recovering your cherished data over complex modifications, follow these simple steps utilizing the Dr.Fone software toolkit:
-
Step 1 Launch the Android Data Recovery Tool
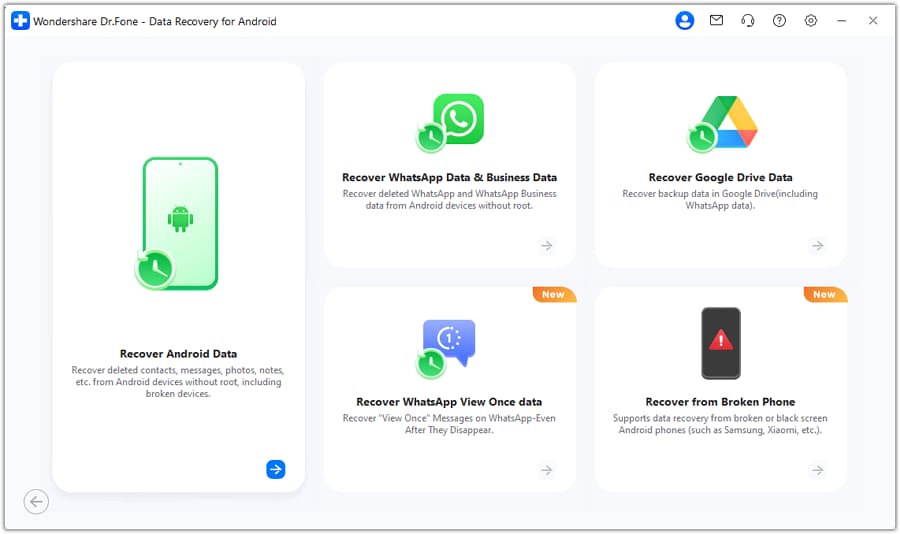
Begin by installing and running the Dr.Fone application on your desktop. On the main interface, navigate to the “Toolbox” tab and select the “Data Recovery” option. Following this, click on “Android” as your platform and specifically choose the “Recover Android Data” function from the subsequent menu screen.
-
Step 2 Connect the Device and Define File Types
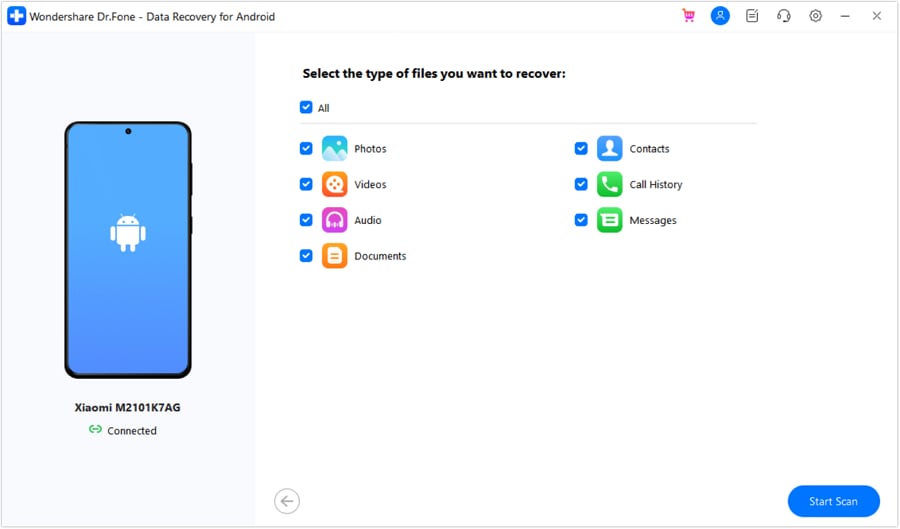
Upon transitioning to the device connection screen, firmly connect your Android phone to the PC via a USB cable (ensure USB Debugging is active). Once the Dr.Fone interface successfully recognizes your specific phone model, it will prompt you to select the exact types of data—like media, messages, or contacts—that you urgently wish to restore. Check your desired boxes and hit the “Start Scan” button to initiate the deep analysis.
-
Step 3 Preview and Execute the Recovery
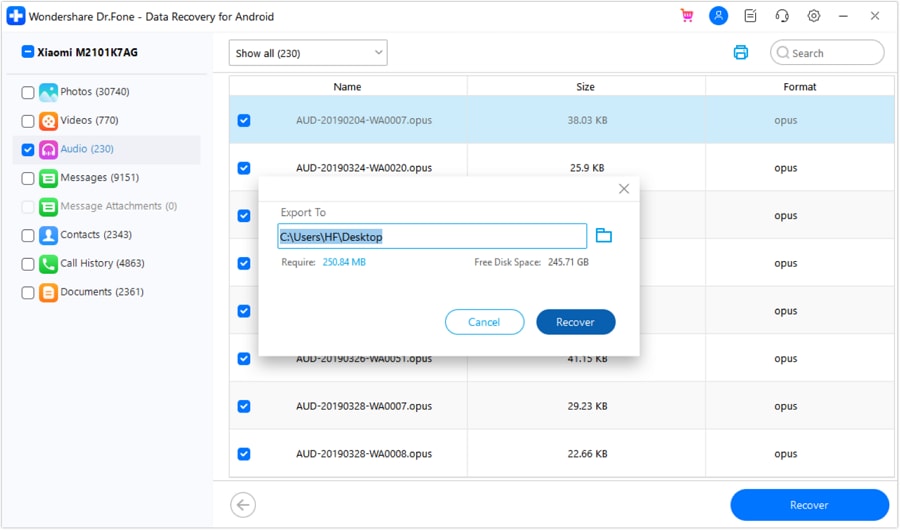
Sit tight as the software meticulously scans the internal storage sectors. Once the comprehensive scan concludes, a neat list of all recoverable deleted files will be displayed. You can preview images and read text snippets to confirm their validity. Tick the specific files you need to keep, click the prominent “Recover” button, assign a safe destination folder on your hard drive, and confirm by hitting “Recover” once more to finalize the retrieval.
Conclusion
To summarize, the Team Win Recovery Project (TWRP) remains an unrivaled, community-driven smartphone management tool that offers robust capabilities to flash custom firmware, wipe deep system partitions, and create comprehensive device backups. Nonetheless, the prerequisite command-line installation can be a daunting, high-risk endeavor for novice users, where even minor missteps could jeopardize the device's functionality or result in severe data loss.
That is precisely why relying on a significantly simpler, safer alternative matters immensely if your primary concern is just retrieving deleted messages or lost memories without any technical hassle. To effectively address this critical requirement without voiding warranties or risking a bootloop, turning to a professional utility like Dr.Fone - Data Recovery (Android) is undeniably a smarter, more secure strategy you can always count on.




FAQ
-
1. Can TWRP be used on all Android devices?
TWRP support relies heavily on dedicated device developers porting the software for specific hardware. Consequently, it is not supported across all Android smartphones, particularly newer models or niche brands. Before attempting any modification, always check the official TeamWin website or trusted Android developer forums to verify your device's compatibility. -
2. Does TWRP support automatic backups before flashing?
TWRP allows for the manual creation of comprehensive Android system backups (Nandroid backups) before flashing new firmware, but it does not feature a fully automatic backup scheduling system. Users must proactively initiate the backup sequence to preserve their current OS state, ensuring they have a secure fallback if flashing causes instability. -
3. Is there a simpler way to recover deleted Android files than using TWRP?
Yes. Dr.Fone provides a much safer and highly intuitive alternative for individuals who find TWRP flashing far too complex or dangerous. It seamlessly restores deleted data—such as lost photos, essential text messages, and critical WhatsApp conversations—without demanding bootloader unlocking or advanced terminal commands. Furthermore, users can meticulously preview their deleted files and retrieve exactly what they need in just a few clicks.
 Add Wondershare Dr.Fone as a preferred source on Google



