[2024 Update] Apple Pencil Tips and Tricks: 19 Best Features to Learn

Jul 12, 2024 • Filed to: Latest News & Tactics • Proven solutions
At the time of its launch, some people thought it was just another overpriced stylus for the iPad and the iPad had no real use for it. Boy, were they wrong! The Apple Pencil was innovative enough to change the entire iPad experience and open up new use cases for everyone, from the child who loves to draw and doodle to the college teen who wants to take notes in their own writing to professional graphics designers that today rely on Apple Pencil to design stunning artwork on the iPad to that suited executive sitting in an airport lounge going over documents, annotating them at will with his Apple Pencil. There is no doubt today that Apple Pencil is more than an accessory to the iPad in spirit. It is often a necessity.
If you are planning or considering buying an Apple Pencil, you might be wondering what it is capable of apart from the obvious. The internet is filled with Apple Pencil tips and tricks - 5 tricks, 7 tricks, 11 tricks, 20 tricks! Some of them aren't even tips and tricks, for example, how is pairing an Apple Pencil to your iPad a trick! We are here to help you discover all of the most amazing Apple Pencil tips and tricks on the internet rolled conveniently for your reading and reference below, minus all the unnecessary junk to bolster the count!
- 1. Scribbling With Apple Pencil
- 2. Converting Handwriting to Text
- 3. Interact With Handwritten Data
- 4. Perfectly Round, Finally!
- 5. Erasing With Apple Pencil
- 6. Apply Formatting to Typed Text
- 7. Text Operations with Scribble Gestures
- 8. How To Shade Using Apple Pencil
- 9. Create Lines of Varying Thickness
- 10. Tracing Through Paper
- 11. Creating Notes from Lock Screen
- 12. Taking Quick Notes with Apple Pencil
- 13. Quick Gestures with Apple Pencil
- 14. Struggling to Draw Straight Lines?
- 15. Change Tools with Apple Pencil
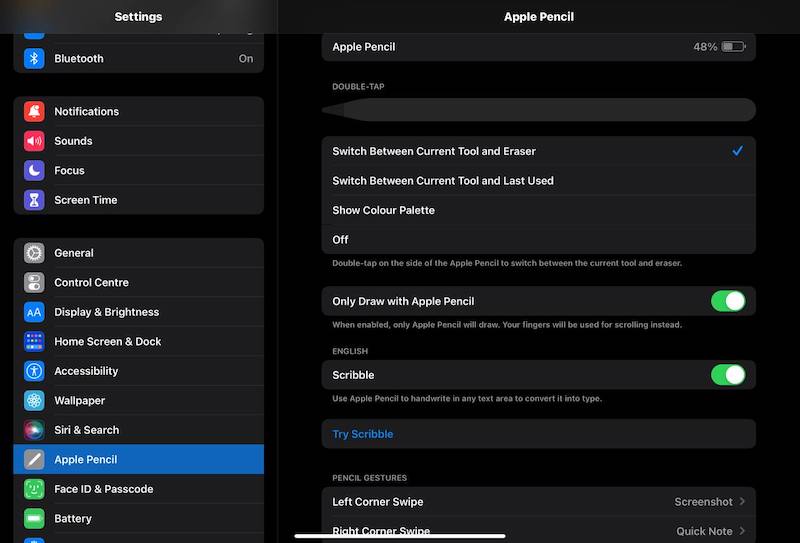
- 16. Use Double Tap Gesture on Apple Pencil 2
- 17. Draw Only with Apple Pencil
- 18. Using Apple Pencil for Screenshots
- 19. Signing Documents with Apple Pencil
1. Scribbling With Apple Pencil
With an Apple Pencil, you can now scribble text anywhere there is a text box or where text is allowed/expected, instead of typing regular text. Why would you use this? This gives a more human touch to filling forms, sometimes, where you can fill a form digitally on the iPad and scribble in your own handwriting with the Apple Pencil and then take a printout of the form and submit wherever required, easy-peasy.
- Step 1: Go to Settings > Apple Pencil.
- Step 2: Toggle Scribble On.
2. Converting Handwriting to Text
This is one of the most profound uses of the Apple Pencil for anyone. You use the Apple Pencil to write in your own handwriting, but how about if we could convert what we wrote in handwriting to regular text? With Apple Pencil, you can do just that.
- Step 1: In the Pencil toolbar, tap the pen with A marked on it.
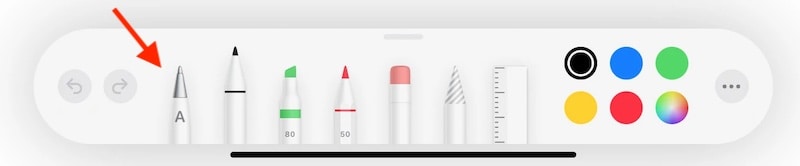
- Step 2: Now, you can write in your own handwriting and iPadOS will convert it into regular text.
4. Perfectly Round, Finally!
Haven't you struggled to make recognizable shapes with your fingers? No more! One of the Apple Pencil tips and tricks includes creating perfect shapes. With Apple Pencil, you can draw the shapes and iPadOS will make them pixel-perfect.
Draw a shape in a single stroke with the Apple Pencil and pause at the end with the tip pressed to the screen. The shape you drew will be replaced with its perfect shape.
5. Erasing With Apple Pencil
Definitely one of the coolest Apple Pencil tips and tricks is erasing text with Apple Pencil. Erasing text using an Apple Pencil is so intuitive, that it's almost funny.
All you need to do is scribble over a word or phrase or line just as we do in real life, and the scribbled over text disappears, better than real life where you now end up with a giant ball of doodle over a word/ phrase/ line. Try it today with your Apple Pencil, we are sure you will appreciate just how beautifully intuitive this feature is.
6. Apply Formatting to Typed Text
Since about iOS 3, we have had the ability to select text and copy, paste, and apply formatting such as Bold, Italic, and such. Did you know how easy it is to do that with Apple Pencil? We bet you will find yourself doing the same on your iPhone after a while, only to realize that it isn't happening just yet.
All you need to do to select typed text is to encircle it with the Pencil. The text will be highlighted and ready with the formatting popup.
Another way to do that is to strike through the text, it will become selected, and the popup will show. However, we do not recommend this method as if that line is not straight enough, it might somehow get misconstrued as a scribble, and iPadOS will interpret that as a request to delete that text.
7. Text Operations with Scribble Gestures
Expanding on the idea of scribbling, Apple Pencil has a bag of tricks up its sleeve. You now know how to erase text using Apple Pencil, right? That was one of the many scribble gestures Apple Pencil supports. Apple Pencil allows you to use gestures to perform text operations such as insert text, separate and join words, etc.
- Insert Text: Simply touch the tip of your Pencil where you want to insert text.
- Join Words: To join two words together, draw a line between them with your Apple Pencil.
- Separate Words: Drawing a line in the middle of two words separates the words.
8. How To Shade Using Apple Pencil
One of the coolest Apple Pencil tricks is how Apple Pencil allows you to draw akin to a real pencil. What is drawing without some shading? And how do we apply shading with Apple Pencil?
- Step 1: Hold the Apple Pencil like you would a real pencil while shading, which is, tilt the Pencil.
- Step 2: Start shading the way you would with a real pencil. It's that simple and intuitive.
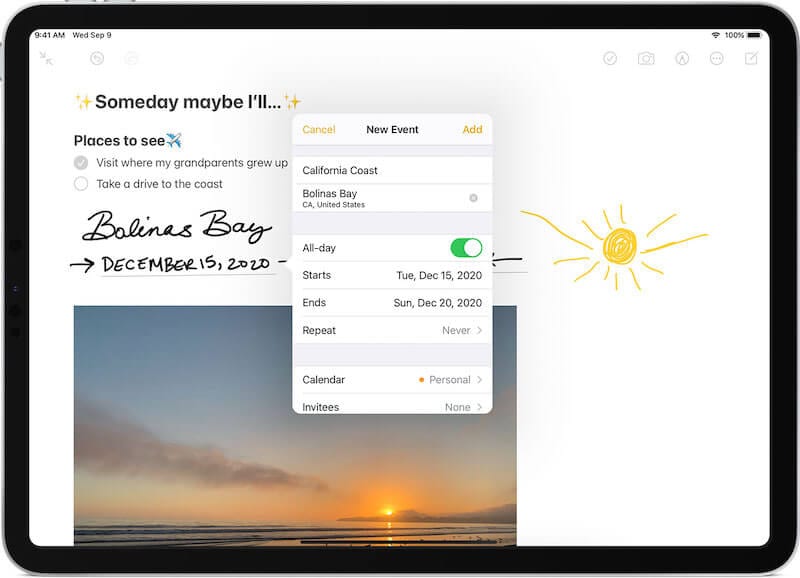
11. Creating Notes from Lock Screen
If you are searching for interesting Apple Pencil tricks, we are happy to tell you that this one is a nifty productivity hack as well. You can use your Apple Pencil to create notes from the Lock Screen without unlocking the iPad. Be aware, though, that this is enabled only for the default Apple Notes app for now. Fingers crossed, maybe iOS 16 opens up this setting to other apps?
Here's how to use Apple Pencil to take notes from the lock screen:
- Step 1: Tap your iPad screen with your Apple Pencil.
- Step 2: A new note will pop up that you can type, write or draw in. That's it!
If this feature is not working, go to Settings > Notes
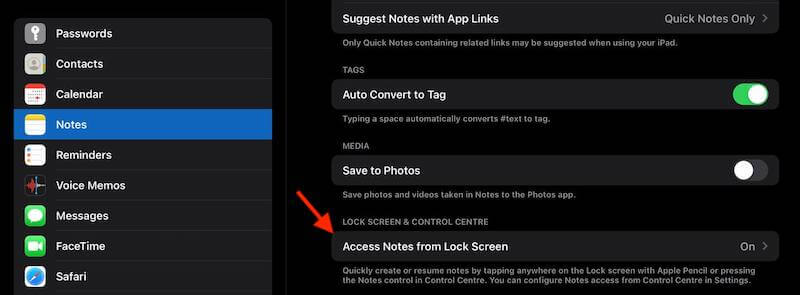
Enable the option.
12. Taking Quick Notes with Apple Pencil
Adding to the ease of taking notes without unlocking the screen and launching the Notes app, with iOS 15, Apple also allows you to use Apple Pencil to take quick notes anywhere, and it is super easy. Here's how:
- Step 1: Swipe diagonally towards the center from the bottom-right corner and you will see a blank note screen coming along (if you do it in slow motion).
- Step 2: Start typing or writing or drawing!
13. Quick Gestures with Apple Pencil
With iOS 15, Apple provides you with two quick gestures to use with Apple Pencil. You just read about one from the bottom right corner, and aren't you wondering about the left corner? Well, Apple has not gone crazy and offered swiping from all 4 corners of the iPad, but just the bottom two.
- Step 1: Go to Settings > Apple Pencil > Pencil Gestures and see the two swipe gestures:

14. Struggling to Draw Straight Lines?
If you struggle to draw straight lines on the iPad, you will be happy to know that the Apple Pencil allows you to draw straight lines, again, exactly like you would in real life.
- Step 1: In the Pencil toolbar, select Ruler.
- Step 2: You can move the ruler around wherever you want.
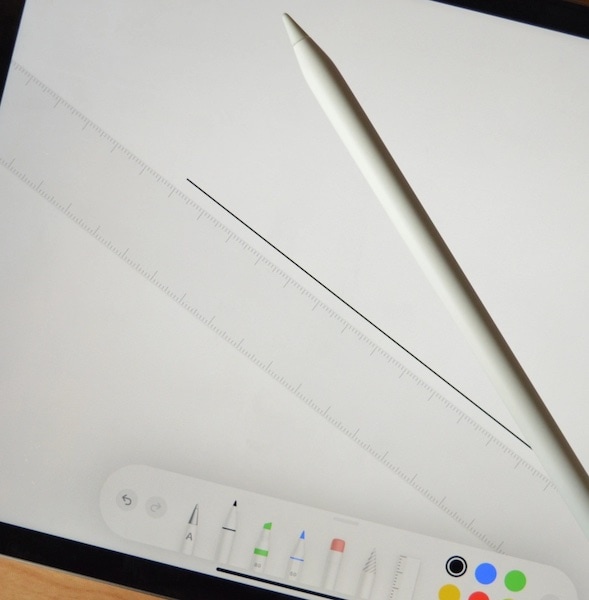
- Step 3: Choose the drawing tool you want to use and draw the line.
15. Change Tools with Apple Pencil
Changing tools while drawing is so easy with Apple Pencil because of how Apple Pencil allows navigation of system UI with its tip. Simply tap the tool you want to use with the Pencil tip. This Apple Pencil trick has been there forever, however, this exclusive Apple Pencil 2 trick coming up next will make life so much easy for you.
16. Use Double Tap Gesture on Apple Pencil 2
Apple Pencil 1 tips and tricks are quite the same as Apple Pencil 2 tips and tricks, but one Apple Pencil trick exclusive to the Apple Pencil 2 is the double-tap gesture. Here is how to set and customize it:
- Step 1: Go to Settings > Apple Pencil.
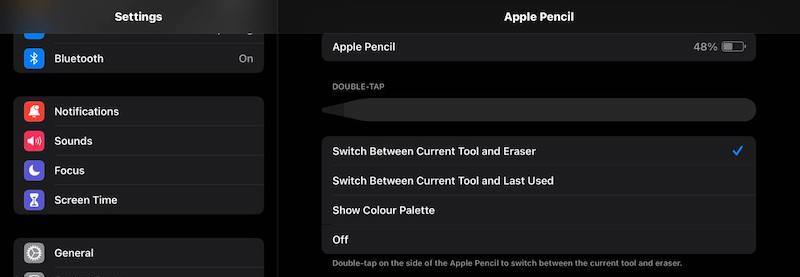
- Step 2: Choose your double-tap gesture and then whenever you want to use that option, double tap close to the tip of your Apple Pencil 2. Nice trick huh!
17. Draw Only with Apple Pencil
Unless you call it your creative process, having two input styli (your finger and the Apple Pencil) means you are in for a chaotic time. However, this Apple Pencil tip will help you minimize errors. You can draw only with your Apple Pencil, and your fingers will be registered only for scrolling with this option enabled. Here is how:

- Step 1: Go to Settings > Apple Pencil and enable the option to only draw with Apple Pencil.
18. Using Apple Pencil for Screenshots
We all take screenshots from time to time, and Apple Pencil makes taking screenshots on the iPad very easy. Here's how to take screenshots with Apple Pencil:
Swipe from the bottom-left corner of the screen into the center of the screen to take a screenshot. This option is default, you might have set it to activate from the bottom-right corner, or not activate at all.
19. Signing Documents with Apple Pencil
One of the best Apple Pencil tips and tricks is the ability to sign documents with Apple Pencil. This is a Pencil, you will be able to register your signature exactly as you do on paper, digitally. This does open up ways to bring a little more digital processing into your life if you want to and can. Here's how:
- Step 1: In any PDF document open on the iPad, tap the Pencil icon.
- Step 2: Tap the plus sign and select Signature.
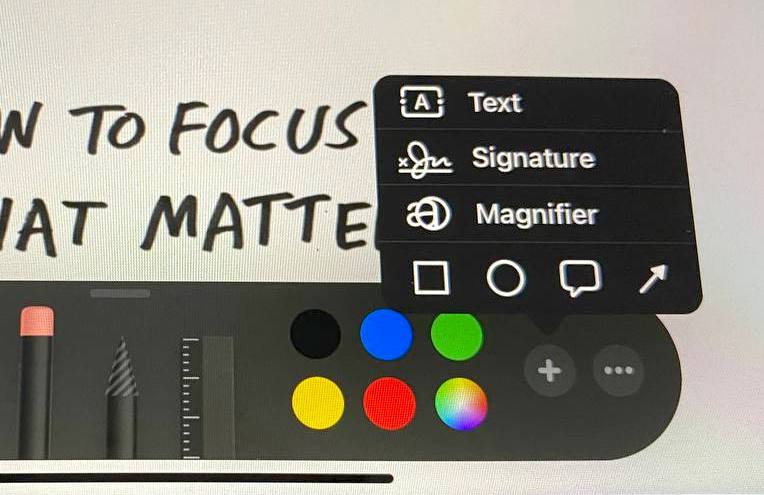
- Step 3: In the box that opens up, sign using your Apple Pencil.
Conclusion
Apple Pencil is a capable little piece of hardware that augments your iPad experience manifold and opens up new use cases. If you are looking for Apple Pencil tips and tricks and struggling to find them all, this article will help you as it includes Apple Pencil tips and tricks as well as Apple Pencil 2 tips and tricks, without causing continuous confusion as to whether the Apple Pencil trick you are reading about is an Apple Pencil 1 trick or Apple Pencil 2 trick.


iPhone Backup
- iPhone Data Backup
- 1. Back up iPhone in Recovery Mode
- 2. Back Up iPhone With/Without iTunes
- 3. Back up iPhone to Mac
- 4. Back up iPhone/iPad to Computer
- 5. Back up iPhone to Mac Catalina
- 6. Back up Jailbreak Apps And Restore
- 7. iPhone Backup Software
- 8. Back up iPhone/iPad Easily
- 9. Back up iPhone/iPad in DFU Mode
- 10. Back up iPhone Apps and App Data
- 11. Back up Notes on iPhone and iPad
- 12. Back up iOS to External Hard Drive
- 13. Export Notes from iPhone to PC/Mac
- 14.Back up iPhone Photos to Google Photos
- 15. Back Up Your iPhone Voicemails
- 16. Back Up to External Drive
- 17.How to Back Up to NAS
- 18.Back Up iPhone With Broken Screen
- 19.Back Up iPhone to Google Drive
- 20.Buy Used iPhones
- 21.Sell Used Phone for Cash
- 22.Sell Used iPhone for Dollar
- 23.How Much is My iPhone Worth
- iPhone Data Recovery
- 1. Recover iPhone Data Without Backup
- 2. Restore Calendar on iPhone
- 3. Recover Call History on iPhone
- 4. Recover iPhone Lost Data
- 5. Restore iPhone in Recovery Mode
- 6. Undelete iPhone Backup Files
- 7. Recover Deleted iPhone Messages
- iPhone Data Restore
- 1. Restore iPhone from iTunes Backup
- 2. Restore iPhone after Downgrade
- 3. Restore iPhone from Backup
- 4. Restore iPhone from iPad Backup
- 5. Restore iPhone from DFU Mode
- 6. Restore iPhone Deleted Text Message
- iPhone Backup Problems
- 1. Find iPhone Backup Location on Mac
- 2. iPhone Backup Password Never Set
- 3. iPhone Backup Password Forget
- 4. iCloud Backup Taking Forever
- 5. iPhone Won't Backup to iCloud
- 6. iTunes Won't Backup iPhone
- iPhone Restore Problems
- 1. iTunes Stuck on Verifying iPhone
- 2. Not Space to Restore iPhone Backup
- 3. iTunes Backup Not Restoring
- 4. iPhone Won't Restore
- WhatsApp Backup & Restore
- 1. WhatsApp from Google Drive to iOS
- 2. Restore Old WhatsApp Backup
- 3. Restore WhatsApp Chat on iPhone
- 4. Retrieve WhatsApp Chat History
- 5. See Deleted Messages on WhatsApp
- 6. Restore WhatsApp Stuck on iPhone
- 7. iPhone WhatsApp to Google Drive
- 8. Back Up WhatsApp on iPhone
- 9. Backup WhatsApp Data before Changing Number
- iPhone Backup Tips
- 1. Extract Data From iPhone
- 2. Encrypt iPhone Backup
- 3. Reset iPhone Backup Password
- 4. Extract iPhone Backup in Win 10
- 5. How Long take iPhone to Backup
- 6. Find iPhone Backup Location
- 7. iPhone Backup Password
- 8. View iPhone Backup on Computer
- 9. iPhone Backup with iTunes/iCloud
- 10. iPhone Backup Unlockers
- 11.How To Encrypt iPhone Backup
- 12. Best Backup Chargers for iPhone
- 13. Speed Up Your iPhone Backups
- 14. Save Data When iPhone Disabled
- 15.Check Last Backup on iPhone
- ● Manage/transfer/recover data
- ● Unlock screen/activate/FRP lock
- ● Fix most iOS and Android issues
- Back up Now Back up Now Back up Now
Daisy Raines
staff Editor