Change App Permissions On Your Android Phone For Better Privacy

Jun 30, 2026 • Filed to: Data Transfer Solutions • Proven solutions
 TL;DR:
Android users can modify app permissions individually by long-pressing an app icon to access the App info menu, or systematically by category using the Permission Manager located in the device privacy settings.
● If the system blocks third-party applications from utilizing accessibility or system-level features, you must manually select Allow restricted settings from the overflow menu on the App info page, provided the menu icon is present.
● Applications granted Device Administrator privileges possess the ability to lock the phone or wipe data and must be explicitly deactivated under Special Permissions before they can be uninstalled or restricted.
● Modifying permissions on devices restricted by enterprise policies requires centralized desktop management software like Wondershare Dr.Fone, compatible with Windows and Mac via USB or wireless connections.
Ask AI for a summary
 ChatGPT
 Perplexity
 Gemini
 Claude
 Grok
Grok
Dr.Fone Basic:
Better Control for Your Phone
Manage, transfer, back up, restore, and mirror your device
Android apps in general run in an isolated environment, so by default it cannot access your phone data. An app must request permission from you before it can access things like your camera, contacts, storage, or location. This system exists to protect personal information and limit how apps interact with your device.
However, many users allow permissions without reviewing them. Over time, some apps keep access to features they no longer need. Android solves this by letting users change app permissions on their Android phone anytime from device settings. You can allow, deny, or limit access with only a few taps.
Understanding how to change permissions for apps on your Android phone gives you full control over privacy app behaviour and device security. This guide explains exactly how to manage these permissions step by step.
- Part 1. What Are App Permissions and Why They Matter
- Part 2. How to Change App Permissions on An Android Phone Using the App Info Option
- Part 3. Change Permissions For Apps On Your Android Phone Using The Permission Manager Tool
- Part 4. How To Allow All Permissions on an Android Phone
- Part 5. How to fix an app that was denied access?
- Part 6. How Do I Remove Admin Permission from An App On Android? (Bonus)
- Bonus Tip: Manage Android Apps And Permissions Using Dr.Fone Android Manager

Part 1. What Are App Permissions and Why They Matter
App permissions grant an application access to your phone’s components — camera, microphone, contacts, and storage or location. Android prompts you to grant permission for these features because they are sensitive.
For example
- A camera app needs camera access
- A map app needs location access
- A messaging app needs contacts access
Android lets users manage these settings from the permission manager inside device settings. This helps protect privacy and keeps apps from collecting unnecessary data.
When you change permissions for apps on your Android phone, you decide what each app can access.
Common permission types include
- Camera
- Microphone
- Location
- Contacts
- Storage
- Calendar
Some permissions can be allowed only while using the app. Others can be blocked completely.
Part 2. How to Change App Permissions on An Android Phone Using the App Info Option
An app is too permissive: you can revoke permissions in seconds.
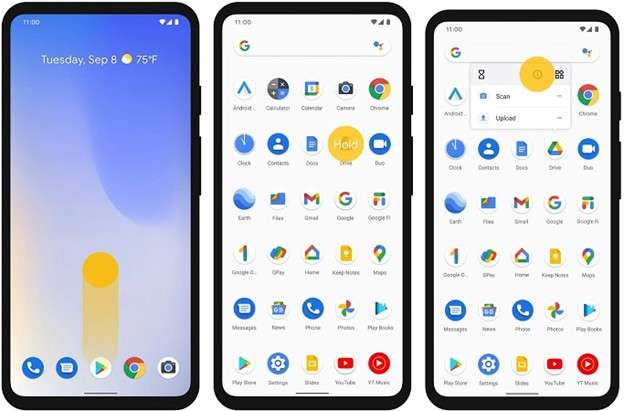
Step 1: Unlock your phone. Swipe up from the bottom of the screen to reveal all installed apps in the app drawer.
Step 2: Locate the app whose access you’d like to control. Long-press the app icon.
Step 3: A pop-up small menu will appear. Select App info to view the settings page for that app.
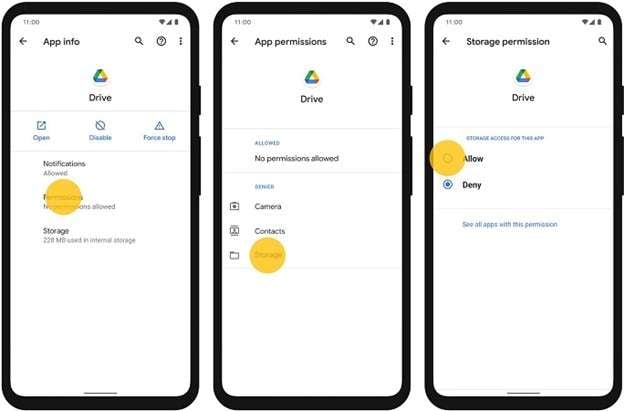
Step 4: In the app settings screen, touch Permissions. The permissions option will not show if the app doesn't request any access.
Step 5: You will now see the permissions associated with that app. It shows which ones are allowed and denied. Tap on any permission to toggle its status. Keep in mind that disabling certain permissions may cause some apps to not function properly.
Step 6: Decide if that permission should be granted to the program. The updated setting will take effect when you make the choice.
Part 3. Change Permissions For Apps On Your Android Phone Using The Permission Manager Tool
One option is the permission manager, which is so simple.
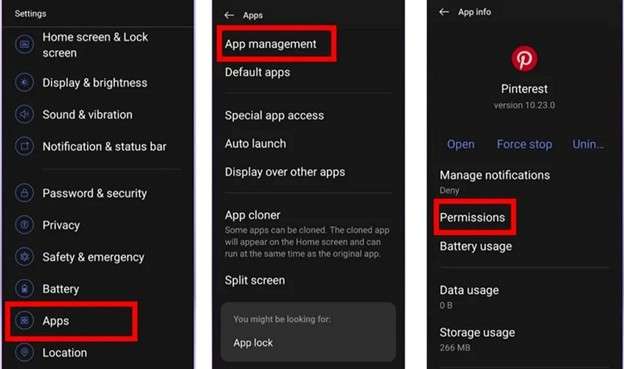
Step 1: Go to the Settings app on your Android phone. Scroll through until you find the Apps section and tap it.
Step 2: In the Apps section, select App management. All applications installed on your device are shown in this area.
Step 3: Choose the app you wish to control. Open the app page, and tap Permissions to view access settings for it.
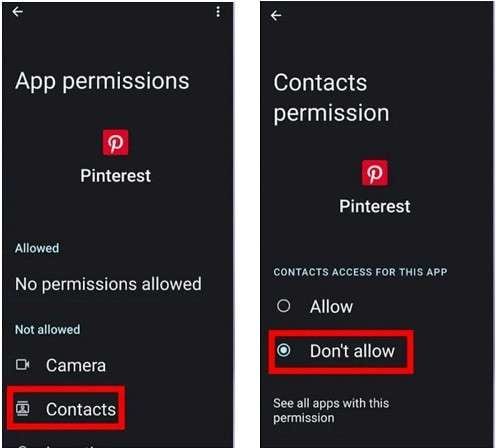
Step 4: A list of permissions will show up. Select the permission you want to control—contacts, for example, or location.
Step 5: Select either Allow or Deny that permission. When you choose the new setting, it will take effect.
Part 4. How To Allow All Permissions on an Android Phone
Sometimes an app cannot work because it lacks permissions. You can allow all required permissions easily.
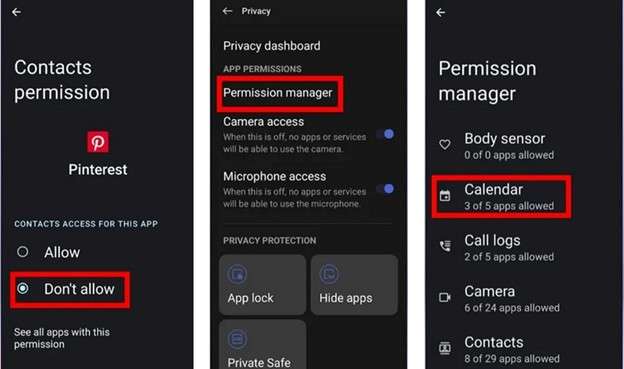
Step 1: On your phone, tap the Settings app. Scroll down and tap Privacy.
Step 2: Select Permission Manager under the privacy section.
Step 3: You will now find several permission categories, such as camera, location, or contacts. Tackle the permission you would like to look over.
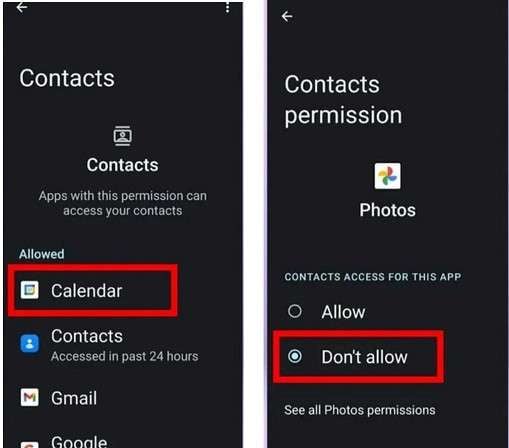
Step 4: A list will pop up of apps that are running under that permission. Click on the app you would like to administer.
Step 5: Select App Permission for Allow or Deny. After selecting your choice, the permission will update.
Part 5. How to fix an app that was denied access?
Sometimes Android blocks certain apps from getting special permissions. This is a common occurrence with third-party apps requesting accessibility or system-level features like dialer or messaging control. The system might present an alert indicating that the application was forbidden access because it could endanger private or monetary information. Now, in this case, settings can be modified through the app information page.
Step 1: Locate the app on your phone. Long touch the app icon until a small menu appears.
Step 2: Select App info to go to the application settings page.
Step 3: Then, check the upper-right corner of the screen and tap on the overflow menu icon.
Step 4: Select Allow restricted settings from the menu.
Step 5: Now head back and test for the permission to enable again, i.e., accessibility access. You will now be able to allow the permission and change app permissions on your Android phone.
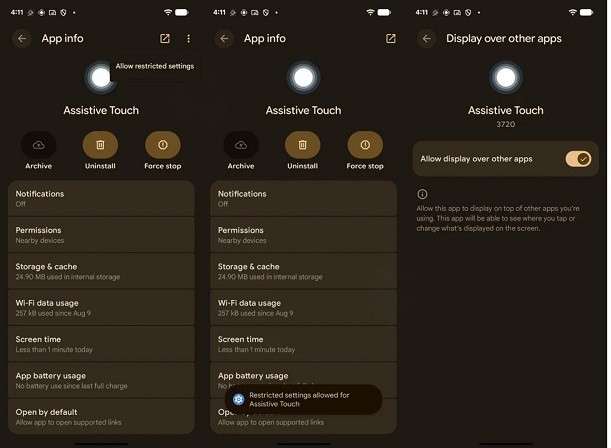
Note: If the overflow menu icon does not appear on the app info screen, this method may not work for that app.
Part 6. How Do I Remove Admin Permission from An App On Android? (Bonus)
Android devices allow certain apps to receive special control through a feature called Device Administrator. Apps that have this privilege can lock the phone, alter passwords, or wipe data. That power makes it important to audit these settings and revoke access when no longer needed. Keeping admin access off is also more private and prevents unnecessary apps from controlling your device.
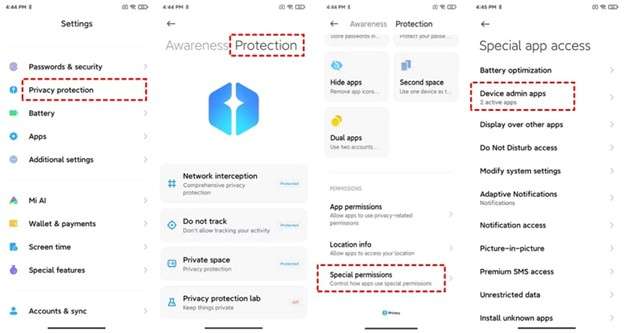
Step 1: Open the Settings app on your Android phone. Scroll until you find Privacy Protection and tap it.
Step 2: Scroll down on the screen and tap Protection. After that, select Special Permissions.
Step 3: Tap Device Admin Apps. This section shows all apps that currently have administrator access on your phone.
Step 4: Choose the app whose admin rights you want to remove. Tap Deactivate this device in the admin app to disable administrator control.
With this option turned off, the app will lose that advanced control over your device. Disabling admin rights is also useful when an app won't uninstall or continues to run with elevated privileges. Regularly managing these settings makes it a lot easier to change app permissions on your Android phone and ultimately keep your device secure.
Some of these permission settings on Android devices are set externally if managed by company or enterprise policies. In those situations, permission changes or admin removal may require device management tools that handle Android data and app control from a central system.
Bonus Tip: Manage Android Apps And Permissions Using Dr.Fone Android Manager
A device management tool can help manage app data and permissions more easily. Wondershare Dr.Fone is a reliable option.
This tool connects your Android device to a computer and gives full control over the device's content. From one dashboard, you can manage photos, videos, messages, files, and other data stored on the phone. It also helps organize apps and device content when normal settings do not allow easy control. This makes it useful when you want a simpler way to change permissions for apps on your Android phone and manage device data safely.
Key Features of Dr. Fone Android Manager
- Manage Android apps from a computer to organize, install, or remove applications easily.
- Transfer photos, videos, music, and files between Android and computer in one click.
- Export or back up important device data to keep your phone storage organized.
- View and manage messages and call history directly from the computer dashboard.
- Access internal storage and SD card files to add, delete, or organize data.
- Preview and manage photos and videos without opening multiple apps.
- Keep better control of installed apps when trying to change permissions for apps on your Android phone.
- Simplify device management by making it easier to change app permissions on your Android phone.
Wondershare Dr.Fone
One-Stop Solution to Manage and Transfer Data on Android Phone
- Transfer files between Android and computer, including contacts, photos, music, SMS, and more.
- Manage, export/import your music, photos, videos, contacts, SMS, Apps, etc.
- Transfer iTunes to Android (vice versa).
- Manage your Android device on the computer.
- Fully compatible with the newest Android OS.


Steps To Manage Android Device Data with Dr. Fone
Step 1: Download and run Dr.Fone on your computer. Connect your Android device with a USB Cable or The Wireless connection option using the App Dr. Fone Link.

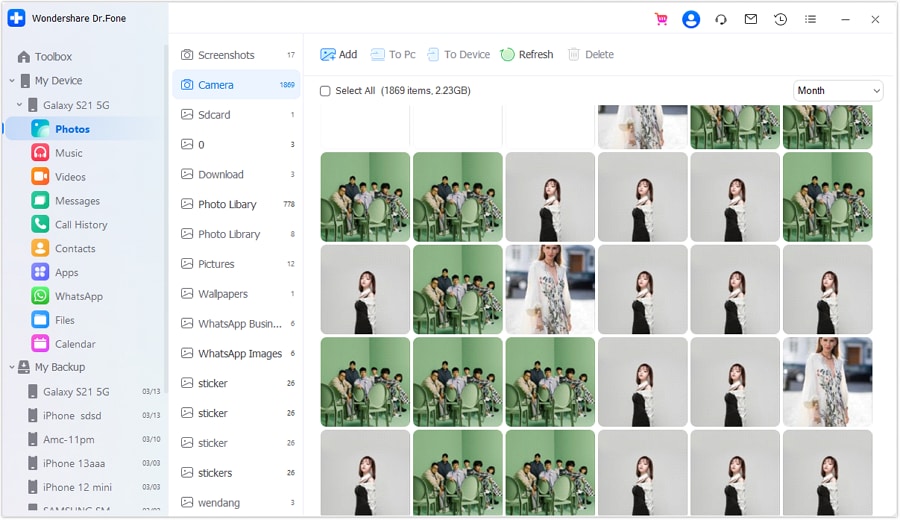
Step 2: Once the device is connected, navigate to My Device. You will see this from the left panel. Select a category to manage photos, videos, messages, files, call history, or calendar.

Step 3: Choose What Data Within A Category. You can preview images, check messages, and go through call logs, or access files stored in your internal storage/SD card.

Step 4: Import, export, delete, or organise the selected data using available options. You may, for example, transfer photos to the computer, export messages, or create folders for files.
Step 5: Use the same dashboard to manage device content, keep apps and data organised. It helps monitor apps and gives you better control when you update app permissions on your Android phone with a well-organised device.
Conclusion
Managing app access is essential for Android privacy and device control. Using the App Info page works best for quick changes when a single app needs review. Permission Manager is ideal when checking multiple apps that use the camera, location, or contacts. Allowing permissions helps apps function correctly, while restricted settings solve access errors. It is for those situations when an app has excessive power. These steps also help you change app permissions on your Android phone and secure your data.
For users who need more control over their device or app manageability, Dr.Fone provides a full dashboard to help you organise apps and manage data as you easily change permissions for apps on your Android phone.
4,624,541 people have downloaded it
Dr.Fone Basic:
Better Control for Your Phone
Manage, transfer, back up, restore, and mirror your device


Android Manage
- Android to iTunes/iCloud
- Android to Mac
- 1. Transfer Data from Android to Mac
- 2. Transfer Videos from Android to Mac
- 3. Transfer Files from Android to Mac
- 4. Connect Android with Mac
- 5. Transfer Photos from Android to Mac
- 6. Sync Android with Mac OS X
- Android to PC
- 1. Transfer Files Using USB Cable
- 2. Share Apps for Android to PC
- 3. Transfer Photos to Windows 10
- 4. Transfer Contacts to PC
- 5. Transfer Photos from Android
- 6. Transfer Files from Android to PC
- 7. Backup and Transfer SMS
- 8. Transfer Photos from Android to PC
- 9. Transfer Videos from Phone to Computer
- 10. Best MoboRobo Alternative to Manage and Transfer Data
- iCloud to Android
- 1. Tips to Sync Data to Android
- 2. Set Up iCloud Account on Android
- 3. Transfer iCloud Contacts
- 4. Transfer iCloud Photos to Android
- iTunes to Android
- 1. Transfer iTunes Audio Books
- 2. Sync iTunes Music with Google Play
- 3. Copy iTunes Playlists to Hard Drive
- 4. Transfer Music from iTunes
- Mac to Android
- 1. Transfer Files from Mac to Android
- 2. Send Files from Mac to Android
- 3. Transfer Music from Mac
- 4. Transfer Photos from Mac
- PC to Android
- 1. Transfer Files to Android Wi-Fi
- 2. Transfer Pictures from Computer
- 3. Transfer Files from PC to Android
- 4. Transfer data from Acer device
- Manage Tips
- 1. Where Are Screenshots Saved on Android
- 2. Android File Transfer for Mac
- 3. Android File Transfer Alternatives
- 4. Unsend a Text on Android
- 5. Introduction To Send Anywhere
- 6. Bold PolyBuzz Mod APK
- 7. Fix File Transfer Not Working
- 8. Top 4chan Alternatives
- 9. Sideloadly Review
- 10. Top LibGen Alternative Options
- 11. 1337x Alternatives
- 12. Keep2Share Downloader Review
- 13. Tez Files Review and Best Alternatives
- ● Manage/transfer/recover data
- ● Unlock screen/activate/FRP lock
- ● Fix most iOS and Android issues
- Free Download Free Download Free Download


Daisy Raines
staff Editor