100% Security Verified | No Subscription Required | No Malware

 :
: 
 ChatGPT
 Perplexity
 Gemini
 Claude
 Grok
Grok
Unboxing the brand new phone is exciting, but when you realize you have to move the data, it turns into chaos. A safe transfer matters even more with the anticipated release of Android 17 in June or July.
This new update is supposed to bring new features, and you need to ensure that data is securely moved if you want to enjoy them. Therefore, this simple guide explains how manual and automated methods can help you move data to Android 17 in mere seconds. Whether you use an application or USB method, learn how desktop transfer tools like Dr.Fone - Phone Transfer are the best.
In this article
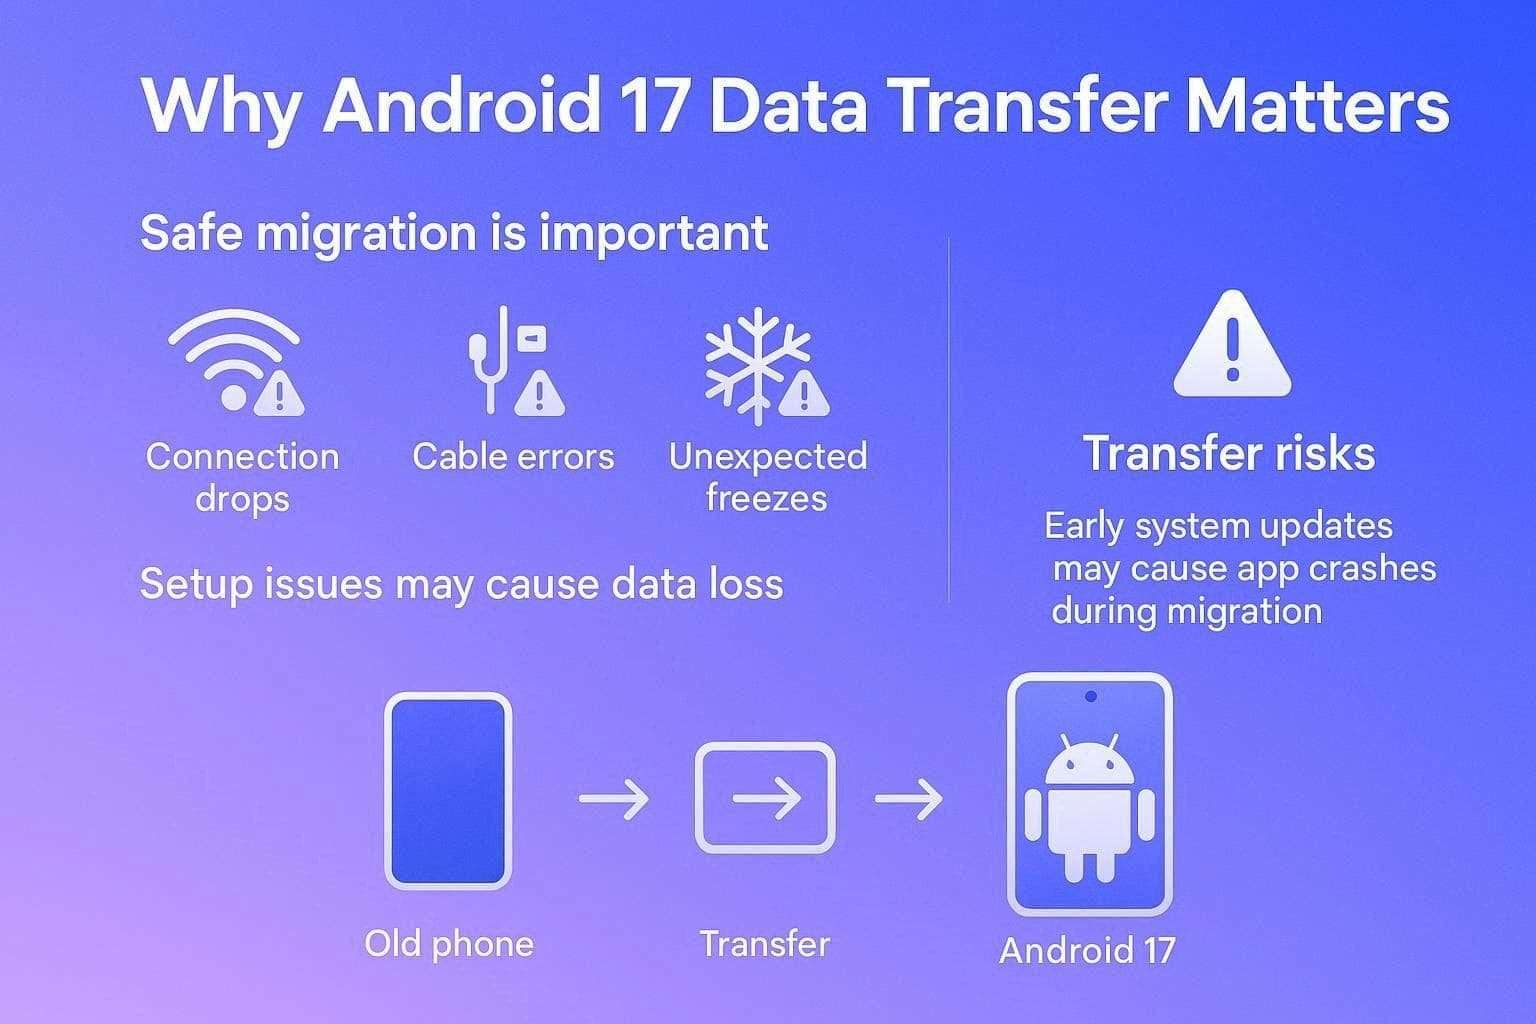
Part 1. Why Android 17 Data Transfer Matters
Before you switch to Android 17, it's important to understand why a safe migration is most important. According to Google Help, a safe migration or backup is important because the standard setup phase is prone to connection drops and cable errors.
In addition, any unexpected freeze can result in major data loss. Vivo Developers further say that early platform versions and system updates naturally carry a risk of third-party app crashes and background instability during the initial file migration.
What Users Commonly Lose During Migration
Regardless of the issue users face during the Android 17 setup, this can lead to data loss of local data that isn’t saved on the cloud servers. Contacts and calendar events also sync easily, which could mean you lose custom device settings such as Wi-Fi passwords, text attachments, and more. So, in the absence of manual backup, you will lose highly secure data such as WhatsApp chats, banking logins, offline documents, and side-loaded apps.
Why Transfer Issues Happen - 5 Reasons
If you want to move data to Android 17 safely, review the mentioned factors to learn why the transfer failure occurs:
| Reason | What Goes Wrong |
|---|---|
| Faulty Connections | Bad USB cables or weak Wi-Fi networks can drop out mid-transfer, corrupting your files. |
| Low Battery | If either phone dies during the migration, it can cause system freezes and major data loss. |
| OS Mismatch | Moving files between heavily different software versions can cause app compatibility errors. |
| Interrupted Setup | Accidentally closing the transfer app or locking the screen can permanently cancel the process. |
| Storage Limits | If your new phone runs out of storage space, the transfer will suddenly crash. |
Part 2. What are the Best Ways to Transfer Data to Android 17?
To ensure you don’t lose any important data during the Android 17 setup transfer, this section provides safe data-sharing solutions.
Easiest Cloud‑Based Transfers
When you are not in the same location or don’t want to use the USB connection, here are some cloud transfer methods you can try:
Way 1. Sign In with Google Account (Auto Sync)
Android re-installs the apps, contacts, emails, and even part of the home screen layout when you sign in during setup. Hence, little to no manual effort is needed, and since the data is backed up in Google’s cloud, you can restore it later even if the old phone is lost.
This method also keeps contact, photos, calendar, and files updated across all Android devices. If you want to move data to Android 17 from Redmi, perform these actions first:
-
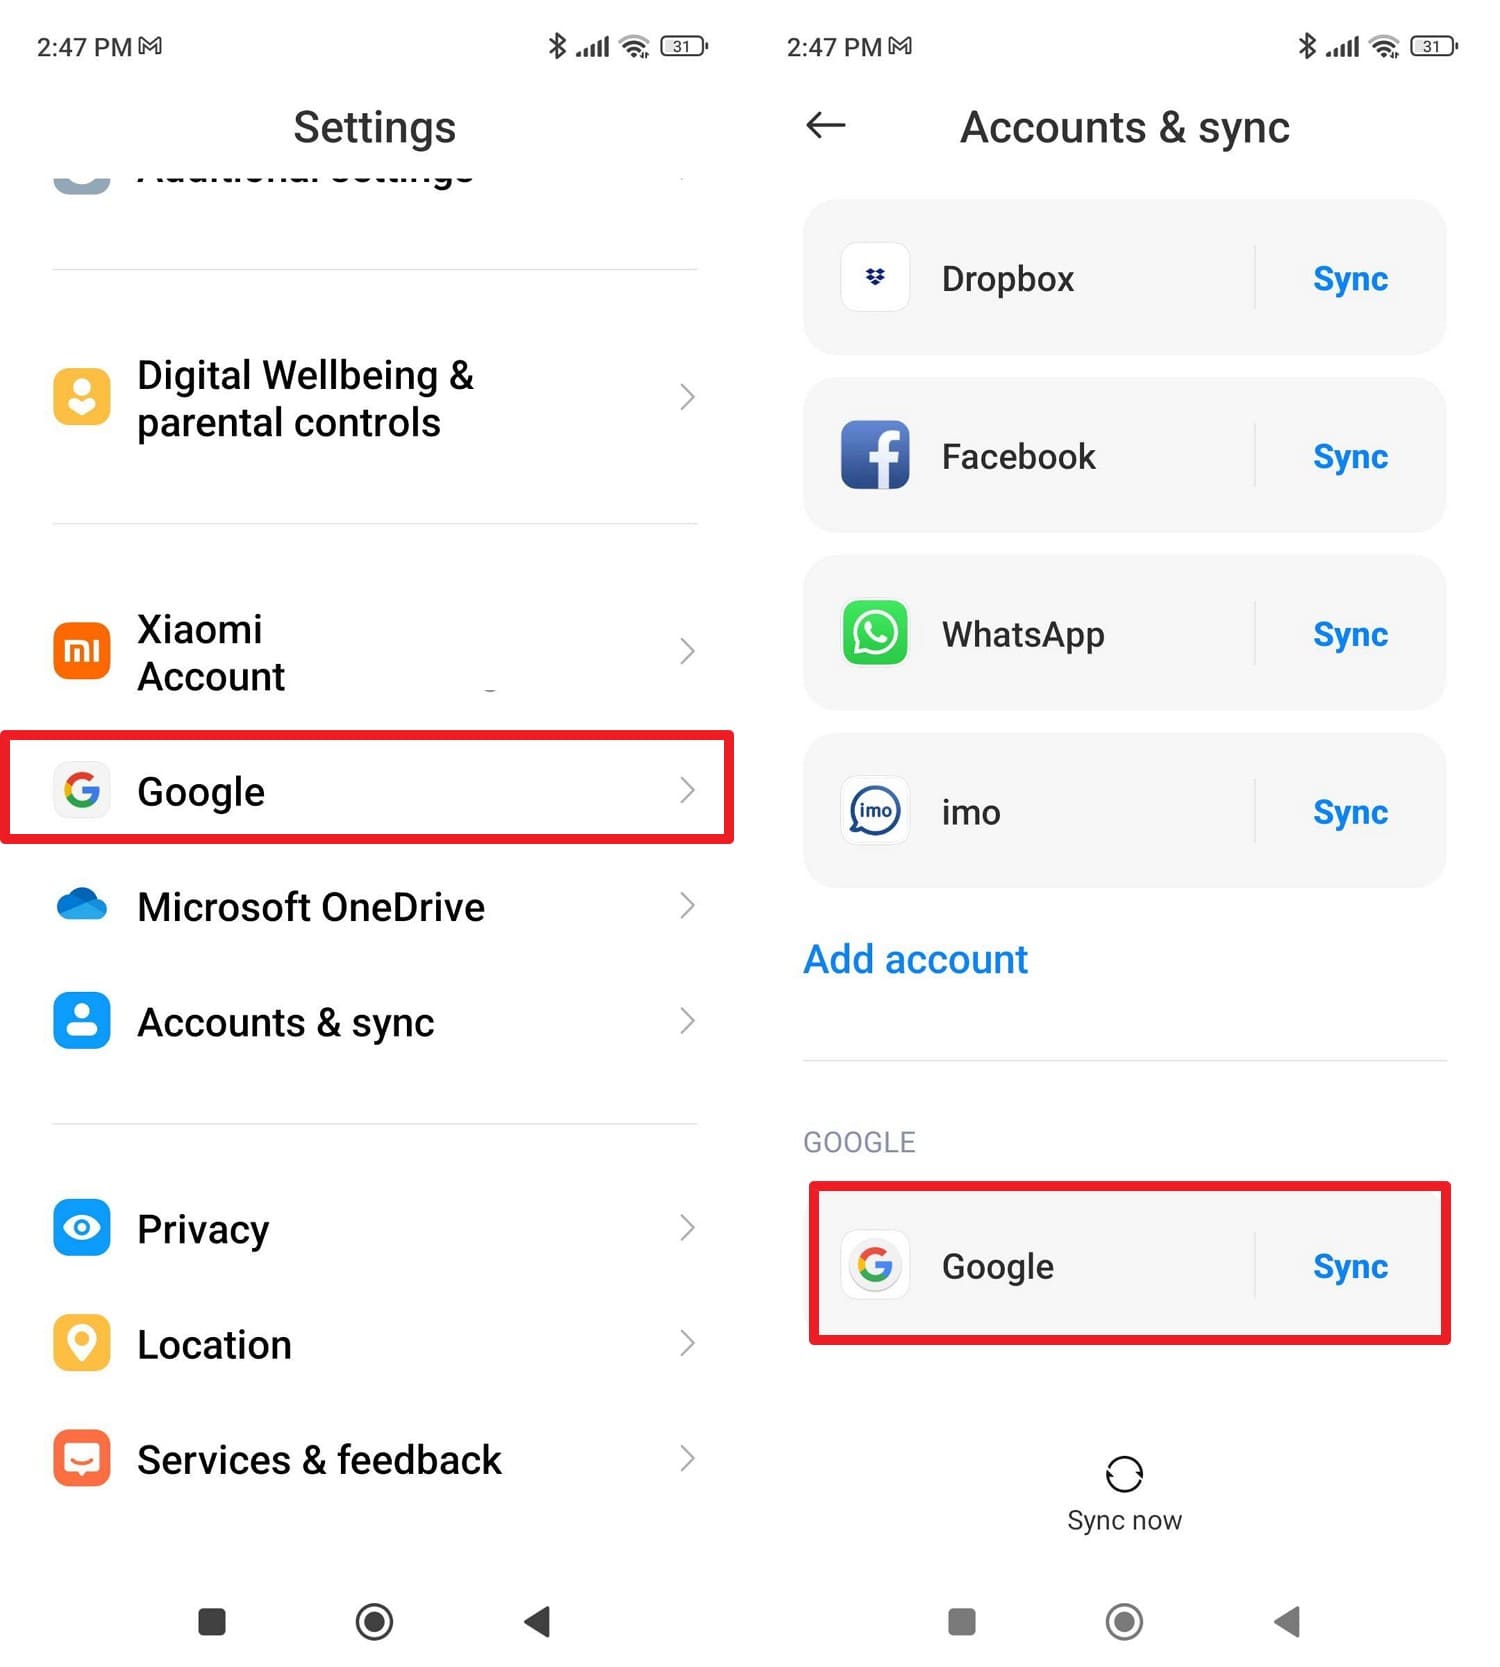
Step 1 Press “Account & Sync” in settings and scroll down to choose “Sync” for Google.
-
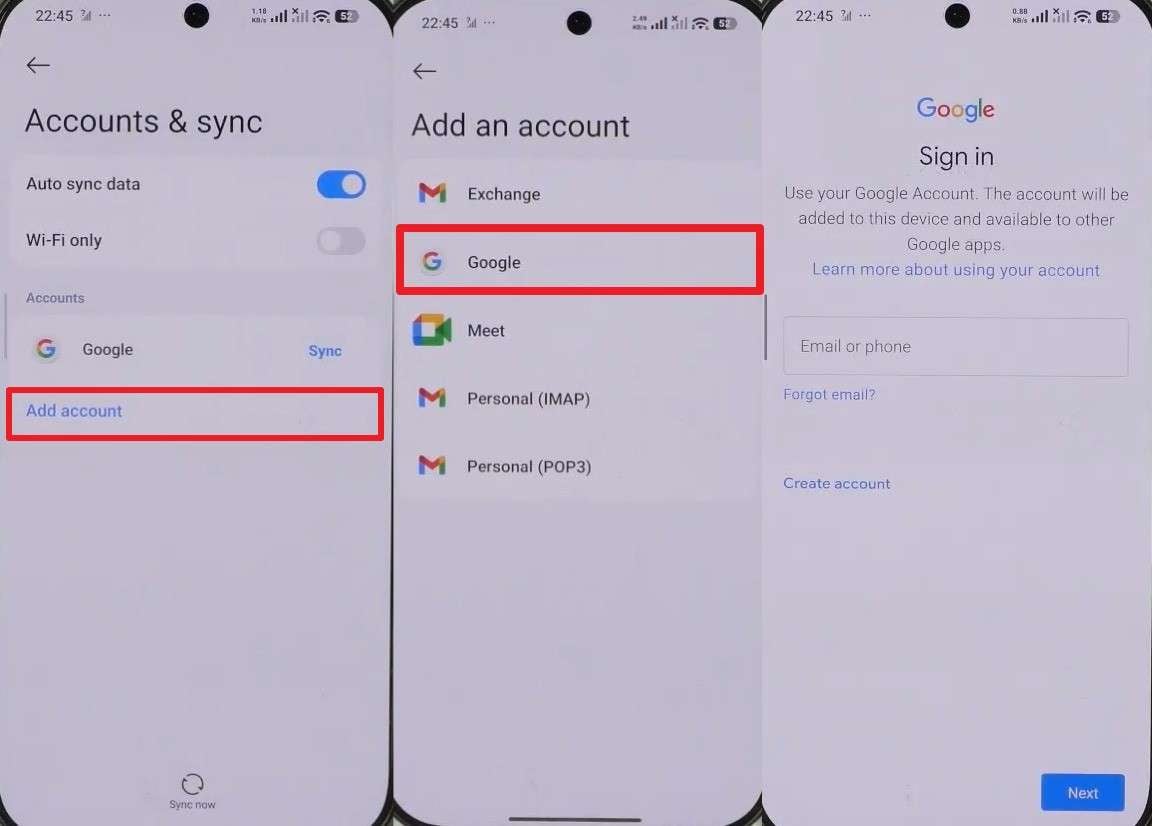
Step 3 On Android 17, during setup or later via settings, go to the “Accounts & Sync” interface and press the “Add Account” button. Choose “Google” and when asked, add the Google email and passcode to “Sign In.”
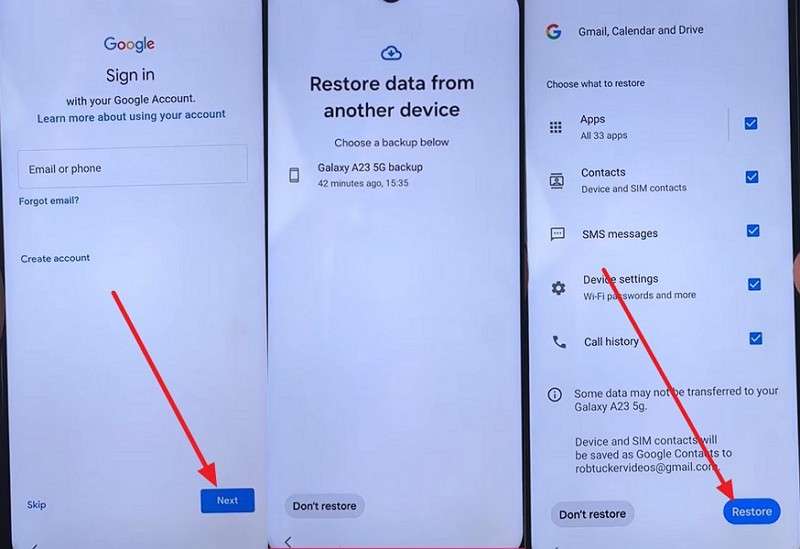
Way 2. Use Google Drive Backup & Restore
You can also use this method during the Android 17 setup, sign in to your Google account, and restore the latest backup. Since the backup is stored in Google’s cloud, the data is safe, and the action can be performed via the mentioned steps:
-
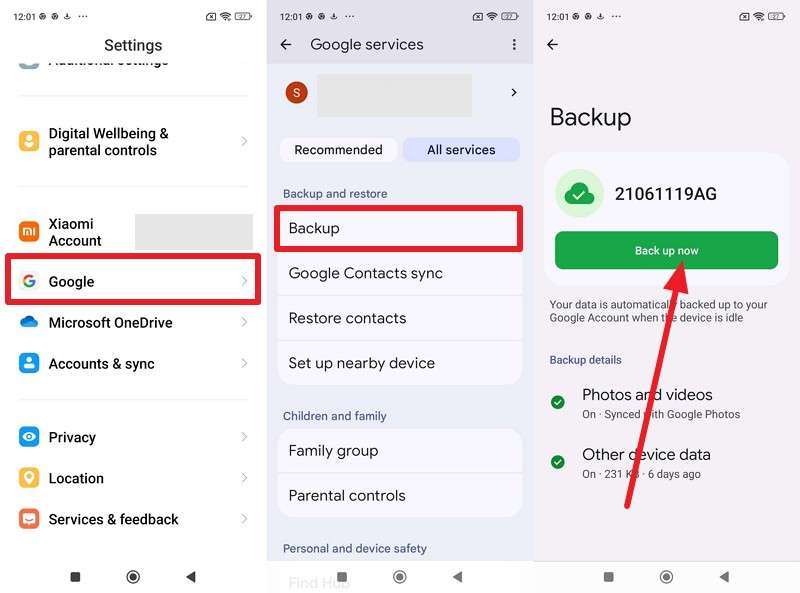
Step 1 Make sure you have a backup of your old device. Go to “Google > All Services > Backup > Back Up Now.”
-
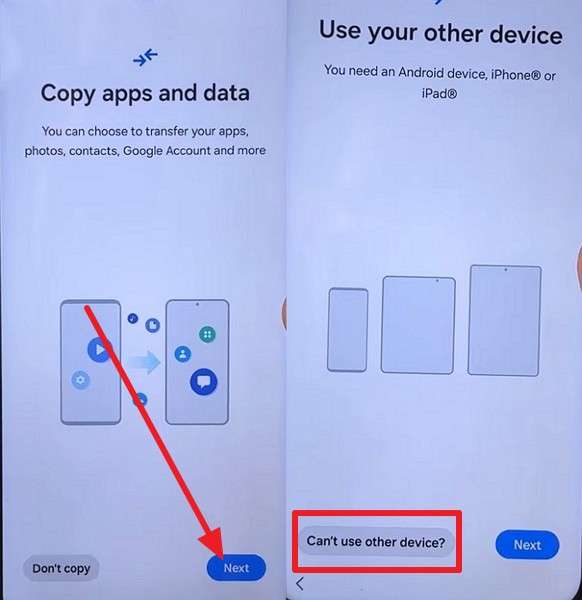
Step 2 Power on Android 17, connect to Wi-Fi, and follow the setup prompts. After that, pick “Next” and “Can’t Use Other Device” on the “Copy Apps & Data” interface.
-
Step 3 Add the previous Google account details and tap “Next” to choose the backup you want to restore. Confirm the old screen lock pattern/PIN when prompted to decrypt the data, choose data, and press “Restore.”
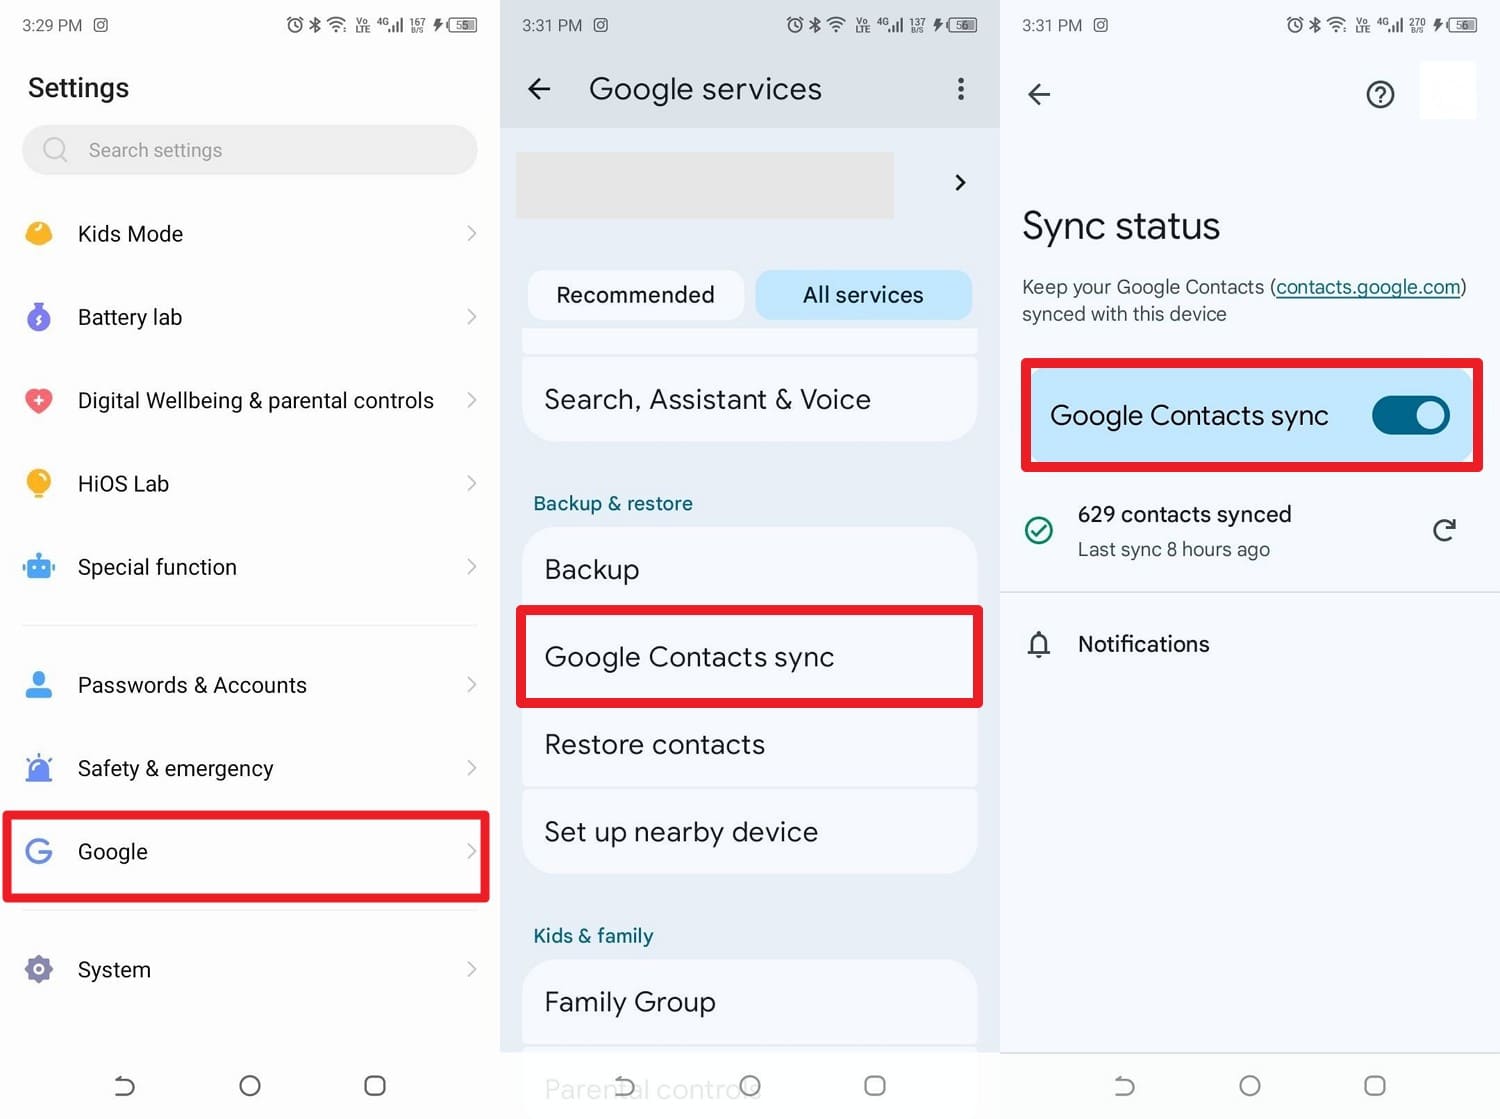
Way 3. Move Contacts via Google Contacts Sync
As you switch to Android 17, if you want to move contacts, this method automatically syncs with your Google Account. After signing into the same account on Android 17, contacts quickly appear over Wi-Fi, and any changes made later are updated across all synced devices, as demonstrated:
-
Step 1 In the Account & Sync (Redmi), pick the “Google” option and on the new interface, choose “Contacts.” Tap the “Three Dots” icon at the bottom and choose the “Sync Now” option.
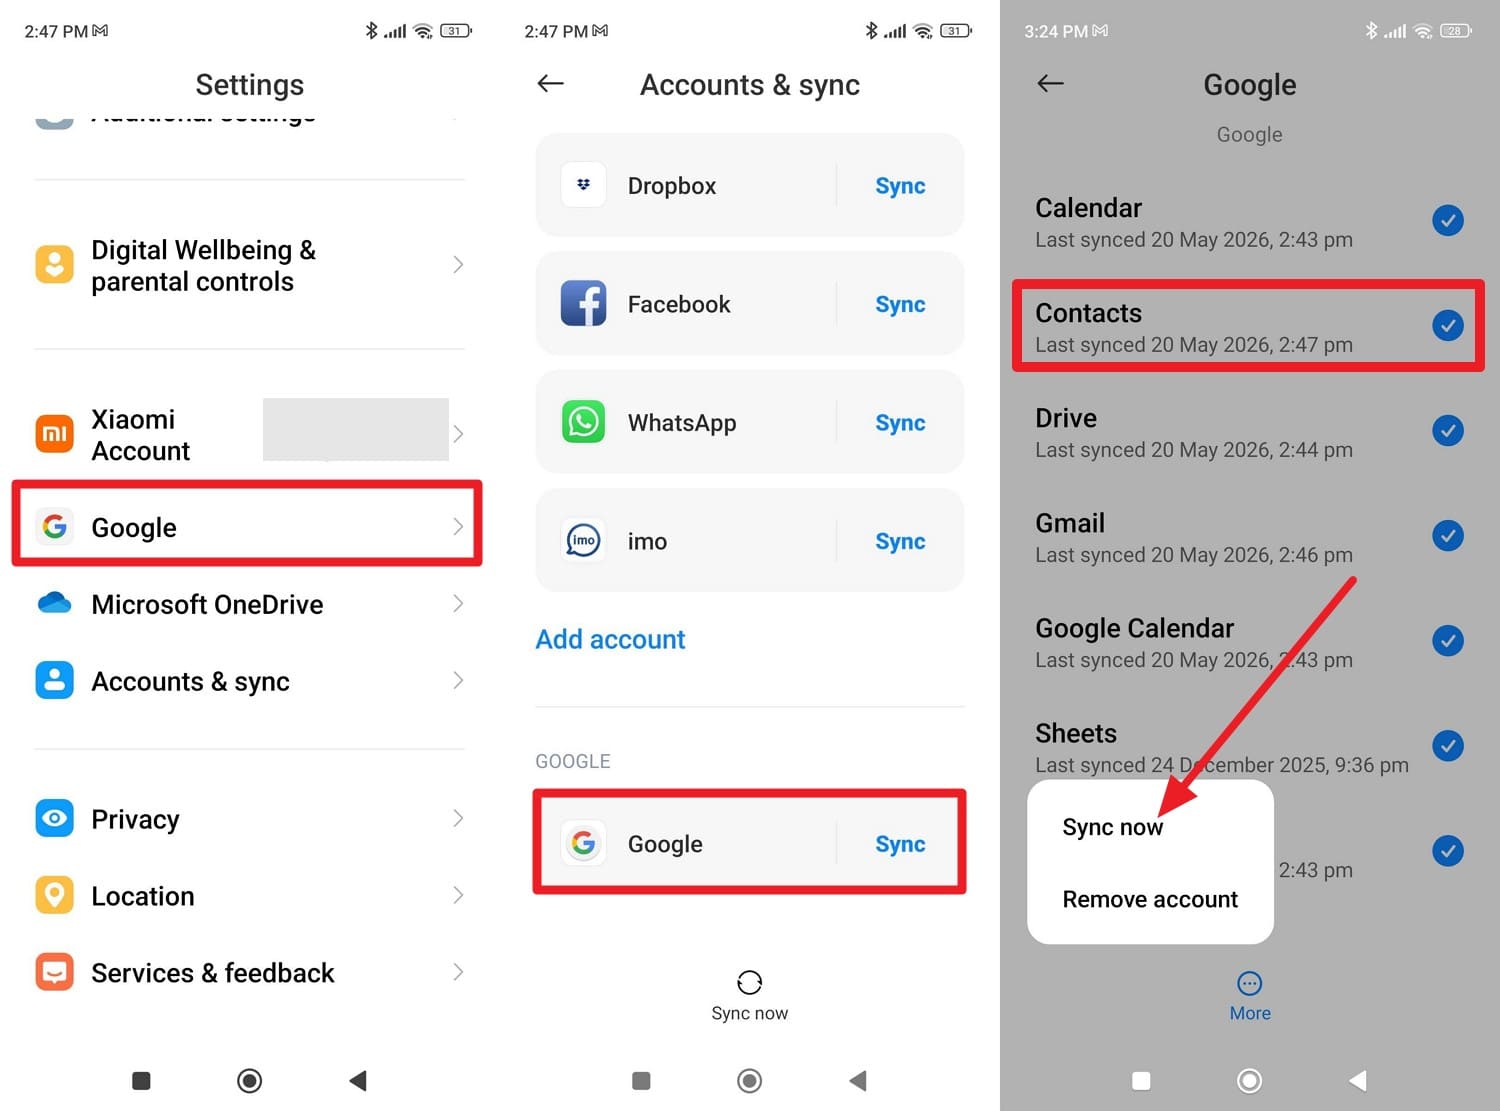
-
Step 2 When asked, sign in with the exact same Google Account on Android 17 that you used on your Redmi phone. If you have already bypassed setup, you can manually verify them by going to your new phone's “Settings > Google > Google Contacts Sync” and toggling them on.
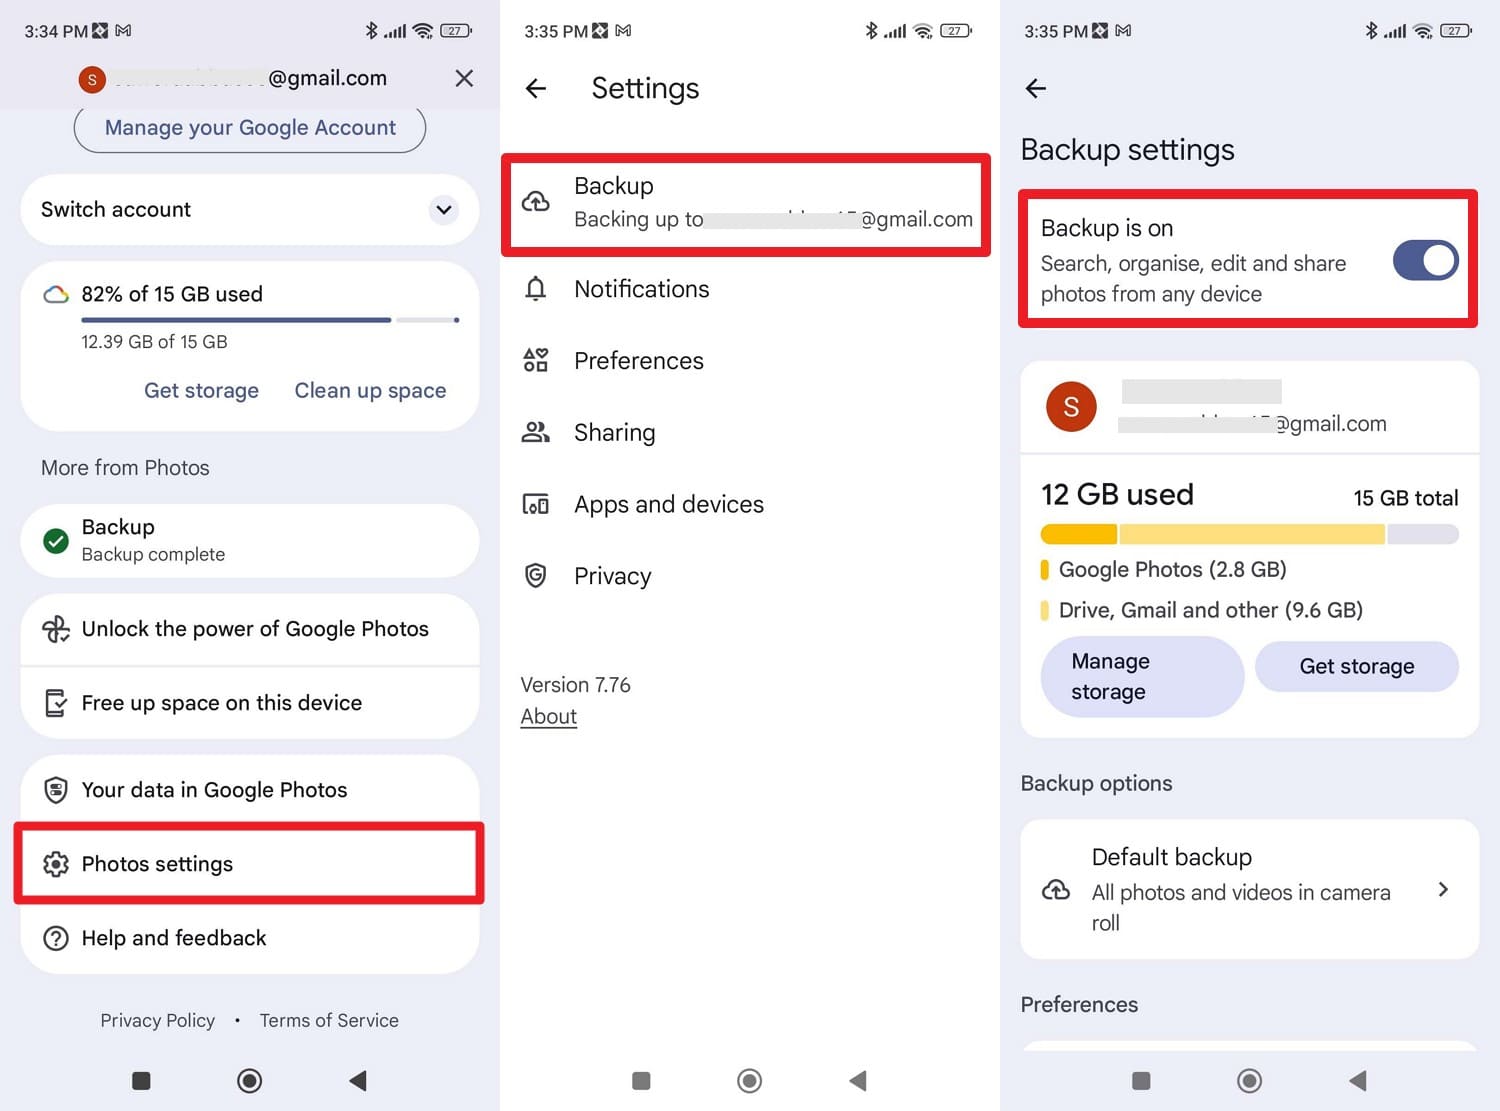
Way 4. Transfer Photos Using Google Photos
When you move data to Android 17, you can use this method to share images without needing cables or manual file transfers. After signing into the same Google account, your photos, videos, albums, and organization instantly appear across devices, as guided:
-
Instructions Tap the profile icon in Google Photos, then choose “Photos Settings > Backup” to toggle on “Backup Is On.” For Android 17, simply open Google Photos and sign in with the same Google account; all backed-up photos will be displayed.
Device‑to‑Device and Local Transfers
In addition to cloud methods, if you want to move data to Android 17 (Selective), try the given ways:
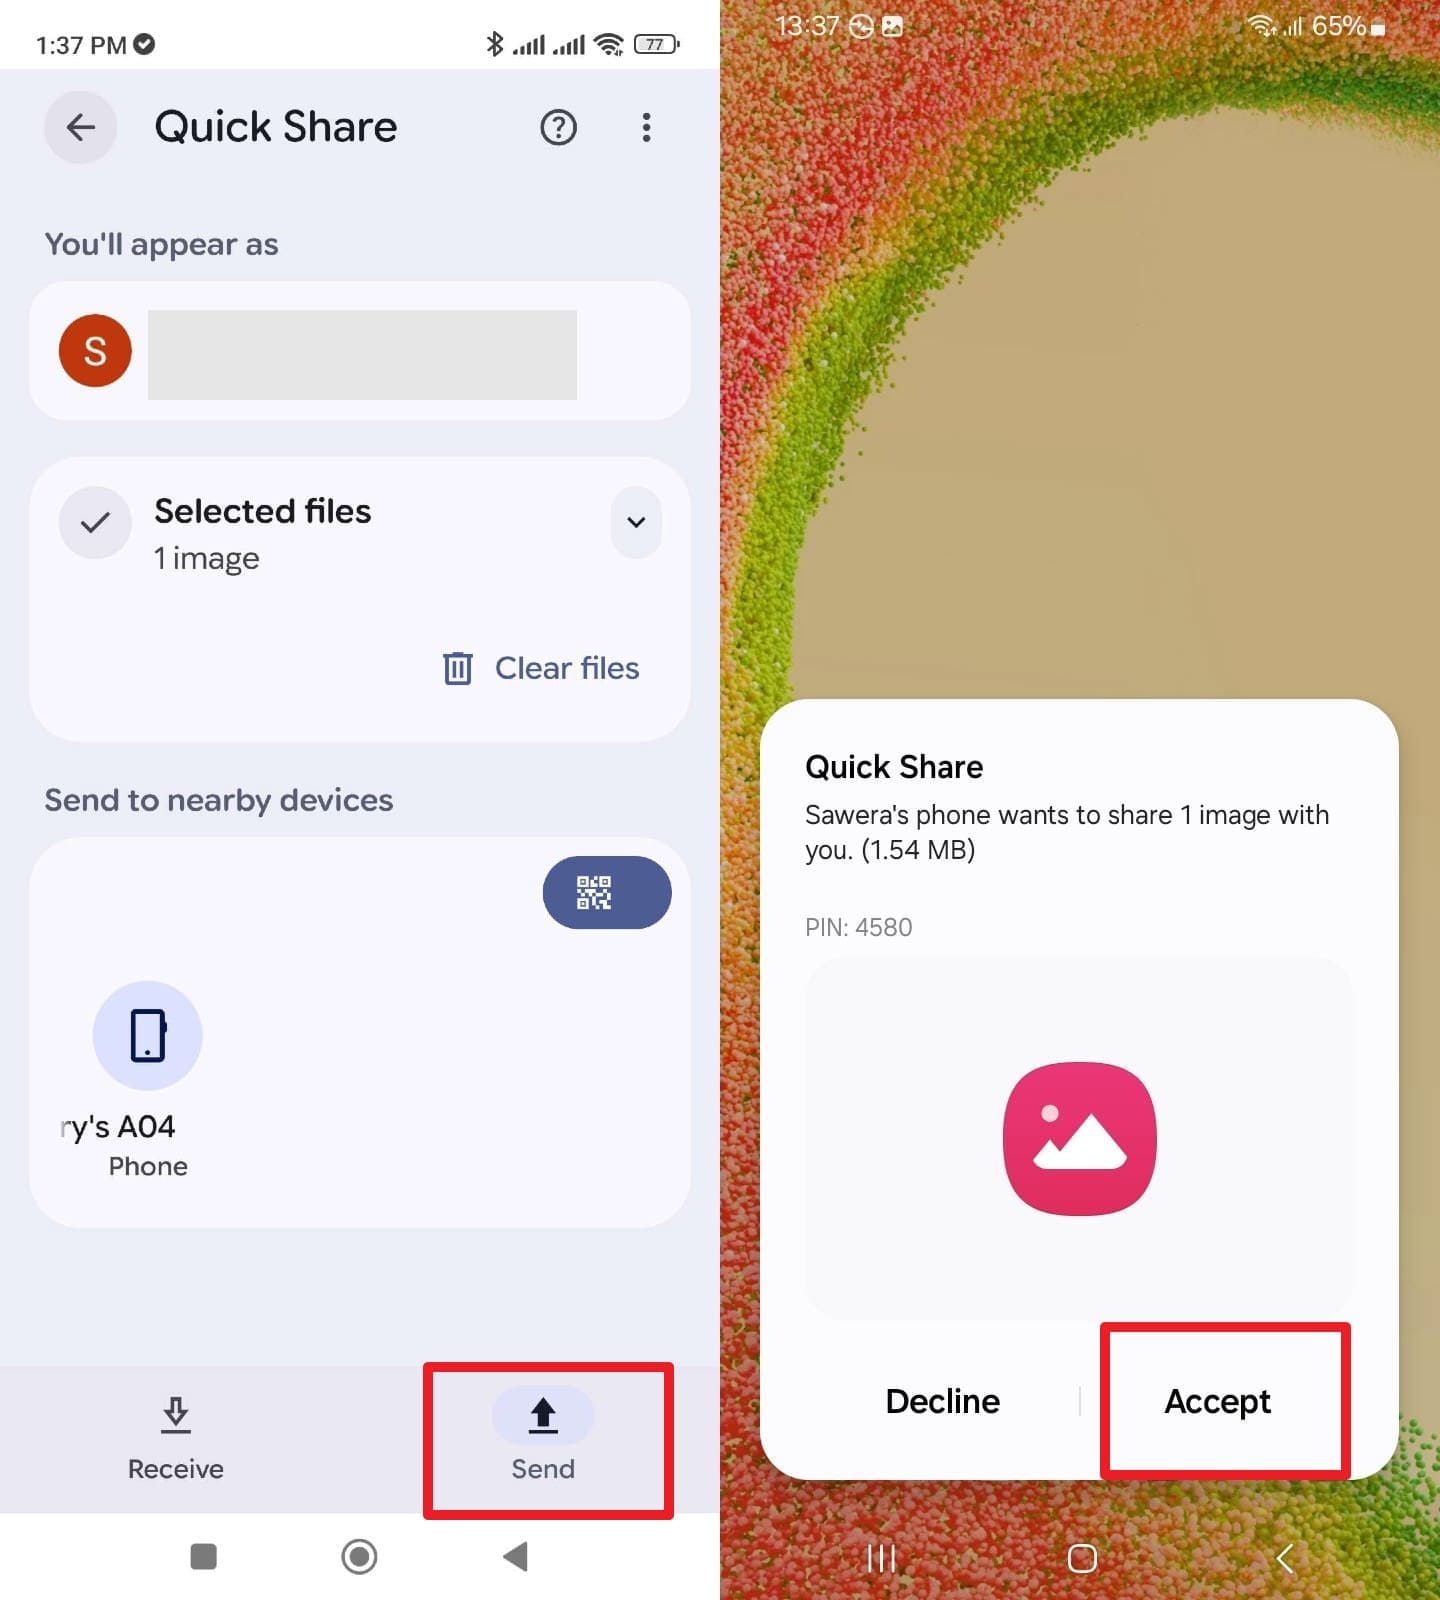
Way 1. Transfer via Nearby Share/Quick Share (Android‑to‑Android Style setup)
Nearby Share, now called Quick Share on many Android devices, is a fast way to share selective data. Using Bluetooth, Wi-Fi, or Wi-Fi Direct, you can pick the Share button to transfer images, videos, or files, as shown below:
-
Step 1 Choose the media from the old Android, then tap the “Send” button to select “Nearby Share” from the popup menu.
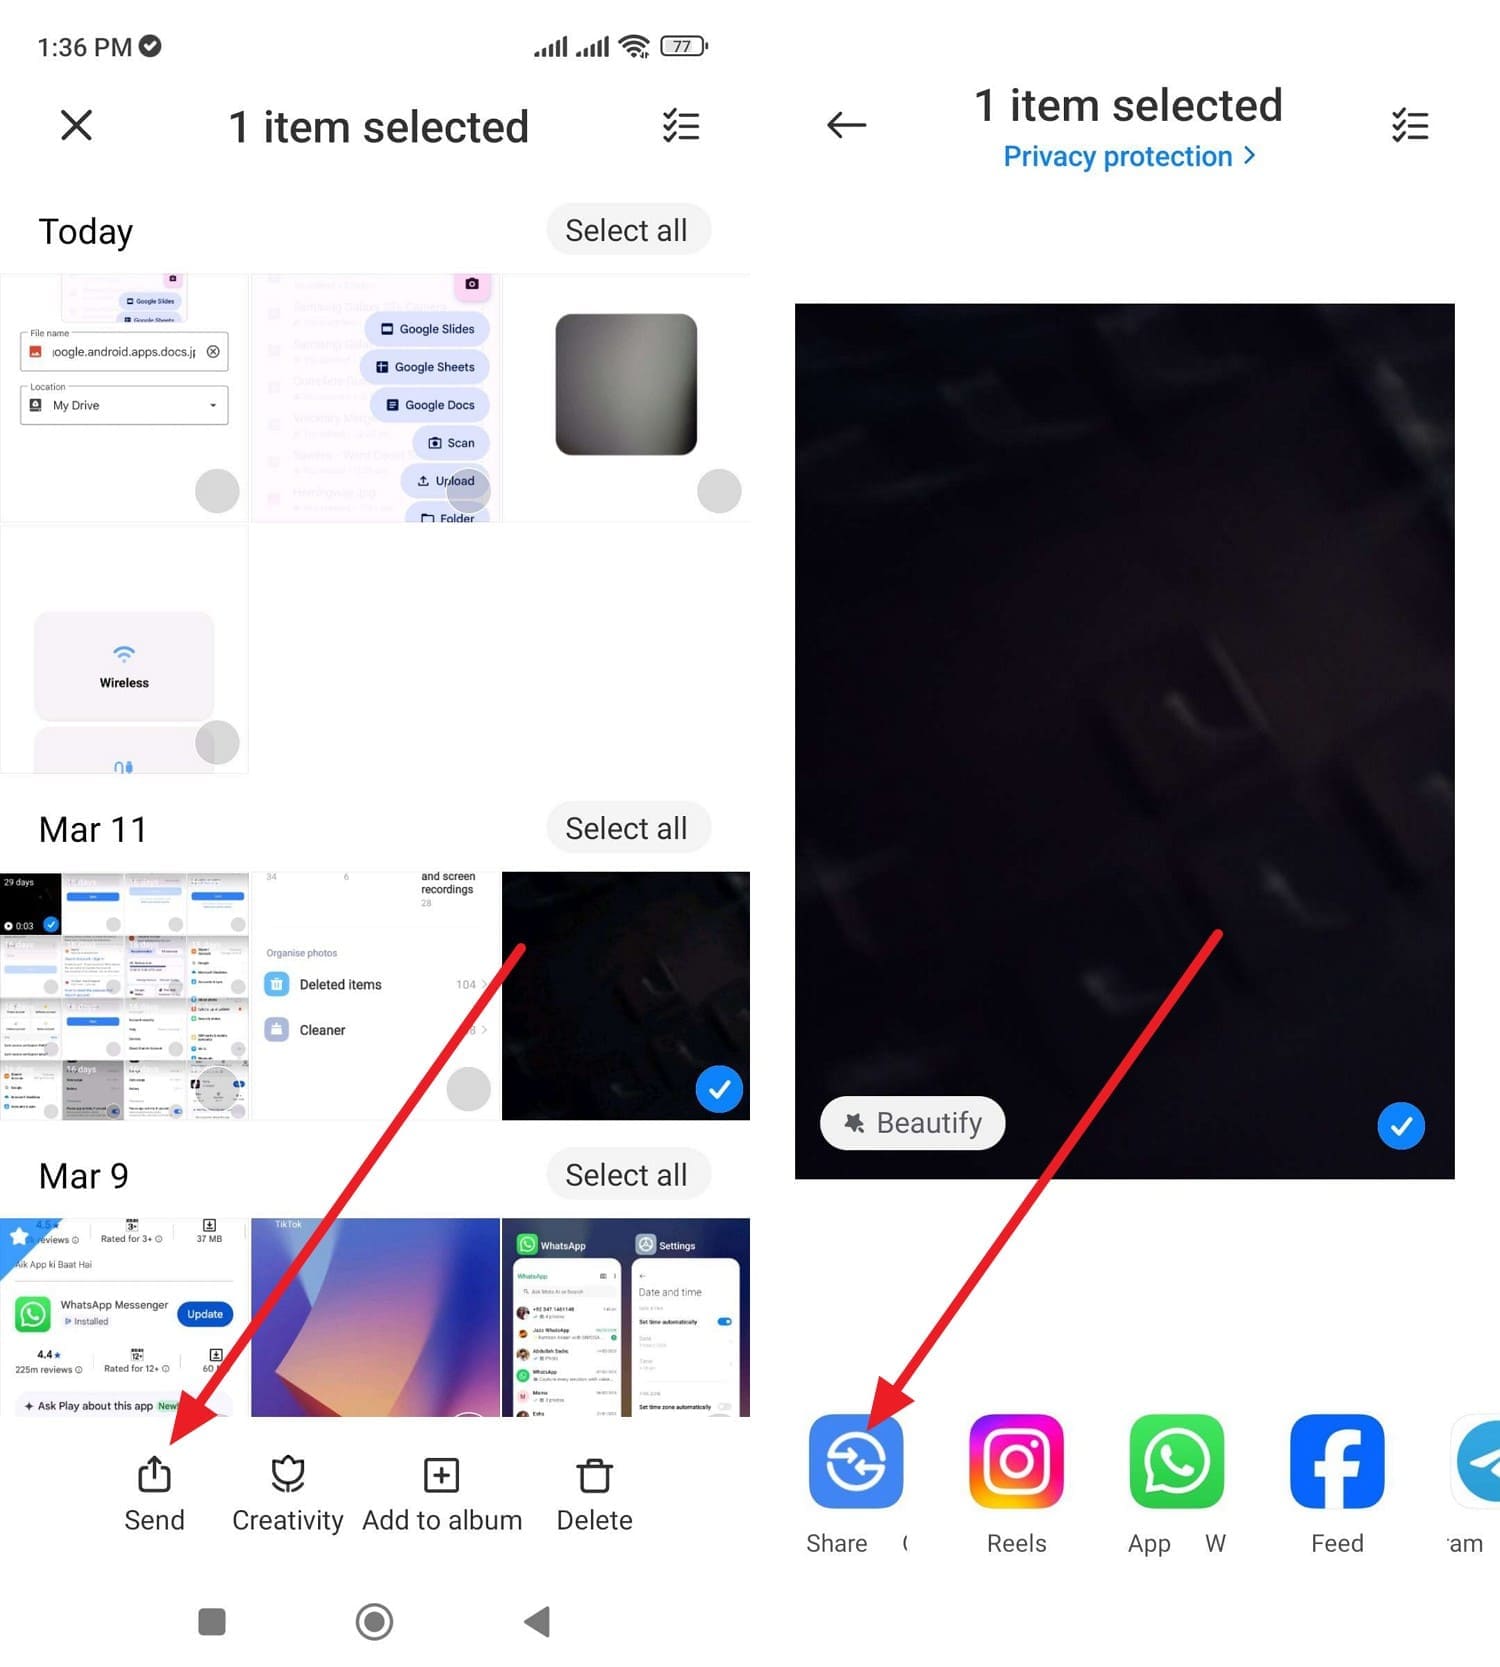
-
Step 2 If the Nearby Share option in the Android 17 settings is enabled, choose the sending device in the “Send” tab. When prompted on the popup menu, press the “Accept” button to share the data.
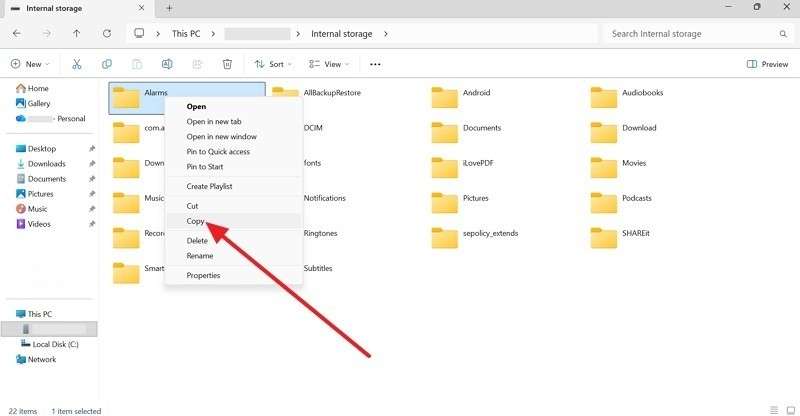
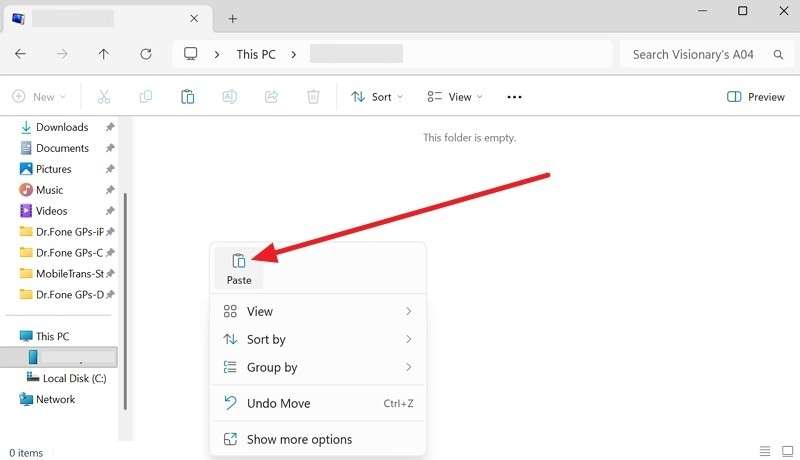
Way 2. Use USB Cable Transfer (Phone‑to‑PC‑to‑Android)
When you switch to Android 17, you can use this method for full control. Since the transfer happens between devices, it's offline, and keeps the media's original quality, as guided:
-
Step 1 Connect the old phone to the PC via a USB cable, then right-click the data you want to move and select “Copy.”
-
Step 2 Use USB to connect Android 17, and right-click to “Paste” the data on internal storage.
Way 3. Transfer Files via SD Card or OTG Drive
Since the storage device also keeps a second copy of your data, it works as an extra backup. This method works across most Android brands without special apps or accounts, as guided:
-
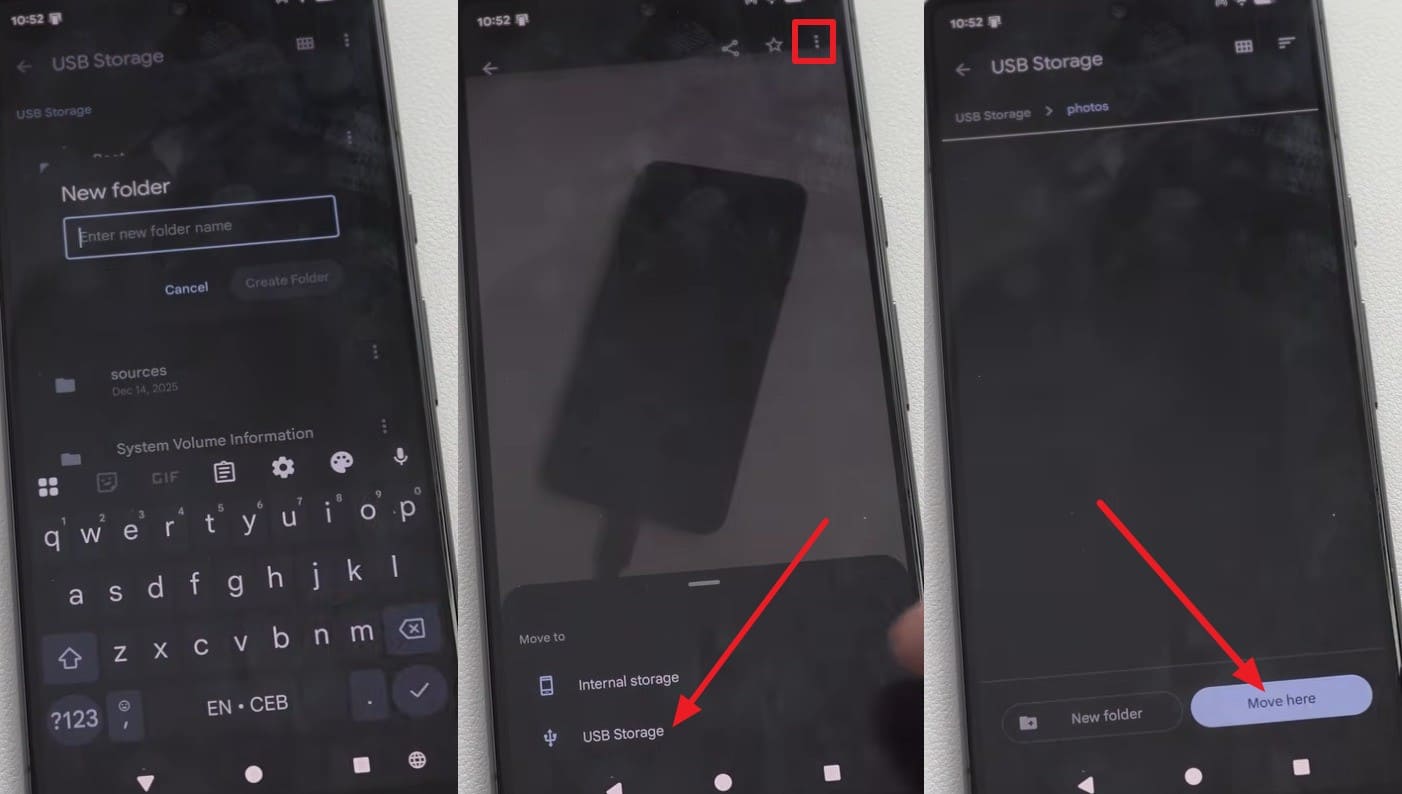
Step 1 Plug your SD card into an OTG adapter or card reader, and connect it to the charging port of your old phone. After that, go to the “USB Storage” section in the File Manager and create the new folder. Pick the data you want to share, press “Three Dots” and choose “USB Storage.” On the new interface, select the folder you created on USB Storage, then press “Move Here.”
-
Step 2 Connect the microSD Card to Android 17, and look for the USB drive in the storage list. Tap on the drive to view your files, or copy them over to your new phone's internal storage if desired.
App‑Specific and Manufacturer Tools
For users who want to avoid the Android 17 setup ways, this section explains 2 app-based options to try:
Way 1. Use WhatsApp Chat Transfer Feature
To share WhatsApp data with Android 17, this method lets you move chats, media, documents, account info, and many settings in a single process. The transfer is end-to-end encrypted, protects your private messages, and reduces the chance of data loss, as highlighted:
-
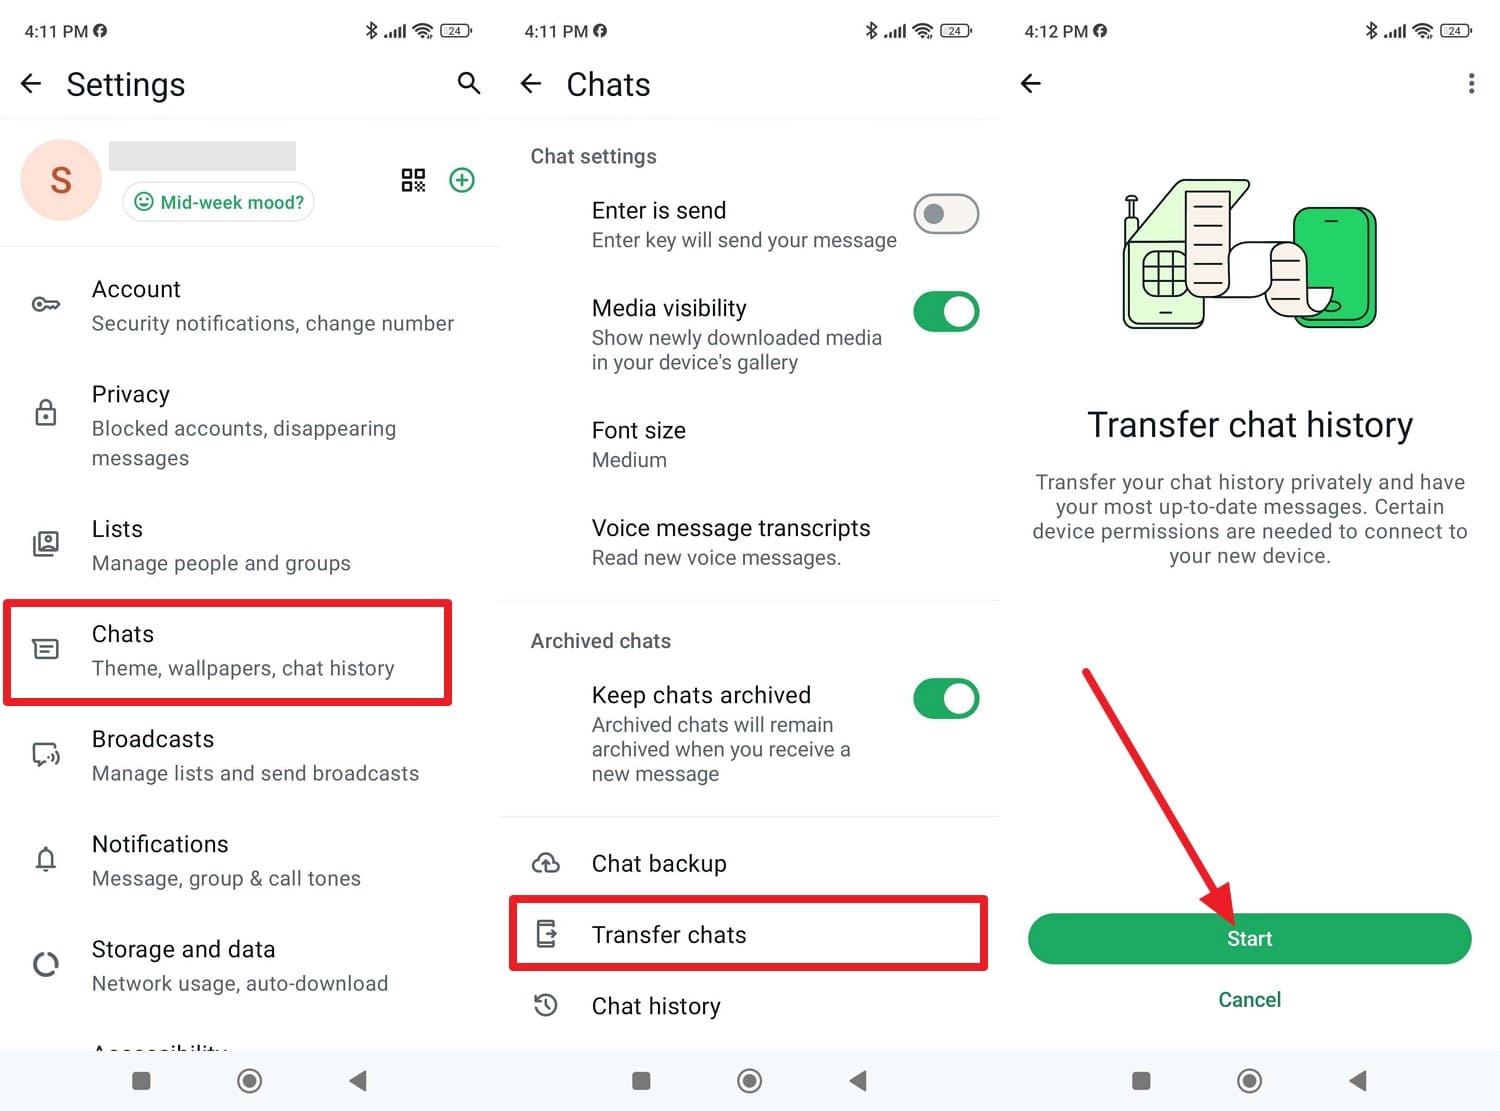
Step 1 In the WhatsApp settings, go to “Chats > Transfer Chats” and press the “Start” button.
-
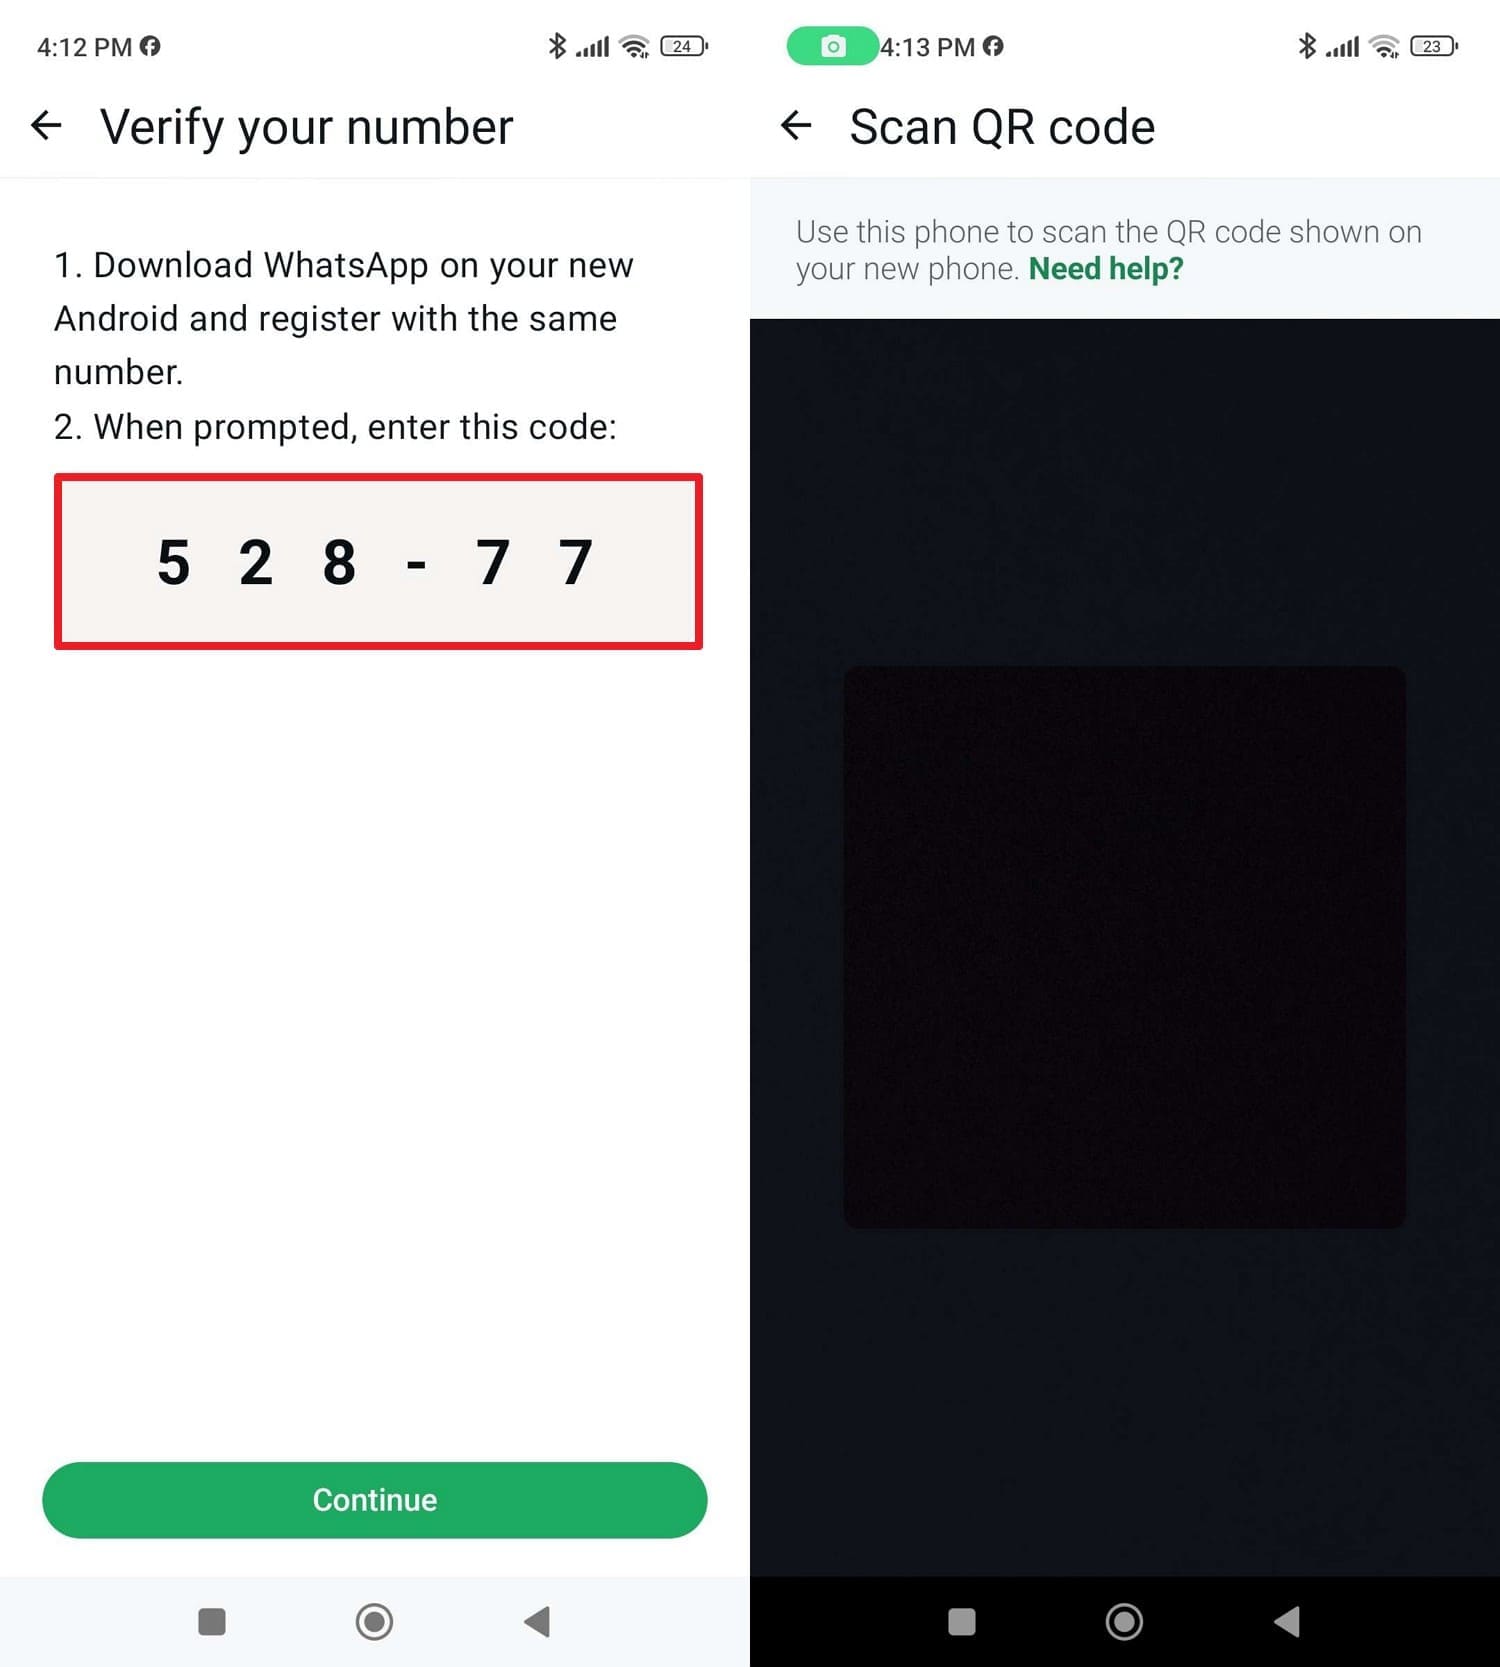
Step 2 When prompted, copy the code, install the app on Android 17, and scan the QR code with the old phone's QR code scanner.
-
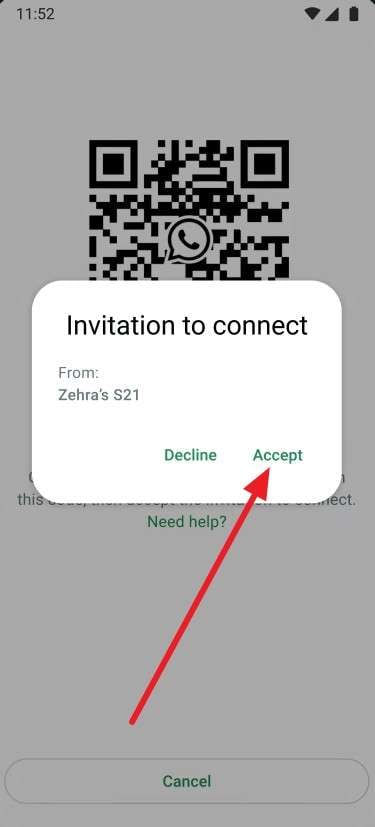
Step 3 Then, choose “Continue” on the old device and “Accept” on Android 17. The chat moving slider will appear on the old phone, and as it ends, tap “Done” on Android 17 to conclude the process.
Way 2. Use Manufacturer Tools (Samsung Smart Switch, etc.)
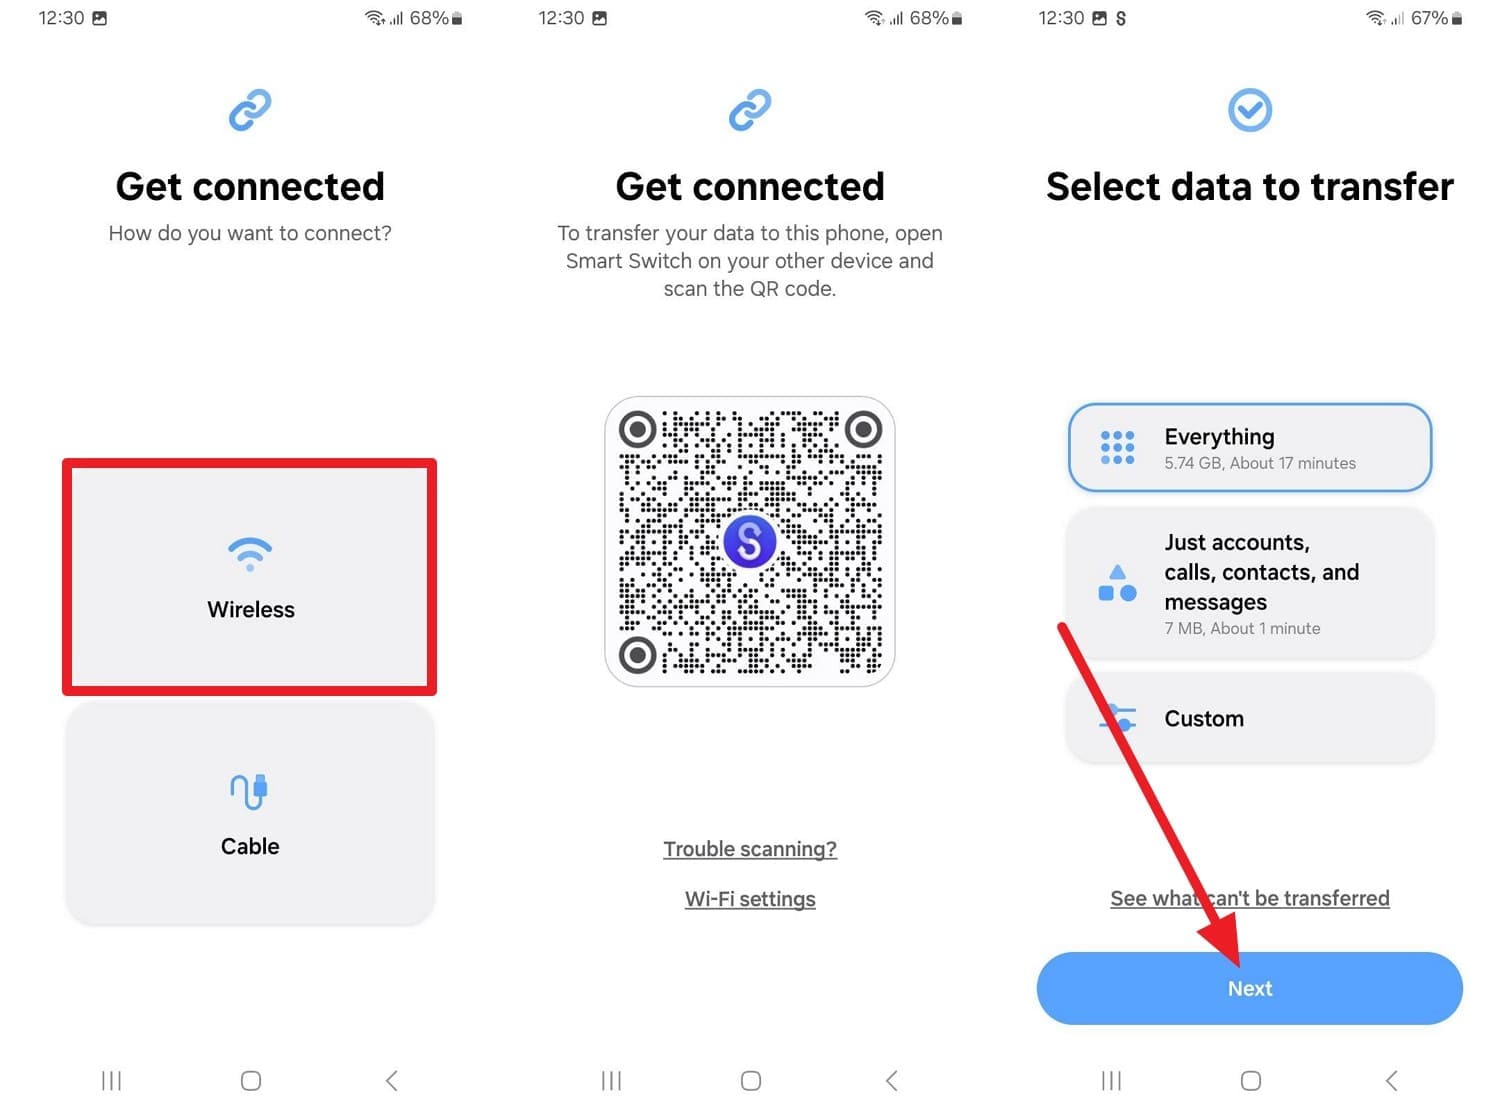
If you have Android devices (OS 5.0 or higher) or a Samsung Galaxy device, use the Samsung SmartSwitch app to switch to Android 17. The application gives you wired and wireless options, and you can move data in bulk via the given guide:
-
Step 1 To move data from Redmi, install the app on both phones and choose “Wireless” on Redmi to access the QR Code scanner.
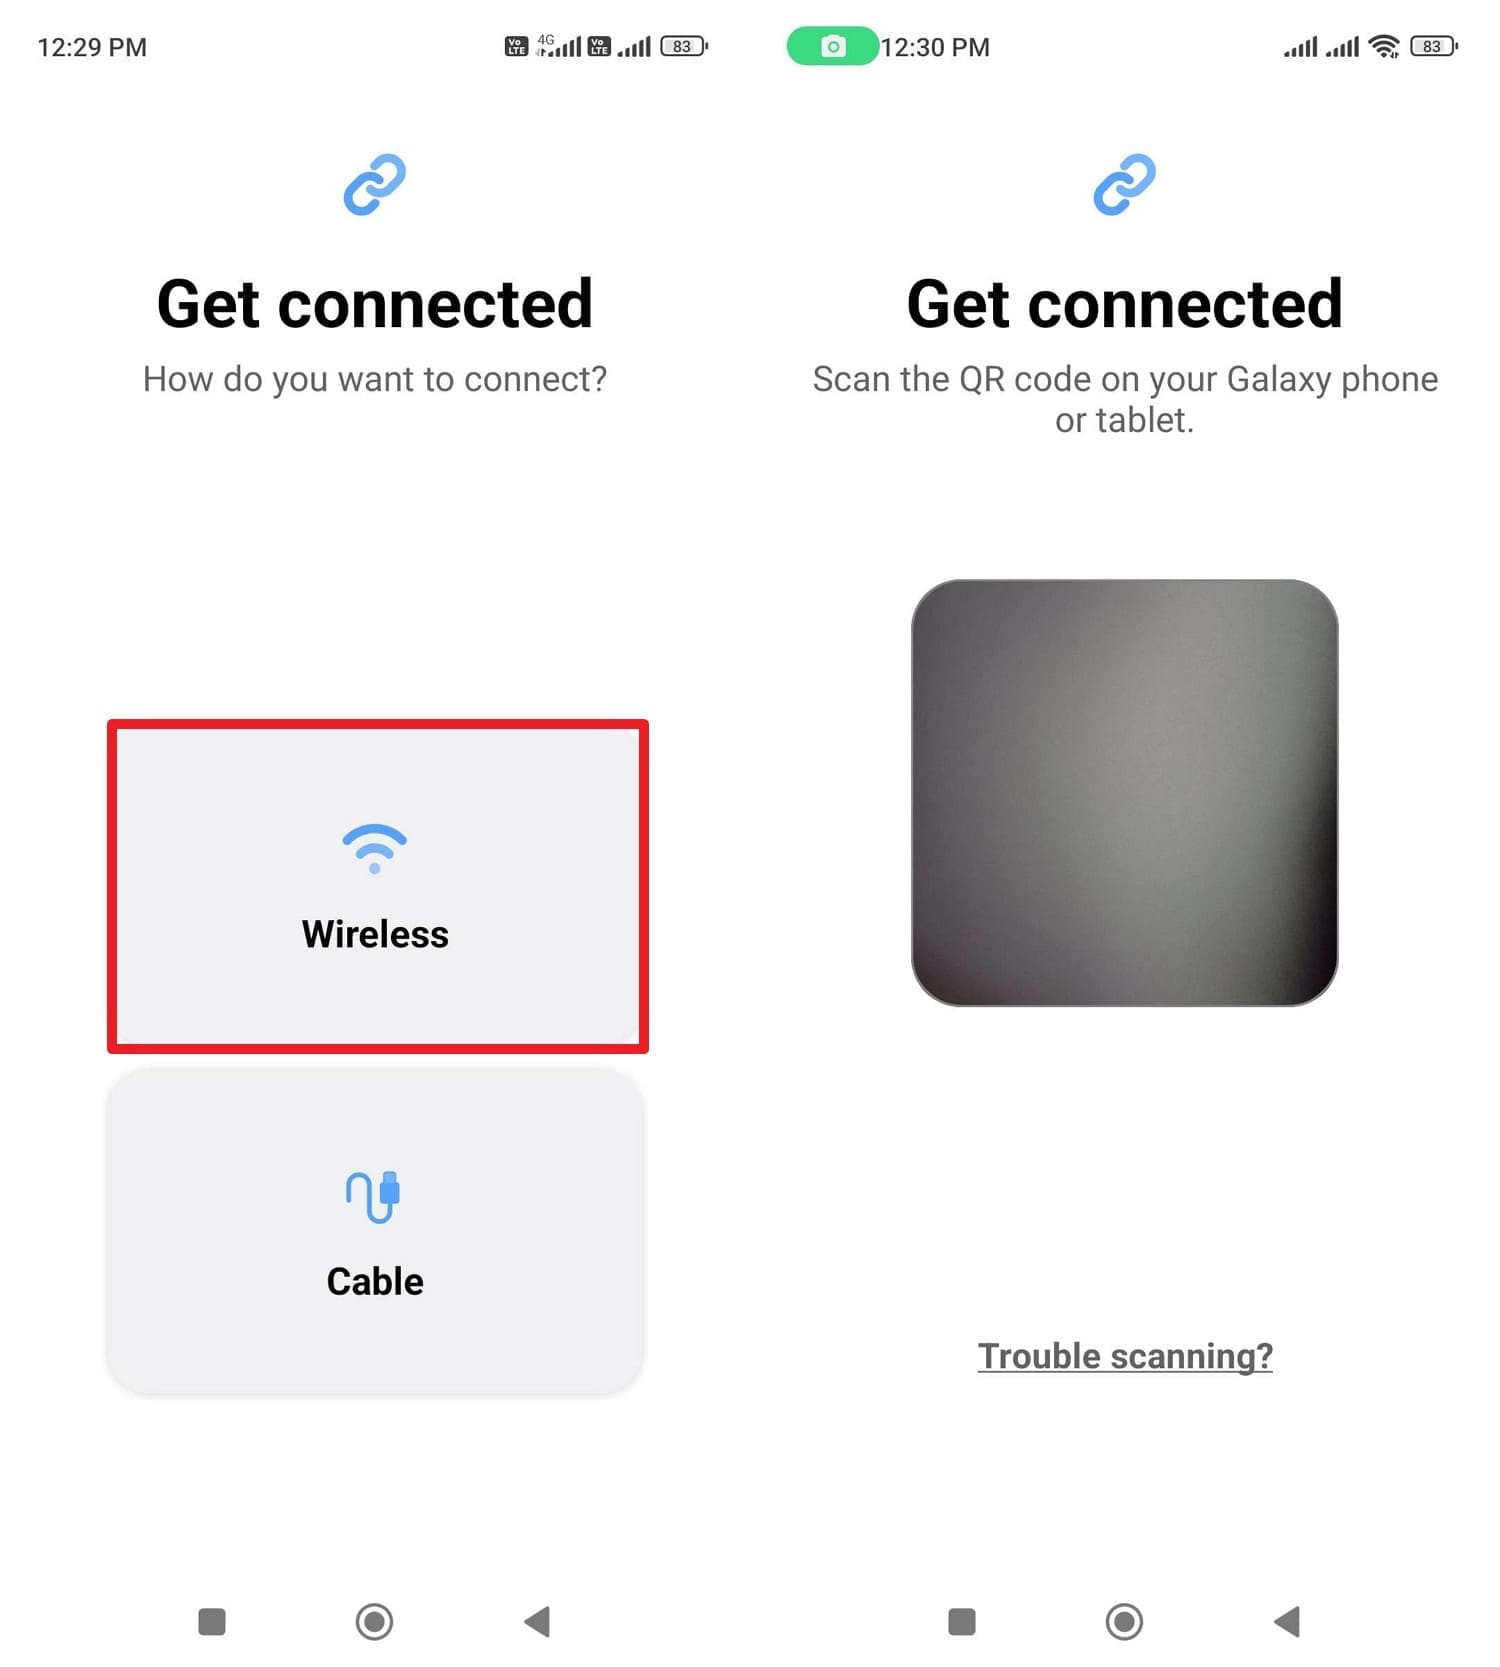
-
Step 2 Tap “Receive On This Phone” on Android 17 and confirm the sender device by pressing “Galaxy/Android.”
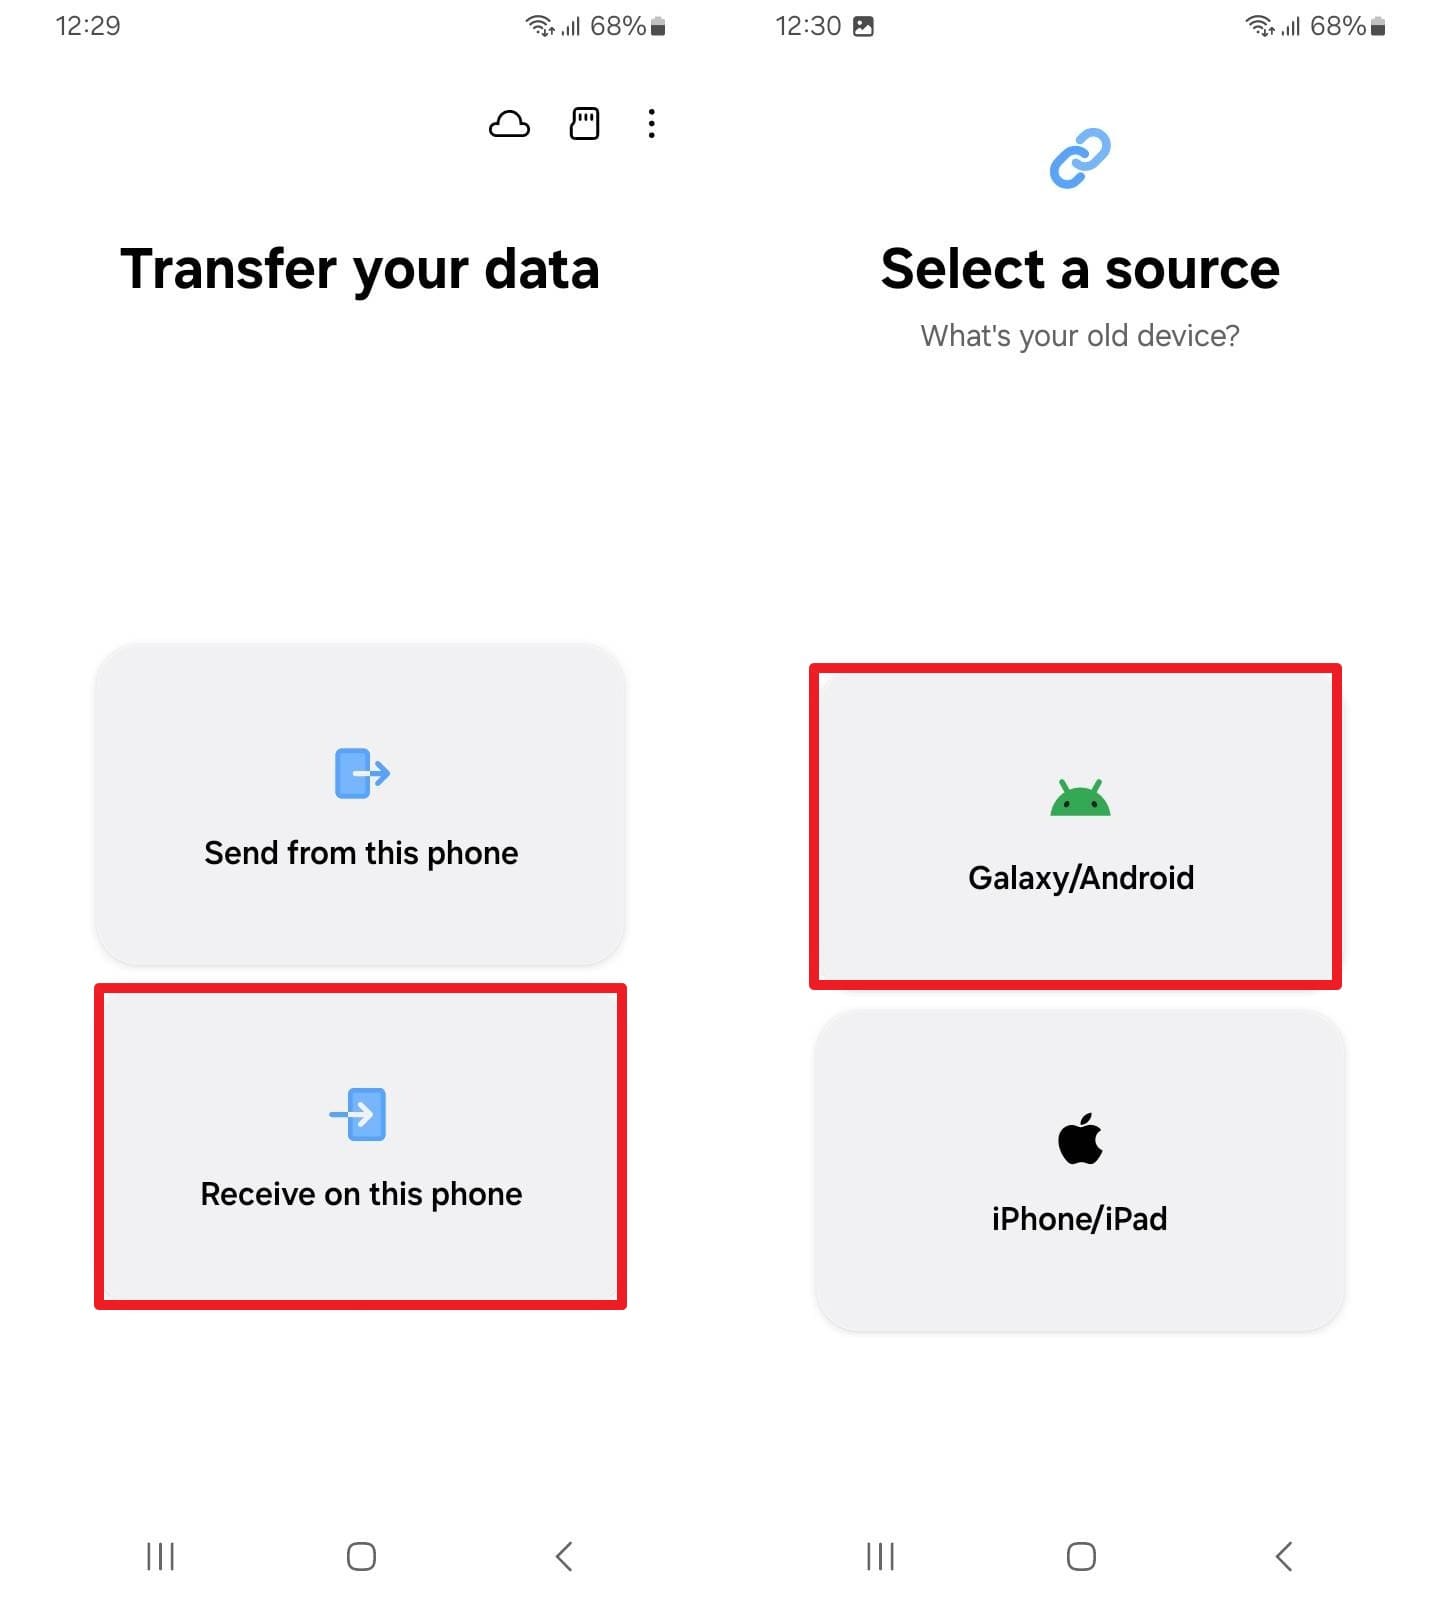
-
Step 3 On Android 17, pick the “Wireless” option and scan the QR code from Redmi. Pick custom or everything as the data type, then tap the “Next” button to start the process.
Advanced All‑in‑One Transfer Options
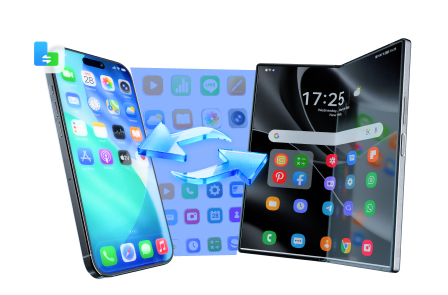
Let’s say you want a one-click method to move data to Android 17 that doesn’t need too many options to navigate. In this case, you can rely on Dr.Fone - Phone Transfer to move the data from Android to Android 17 or from iOS to Android 17. Regardless of the transfer direction, the tool is compatible with Android 16 and the latest iOS 26 version and moves data in 3 simple steps.
Additionally, users can use it to share 18+ file types and maintain data integrity during transfers. Since the method is USB-based, you just need to connect the device and choose data types, making it ideal for novices. Moreover, the Flip icon makes it easy to identify the devices, and no extra setup or sign-in is needed.
 Move data between iOS to Android and vice versa.
- Transfer contacts, SMS, photos, videos, music, and more types.
- Available with all phones with Android and iOS versions.
- Simple, click-through process.
How to Move the Data from Android to Android 17 via Dr.Fone?
To determine the accuracy of all claims, let’s perform a real-world test to switch to Android 17:
-
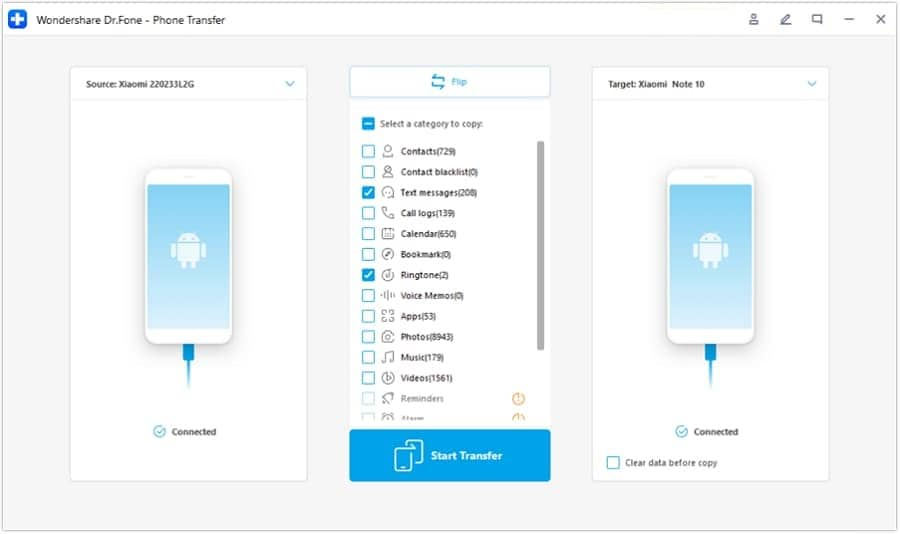
Step 1 Access the Phone Transfer Tool
In the Phone Transfer tool, connect the devices and use the “Flip” icon to select the source and destination devices.

-
Step 2 Choose the Data Types to Move
Select from 18 data types you want to move and press the “Start Transfer” button.
-
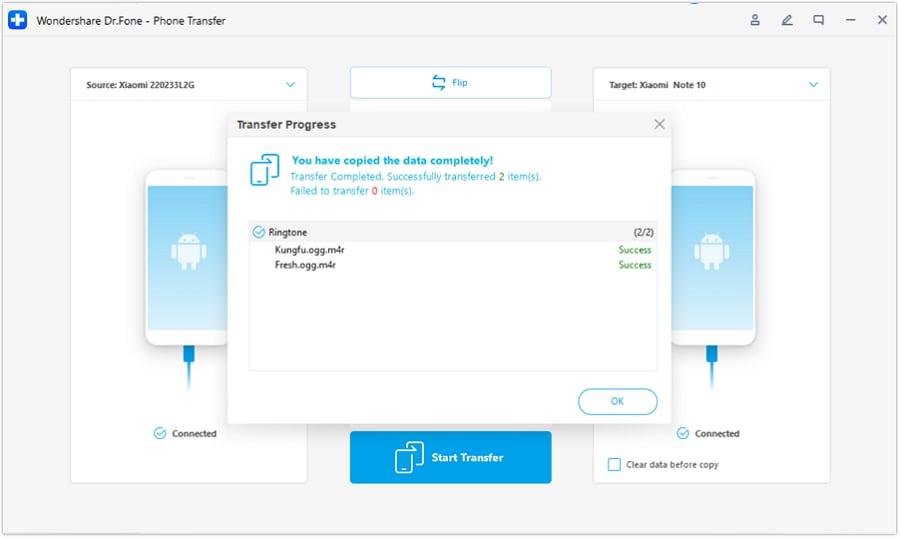
Step 3 Press Ok to End the Process
When the “Copying Data” slider ends, choose the “OK” button on the popup menu to conclude.


Part 3. How to Prevent Data Loss During Android 17 Setup?
When you switch to Android 17, make sure to follow the listed tips for safe data sharing:
| Tip | Action to Take | Why It Matters |
|---|---|---|
| Fresh Cloud Backup | Go to Settings > Google > Backup and tap Back up now. | Saves your latest texts, contacts, and settings. |
| Backup WhatsApp | Go to WhatsApp > Settings > Chats and force a manual backup. | Encrypted chats are stored locally and will be left behind. |
| Charge & Stay Awake | Charge both phones to 80%+ and set the screen timeout to 10+ minutes. | Stops the phone from sleeping or dying mid-transfer. |
| Wait 7 Days to Reset | Keep your old phone active for a week before wiping it. | Gives you time to catch missing files or app logins. |
Conclusion
To move data to Android 17, this guide has explained 10 simple methods so that you can securely move important data and benefit from Android 17 features. Setup methods can baffle novices, so tools like Dr.Fone - Phone Transfer make the move seamless in 3 simple steps. It also allows direct device-to-device transfer without relying on cloud syncing or manual file handling.
FAQ
-
1. Will everything move automatically if I just sign in with my Google account?
No, logging in to your Google account only syncs cloud data, like contacts, emails, and photos. -
2. Will my sideloaded apps automatically move over to Android 17?
No, apps downloaded outside the official Google Play Store do not transfer automatically and must be reinstalled manually. -
3. Do I need to unpair my smartwatch before switching to Android 17?
Yes, you should back up and unpair your smartwatch from your old device so it can connect smoothly to your new phone.
 Add Wondershare Dr.Fone as a preferred source on Google