
 TL;DR:
You can unprotect a Word document natively in MS Word if you know the password, while forgotten passwords require file modification workarounds or dedicated decryption software to bypass restrictions.
● To manually remove editing restrictions without a password, change the file extension to .zip, open the Settings.xml file, change the "enforcement" value from "1" to "0", and revert the extension back to .docx.
● You can also bypass unknown passwords by uploading the locked file to Google Docs and downloading it as a new Microsoft Word document, or by saving it as a Rich Text Format (.rtf) file and replacing the "passwordhash" string with "nopassword" using Notepad.
● For strict open-password locks, Dr.Fone - DocPassRemover uses Brute Force Decryption to recover 3 to 16-character passwords, while online services like LostMyPass recover weak passwords instantly but require up to 24 hours for stronger encryption.
Ask AI for a summary
 ChatGPT
 Perplexity
 Gemini
 Claude
 Grok
Grok
A lot of users face the problem of not being able to edit or view Word documents because they are locked. Many times, the document was protected long ago, and the password is now forgotten. Other times, users receive a file from someone else and can’t make changes to it. This can be annoying, especially when you need to view or update the files quickly.
Fortunately, several quick and easy solutions are available that help you unlock your protected files. Thus, this article explores all possible ways to learn how to unprotect a Word document effortlessly. Even if you know the password or not, this guide will walk you through every method that works.
In this article
Part 1. How to Unprotect a Word Document Using MS Word
Moving towards the solution, opting for MS Word is the best option when you want to learn how to unprotect a Word doc. This section will show simple steps you can follow using Word, whether you know the password or not:
Way 1. Remove Editing Restrictions with Known Password
When you have the correct password, you can remove editing limits directly in Microsoft Word. Notably, it works well for documents where editing is blocked, but the password is available. Hence, follow the quick steps below to learn how to unprotect a Word file by removing restrictions through the password:
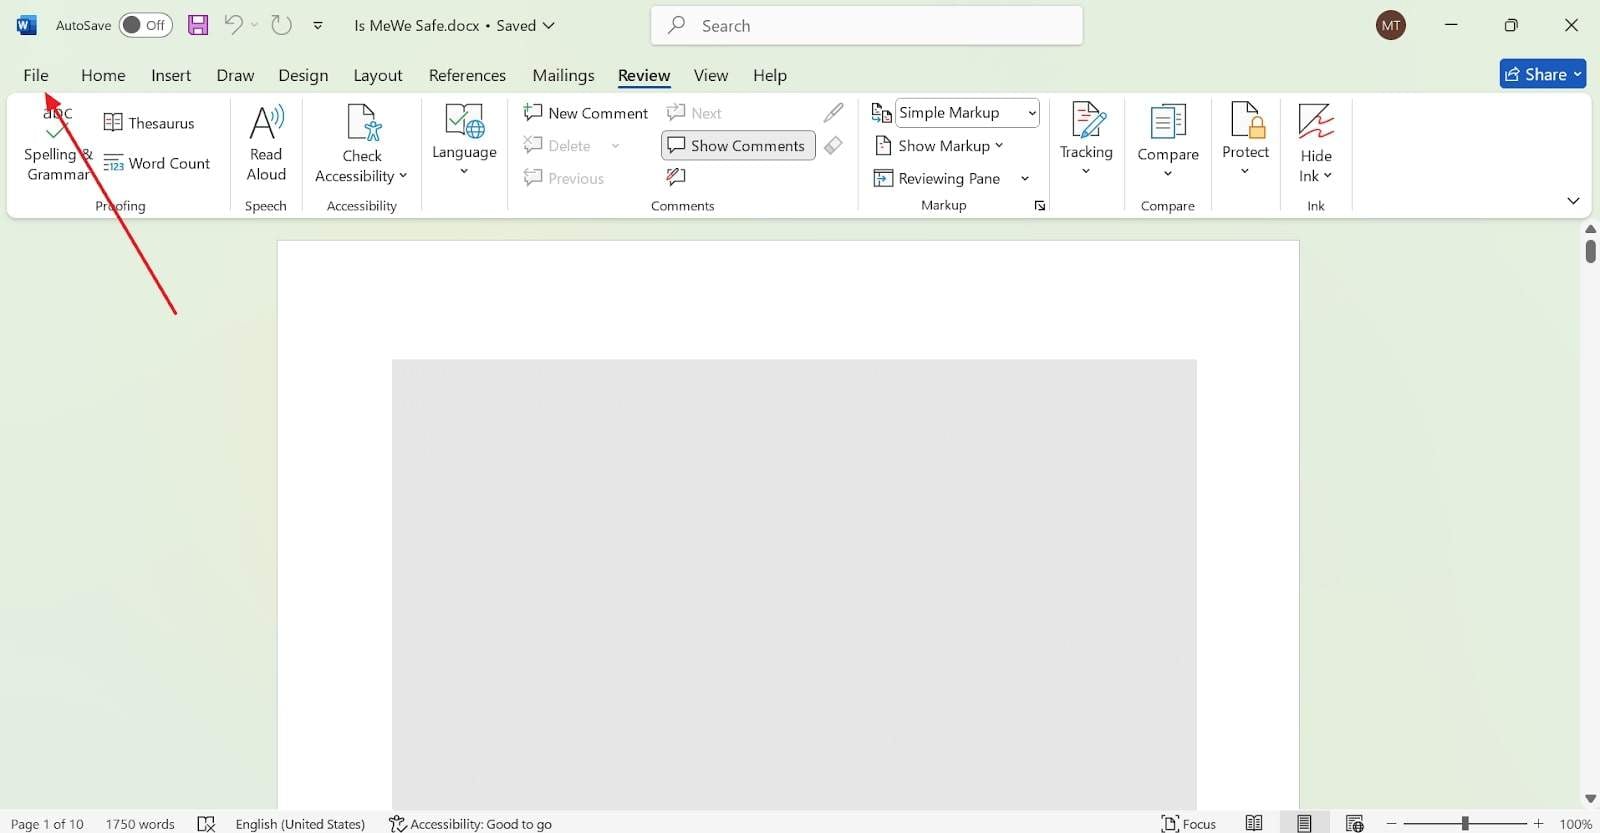
Step 1 Access Word Restrict Editing Settings
To initiate, launch the protected document in the "Word" app and navigate to the "Review" tab. After that, click the "Protect" drop-down feature and opt for the "Restrict Editing" option.
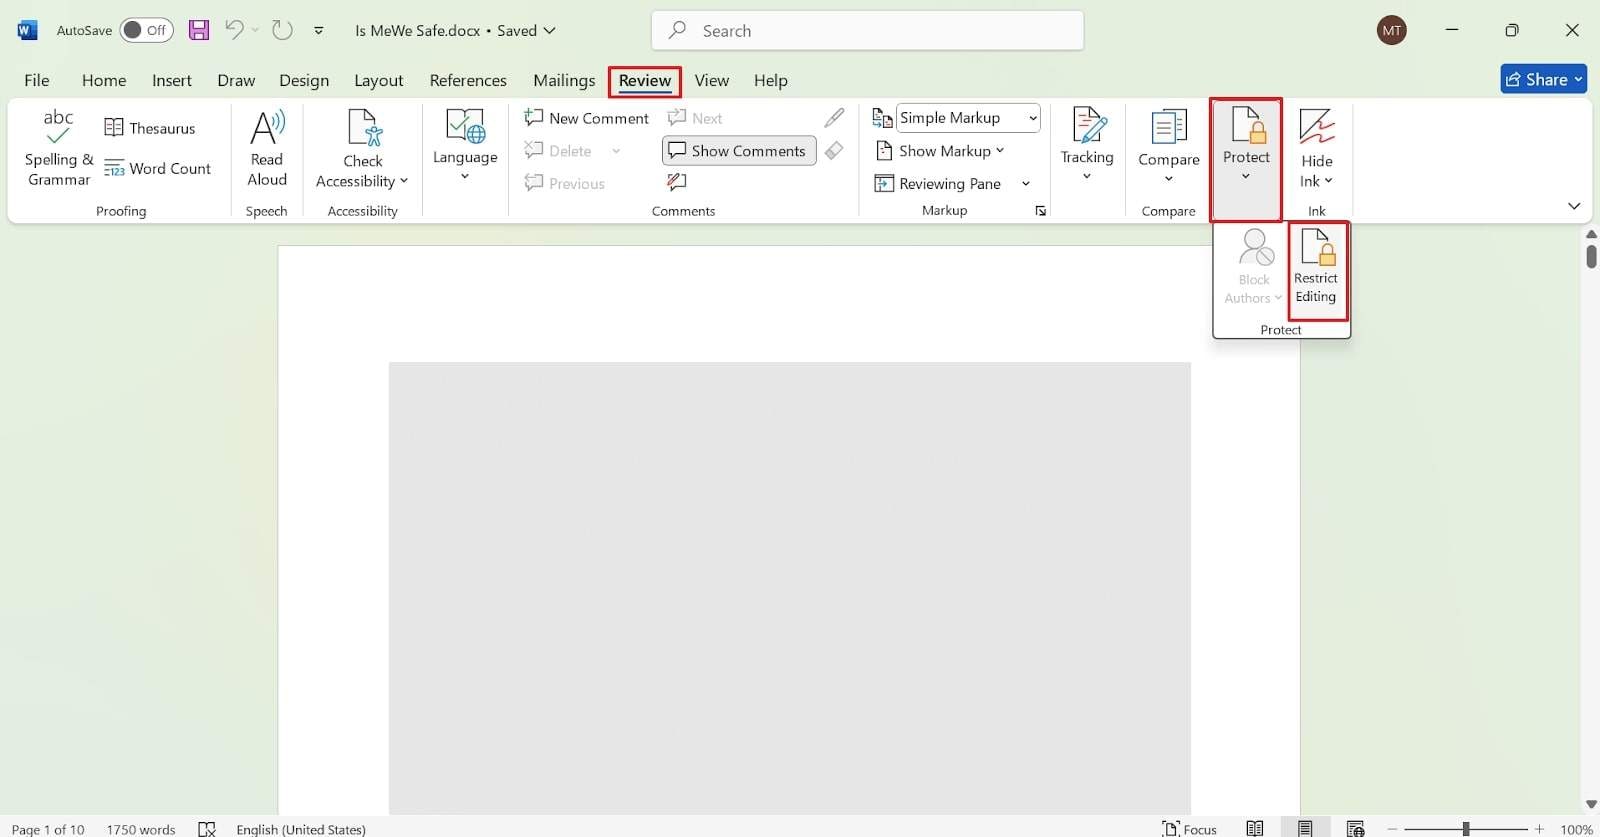
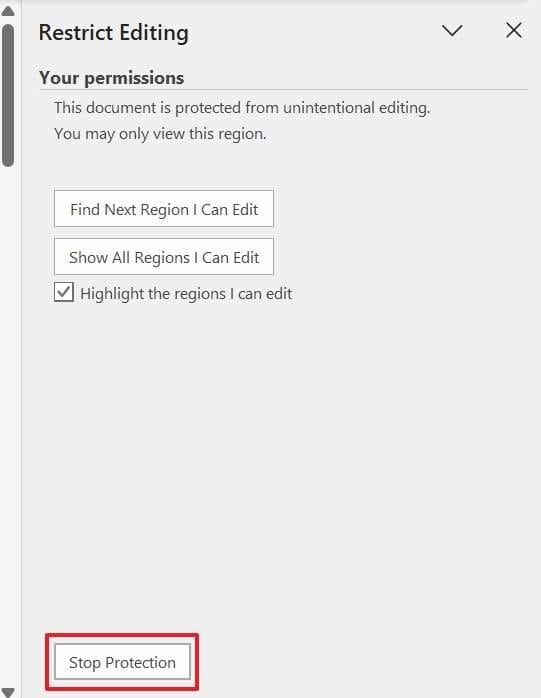
Step 2 Click Stop Protection Button
Upon seeing a new pane on your screen, press the "Stop Protection" button.
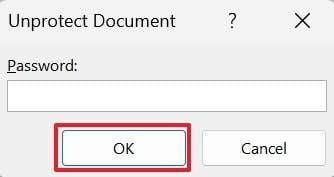
Step 3 Enter Password and Confirm
Following that, enter the password in the upcoming dialogue box and hit the "OK" button to unprotect the file.
Way 2. Remove Open Password
If your file asks for a password before it even opens, this method helps remove it from the Info tab. It's useful when you know the password and want to unlock the file permanently through Encrypt with Password option. Hence, go through the steps below to understand how to unprotect document in Word when access is blocked at the start:
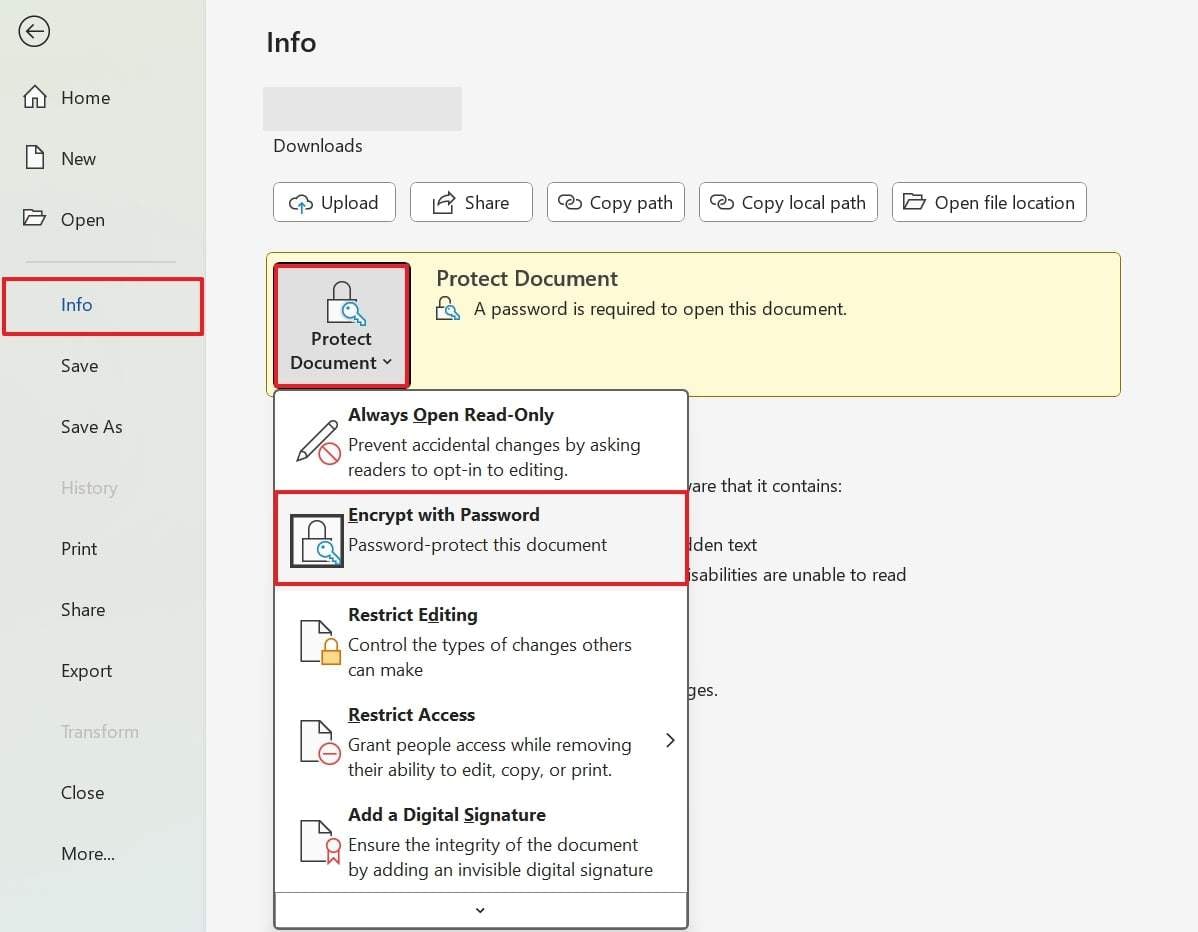
Step 1 Go to File Tab
Open the protected Word document and head to the "File" menu.
Step 2 Choose Encrypt With Password Option
Going ahead, navigate to the "Info" tab and click the "Protected Document" drop-down to choose the "Encrypt With Password" option.
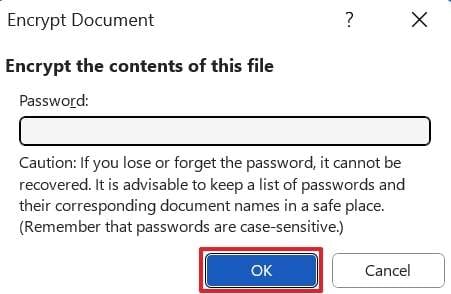
Step 3 Remove Password and Confirm
When you access its dialogue box, remove the password and press the "OK" button.
Pro Tip. How to Unprotect a Word Document Without a Password: Dr.Fone - DocPassRemover
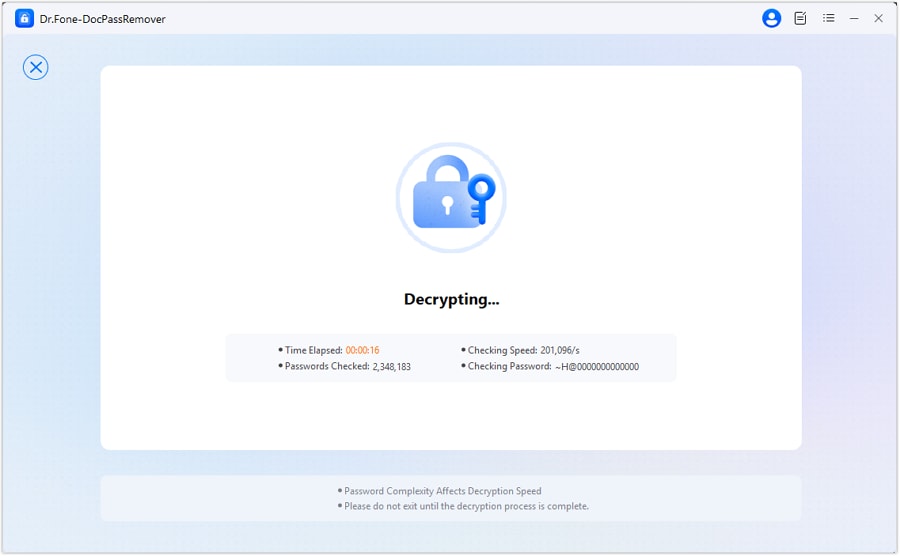
When you've lost or forgotten the password, you cannot open the file or enable restrictions by using the above two methods. In such cases, Dr.Fone - DocPassRemover offers a smart and secure way to unprotect Word documents without a password. This tool can unlock even complex file protection without damaging your content or changing its layout. It uses advanced methods like Brute Force Decryption to break through different types of password protection.
The program tries every possible combination using a smart engine that can run 680,000 attempts per second. Plus, it supports passwords with 3 to 16 characters and works with many types of encryptions. The tool also uses AI to speed up the unlocking process. If the password is simple, it uses quicker methods like Dictionary Attack or Combined Decryption.
Dr.Fone - DocPassRemover
Decrypt open passwords, remove restrictions & passwords - all in one go!
- Convert secured PDF to PDF even if you don't know the open password.
- The "Remove Password" feature is free when the password is already known.
- Automatically detects the PDF file's name, location, and specific lock status.
- Removes permission restrictions like editing, printing, and copying.
- Clean and easy interface, perfect for all users—no technical skills needed.
Detailed Guide to Unprotect a Word Document Without a Password
After exploring the top features of this tool, adhere to the given steps to learn how to unprotect a Word file without a password:
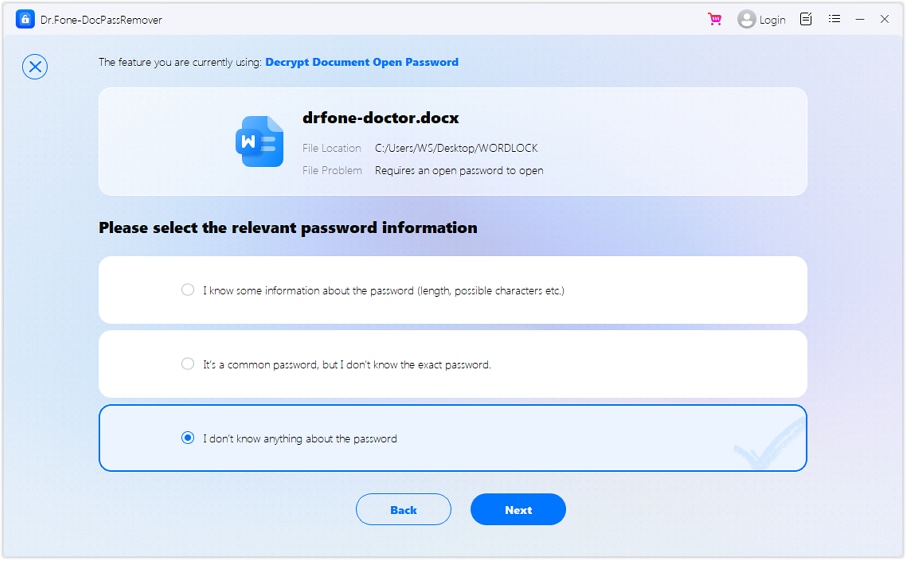
Step 1. Access Dr.Fone to Unprotect Your Word Document
Start by opening the tool and importing your locked file using the "Select the File" button. Then, choose the password removal feature, select the option that says "I Don't Think Anything About the Password," and click "Next" to proceed.
Step 2. Select the Brute Force Decryption to Unlock the Protected File
Following that, opt for the "Brute Force Decryption" mode from the list of available methods and hit the "Next" button.
Step 3. Effortlessly Unprotect Your Word Document
At this point, Dr.Fone will begin scanning and trying various password combinations automatically to unlock the document.
Part 2. How to Unprotect a Word Document Using Alternative Approaches
Apart from the above-dedicated solution, various other ways are available to unprotect your document when you don't have a password. Thus, the following section provides you with 3 other ways to learn how to unprotect a Word document effortlessly:
Method 1. Convert to Rich Text Format (RTF) and Modify
This method helps you unprotect Word doc without password by converting it to a different file type. Upon saving the document as Rich Text Format (RTF), it lets you remove the password from your file. Hence, let's dive below to find out how you can convert your document effortlessly and unprotect it:
Step 1 Save File in This PC
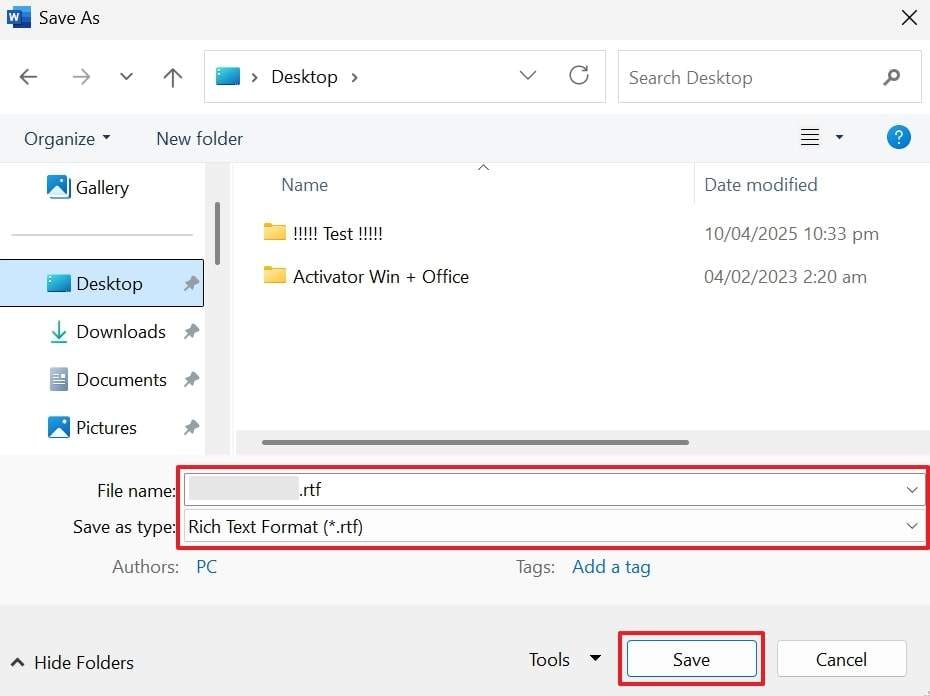
Access the protected file on Word and navigate to the "File" menu to access the "Save As" tab. Following that, select the "This PC" option under the "Other Locations" section.

Step 2 Get RTF and Click Save
Moving forward, opt for the "Rich Text Format (*.rtf)" format in the "Save As Type" drop-down and press the "Save" button.
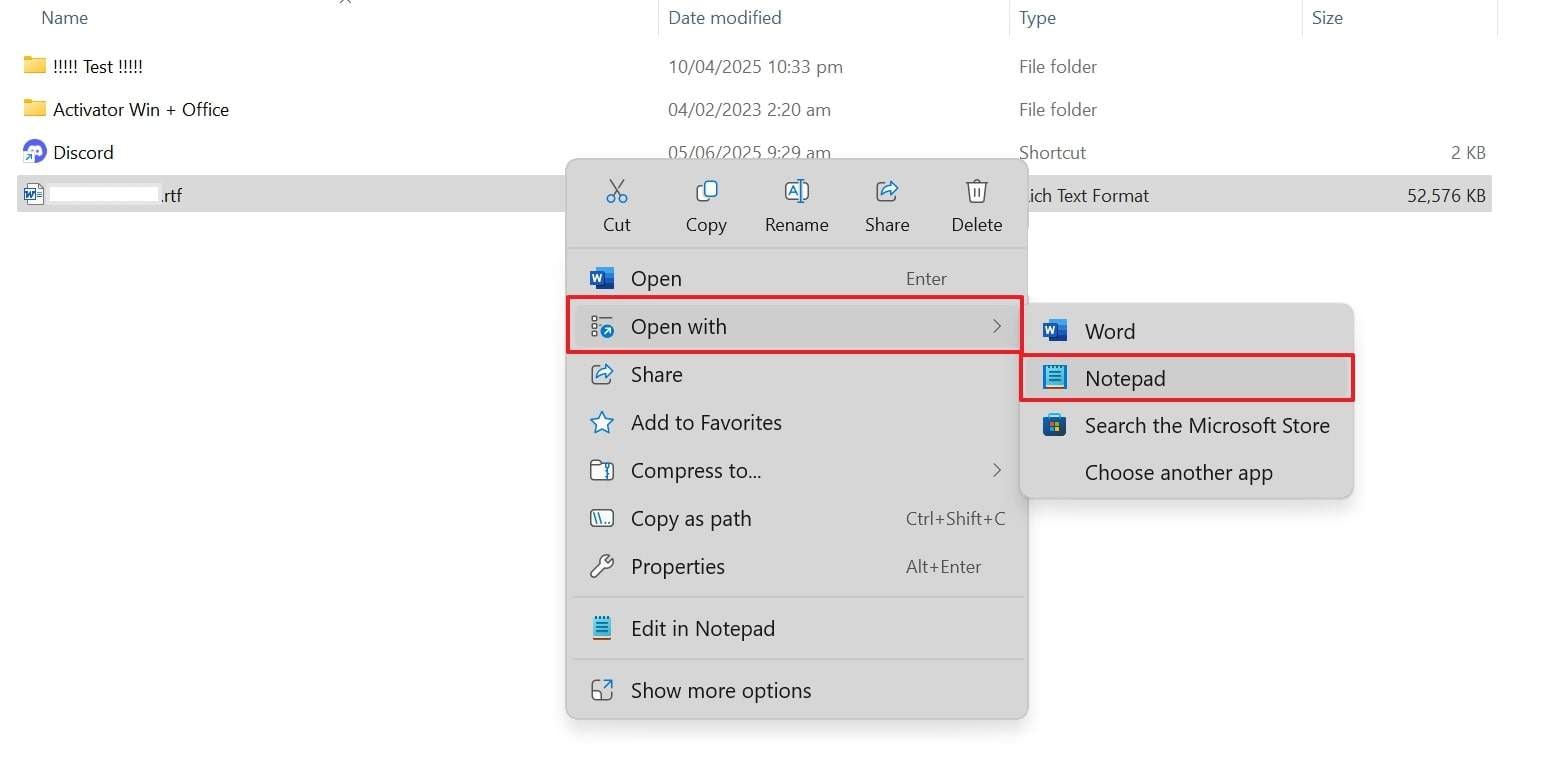
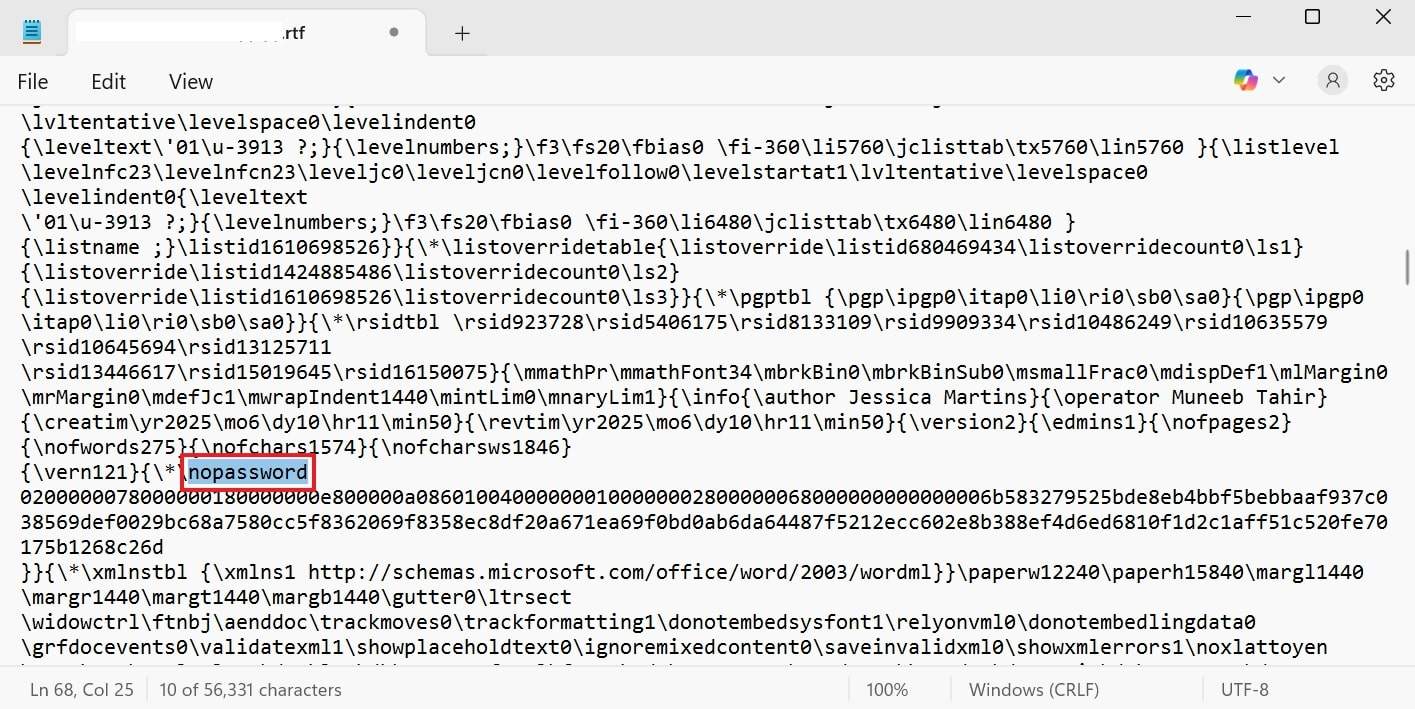
Step 3 Open With Notepad
Afterward, access the newly saved file and right-click on it to choose the "Open With" option. Subsequently, simply opt for the "Notepad" option to open the "RTF" file effortlessly.
Step 4 Browse Passwordhash Text
Upon opening it, press the "CTRL + F" keys and search for the "passwordhash" word.
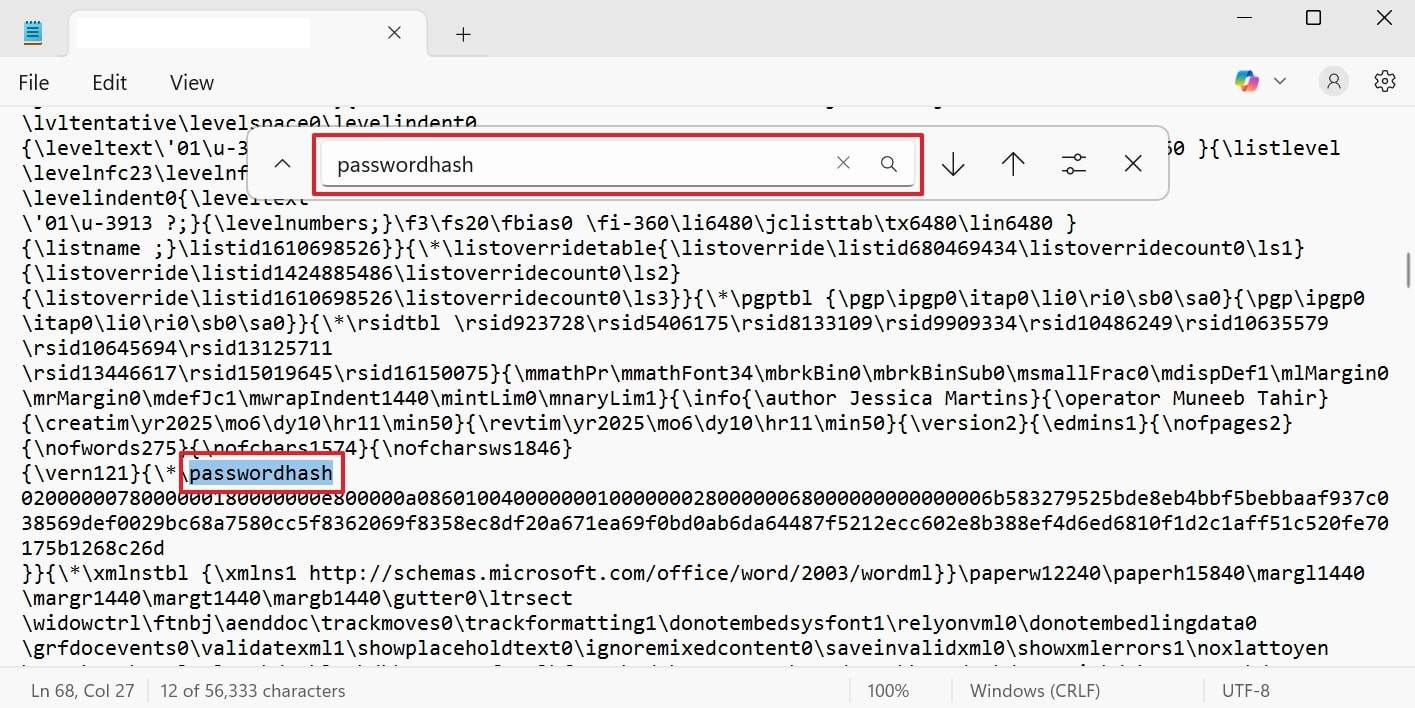
Step 5 Replace Text With Nopassword
When it appears, you need to replace it with the "nopassword" word and then save the file. At this point, open this file with "MS Word," and you will successfully unprotect it.
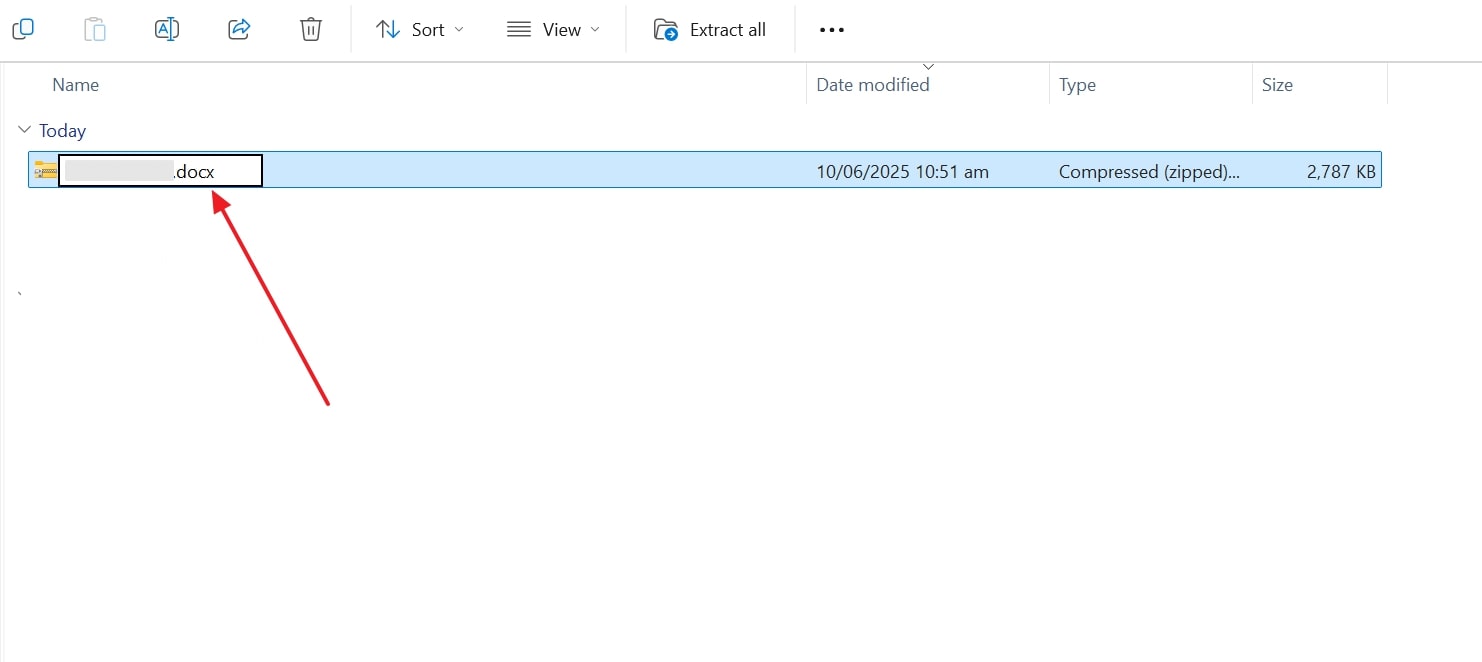
Method 2. Change File Extension to .zip and Modify XML
When you ask how do you unprotect a Word document, changing the Word file's extension to ZIP format can help. This method lets you open its folders, find the settings file, and remove the protection code. So, follow the quick and detailed steps below to find out how to unprotect your document using this approach:
Step 1 Change Word to Zip Extension
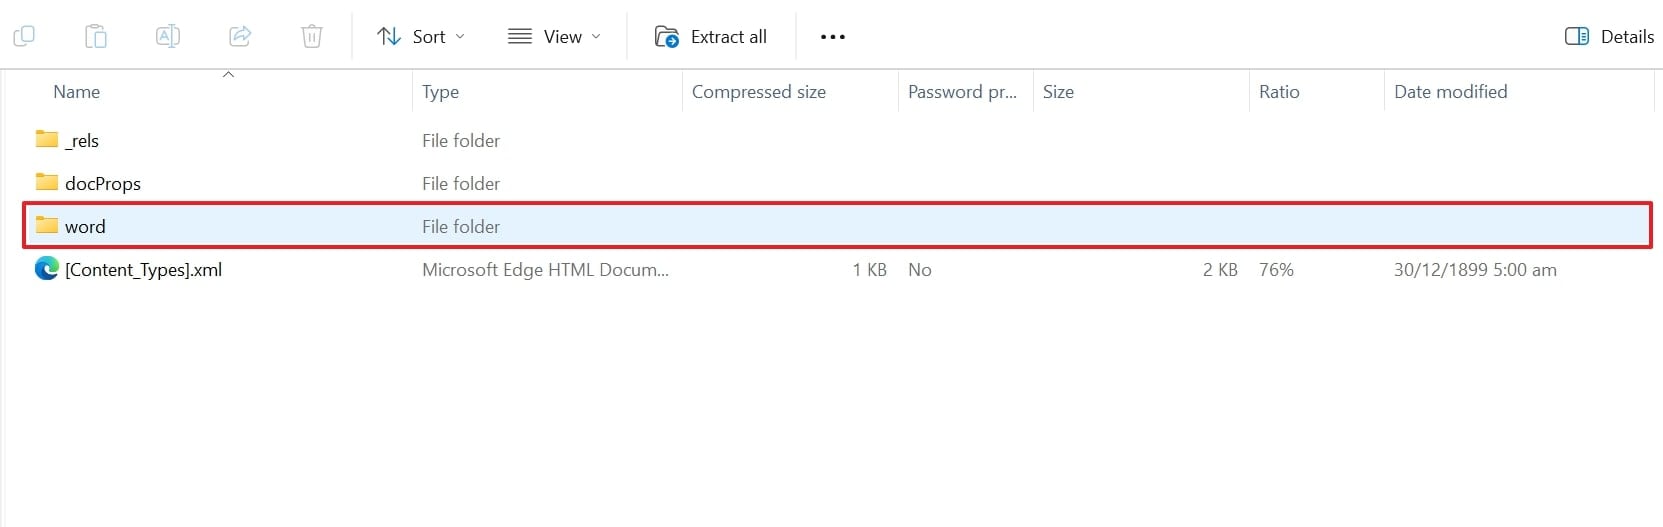
Initially, access the protected "Word" file, change its format to ".zip," and then open it.

Step 2 Enter Converted Zip
Moving forward, click the "Word" folder to open it after entering into the ZIP folder.
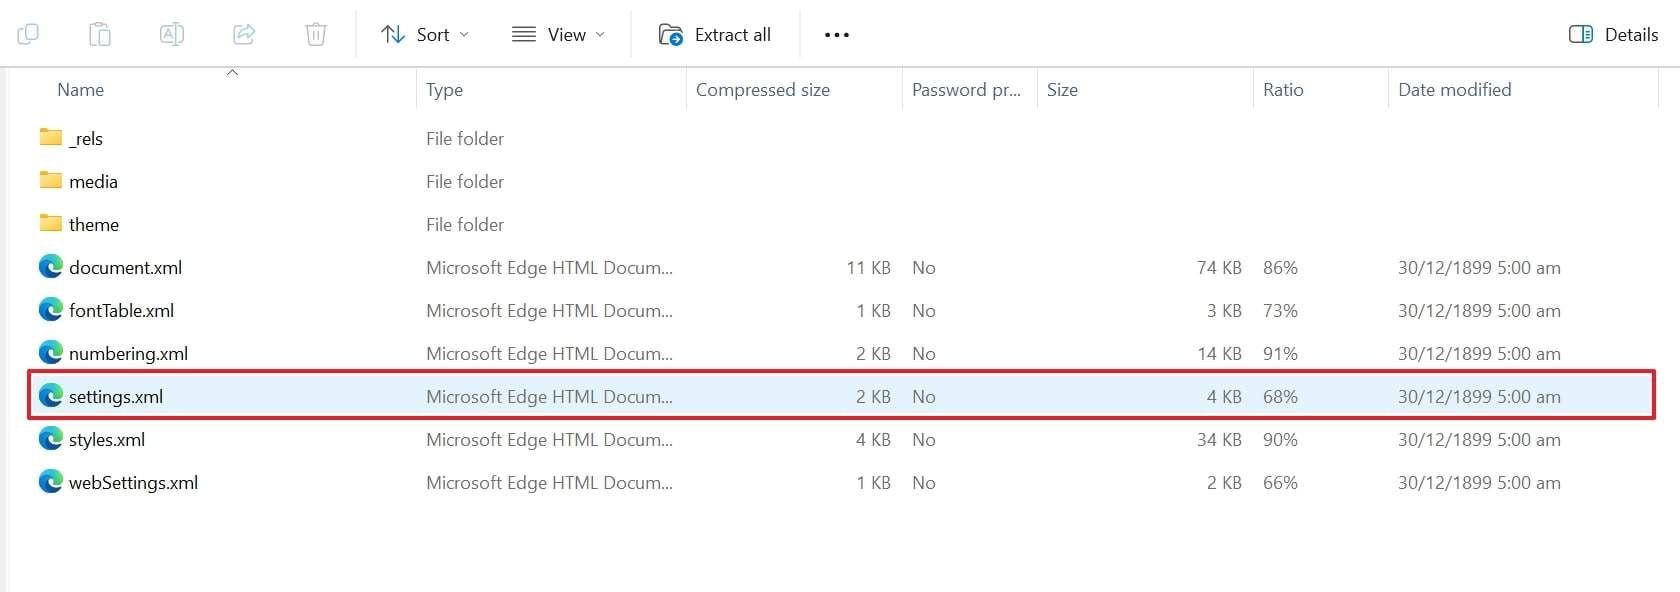
Step 3 Opt for Settings XML
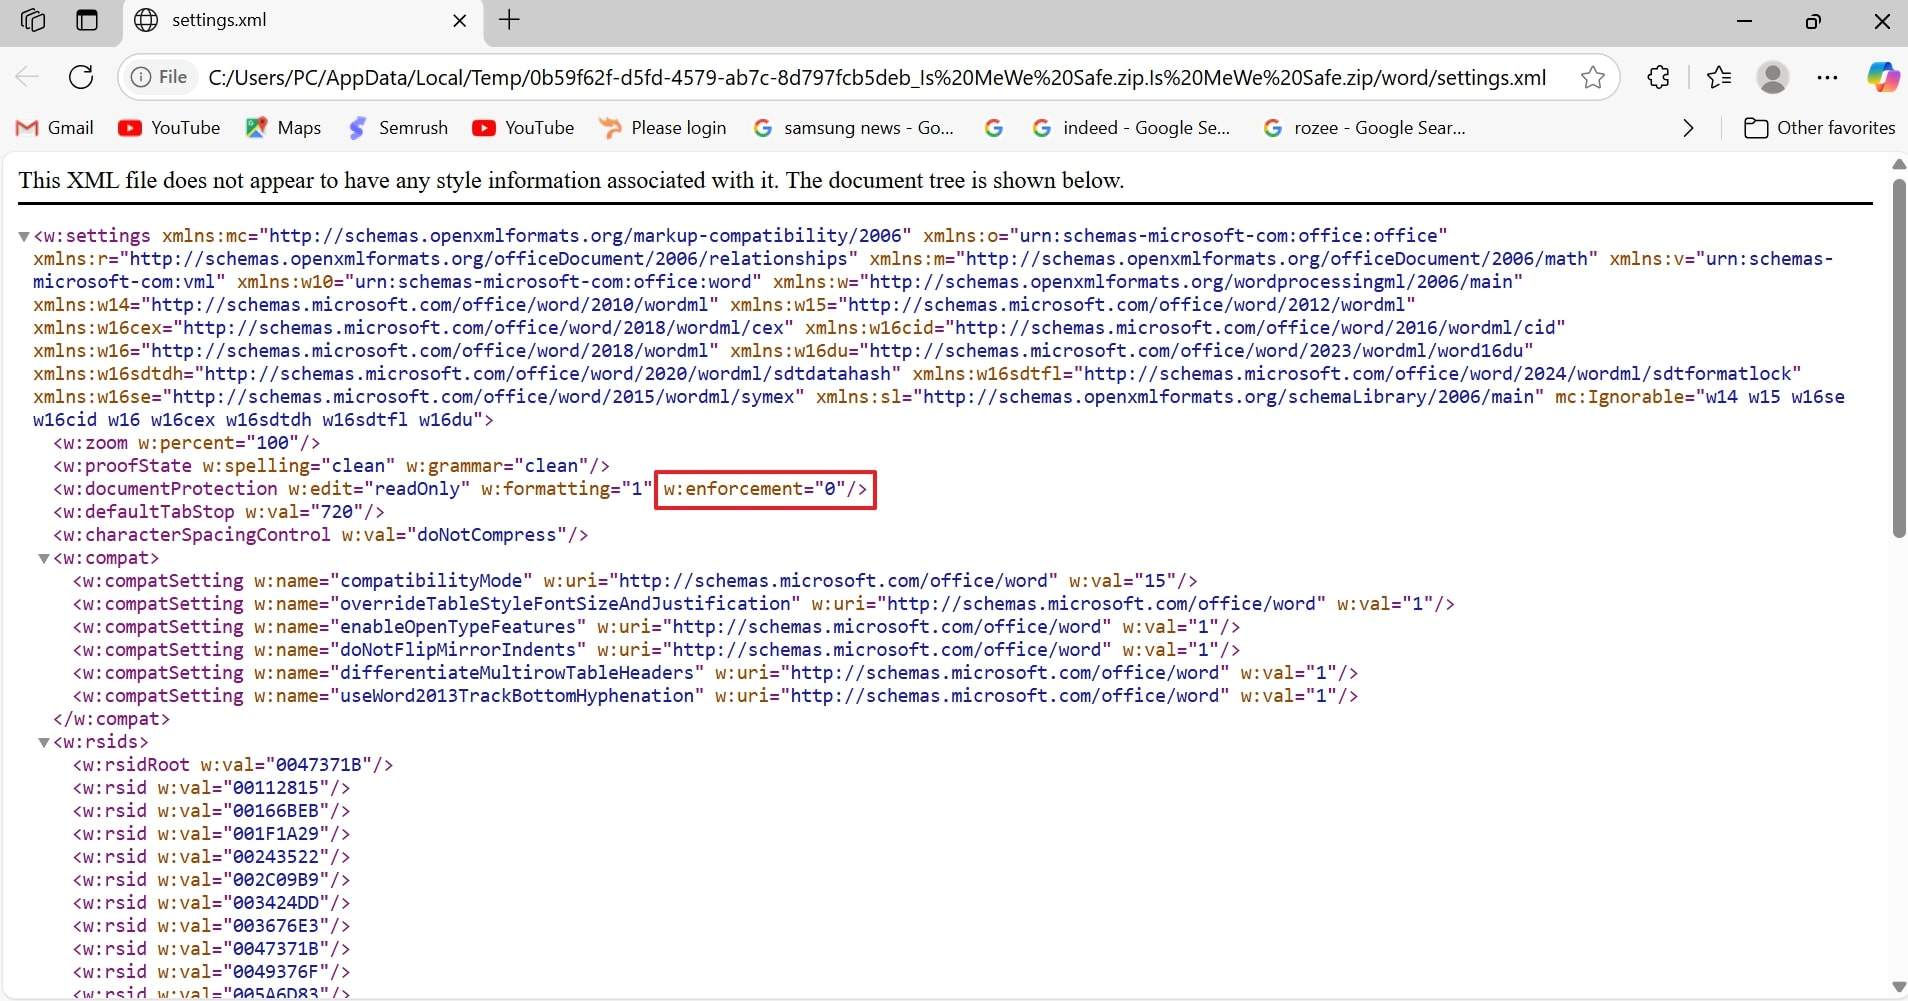
Following that, opt for the "Settings.xml" file to access its content.
Step 4 Change Enforcement Value
When accessed, change the "enforcement" value from "1" to "0" and save the Word file.
Step 5 Again Convert to Docx
Finally, head to the "ZIP" folder and now change its format to "docx" to successfully unprotect your file.
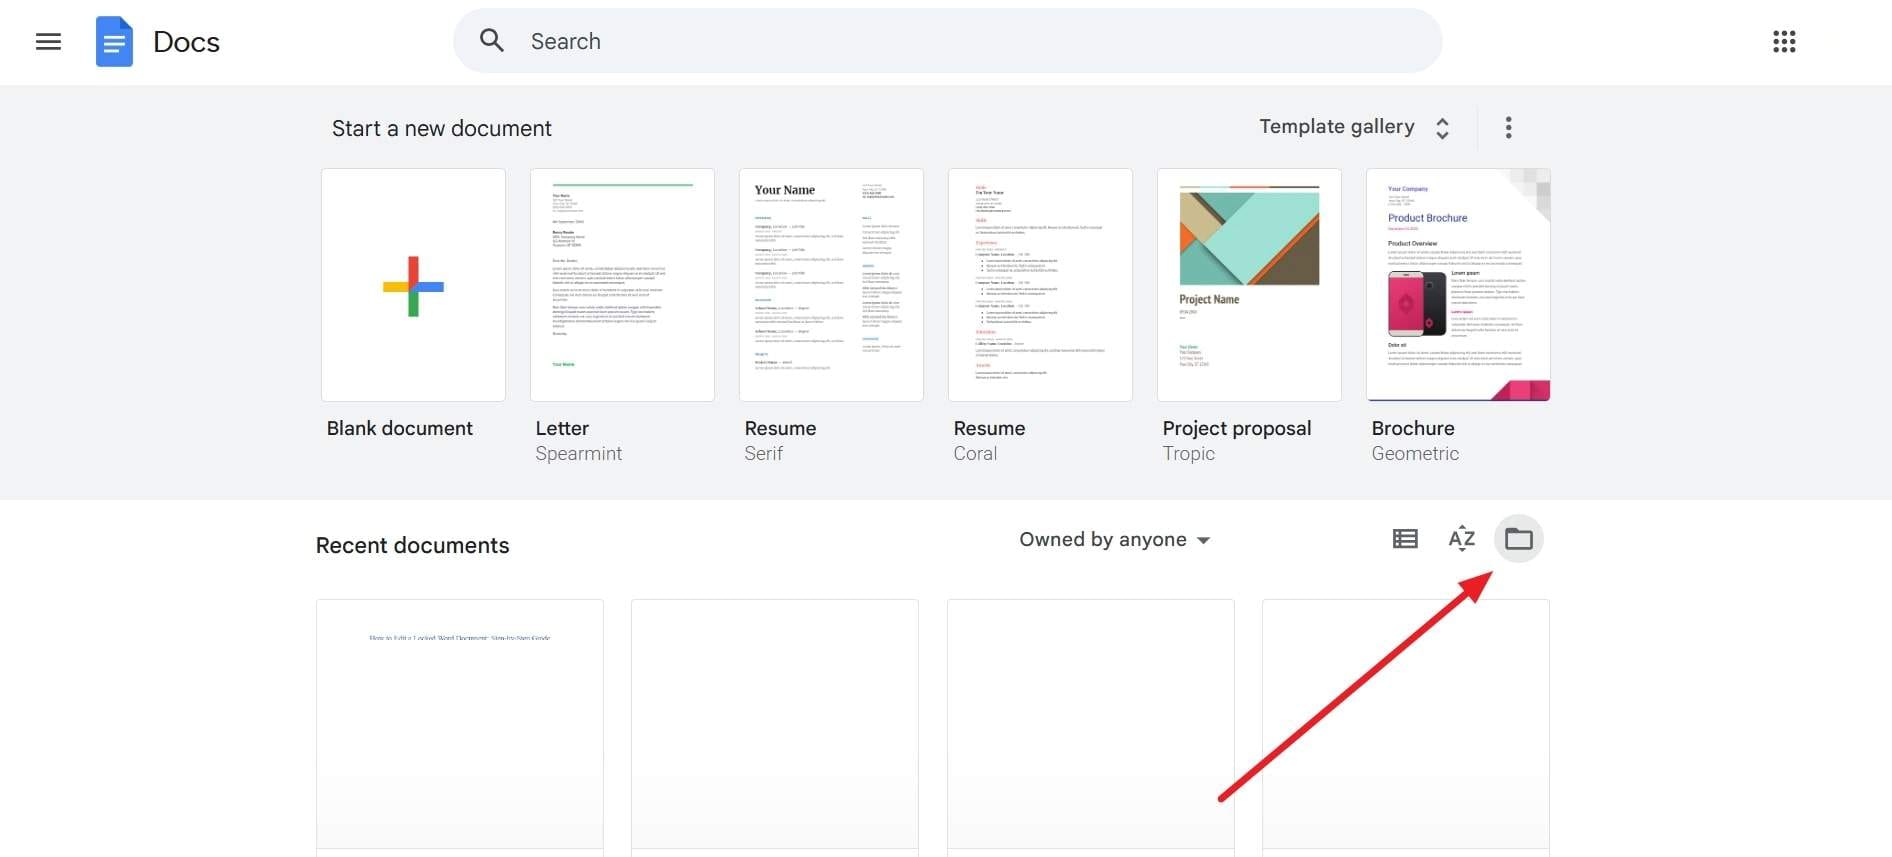
Method 3. Use Google Docs to Remove Restrictions
Another easy way to learn how to unprotect a Word doc is by using the Google Docs File option. It enables you to upload the locked document from your device or other storage and download its unprotected version. Hence, adhere to the steps below to understand the process of opting for Google Docs to remove restrictions from your file:
Step 1 Click Folder Icon on Doc
To inaugurate the task, navigate to your browser and search for the "Google Docs" website. From its main display, click the "Folder" icon in order to move further.
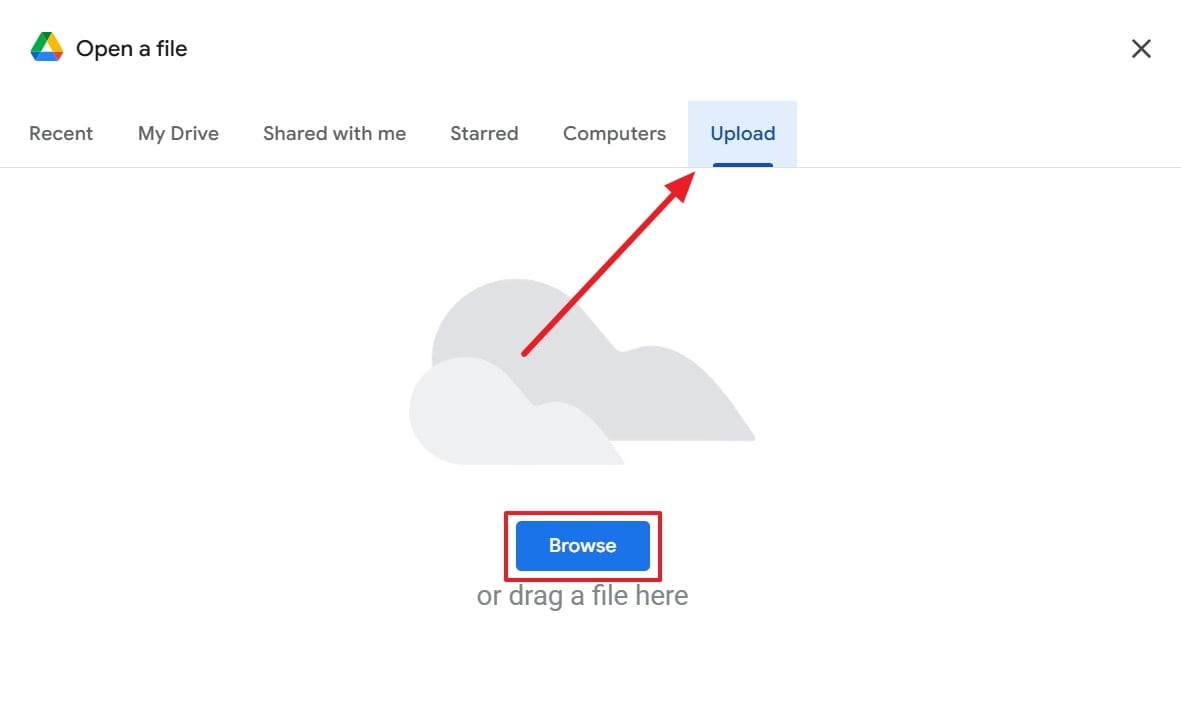
Step 2 Browse Word and Upload
When you see an "Open a File" display, head to the "Upload" section and press the "Browse" button to upload the protected document from your computer.
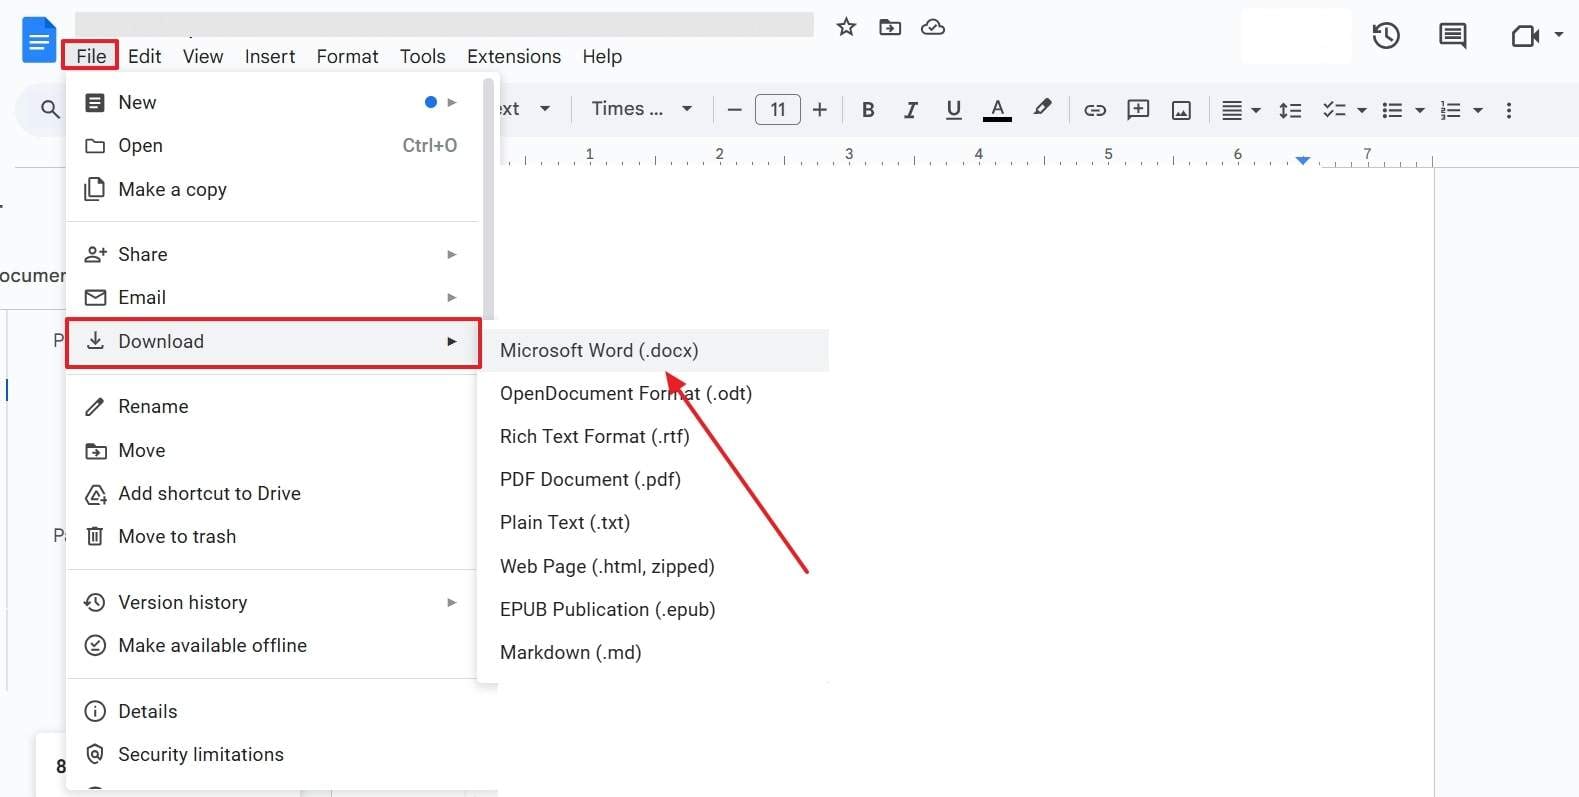
Step 3 Select Microsoft Word From Download
Once it is uploaded, click the "File" menu and opt for the "Download" option. After that, choose the "Microsoft Word (.docx)" format to save your unprotected file effortlessly.
Part 3. How to Unprotect a Word Document Using Online Tools
Besides the above solutions, a few online tools are available that let you learn how to unprotect a Word file without any hassle:
1. LostMyPass
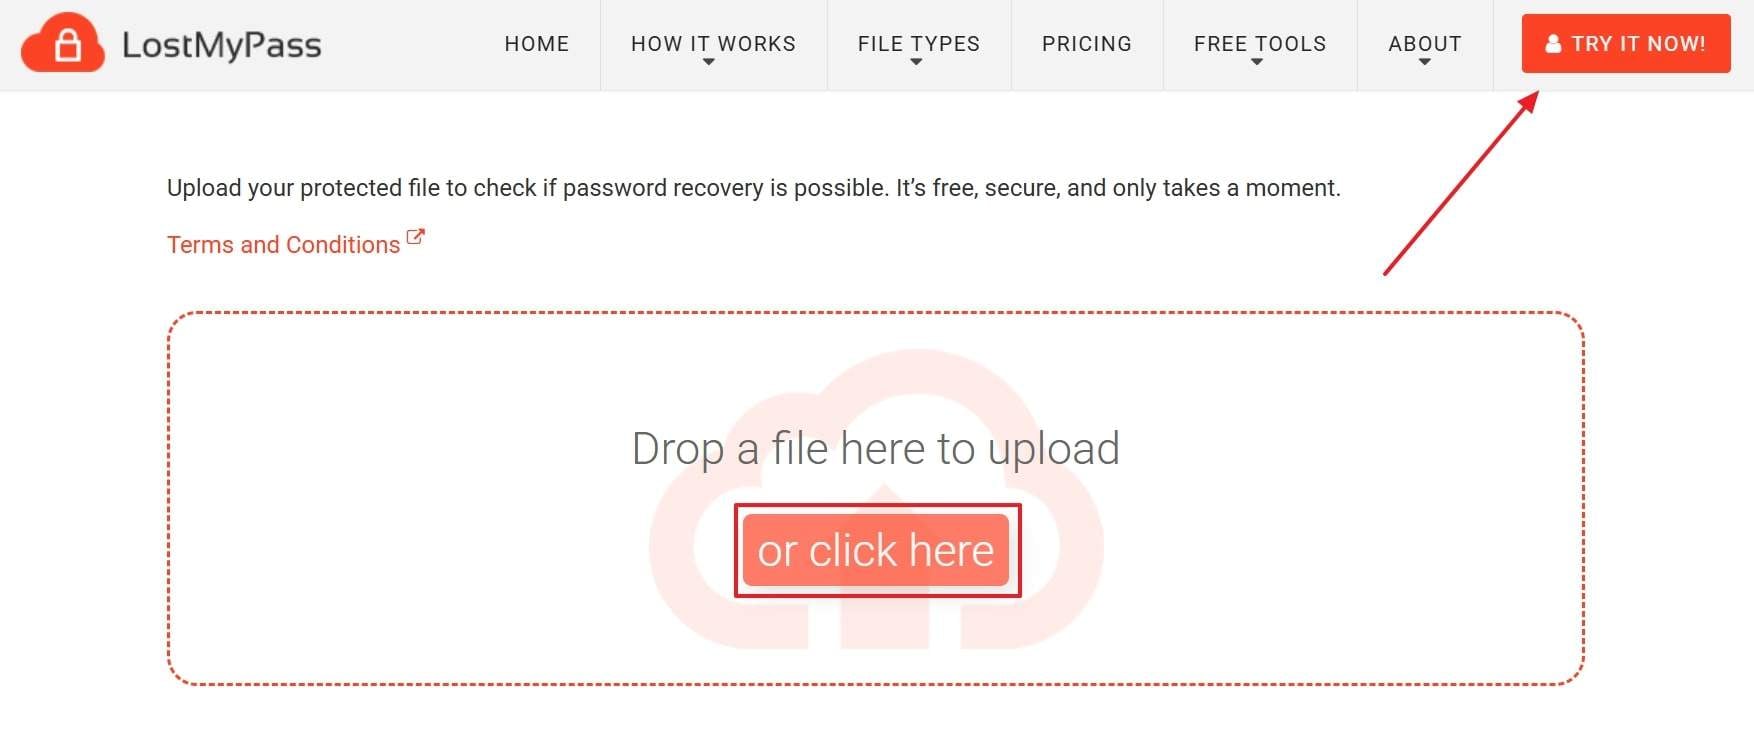
It is a helpful online tool that offers both fast and deep recovery methods based on your file's security level. When your password is weak, it may unlock the file quickly for free, while stronger protection can take up to 24 hours. Thus, follow the steps below to unprotect Word doc without password effortlessly through the LostMyPass tool:
Step 1 Drop File at LostMyPass
Access LostMyPass and press the "Try It Now" button from the main display. Then, either drag or drop the protected file or press the "Or Click Here" button to upload it.
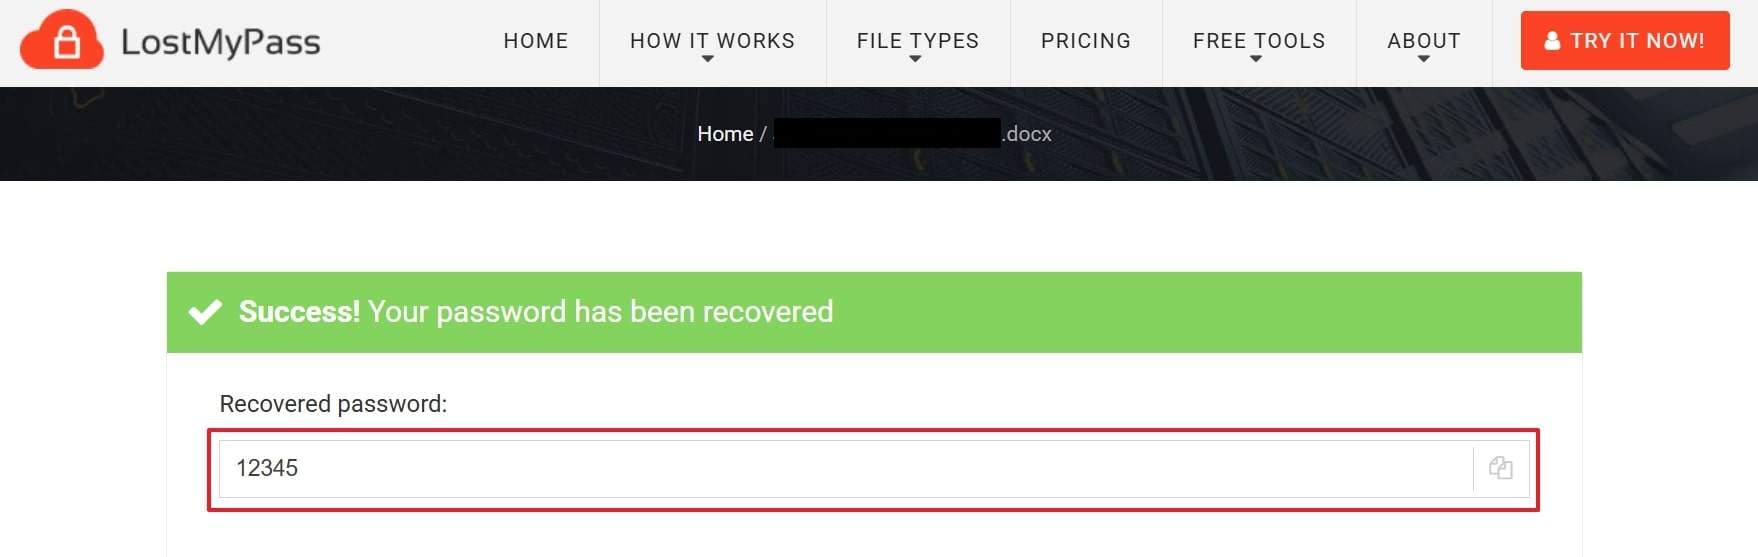
Step 2 Get Password Revealed
When it is uploaded, the tool starts analyzing your file and gives you its "Recovered Password" in the designated box.
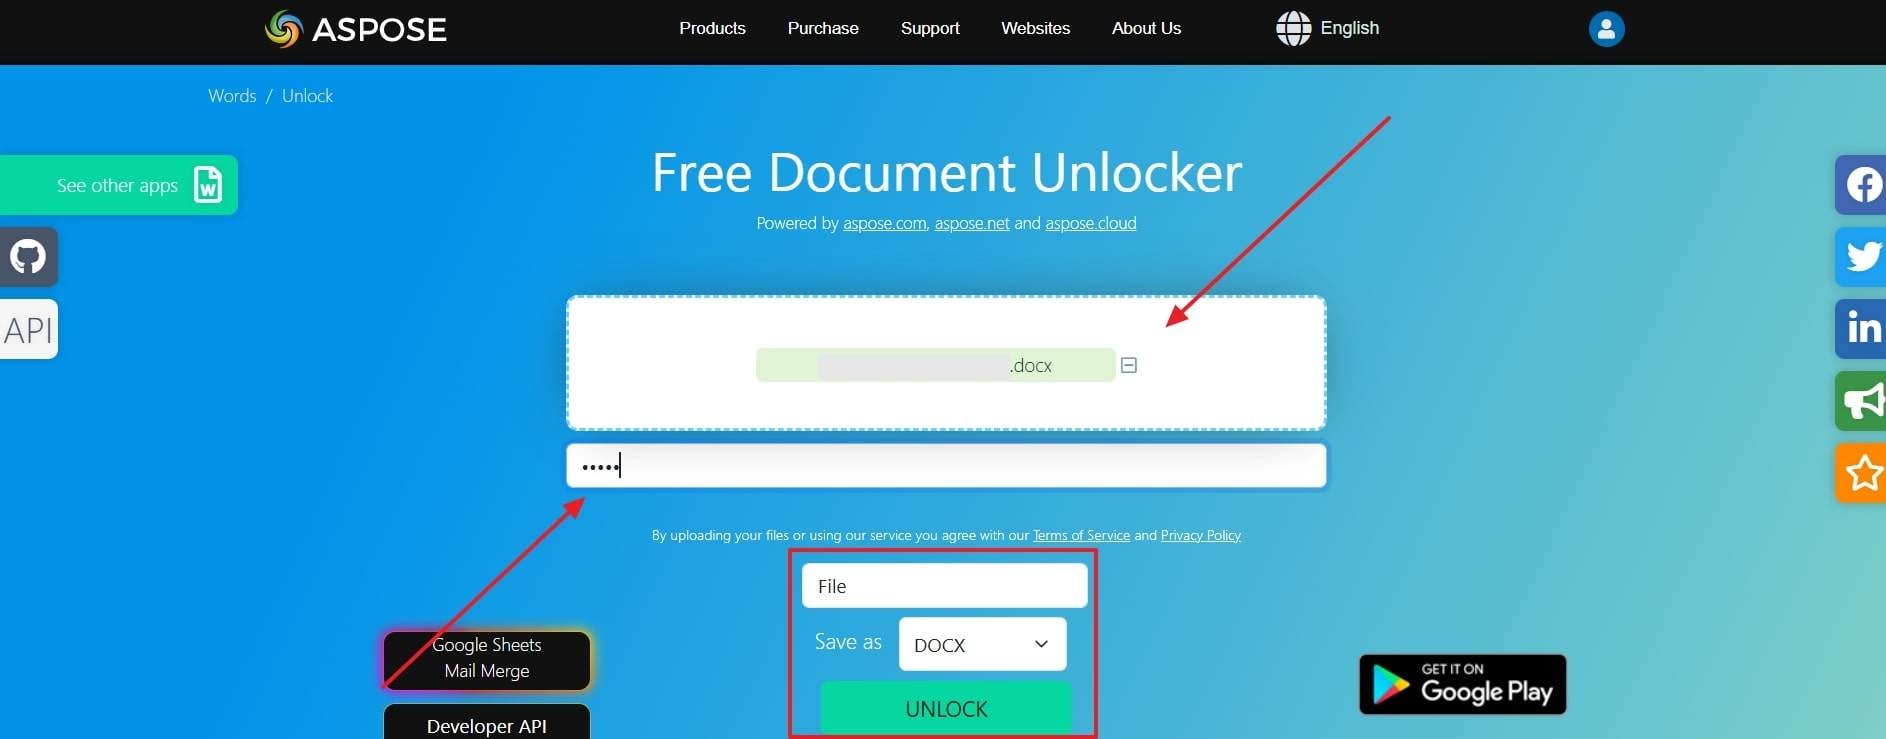
2. Aspose Words Unlock
Aspose Words Unlock is a free online tool that helps you unprotect a Word document when you already know the password. It lets you name your unprotected document, along with opting for your desired format to download it on your device. Go through the steps below and find out how you can remove the password from your Word document:
Step 1 Enter Password of Uploaded File
Head to the Aspose Words Unlock tool and click the "Choose Files" area to upload a protected document. Next, enter the "Password" below the uploaded document box and then set the "File Name." Afterward, choose the format in the "Save As" section and press the "Unlock" button.
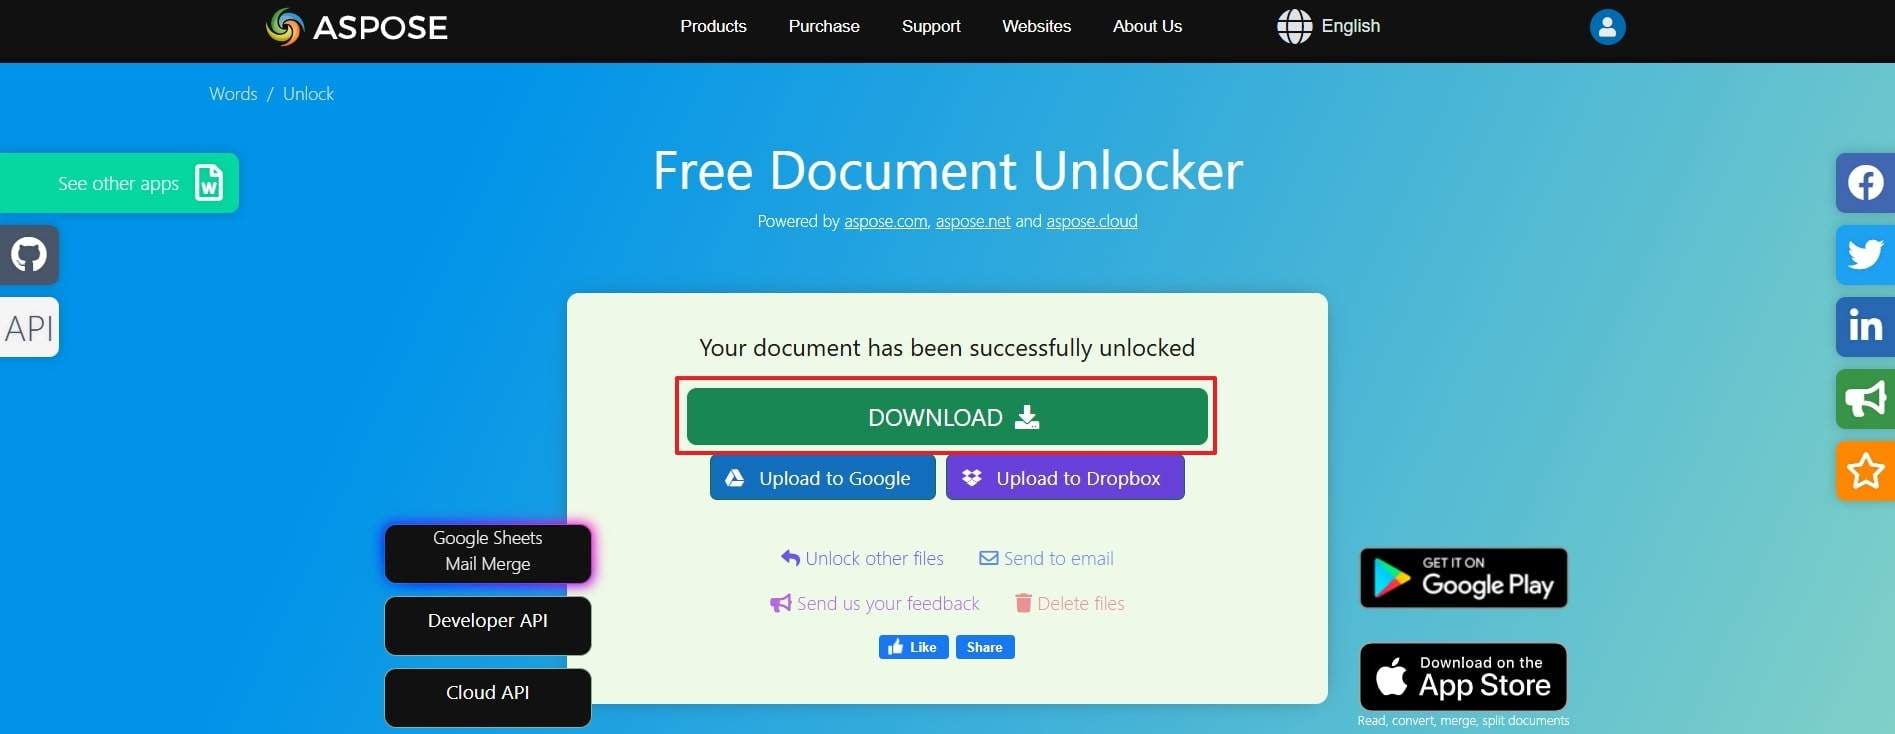
Step 2 Download Unlocked File
When the file is unprotected, hit the "Download" button to export it to your device.
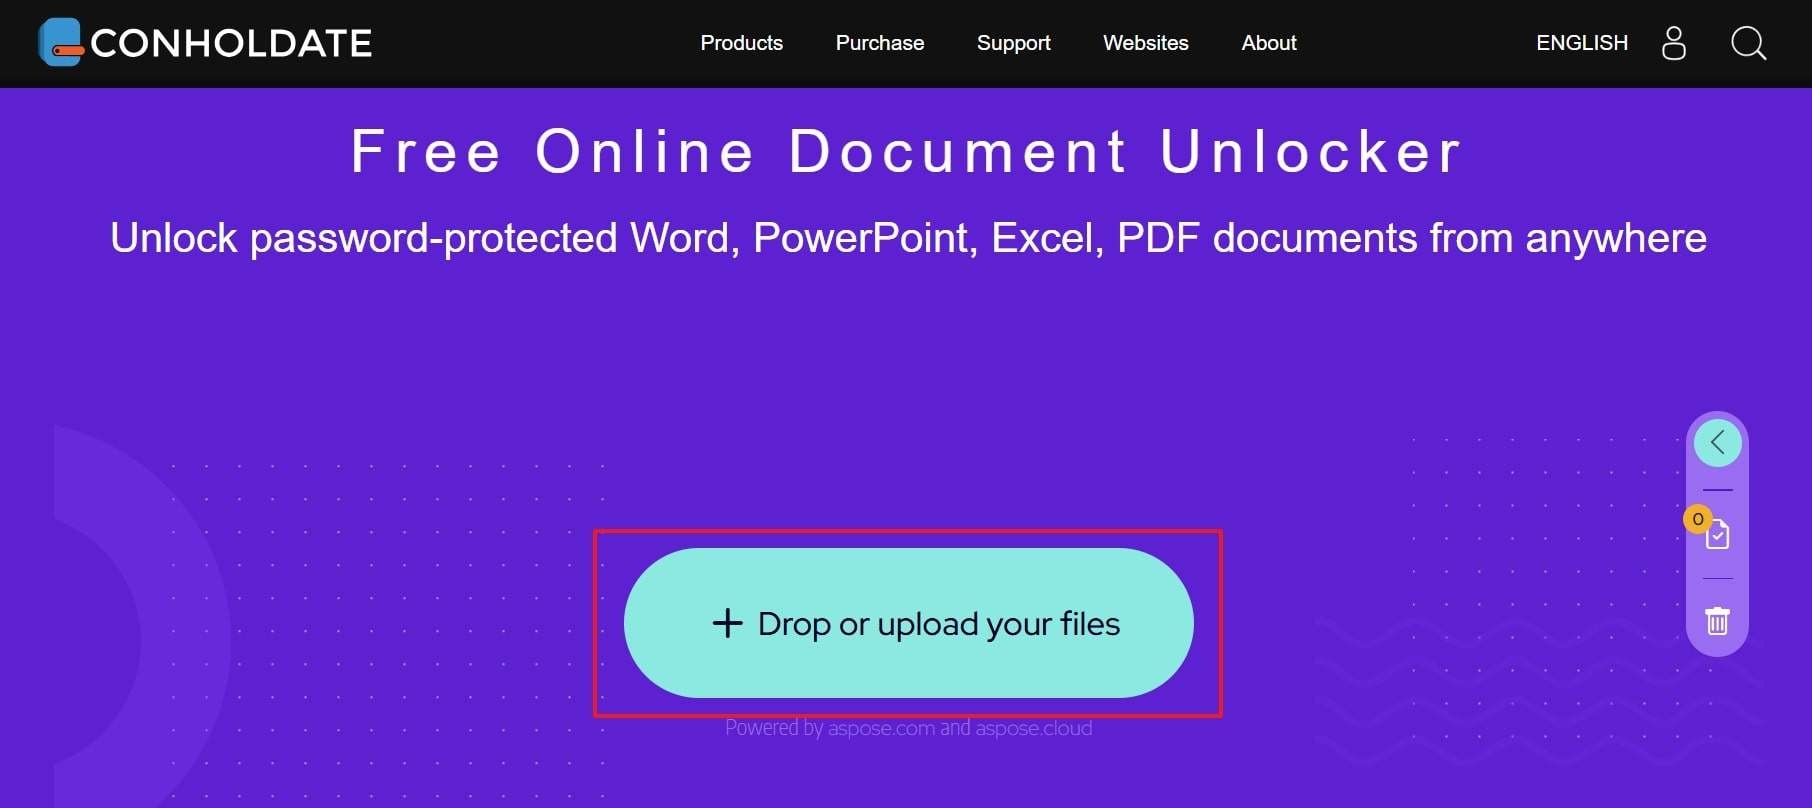
3. Conholdate Online Document Unlocker
This handy online tool also offers a quick and free solution to unprotect your multiple Word or other file formats at once. It lets you effortlessly retrieve files directly from cloud services like Google Drive and Dropbox. Hence, let's dive below to explore how to unprotect a Word doc when you know the password:
Step 1 Drop File at Conholdate Document Unlocker
Initially, go to your desktop browser and access the Conholdate Online Document Unlocker website. Next, click the "Drop or Upload Your Files" button to upload the protected file.
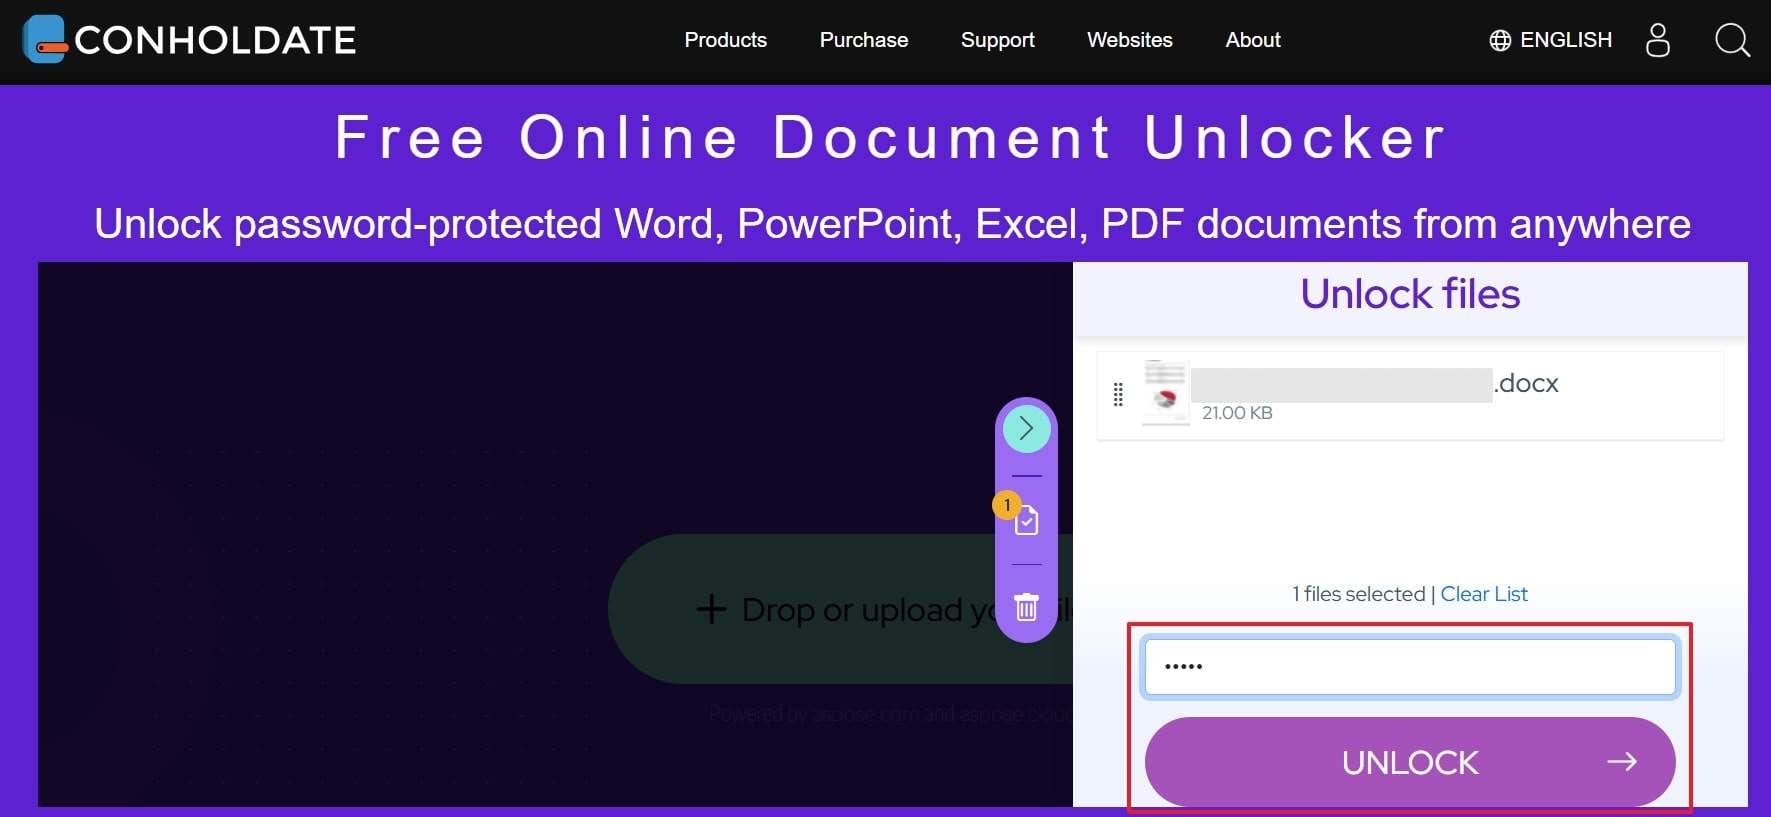
Step 2 Use Unlock After Adding Password
Subsequently, input the password of this Word document and press the "Unlock" button.
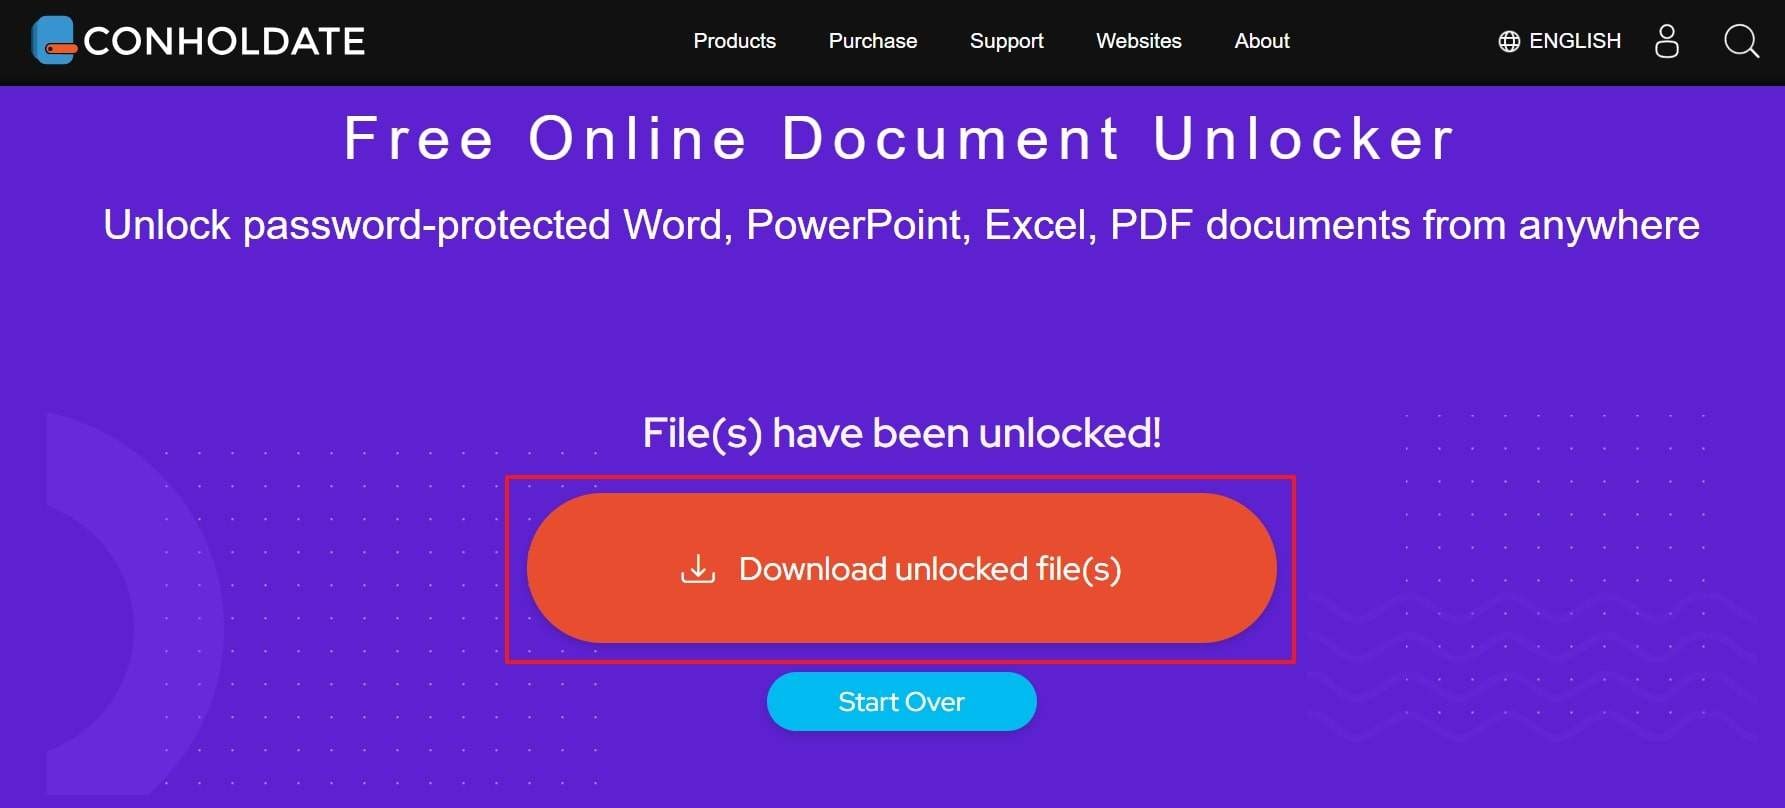
Step 3 Press Download Unlocked File
When the tool unprotects the file, hit the "Download Unclocked Files" button to save it to your system.
Conclusion
In summary, many users want to learn how to unprotect a Word document because either they forget the password or receive the file from others. This article has explored several quick and easy methods to unprotect your file, whether you have a password or not. In case you don't have a password, and the basic methods couldn't unprotect the file, you should opt for Dr.Fone - DocPassRemover to overcome this need.


Julia Becker
staff Editor
Generally rated4.5(105participated)