Allow All Permissions on Android and Unlock Full Control Today

Jun 30, 2026 • Filed to: Data Transfer Solutions • Proven solutions
 TL;DR:
Modern Android versions no longer allow users to grant all permissions simultaneously during installation; instead, you must manually configure unrestricted access for individual apps or specific features through the system settings.
● To grant an application full access, navigate to Settings > Apps & Notifications, select the specific app, open Permissions, and manually set features like Camera or Location to "Allow all the time".
● File managers and backup tools on Android 11 or newer require the specific "Allow Management of All Files" permission to function correctly, while modifying system-level files requires a Root Permissions Manager that carries risks of device bricking and voided warranties.
● Applications with elevated system privileges cannot be uninstalled until you deactivate them under Settings > Privacy Protection > Special Permissions > Device Admin Apps, unless they are MDM applications controlled by a school or employer which require IT department approval.
Ask AI for a summary
 ChatGPT
 Perplexity
 Gemini
 Claude
 Grok
Grok
Dr.Fone Basic:
Better Control for Your Phone
Manage, transfer, back up, restore, and mirror your device
The Permissions Handling has never been a clear setting on an Android device for many users. Storage, camera, and location are handled differently in Android on newer systems than on older ones. Then, instead of granting all permissions at install time like before, Android now asks you to decide what each app can use. Some apps may require all permissions to work properly.
On newer Android systems, you might see an option to allow management of all files and Android 11 permissions when an app needs unrestricted access to files. These settings balance privacy and control, but can confuse users who want apps to run smoothly.
This guide explains how to grant the necessary permissions to apps and clearly outlines Android’s permission model.

Part 1. How to Allow All Permissions on Android
Allowing all permissions on Android helps to access everything. Here are the ways to do it:
Option 1: Adjusting Permissions by App
Here is a guide to grant all permissions on Android for some apps. This is a simple way to manage such permissions and control what your apps can access.
Step 1: Open Settings on your Android device, then select Apps & Notifications. This option might appear as just Apps on some Android devices.
Step 2: Choose the application whose permissions you wish to modify. This will display a list of all apps installed on your device. To change one, tap on it.
Step 3: After this, in the app’s settings scroll list, tap Permissions. This will show you a list of permissions that the app currently has access to (camera, location, or storage).
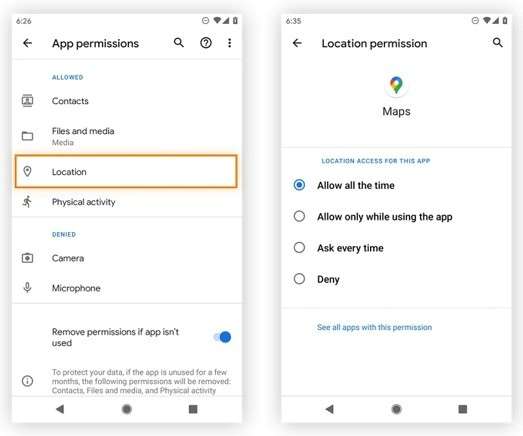
Step 4: Find the permission you wish to change. For example, to prevent the app from accessing your location, tap on Location. You'll then see options to adjust that permission for that particular feature.
Step 5: Based on the permission, you can either provide unlimited or only limited access to it—give access all the time, give access while using the app, always ask for permission before accessing, or fully deny access.
Step 6: After making your changes, the application will have new permissions that you allowed. This puts you in full control of what data and features apps have access to.
Option 2: The Permission Manager For More Control
A detailed way to allow all permissions on Android: You can manage your app launch permissions using the permission manager. Here’s how to do it:
Step 1: On your Android device, open Settings, then Apps.
Step 2: In the Apps menu, open the Options Menu.
Step 3: Choose Permission Manager from the list. This should enable you to control what features and apps are permitted.
Step 4: There will be a long list of features, camera, location, storage, etc., select any feature that you want to check/change permissions on.
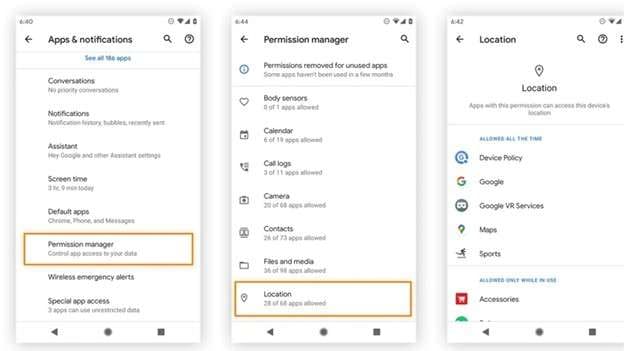
Step 5: To adjust access for a particular app, tap its name. If you want to change the location permission of the Galaxy Wearable app, for example, tap on it in the list.
Step 6: Now you have multiple options to modify the permission:
- Allow all the time: The app will tap into this data when it’s playing in the background.
- Allow only while using the app: It can access the data only when it’s open.
- Ask every time: The app will ask for your permission each time it needs access.
- Deny: This will prevent the app from accessing the feature completely.

Part 2. What is the Root Permissions Manager on My Android Phone?
A root permission manager is the app you use on a rooted Android device to manage the apps that have elevated or system-level access to your phone. On unrooted devices, apps cannot be granted access to system files. With this tool, you can allow all permissions on Android and fine-tune permissions for more in-depth functionality of your phone.
Here are the pros & cons of having a root permission manager on your Android phone:
Part 3. Remove Admin Permission from An App On Android (Bonus)
To revoke admin rights from an app on your Android system, head to Settings > Privacy Protection and tap Special Permissions. Select Device Admin Apps, then tap the app to revoke admin access. In addition, disabling administrator rights is a way to unlock the application from your device and to keep everything safe. Such apps may be hard to uninstall or can run with elevated privileges; so you gotta look for the emergency power button.
To revoke admin permissions for an app in Android:
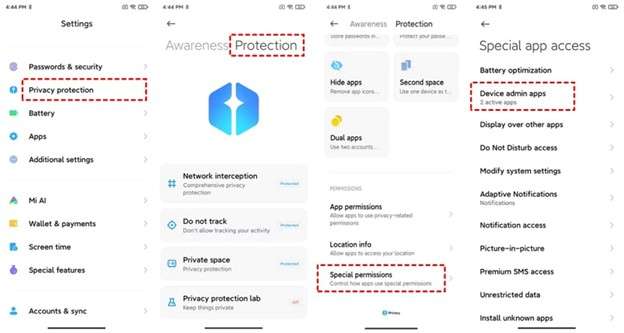
Step 1: Just start by tapping the Settings app on your Android device. Scroll to the bottom and select Privacy Protection.
Step 2: Go to the Privacy Protection Menu and Scroll Further to Choose Protection. Then tap Special Permissions.
Step 3: Then select Device Admin Apps. This shows you a list of all apps with administrator access on your device.
Step 4: Now, select the app you want to remove admin rights for. Select Deactivate this device to remove its admin privilege. This action will revoke the elevated permissions that the app had over your device.
In some instances, these settings may be controlled externally by a company or enterprise. Under such circumstances, you may require specialized management tools to adjust admin rights or update permissions remotely.
By limiting admin rights to trusted apps only, you can better control Android app permissions and keep your device safe.
Bonus Tip: Use Dr.Fone’s Android Manager to Bypass Restrictions and Manage Permissions
As a single solution for easily managing permissions on your Android device while also bypassing restrictions, Wondershare Dr.Fone is an excellent tool. It doesn't root your device, so it's a much safer way to get around phone data limits without risking rooting.
Wondershare Dr.Fone
One-Stop Solution to Manage and Transfer Data on Android Phone
- Transfer files between Android and computer, including contacts, photos, music, SMS, and more.
- Manage, export/import your music, photos, videos, contacts, SMS, Apps, etc.
- Transfer iTunes to Android (vice versa).
- Manage your Android device on the computer.
- Fully compatible with the newest Android OS.


Take a look at how you can manage your device permissions and data with Dr.Fone’s Android Manager:
Step 1: Install Dr.Fone on your computer and connect your Android with a USB cable, or wirelessly through the Dr.Fone app.

Step 2: After successfully connecting the device, go to My Device tab. You can view photos, videos, messages, call history, and more under different section. We pick the category to manage.

Step 3: Preview the data. Like view photos, read messages, see the call log, or access files saved on the device's internal storage or SD card.

Step 4: Here you can import, export, delete or organize the data selected. You can move photos from your device to your computer, export messages or just create folders with all the files.
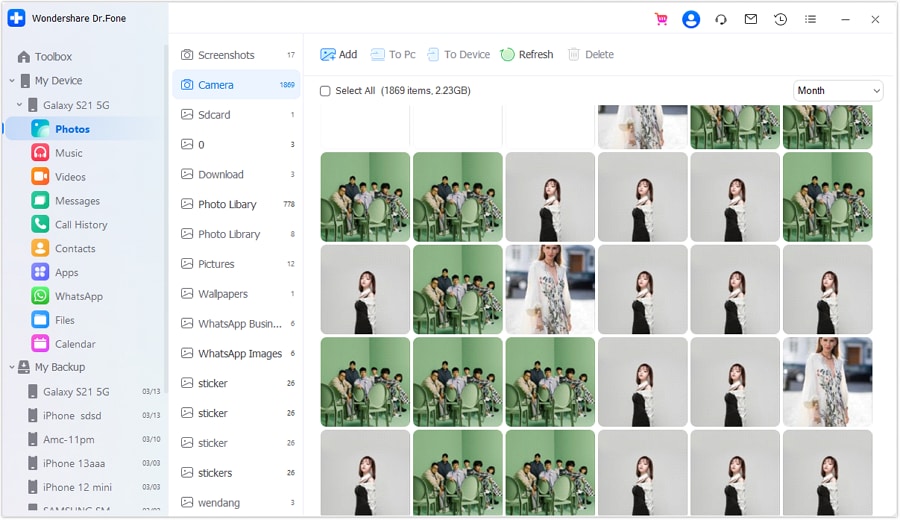
Step 5: Use the dashboard to handle your device content and apps. This would keep all things in line and provide you with an easy method to control Android app permissions, thus enabling the process of controlling and updating permissions more efficient on your device.
Conclusion
To summarise, to maintain both privacy and functionality on your Android phone, it is very important to adjust app permissions. Once you've set things up, features like allowing management of all files, Android 11 permissions, or the Permission Manager give you control over what apps can do. This includes access to sensitive features like the camera, your location, and app storage. The new permission system stops apps from accessing areas they shouldn’t, improving security. Also, removing unwanted admin privileges ensures no app has too much control over your device.
The Android Manager from Dr.Fone provides an all-in-one solution for managing your device. It lets you control permissions and data in a more organized, secure, and hassle-free way, keeping your phone fully under control.
4,624,541 people have downloaded it
FAQs
Dr.Fone Basic:
Better Control for Your Phone
Manage, transfer, back up, restore, and mirror your device


Android Manage
- Android to iTunes/iCloud
- Android to Mac
- 1. Transfer Data from Android to Mac
- 2. Transfer Videos from Android to Mac
- 3. Transfer Files from Android to Mac
- 4. Connect Android with Mac
- 5. Transfer Photos from Android to Mac
- 6. Sync Android with Mac OS X
- Android to PC
- 1. Transfer Files Using USB Cable
- 2. Share Apps for Android to PC
- 3. Transfer Photos to Windows 10
- 4. Transfer Contacts to PC
- 5. Transfer Photos from Android
- 6. Transfer Files from Android to PC
- 7. Backup and Transfer SMS
- 8. Transfer Photos from Android to PC
- 9. Transfer Videos from Phone to Computer
- 10. Best MoboRobo Alternative to Manage and Transfer Data
- iCloud to Android
- 1. Tips to Sync Data to Android
- 2. Set Up iCloud Account on Android
- 3. Transfer iCloud Contacts
- 4. Transfer iCloud Photos to Android
- iTunes to Android
- 1. Transfer iTunes Audio Books
- 2. Sync iTunes Music with Google Play
- 3. Copy iTunes Playlists to Hard Drive
- 4. Transfer Music from iTunes
- Mac to Android
- 1. Transfer Files from Mac to Android
- 2. Send Files from Mac to Android
- 3. Transfer Music from Mac
- 4. Transfer Photos from Mac
- PC to Android
- 1. Transfer Files to Android Wi-Fi
- 2. Transfer Pictures from Computer
- 3. Transfer Files from PC to Android
- 4. Transfer data from Acer device
- Manage Tips
- 1. Where Are Screenshots Saved on Android
- 2. Android File Transfer for Mac
- 3. Android File Transfer Alternatives
- 4. Unsend a Text on Android
- 5. Introduction To Send Anywhere
- 6. Bold PolyBuzz Mod APK
- 7. Fix File Transfer Not Working
- 8. Top 4chan Alternatives
- 9. Sideloadly Review
- 10. Top LibGen Alternative Options
- 11. 1337x Alternatives
- 12. Keep2Share Downloader Review
- 13. Tez Files Review and Best Alternatives
- ● Manage/transfer/recover data
- ● Unlock screen/activate/FRP lock
- ● Fix most iOS and Android issues
- Free Download Free Download Free Download


James Davis
staff Editor