Top Android App Permission Managers for Better Control Over Your Google Application Permissions

Jun 30, 2026 • Filed to: Data Transfer Solutions • Proven solutions
 TL;DR:
Managing Android app permissions requires choosing between native OS settings for basic access control or specialized third-party tools for automated revocation, network monitoring, and risk categorization.
● Native Android and Samsung settings enable manual access control per app or via the centralized Permission Manager, and automatically revoke permissions for applications that remain unused for extended periods.
● For third-party alternatives, Bouncer is best for automatically revoking temporary permissions without root access, GlassWire is optimized for network traffic and bandwidth monitoring, and App Permission Manager categorizes apps by high or low risk levels but can cause app crashes when access is denied.
● Wondershare Dr.Fone Android Manager serves as a non-rooted, desktop-based solution for Windows and Mac that combines media file transfers with app permission management over a USB or wireless connection.
Ask AI for a summary
 ChatGPT
 Perplexity
 Gemini
 Claude
 Grok
Grok
Dr.Fone Basic:
Better Control for Your Phone
Manage, transfer, back up, restore, and mirror your device
This is not new; apps on your Android phone request access to various parts of your device. Some request your location, camera, messages, or contacts. This can feel normal at first. But many apps ask for permissions they do not really need. Android has a built‑in system to control this. You can allow or deny access when an app requests it. This helps protect your data from harm. But this system can be difficult for some people to use.
That is where an app permission manager comes in. It gives you clearer control over every app on your device. With the right tools, you can see who can use your app's location permission and other features. This guide will show you how to take control and protect your privacy.
Part 1. How do I manage app permissions on an Android phone?
On Android, app permissions are easy to manage from within the settings. Both standard Android and Samsung devices let you decide how apps access your information.
A. Granting App Permissions
When you download a new app, you’re usually prompted to approve permissions. Though you might not need all of them. How to change permission Settings between the Install
Step 1. Access the Google Play Store App
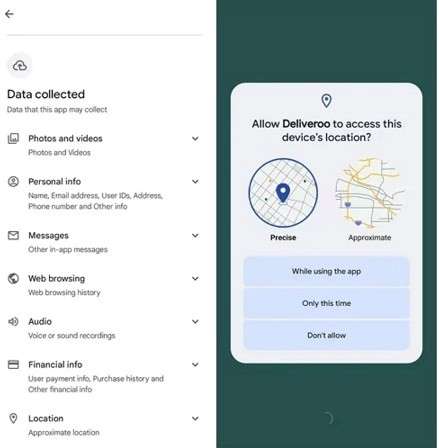
Step 2. Scroll down to the Data Safety section.
Step 3. Touch the arrow next to it, then choose Data Collected to see an app’s personal data and required permissions.
B. Changing Android App Permissions on Samsung Devices
If you have found you’ve made some unwanted selections or sick of being told to allow the app to do things every other minute, you can adjust these app permissions at any given point. For Samsung devices:
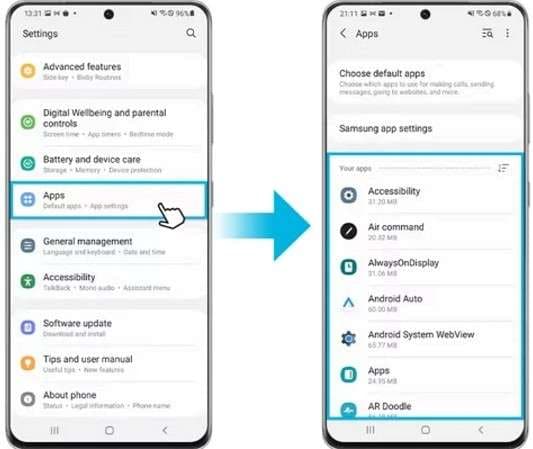
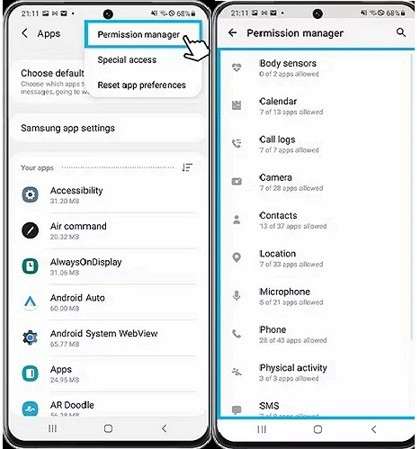
Step 1. Go to Settings and select Apps.
Step 2. Choose the app that you want to manage.
Step 3. Select Permissions to view the app’s permissions.
Step 4. Choose the permission you want to change. You’ll have options like:
- Allow only while using the app
- Ask every time
- Don’t allow
To open the app permission settings on Android for all apps at once:
Step 1. Go to Settings > Apps and tap the three dots in the top-right corner.
Step 2. Select Permission Manager.
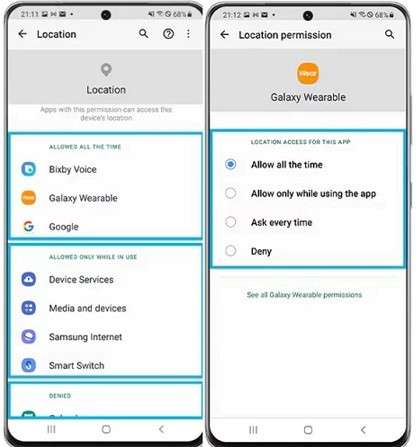
Step 3. Pick a permission (e.g., location, camera) and choose the desired setting for all apps that use it.
C. Checking Allowed Permissions
To see which permissions are enabled on your device:
Step 1. To find out what permissions your device has:
Step 2. To change your settings, go to Security & Privacy.
Step 3. Choose Privacy, then Permission Manager.
Step 4. You will see a list of permissions and the apps that have them. You can then alter these settings to fit your needs.

D. Review Permissions for Unused Apps:
Android may take away an app's permissions if you haven't used it in a long time. You will receive a message prompting you to review these programs and decide whether to keep them or uninstall them.
Part 2. How to use the app permission manager?
An app permission manager lets you manage the permissions asked by apps. These tools offer greater granularity and flexibility than the default Android options. Whether you’re working with a built-in feature such as the Permission Manager, if you have a Samsung device or using some third-party tool, the aim is exactly the same: you want to manage what apps can and cannot access on your phone.
Using Built-In Permission Management (Android)
For every app, Android has an inbuilt app permission manager, which enables you to manage permissions on individual apps. Here’s how you can
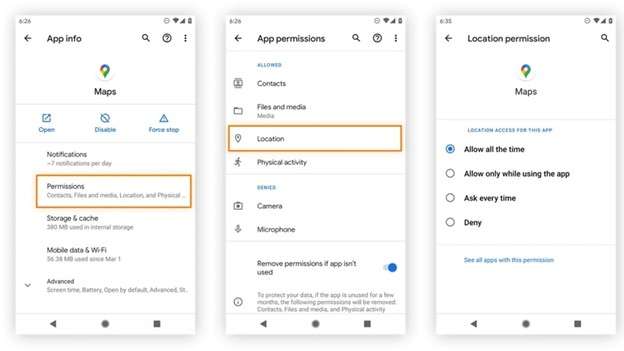
Step 1. Access Settings: First of all, open the Settings app on your Android phone.
Step 2. Scroll down and tap on Apps or Applications: Find the Apps Section
Step 3. Pick the App: Browse through the list and tap on an app you want to edit that has access for.
Step 4. Access permissions: Tap Permissions to see which features on your phone have access to the app.
Step 5. Adjust Permissions: You can grant or deny permissions for features such as the camera, location, or microphone.
The built-in tool will suffice for most users, but if you want more control of the process, third-party apps are available.
Part 3. Best Android app permission manager
Based on our research and comparison table, here are some of the top-rated app permission managers you can use:
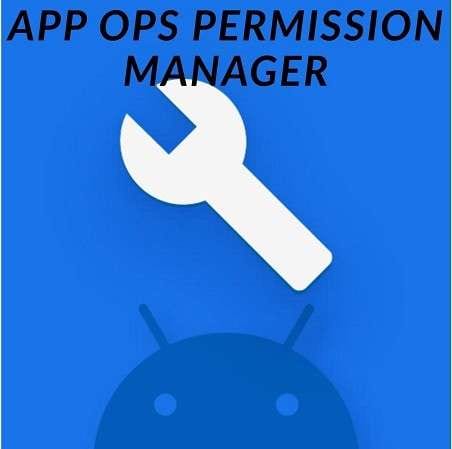
1- App Ops Permission Manager
With App Ops Permission Manager, users can change appops and take fine-grained control over the app's permissions. This simplifies access to features such as camera/ location or microphone by apps. The App Ops Permission Manager APK is suitable for those looking to manage permissions in-depth and effectively but are on a rooted device.
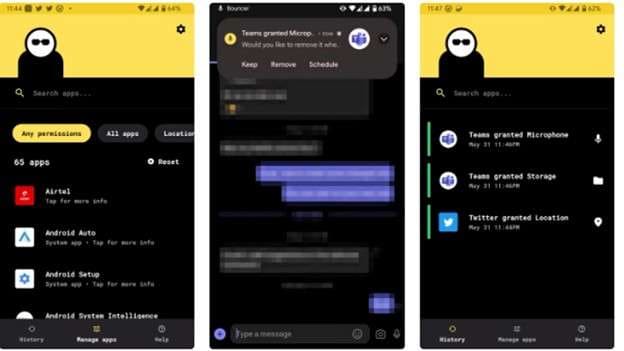
2- Bouncer
You can also use an app like Bouncer that only grants permissions for a limited time. It only grants access to features like location or the camera when an app is in use, and also automatically revokes access as soon as the app is no longer open.” Traditionally, once an app is installed, it has access until the user goes in to turn functionality off.
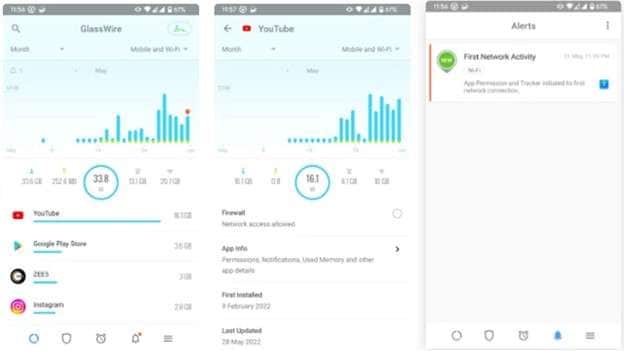
3- GlassWire
In the sense that it is mainly a privacy monitor, GlassWire does some things—most importantly, it manages app location permissions and other network-related permissions. It tracks what apps use your data, warns you about suspicious activity and blocks apps from using the internet. This makes it a good permission-controller app that helps protect your privacy and save battery life.
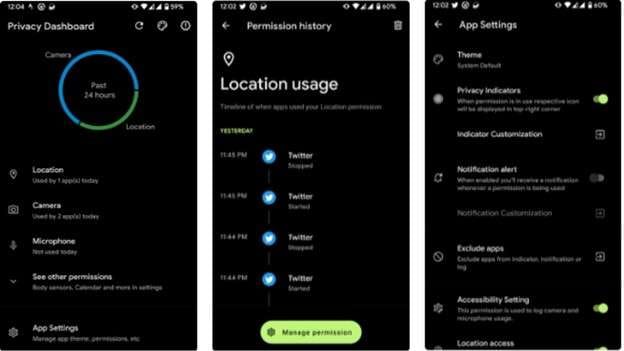
4- Privacy Dashboard
Android users can see app permissions much more clearly in the Privacy Dashboard. It logs when apps access sensitive features like the camera, location and microphone. It comes with real-time indicators and detailed reports enabling you to review and control Android app permissions, maintain privacy from all the apps on your device.
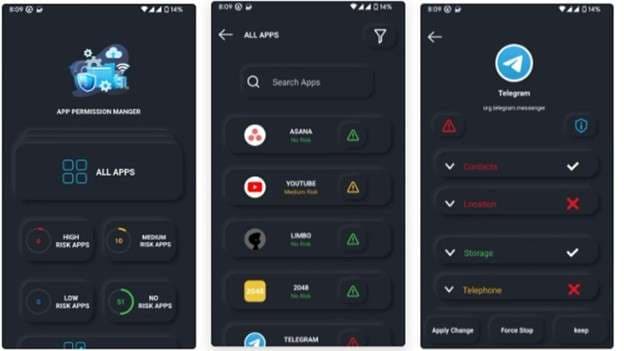
5- App Permission Manager
It groups all apps by risk level (high or low) and efficiently manages your Android app permissions. It gives you a simple way to tweak app access to sensitive information, such as contacts and location. This feature helps ensure that no app has more access than it requires.
3.1 Quick Comparison of the Best Android App Permission Managers
|
App |
Features |
Pros |
Cons |
| App Ops Permission Manager |
|
|
|
| Bouncer |
|
|
|
| GlassWire |
|
|
|
| Privacy Dashboard |
|
|
|
| App Permission Manager |
|
|
|
Part 4. Bonus Tip: Bypass Restrictions with Dr Fone’s Android Manager
Wondershare Dr.Fone is a lightweight utility for managing your Android device without all the control-access shenanigans. This means you can manage and use your Android device's files between your device and your computer, subject to certain restrictions. From checking your device’s root status, managing media files, or keeping track of battery health, Dr.Fone helps you do it all without taking a hit on security. It is an all-in-one tool to optimise your device’s performance, simplifying data and app management.
Wondershare Dr.Fone
One-Stop Solution to Manage and Transfer Data on Android Phone
- Transfer files between Android and computer, including contacts, photos, music, SMS, and more.
- Manage, export/import your music, photos, videos, contacts, SMS, Apps, etc.
- Transfer iTunes to Android (vice versa).
- Manage your Android device on the computer.
- Fully compatible with the newest Android OS.


Steps to Use Dr Fone Android Manager:
Step 1. Download Dr. Fone: The first step is to download Dr.Fone on your computer, and connect the Android phone with a USB cable or wireless connection through the Dr.Fone app.

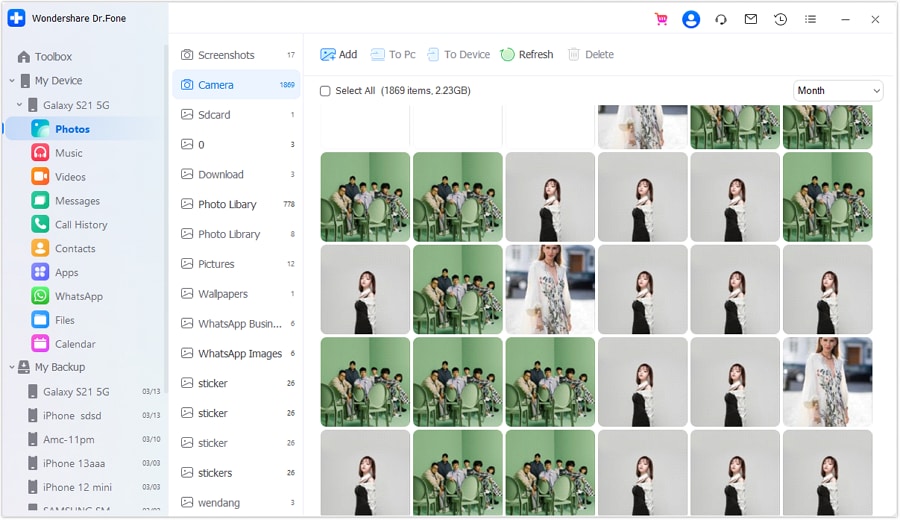
Step 2. After connecting, head to the My Device tab. This will show you different catalogues like photos, videos, messages, call history and more.

Step 3. Preview Your Data: It allows you to preview your data including photos, messages, call logs or files saved in the internal storage/SD card.

Step 4. Managing Your Data: Here, you can import, export, delete or organise your files. Manage photos on your device to transfer them to your Mac or PC, export text messages and more, all using the File operation.
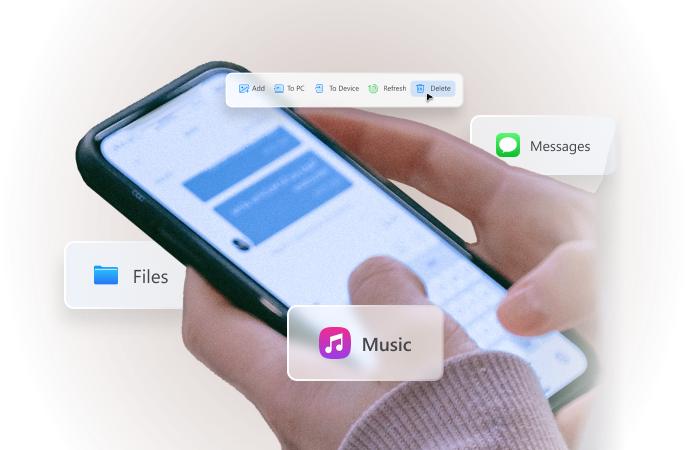
Step 5. Manage Your Apps and Permissions: You can manage the apps and permissions used on your device through the dashboard. Simplifies managing Android app permissions manager, allowing you to manage everything.
Conclusion
Android app permission management is very important for your privacy and security. And for users who want granular granularity over permissions, App Ops Permission Manager is exactly what they need on a rooted device. You can give temporary permissions to apps when you want, and for that, Bouncer is an excellent option. GlassWire is great for monitoring microphone and network activity, whereas Privacy Dashboard gives you live updates on app usage.
But we found that Dr.Fone’s Android Manager is the best all-around solution. Without rooting, it helps you control the app permissions and device data for the best performance.
4,624,541 people have downloaded it
FAQs
Dr.Fone Basic:
Better Control for Your Phone
Manage, transfer, back up, restore, and mirror your device


Android Manage
- Android to iTunes/iCloud
- Android to Mac
- 1. Transfer Data from Android to Mac
- 2. Transfer Videos from Android to Mac
- 3. Transfer Files from Android to Mac
- 4. Connect Android with Mac
- 5. Transfer Photos from Android to Mac
- 6. Sync Android with Mac OS X
- Android to PC
- 1. Transfer Files Using USB Cable
- 2. Share Apps for Android to PC
- 3. Transfer Photos to Windows 10
- 4. Transfer Contacts to PC
- 5. Transfer Photos from Android
- 6. Transfer Files from Android to PC
- 7. Backup and Transfer SMS
- 8. Transfer Photos from Android to PC
- 9. Transfer Videos from Phone to Computer
- 10. Best MoboRobo Alternative to Manage and Transfer Data
- iCloud to Android
- 1. Tips to Sync Data to Android
- 2. Set Up iCloud Account on Android
- 3. Transfer iCloud Contacts
- 4. Transfer iCloud Photos to Android
- iTunes to Android
- 1. Transfer iTunes Audio Books
- 2. Sync iTunes Music with Google Play
- 3. Copy iTunes Playlists to Hard Drive
- 4. Transfer Music from iTunes
- Mac to Android
- 1. Transfer Files from Mac to Android
- 2. Send Files from Mac to Android
- 3. Transfer Music from Mac
- 4. Transfer Photos from Mac
- PC to Android
- 1. Transfer Files to Android Wi-Fi
- 2. Transfer Pictures from Computer
- 3. Transfer Files from PC to Android
- 4. Transfer data from Acer device
- Manage Tips
- 1. Where Are Screenshots Saved on Android
- 2. Android File Transfer for Mac
- 3. Android File Transfer Alternatives
- 4. Unsend a Text on Android
- 5. Introduction To Send Anywhere
- 6. Bold PolyBuzz Mod APK
- 7. Fix File Transfer Not Working
- 8. Top 4chan Alternatives
- 9. Sideloadly Review
- 10. Top LibGen Alternative Options
- 11. 1337x Alternatives
- 12. Keep2Share Downloader Review
- 13. Tez Files Review and Best Alternatives
- ● Manage/transfer/recover data
- ● Unlock screen/activate/FRP lock
- ● Fix most iOS and Android issues
- Free Download Free Download Free Download


James Davis
staff Editor