
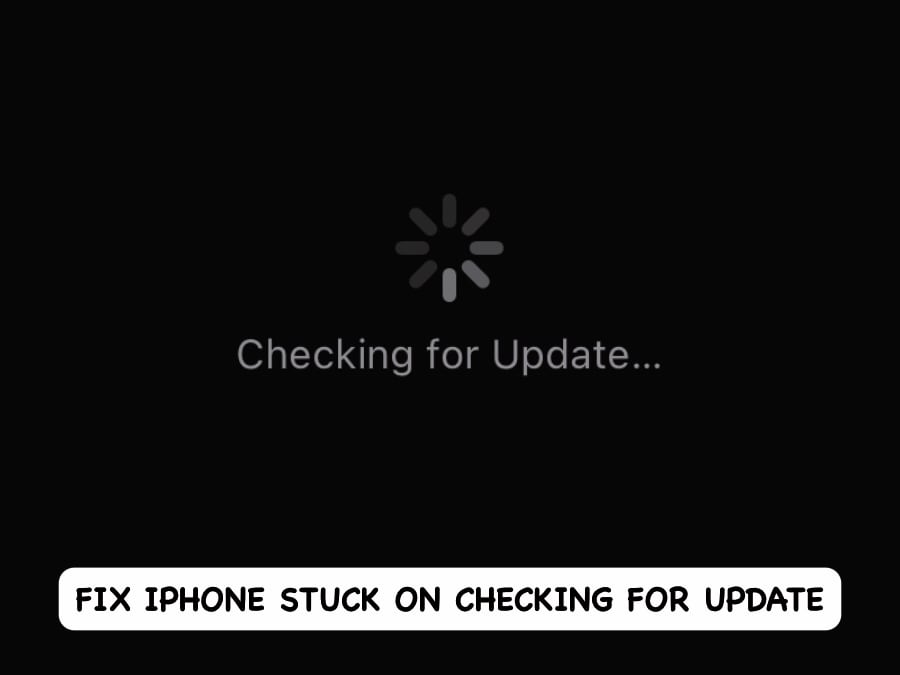
Checking For Update and Stuck iPhone? Here’s How To Fix

Jun 11, 2026 • Filed to: Phone Repair Solutions • Proven solutions
 TL;DR:
To fix an iPhone stuck on "Checking for Update," disable VPNs and Wi-Fi Low Data Mode, clear at least 10 GB of local storage, or use Dr.Fone - System Repair (iOS) to bypass the error without losing data.
● The iOS 26 Beta update process will stall on incompatible hardware because it strictly requires an iPhone SE (2nd generation and later), XR, XS, or newer, excluding older models like the iPhone X and iPhone 8.
● Dr.Fone - System Repair (iOS) resolves iOS 26 Beta boot loops and can downgrade devices to signed versions like iOS 18.5 in 10 minutes, provided the Apple signing windows are currently open.
● Updating via iTunes on Windows or macOS Mojave and earlier bypasses local device storage limits, but selecting the Restore iPhone option will permanently delete all user data.
Ask AI for a summary
 ChatGPT
 Perplexity
 Gemini
 Claude
 Grok
Grok
Owning an iPhone is usually a smooth experience—but issues can arise. If your iPhone is stuck on “Checking for Update,” you're not alone. This common problem can prevent updates from installing properly. Instead of visiting an Apple Store, follow this guide to troubleshoot the issue. Tools like Dr.Fone – System Repair (iOS) offer quick, effective fixes for a stuck iPhone and get your device back on track in no time.
Part 1: Common Reasons Why the iPhone Is Unable to Check for Update
When your iPhone gets stuck on “Checking for Update,” it's often due to network connectivity issues or temporary problems with Apple’s servers—not necessarily a fault in the device’s operating system. Still, it's frustrating and can delay important updates. Common causes of a stuck iPhone during the update process include unstable Wi-Fi, server overload, outdated system settings, or low device storage. Understanding these issues is key to resolving them quickly.
1.1: Internet Connection Down
Why won’t my phone update? Maybe your internet connection went down just as you were checking for iPhone update. You can easily test it by using any app, as most of them require the internet to work properly. The best way to check is to launch Safari and try visiting a website.
1.2: Apple Server Issue
Sometimes, the reason your iPhone is stuck on “Checking for Update” isn’t on your end—it could be an issue with Apple’s servers. When this happens, the update process may be temporarily blocked. The best course of action is to wait for a while and try again later.
1.3: Using VPN/ Content Blockers
Using VPN and content blocker apps generally does not cause issues with the Apple update system. However, it is in your best interest to always disable VPNs and content blockers before trying to check for iPhone update. This is because, depending on settings, they might be the reason why is iPhone checking for update stuck and not working.
1.4: Incompatible Hardware
Wondering why your iPhone won’t update to iOS 26 Beta? This often happens because Apple limits updates to supported models. Devices like the iPhone SE (2nd generation and later), iPhone XR, XS, and newer are eligible, while older models such as the iPhone X, iPhone 8, and earlier aren’t supported. This can cause your iPhone to get stuck on “Checking for Update.”
Part 2: Easiest Fixes You Should Try First
Let’s start with the easiest ways to fix iPhone unable to check for update. The two fastest ways to fix unable to check for update iPhone issue is restarting the phone and if that does not work, using a third-party app called Dr.Fone – System Repair to fix the issue in a jiffy.
2.1: Restart iPhone
Restarting almost always resolves most issues. Here’s how to restart your iPhone:
Step 1: Go to Settings > General > Shut Down.
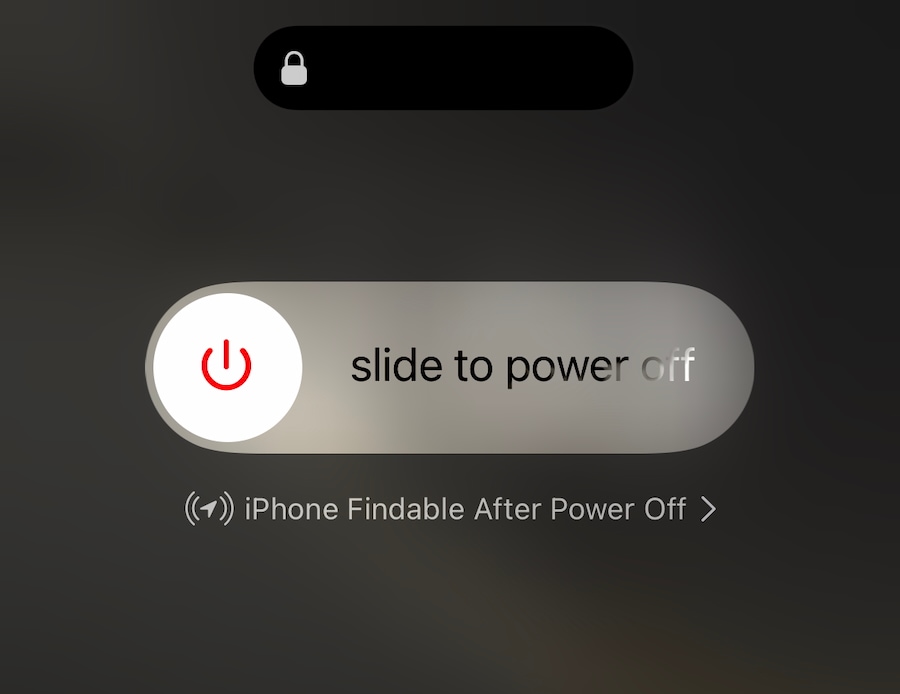
Step 2: Slide to shut the device down.
Step 3: Once the device is shut down completely, wait a few seconds and press the Side button to start the phone.
2.2: One-Stop Fix to Update Your iPhone Without Data Loss: Dr.Fone – System Repair
If restarting your device didn’t fix the iPhone stuck on “Checking for Update” issue, don’t worry—there’s a reliable solution. Introducing Dr.Fone - System Repair (iOS), a powerful tool designed to quickly resolve update glitches and get your iPhone back to normal without data loss.
Did you know that you do not have to update your iPhone from within Settings strictly? You can always use other ways to update your iPhone, such as using Dr.Fone - System Repair(iOS), a multi-utility tool that allows you to fix nearly all smartphone issues in just a few clicks.
Dr.Fone - System Repair (iOS)
Fix iPhone Checking for Update Stuck
- Fix iOS issues in a few clicks without any data loss
- Troubleshoot and repair a variety of iPhone errors
- Enjoy a safe, reliable, and seamless experience
- Work for all models of iPhone, iPad, and iPod touch


Here’s how to update your iPhone with Dr.Fone.
Step 1: Launch Dr.Fone and Select System Repair.
Start by launching Dr.Fone on your computer, and from the sidebar on the left, click Toolbox and select System Repair. You may also click System Repair banner in the app window.

Step 2: Select your device.
In System Repair, you will see Android and iOS. Select "iOS" and then, click "iOS Upgrade/Downgrade".


Step 3: Attach iDevice
As you attach the device with a proper USB cable, the platform detects the device and continues to establish a proper connection.

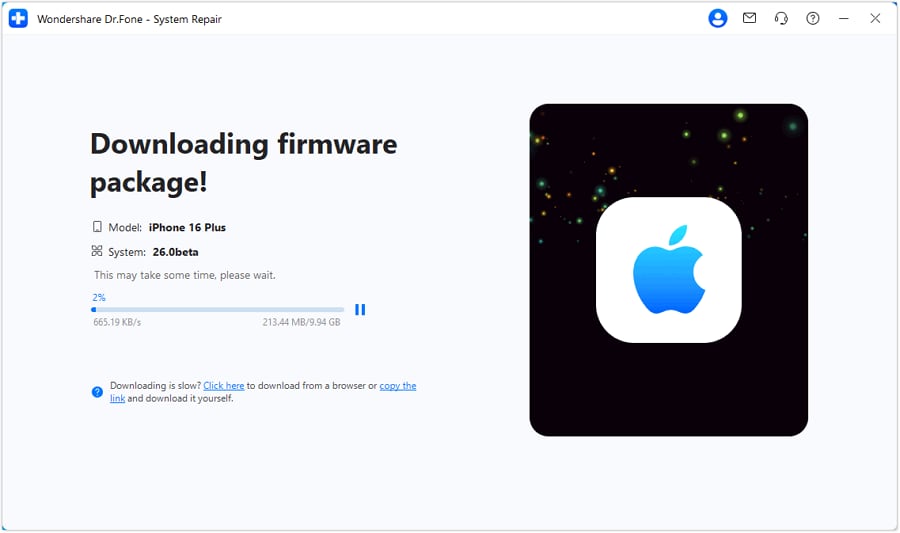
Step 4: Select iOS Firmware and Download.
You will also see a list of versions available for your device. Select the version you want to update to, and the download will initiate.
The firmware starts to download on the platform and is verified before it is made ready for installation on the iDevice.
Step 5: Update your iPhone.
Once the download is complete, Dr.Fone will be ready to update your iPhone without data loss.
Step 6: Click Repair Now to start the process.
You can analyze the completion of the process through the progress bar appearing on the next screen.

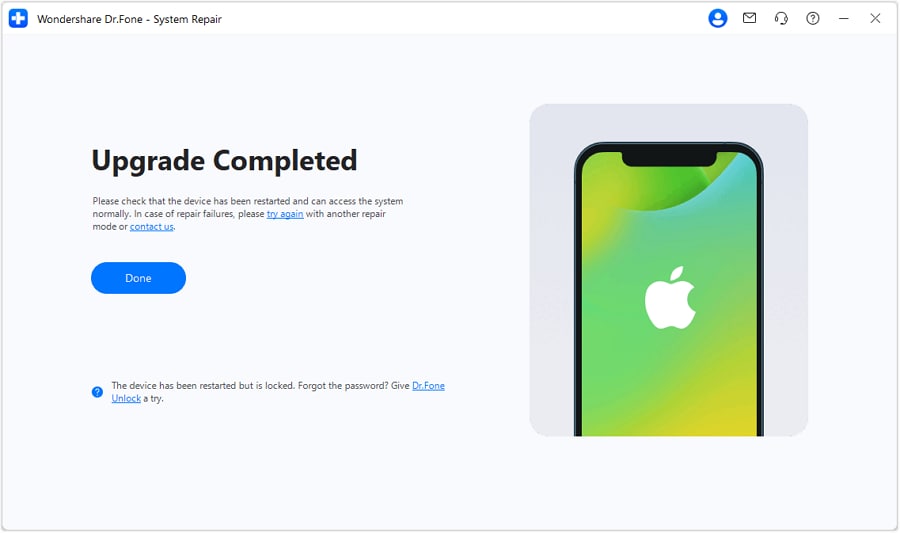
Step 7: Conclude Upgrading iOS/iPadOS
As the operating system is upgraded on your iDevice, continue to click Done to conclude the entire process.
The Best Solution for iOS 26 Beta Issues
Tips: Dr.Fone - System Repair now enables zero-data-loss solutions for iOS 26 Beta crashes (boot loops/black screen/failed updates) and one-click downgrades to signed versions (e.g. iOS 18.5), completing in 10 minutes. Supports all iPhone models, bypassing iTunes factory reset risks. Downgrades require open Apple signing windows (real-time tool verification). Pre-export critical data when reverting from iOS 26.
Part 3: Other Fixes
Now, there are other fixes you can try if you have the time.
3.1: Force Restart iPhone
Apart from the standard restart method, there is another way to restart iPhone, called Force Restart. You can force restart iPhone as another helpful way to fix random issues.
Step 1: Press the Volume Up key on your iPhone once and release.
Step 2: Press the Volume Down key once and release.
Step 3: Press and hold the Side button until the iPhone restarts.
This is called a Force Restart.
3.2: Check Low Data Mode in Wi-Fi Settings
It is possible that you are unable to check for updates on iPhone due to a setting called Low Data Mode that is usually activated on newer iPhone models with fresh software installs. Here’s how to check for and disable Low Data Mode in your phone’s Wi-Fi settings.
Step 1: Go to Settings > Wi-Fi and tap the info button on your connected Wi-Fi network name.
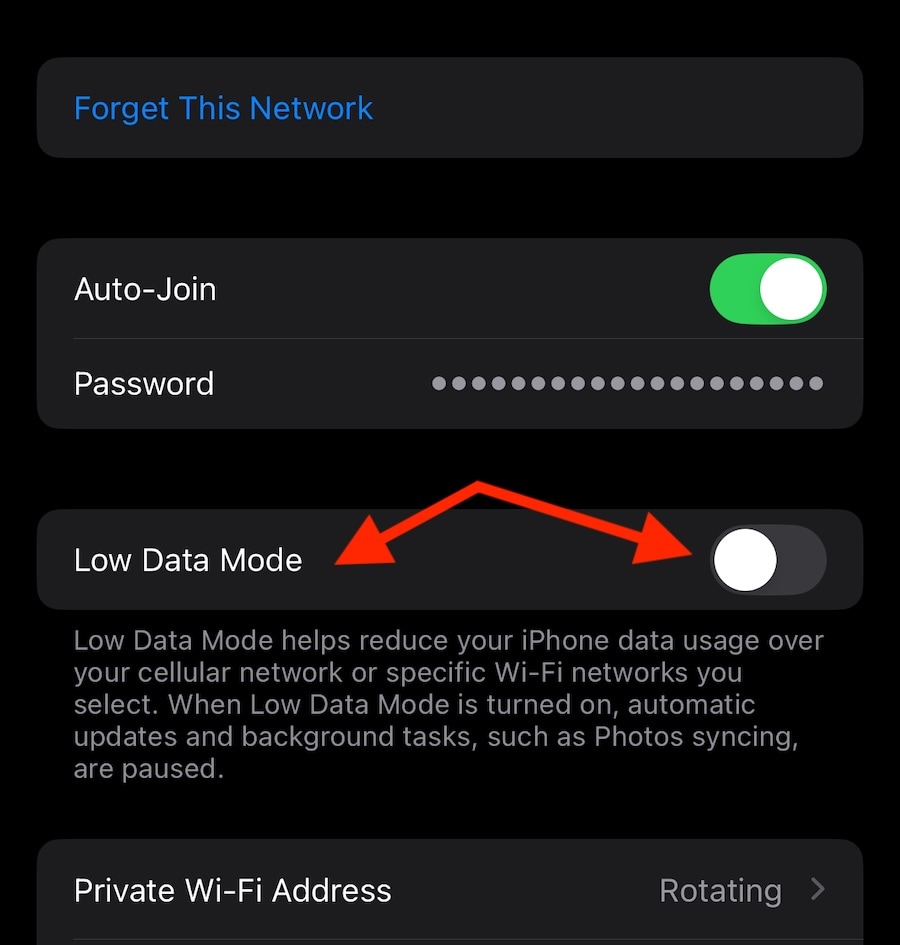
Step 2: Ensure that Low Data Mode is disabled.
3.3: Check Device Storage
If your iPhone does not have enough storage space free, it might be why it refuses to check for update or is stuck at checking for update. Check your free storage and clean up if necessary.
Step 1: Go to Settings > General > iPhone Storage.
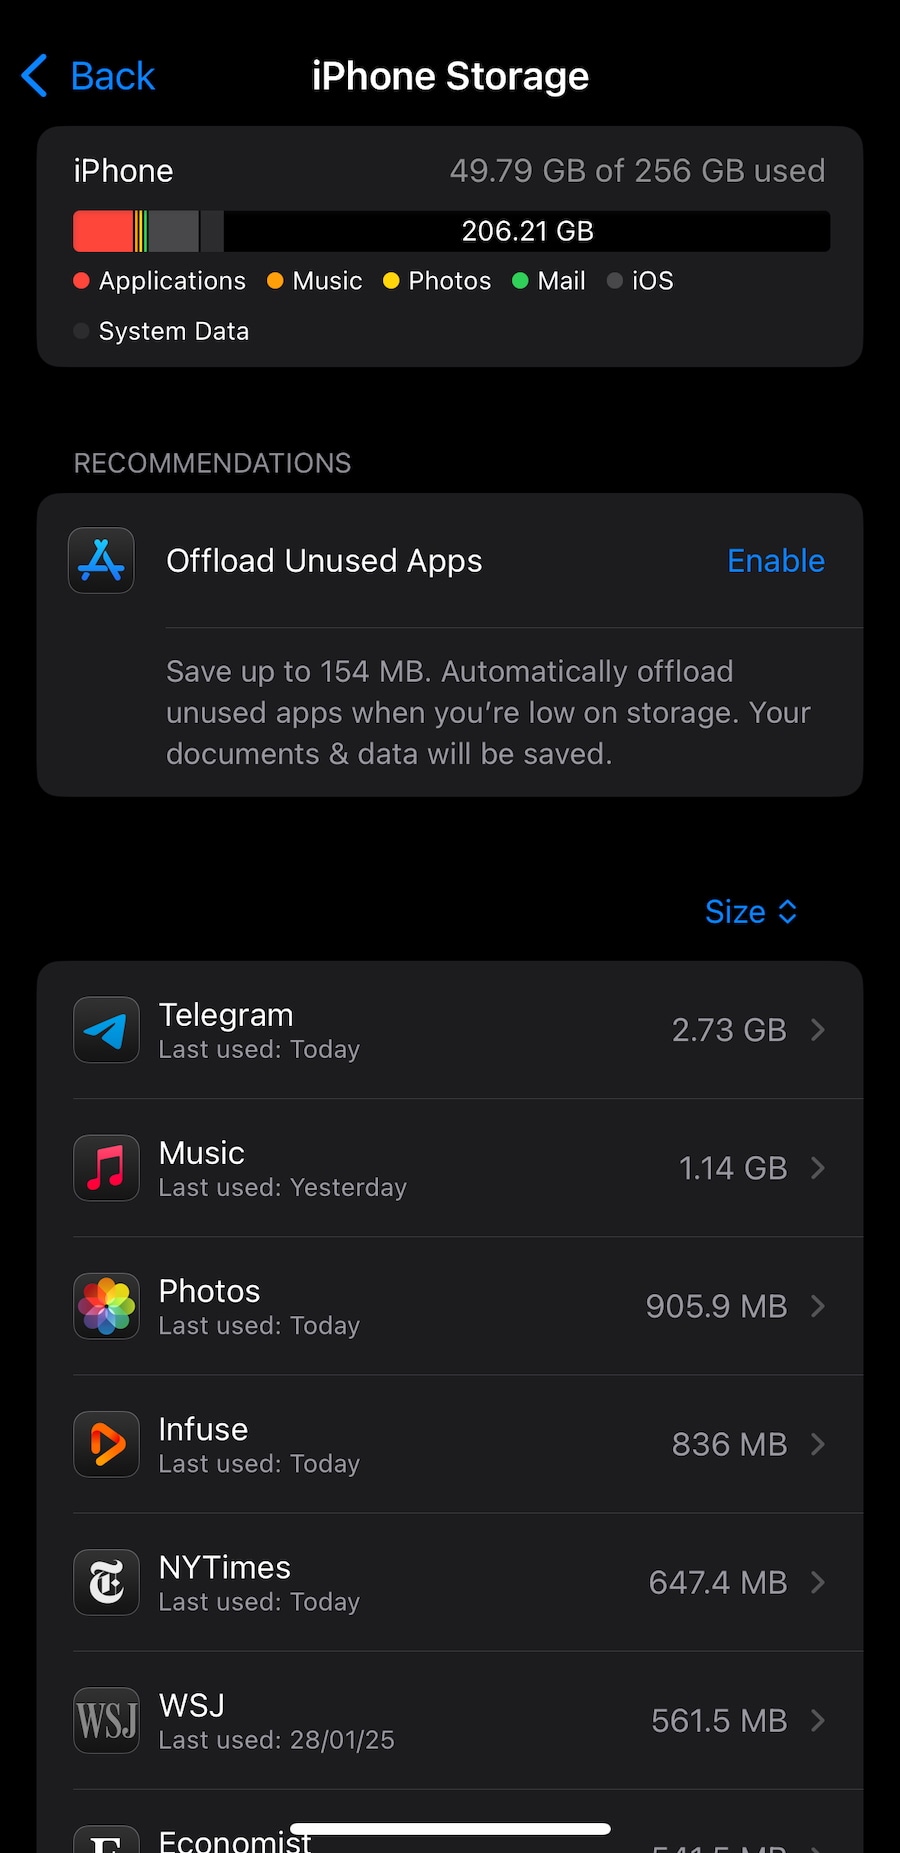
Step 2: Remove apps or offload apps if required, to make room for the iOS software download on your phone. On average, it is best to have around 10 GB free for software update to work seamlessly.
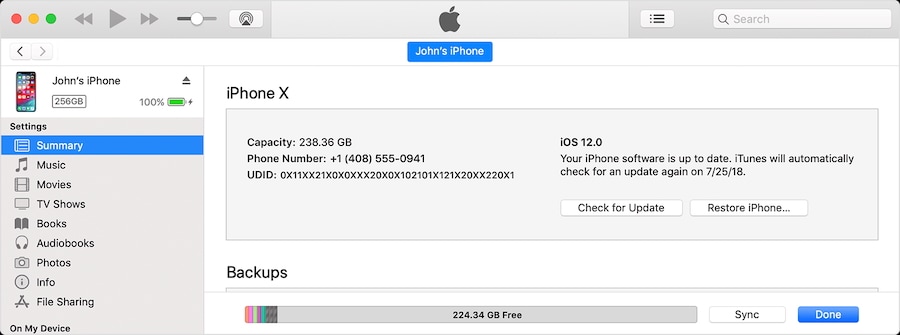
3.4: Check for Updates Using iTunes
If you simply cannot make enough free space on the iPhone, you can use your computer and iTunes to check for updates.
Step 1: Connect your iPhone to your computer.
Step 2: Launch iTunes on Windows or Mac with macOS Mojave or earlier.
Step 3: Click the iPhone button in the iTunes toolbar.

Step 4: Click Summary from the sidebar and click Check for Update button to check for updates.
3.5: Restore iPhone Using iTunes
You can use iTunes to restore your iPhone as well, but beware, this process will delete user data.
Step 1: Connect your iPhone to your Mac or Windows computer.
Step 2: Launch iTunes on Windows or a Mac with macOS Mojave or earlier.
Step 3: Click the iPhone button in the iTunes toolbar.
Step 4: Click Summary from the sidebar on the left and click Restore iPhone.
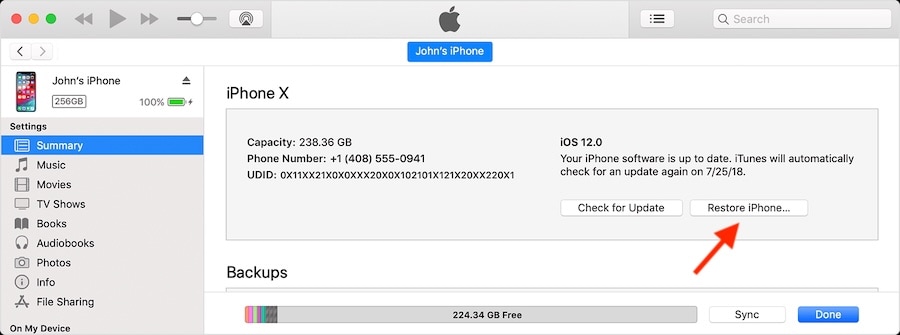
Follow the process to factory reset your iPhone and update it to the latest version. This method deletes user data on the device. You might be required to backup iPhone using iTunes if you use this method.
Final Words
Is your iPhone stuck on checking for update but not moving forward? We understand how incredibly frustrating it is when that happens! We understand you want to resolve this iPhone unable to check for update problem quickly. So, this comprehensive guide offers solutions that range from simply force restarting the iPhone and checking your internet connectivity to other ways such as using Dr.Fone - System Repair(iOS) to check for updates on iPhone and update your iPhone reliably and quickly in just a few clicks. Download the app today and get started!


Upgrade & Downgrade
- iOS Beta Install
- 1. Download iOS Beta Profile
- 2. Download the iOS 13 Beta
- 3. iOS 16 Beta Download
- 4. Uninstall iOS Beta
- 5. Install iPhone Beta Profile
- 6. Install Mac Beta Profile
- 7. Install iOS 15 Beta Profile
- 8. Upgrade iPad to iOS 14
- iOS News
- 1. Update iPhone 4s to iOS 9
- 2. Cheaper iPhone
- 3. Customize iPhone Home Screen
- 4. Know About iOS 15 Lock Screen
- 5. Add Lyrics to Song on Apple Music
- 6. Current iOS Version
- 7. Current iOS for iPad
- 8. iOS 19 and the iOS 26 Rumor
- iPhone Downgrade Tips
- 1. Downgrade iOS Like a Pro
- 2. Roll Back to an Older iOS Version
- 3. Downgrade to iOS 15
- 4. Install Developer Profile
- 5. Downgrade iOS without iTunes
- 6. Downgrade to iOS 14
- 7. Download and Install the iOS 16
- iPhone Update Tips
- 1. iPhone & iPad Security Updates
- 2. Undo an Update on iPhone
- 3. Update iPhone with/without iTunes
- 4. Fix iPhone Checking for Update Stuck
- 5. Fix iPad Software Update Failed
- 6. Fix iPhone Stuck On Update
- 7. Fix iPhone Won't Update
- 8. Fix Update Server Not Be Contacted
- 9. Fix iPhone Stuck on Update Requested
- 10. Resolve iPhone Cellular
- 11. Resolve iPhone Error 1110
- 12. Fix iPhone Frozen
- iOS 11/12 Problems
- 1. Fix iPhone Stuck on Waiting
- 2. Fix iPhone Can't Make Calls
- 3. Fix iPhone Stuck on Logo
- 4. Fix Photos Disappeared from iPhone
- 5. Fix iPhone Keeps Freezing
- iOS 13/14 Problems
- 1. Fix CarPlay Not Connecting
- 2. Fix Resolve Apps Won't Open
- 3. Fix Song/Playlist Missing
- 4. Fix iPhone Asking for Passcode
- 5. Fix Map Voice Navigation Won't Work
- 6. Fix iMessage Not Working
- 7. Recover Deleted Data on iOS 14
- 8. Recover Disappeared Notes on iOS 14
- iOS 15 Problems
- iOS 16 Problems
- 1. Fix iPhone Wi-Fi Not Working
- 2. Fix iOS 16 Battery Drain Issues
- 3. Fix Screen Mirroring Not Working
- 4. Fix Apple CarPlay is Not Supported
- 5. Fix iPhone Screen Not Responding
- 6. Fix iPhone Apps Keep Crashing
- 7. Fix Call Failed iPhone Issue
- 8. Fix iPhone Stuck On Apple Logo
- 9. Counter iPhone Heating Problems
- 10. Fix iPhone Stuck in Boot Loop
- 11. Fix iPhone Bluetooth Not Working
- iOS 17 Problems
- 1. iPhone Freezing After Update
- 2. iOS 17 Wallpapers Blurry at Top
- 3. Fix iPhone Charging Slow
- 4. Enable Live Activities iOS 17
- 5. Fix iOS 17 Apps Crashing
- 6. Fix iPhone Stuck on Verifying Update
- 7. Overheating after 17 Update
- 8. Fix iOS 17 Keyboard Bug
- 9. Fix iOS 17 Green Screen Issue
- 10. iOS 17 Bugs & Fixes
- 11. No iOS 17 Update on Your iPhone
- 12. iOS 17 Unable to Download
- 13. Missing contacts with iOS 17 update
- iOS 18 Problems
- 1. iOS 18 Black Screen
- 2. iPadOS 18 Math Notes Issues
- 3. iPhone Email Not Working
- 4. iPhone Contacts Disappeared
- 5. iPhone Stuck in Restore Mode
- 6. iPhone Stuck on Preparing Update
- 7. iPhone Flashlight Not Working
- 8. iPhone Bluetooth Issues
- 9. Stuck on Terms and Conditions
- 10. Frozen iPhone iOS 18
- 11. iOS 18 Beta Boot Loop Issue
- 12. iOS 18 Beta Overheating
- 13. iOS 18 Beta Volume Bug
- iOS 26 Topics
- ● Manage/transfer/recover data
- ● Unlock screen/activate/FRP lock
- ● Fix most iOS and Android issues
- Free Download Free Download Free Download


Alice MJ
staff Editor
Generally rated4.5(105participated)