
iPhone Not Connecting To Wi-Fi After iOS 26 - iOS 27 Update? Read This.

Jun 30, 2026 • Filed to: Phone Repair Solutions • Proven solutions
 TL;DR:
To resolve an iPhone not connecting to Wi-Fi after the iOS 26 - iOS 27 update, sequentially execute basic network refreshes like forgetting the network or resetting network settings before utilizing a dedicated iOS repair tool to fix underlying software glitches.
● Because major updates can introduce conflicting modem firmware, executing a network reset via your device settings forces the iPhone to adapt to the new OS changes and establish a fresh connection.
● Before troubleshooting the handset, verify the router has active internet access, as your iPhone is intentionally designed to automatically disconnect from Wi-Fi and switch to cellular data if it detects a lack of internet service.
● For persistent software issues, Dr.Fone - System Repair (iOS) provides a Standard Mode to fix connectivity errors without data loss, and supports downgrading from iOS 27 within 10 minutes strictly if the Apple signing window for the target version remains open.
Ask AI for a summary
 ChatGPT
 Perplexity
 Gemini
 Claude
 Grok
Grok
You’ve just updated to iOS 26 - iOS 27, only to discover your iPhone is not connecting to Wi-Fi—a frustrating experience. Is it a software glitch or something more serious? Don't worry. This guide will walk you through quick and effective solutions to fix iPhone Wi-Fi not working issues, so you can get reconnected and back to what matters most.

Part I: Ways To Fix Wi-Fi Not Working Issue After Upgrading To iOS 26 - iOS 27
Is your iPhone connected to Wi-Fi but there's no internet access, or is Wi-Fi not connecting at all after the iOS 26 - iOS 27 update? If you’re experiencing this for the first time, it can definitely be concerning. But the good news is—thanks to Apple’s high-quality hardware—these problems are usually related to software glitches, not hardware failure.
Fix 1: Toggle Wi-Fi Off And On
In case of iPhone Wi-Fi not working, one of the first fixes is to toggle Wi-Fi off and back on. Here's how:
Step 1: Swipe down from the top right corner to launch Control Center
Step 2: Toggle the Wi-Fi symbol to disconnect from Wi-Fi.
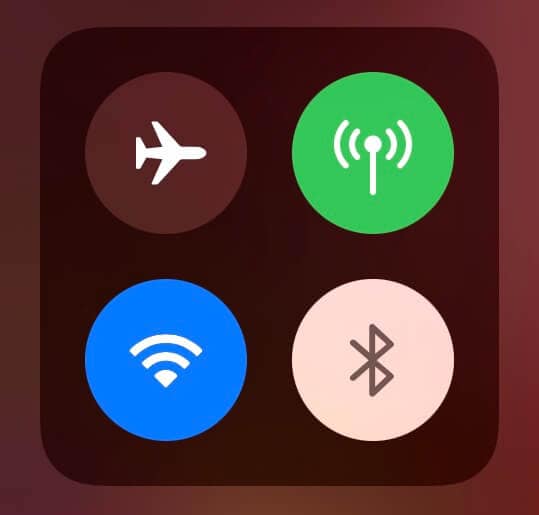
Step 3: After a few seconds, toggle it back ON.
Dr.Fone Unlock Online - Free IMEI Check
iPhone 17 Is Here. Is Your Old Phone Ready to Sell?
Quickly check your iPhone or Android device status for free: Verify Blacklist, iCloud, Carrier Lock, and Warranty Status in Seconds. Ad-free, and globally.
Fix 2: Re-connect To Wi-Fi Network
The next fix is to forget the network and reconnect. Here's how to do that:
Step 1: Go to Settings > Wi-Fi

Step 2: Tap the info icon across the network name
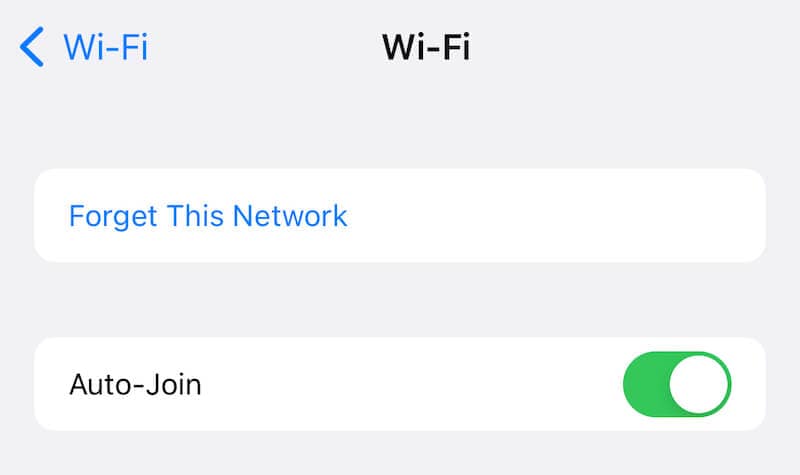
Step 3: Tap Forget This Network.
Step 4: Tap Forget again.
Step 5: The network will reflect in the list of networks again. Tap it and enter your password again to connect.
Fix 3: Toggle Airplane Mode
You can turn Airplane Mode on to disconnect the iPhone from all network connections. That way, when you re-enable the connectivity, all connections are established afresh, often times resolving the underlying issues. Here's how:
Step 1: Launch Control Center by swiping down from the top right of the iPhone
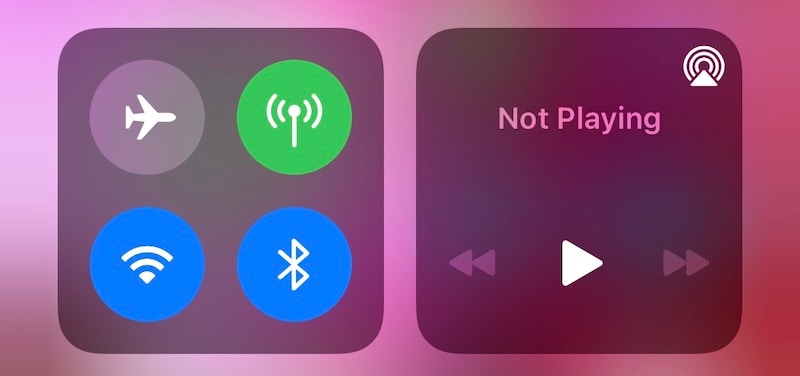
Step 2: Tap the greyed-out Airplane symbol to activate Airplane Mode. When activated, it will look like this:
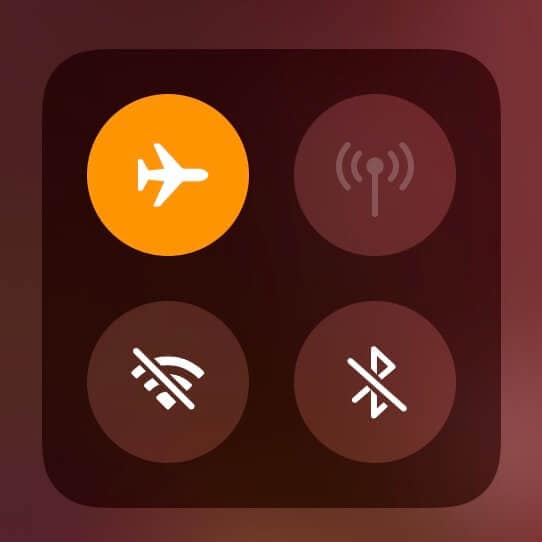
Step 3: Now, wait a few seconds and tap the Airplane to disable Airplane Mode and reconnect to cellular and Wi-Fi networks.
Fix 4: Restart Handset
The good old handset restart fix is recommended in this situation as well. Here's how to restart the iPhone:
Step 1: Go to Settings > General > Shut Down
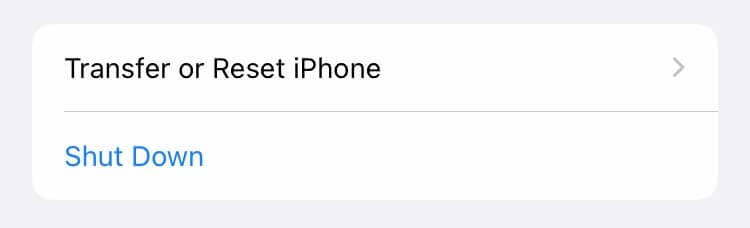
Step 2: Slide to turn the iPhone off
Step 3: Wait for a few seconds, then press the Side Button to restart.
Fix 5: Force Restart
While at it, you might want to force restart the iPhone. This is a harder restart and is known to resolve the occasional stubborn issues. iOS 26 - iOS 27 is available for iPhone 8 and above, so that is what we are going to talk about here. Here's how to force restart the iPhone:
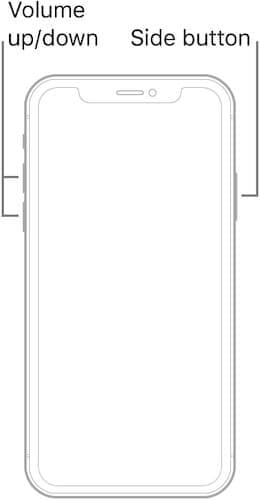
Step 1: Press the volume Up key, then volume Down key, then press and hold the Side button until the iPhone restarts.
Fix 6: Check Internet Connectivity On Wi-Fi Router
Before trying multiple fixes, ensure your Wi-Fi router has active internet connectivity. If not, your iPhone may connect to Wi-Fi but disconnect shortly after, automatically switching to mobile data to maintain a stable connection. This behavior is intentional. To rule this out, test your Wi-Fi connection using another device like a computer.
Your iPhone will show you if it finds there is no internet connection on Wi-Fi.
Step 1: Go to Settings > Wi-Fi

If you see a 'No Internet Connection' message, it means your iPhone has detected that your Wi-Fi router is probably not getting internet service in the moment.
Fix 7: Restart Wi-Fi Router
It is possible that something is stuck in the Wi-Fi router causing it to not accept your iPhone Wi-Fi connection. A quick restart of the router should resolve those issues, if any.
Fix 8: Reset Network Settings
When you upgrade from iOS 15 to iOS 26 - iOS 27, your iPhone may receive modem firmware updates that affect network connectivity. If your iPhone is not connecting to Wi-Fi, resetting network settings can help it adapt to these changes and establish a fresh, stable connection.
Step 1: Go to Settings > General > Transfer or Reset iPhone
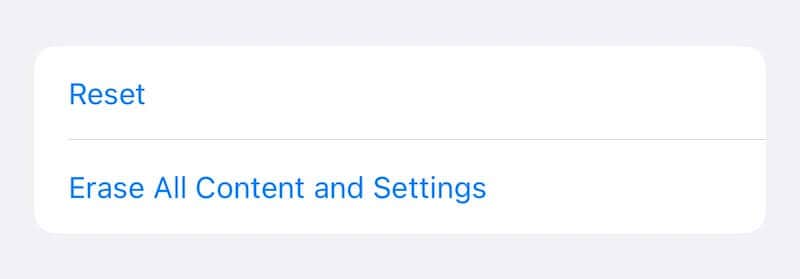
Step 2: Tap Reset
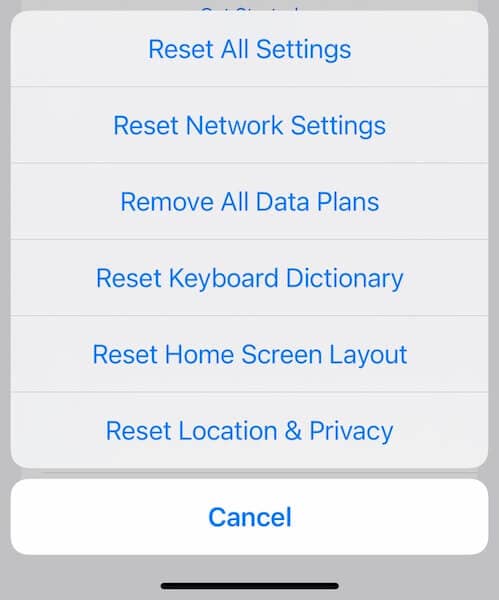
Step 3: Tap Reset Network Settings and confirm.
Fix 9: Repair iOS with Dr.Fone - System Repair
If you're dealing with iPhone not connecting to Wi-F, Dr.Fone - System Repair (iOS) offers a quick and effective solution. This dedicated module is designed to fix various iOS system issues—like Wi-Fi connectivity problems, freezing screens, update failures, and more—without causing data loss. With support for the latest iOS versions and an intuitive interface, it's the ideal tool to restore normal Wi-Fi functionality on your iPhone in just a few clicks.
Dr.Fone - System Repair (iOS)
Repair iOS System Errors Without data loss.
- Only fix your iOS to normal, no data loss at all.
- Fix various iOS system issues stuck in recovery mode, white Apple logo, black screen, looping on start, etc.
- Downgrade iOS without iTunes at all.
- Work for all iPhone/iPad/iPod Touch, running on all iOS versions


Step 1: Get Dr.Fone
Step 2: Launch the app after installation

Step 3: Click System Repair. There are two modes: Standard and Advanced. Standard Mode fixes iOS issues without data loss whereas Advanced Mode wipes user data and performs a more thorough repair. Select Standard Mode to begin.

Step 4: At the version screen, choose your version and download:

Step 5: Now, the firmware will start downloading and after verification with Apple. Click Repair Now

Step 6: Once the repair is finished, you’ll see a completion message. Click "Done" to end the process and start using your iPhone or iPad again.

The iPhone will restart when the repair is complete.
The Best Solution for iOS 27 Issues
Tips: Dr.Fone - System Repair now enables zero-data-loss solutions for iOS 27 crashes (boot loops/black screen/failed updates) and one-click downgrades to signed versions (e.g. iOS 26.6), completing in 10 minutes. Supports all iPhone models, bypassing iTunes factory reset risks. Downgrades require open Apple signing windows (real-time tool verification). Pre-export critical data when reverting from iOS 27.
Conclusion
Facing iPhone not connecting to Wi-Fi after the iOS 26 - iOS 27 update? You're not alone—and fortunately, you're not without solutions. Try the proven fixes to restore internet access. If nothing works, use a professional iOS repair tool like Dr.Fone - System Repair (iOS). It offers step-by-step guidance and fixes iOS issues—including Wi-Fi problems—without data loss, helping you get back online fast.


Upgrade & Downgrade
- iOS Beta Install
- 1. Download iOS Beta Profile
- 2. Download the iOS 13 Beta
- 3. iOS 16 Beta Download
- 4. Uninstall iOS Beta
- 5. Install iPhone Beta Profile
- 6. Install Mac Beta Profile
- 7. Install iOS 15 Beta Profile
- 8. Upgrade iPad to iOS 14
- iOS News
- 1. Update iPhone 4s to iOS 9
- 2. Cheaper iPhone
- 3. Customize iPhone Home Screen
- 4. Know About iOS 15 Lock Screen
- 5. Add Lyrics to Song on Apple Music
- 6. Current iOS Version
- 7. Current iOS for iPad
- 8. iOS 19 and the iOS 26 Rumor
- iPhone Downgrade Tips
- 1. Downgrade iOS Like a Pro
- 2. Roll Back to an Older iOS Version
- 3. Downgrade to iOS 15
- 4. Install Developer Profile
- 5. Downgrade iOS without iTunes
- 6. Downgrade to iOS 14
- 7. Download and Install the iOS 16
- iPhone Update Tips
- 1. iPhone & iPad Security Updates
- 2. Undo an Update on iPhone
- 3. Update iPhone with/without iTunes
- 4. Fix iPhone Checking for Update Stuck
- 5. Fix iPad Software Update Failed
- 6. Fix iPhone Stuck On Update
- 7. Fix iPhone Won't Update
- 8. Fix Update Server Not Be Contacted
- 9. Fix iPhone Stuck on Update Requested
- 10. Resolve iPhone Cellular
- 11. Resolve iPhone Error 1110
- 12. Fix iPhone Frozen
- iOS 11/12 Problems
- 1. Fix iPhone Stuck on Waiting
- 2. Fix iPhone Can't Make Calls
- 3. Fix iPhone Stuck on Logo
- 4. Fix Photos Disappeared from iPhone
- 5. Fix iPhone Keeps Freezing
- iOS 13/14 Problems
- 1. Fix CarPlay Not Connecting
- 2. Fix Resolve Apps Won't Open
- 3. Fix Song/Playlist Missing
- 4. Fix iPhone Asking for Passcode
- 5. Fix Map Voice Navigation Won't Work
- 6. Fix iMessage Not Working
- 7. Recover Deleted Data on iOS 14
- 8. Recover Disappeared Notes on iOS 14
- iOS 15 Problems
- iOS 16 Problems
- 1. Fix iPhone Wi-Fi Not Working
- 2. Fix iOS 16 Battery Drain Issues
- 3. Fix Screen Mirroring Not Working
- 4. Fix Apple CarPlay is Not Supported
- 5. Fix iPhone Screen Not Responding
- 6. Fix iPhone Apps Keep Crashing
- 7. Fix Call Failed iPhone Issue
- 8. Fix iPhone Stuck On Apple Logo
- 9. Counter iPhone Heating Problems
- 10. Fix iPhone Stuck in Boot Loop
- 11. Fix iPhone Bluetooth Not Working
- iOS 17 Problems
- 1. iPhone Freezing After Update
- 2. iOS 17 Wallpapers Blurry at Top
- 3. Fix iPhone Charging Slow
- 4. Enable Live Activities iOS 17
- 5. Fix iOS 17 Apps Crashing
- 6. Fix iPhone Stuck on Verifying Update
- 7. Overheating after 17 Update
- 8. Fix iOS 17 Keyboard Bug
- 9. Fix iOS 17 Green Screen Issue
- 10. iOS 17 Bugs & Fixes
- 11. No iOS 17 Update on Your iPhone
- 12. iOS 17 Unable to Download
- 13. Missing contacts with iOS 17 update
- iOS 18 Problems
- 1. iOS 18 Black Screen
- 2. iPadOS 18 Math Notes Issues
- 3. iPhone Email Not Working
- 4. iPhone Contacts Disappeared
- 5. iPhone Stuck in Restore Mode
- 6. iPhone Stuck on Preparing Update
- 7. iPhone Flashlight Not Working
- 8. iPhone Bluetooth Issues
- 9. Stuck on Terms and Conditions
- 10. Frozen iPhone iOS 18
- 11. iOS 18 Beta Boot Loop Issue
- 12. iOS 18 Beta Overheating
- 13. iOS 18 Beta Volume Bug
- iOS 26 Topics
- ● Manage/transfer/recover data
- ● Unlock screen/activate/FRP lock
- ● Fix most iOS and Android issues
- Free Download Free Download Free Download


James Davis
staff Editor
Generally rated4.5(105participated)