How to Share Facebook Videos on WhatsApp Status (Without Link) - 4 Easy Methods
WhatsApp Manage
- WhatsApp Transfer
- 1. Save Whatsapp Audio
- 2. Transfer WhatsApp Photos to PC
- 3. WhatsApp from iOS to iOS
- 4. WhatsApp from iOS to PC
- 5. WhatsApp from Android to iOS
- 6. WhatsApp from iOS to Android
- 7. Whatsapp Communities Messages
- 8. Switch Between WhatsApp and GBWhatsApp
- 9. Recover Deleted WhatsApp Call History
- 10. Delete Call History on WhatsApp
- 11. Starred Messages in WhatsApp
- 12. Send Bulk SMS on WhatsApp
- 13. Download Whatsapp Audio Notes
- 14. Saving Videos from WhatsApp
- WhatsApp Backup
- 1. Access WhatsApp Backup
- 2. WhatsApp Backup Extractor
- 3. Backup WhatsApp Messages
- 4. Backup WhatsApp Photos/Videos
- 5. Backup WhatsApp to PC
- 6. Backup WhatsApp to Mac
- 7. WhatsApp Backup Stuck
- 8. Restore WhatsApp Backup from Google Drive to iCloud
- 9. Find the Best WhatsApp Clone App
- WhatsApp Restore
- 1. Top Free WhatsApp Recovery Tools
- 2. Best WhatsApp Recovery Apps
- 3. Recover WhatsApp Messages Online
- 4. Recover Deleted WhatsApp Messages
- 5. Restore Deleted WhatsApp Messages
- 6. Retrieve Deleted WhatsApp Messages
- 7. Recover Deleted WhatsApp Images
- 8. WhatsApp Restoring Media Stuck
- 9. Restore Old WhatsApp Backup
- 10. See Deleted WhatsApp Messages
- WhatsApp Tips
- 1. Best WhatsApp Status
- 2. Best WhatsApp Messages
- 3. Most Popular WhatsApp Ringtones
- 4. Best WhatsApp Mod Apps
- 5. What is Blue WhatsApp
- 6. 234 Country Code WhatsApp
- 7. Delete WhatsApp Account
- 8. Hide WhatsApp Ticks
- 9. Hack WhatsApp Account
- 10. Verify WhatsApp without SIM
- 11. Blue Ticks on WhatsApp
- 12. WhatsApp Plus Download
- 13. Grey Tick on WhatsApp
- 14. Does WhatsApp Notify Screenshots
- WhatsApp Problems
- 1. WhatsApp Common Problems
- 2. WhatsApp Calls Not Working
- 3. Whatsapp Not Working on iPhone
- 4. WhatsApp Backup Stuck
- 5. WhatsApp Not Connecting
- 6. WhatsApp Not Downloading Images
- 7. WhatsApp Not Sending Messages
- 8. Couldn‘t Restore Chat History
- 9. WhatsApp Not Showing Contact Names
- WhatsApp Business Manage
- 1. WhatsApp Business for PC
- 2. WhatsApp Business Web
- 3. WhatsApp Business for iOS
- 4. Add WhatsApp Business Contacts
- 5. Backup & Restore WhatsApp Business
- 6. Convert a WhatsApp Account to a Business Account
- 7. Change A WhatsApp Business Account to Normal
- 8. WhatsApp Notifications Are Not Working
- Other Social Apps Manage
- ● Manage/transfer/recover data
- ● Unlock screen/activate/FRP lock
- ● Fix most iOS and Android issues
- Manage Now Manage Now
Dec 31, 2025 • Filed to: Social App Management • Proven solutions
Sharing videos is a big part of social media. If you want to share a Facebook video on WhatsApp, you’re not alone. Many people save or forward clips to friends and groups for fun or to share news. Knowing the right steps makes it quick and keeps quality intact, whether you use an iPhone or Android.
In this article you’ll learn simple ways to transfer and post clips — from copying links to saving videos and using screen recording. We cover step-by-step guides for both systems and show helpful tools. We also explain how backups affect sharing Facebook videos on WhatsApp, and how Wondershare Dr.Fone – WhatsApp Transfer makes backing up and restoring simple.
Part 1. How do you share a video from Facebook to WhatsApp Directly
The easiest way to share a video link on WhatsApp is directly through Facebook. This method is simple, quick, and works smoothly on both iPhones and Android phones. By using the built-in share option, you can share a video from Facebook on WhatsApp without losing quality or needing to download anything.
Below, you’ll find detailed steps to send a video from Facebook to WhatsApp on each device type.
For the Users of the iPhone
If you use an iPhone, you can easily share Facebook videos with your friends — whether they’re using iPhone or Android. Follow these steps to send a video from Facebook to WhatsApp:
-
Open the Facebook app and find the video you want to share.
-
Tap the Share button below the video.
-
From the list of options, choose WhatsApp.
-
Select the chat or group where you want to send the video.
- Tap Next, then Send to finish.
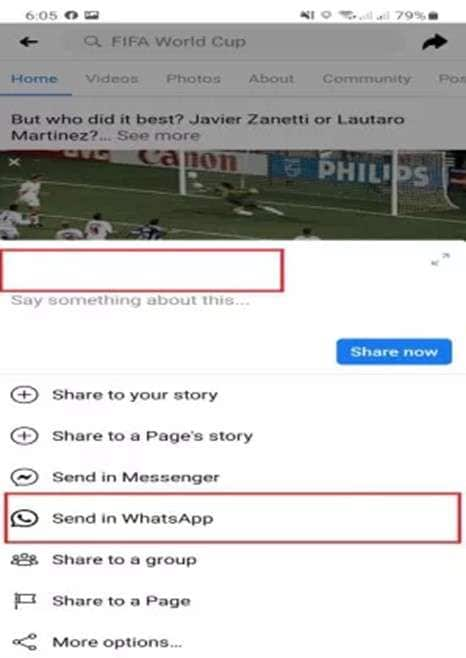
For the Users of the Android
Just like on iPhone, Android also allows you to share a video from Facebook on WhatsApp with only a few taps. Here’s how:
-
Open the Facebook app and locate the video you want.
-
Tap the Share option beneath the video.
-
Choose WhatsApp from the menu.
-
Pick your desired chat or group to share the video with.
-
Tap Send to complete the process.
💡 Tip:
If you can’t find WhatsApp in the share menu, simply tap Copy Link on Facebook, open WhatsApp, and paste it into the chat. This way, you can still share Facebook videos easily, even when the direct share option doesn’t appear.
Part 2. How to Share Facebook Video on WhatsApp by Downloading
You can use this other way on your PC to send your Facebook videos to people you talk to on WhatsApp. You can additionally save your preferred Facebook videos to watch later when you're not online. Use this method by following these easy steps.
Step 1: Go to your computer and open Facebook.
Step 2: Find the video you want to send to WhatsApp.
Step 3: Finally, click the "Share" button and choose "Copy link."
Step 4. Go to the Getfvid page now. Ultimately, click the "Download" button after pasting the link into the box that appears in the picture.

Step 5: You will get the video and save it on your computer. Now, go to WhatsApp web and proceed to the chat where you'd like to send the video. Hit "Send" after choosing the video, and then send the Facebook video link to WhatsApp.
Part 3. Share Facebook Videos to WhatsApp on the Desktop
You can also easily share a Facebook video to WhatsApp on your computer. In this case, you need to use WhatsApp web to send the video to the people you know. Just follow these steps carefully:
Step 1: Log in to a Facebook ID and look through the app to find the video you wish to share. After you've chosen it, tap on it to make it bigger. You will notice its URL link at the top of the screen. After that, copy the link address.

Step 2: Type "web.whatsapp.com" into your web browser to access the WhatsApp web. At the same time, start WhatsApp on the mobile device and tap "Settings." That's where you need to tap on "WhatsApp Web." Once you read the QR code on your phone, the WhatsApp app will be available on your desktop.
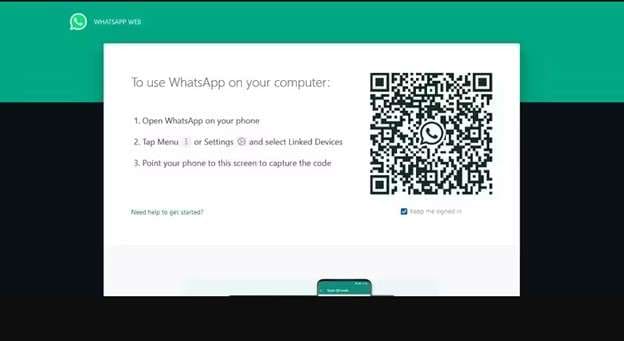
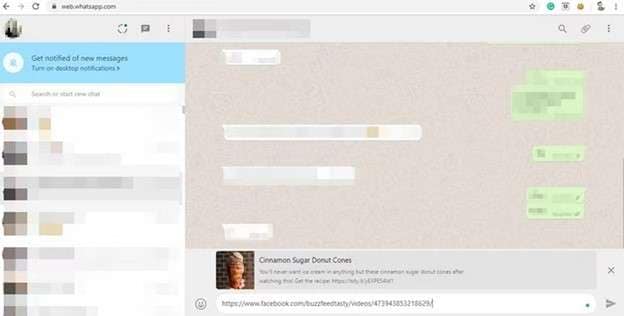
Step 3: After that, you can choose who to send the Facebook video to. Copy the URL link of the Facebook video and paste it into the box. Then, hit "Send" to send it to your contact.
Part 4. Pro-tip: Backup and Restore WhatsApp Contacts on Both iOS and Android with a Single Click
Back-ups are an important part of keeping data safe. A lot of methods for protecting data indicate that backups should be done before anything else. iCloud protects all of your info on iOS devices, but there's always more that can be done. Having a different place to store your WhatsApp backup is important, and this part will help you explore Dr.Fone - WhatsApp Transfer.

Dr.Fone - WhatsApp Transfer
Backup and Restore WhatsApp Contacts on Both iOS and Android with a Single Click
- Transfer WhatsApp messages from Android to iOS, Android to Android, iOS to iOS, and iOS to Android.
- Backup WhatsApp messages from iPhone or Android on your PC.
- Allow restoring any item from the backup to iOS or Android.
- Completely or selectively preview and export WhatsApp messages from iOS backup to your computer.
- Support all iPhone and Android models.
Backup and Restore WhatsApp on iOS
As we go through the steps, the WhatsApp Transfer tool from Dr.Fone makes it easy for iOS devices to back up their essential WhatsApp data. Using this exclusive tool is very easy, and you have full control over the data you want to back up. To back up and restore WhatsApp on your iPhone or iPad, follow these detailed steps:
Step 1: Start up the WhatsApp Transfer Software on your desktop.
Open Wondershare Dr.Fone on your PC to begin. To open the WhatsApp Transfer tool, go to the Toolbox and choose it.

Step 2: Use the backup feature
When the tool starts up, go to the WhatsApp section and choose Backup WhatsApp messages to start a backup of the WhatsApp data on your iPhone.

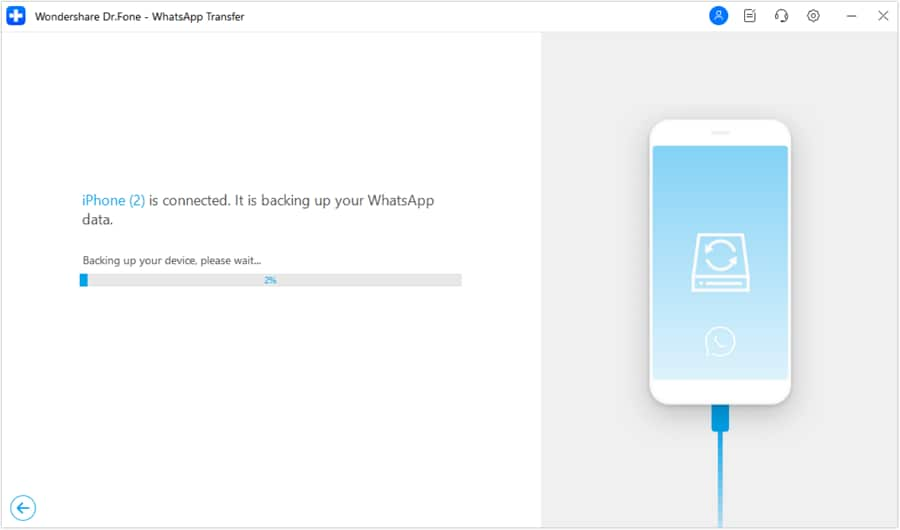
Step 3: Check on the Backup's Progress
As soon as the backup starts, the next screen shows the progress, so you can keep an eye on it.
Step 4: Finish the backup and view
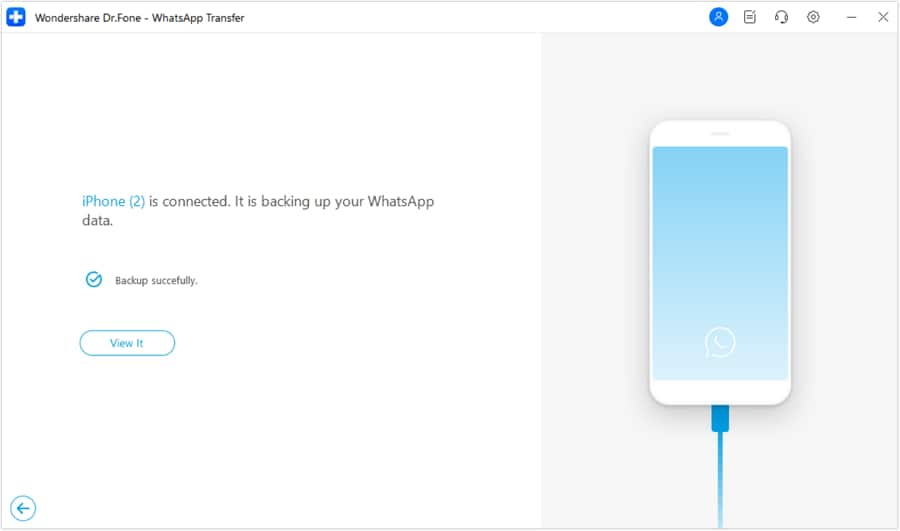
A message will show up to let you know that the process was successful when the data is backed up. Click "View It" to open the backed-up info in a new window and look at it.
Step 5: Use the restore function
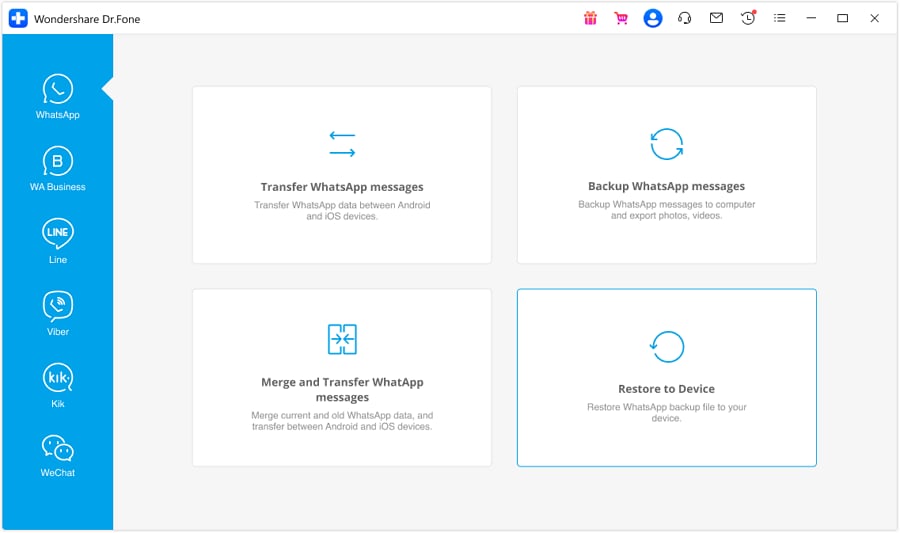
Anytime you want to get your WhatsApp data back on your iOS device, go to the WhatsApp area and tap on Restore to Device. This will start the process of restoring the data in a new window.
Step 6: Pick the backup file you want to restore.
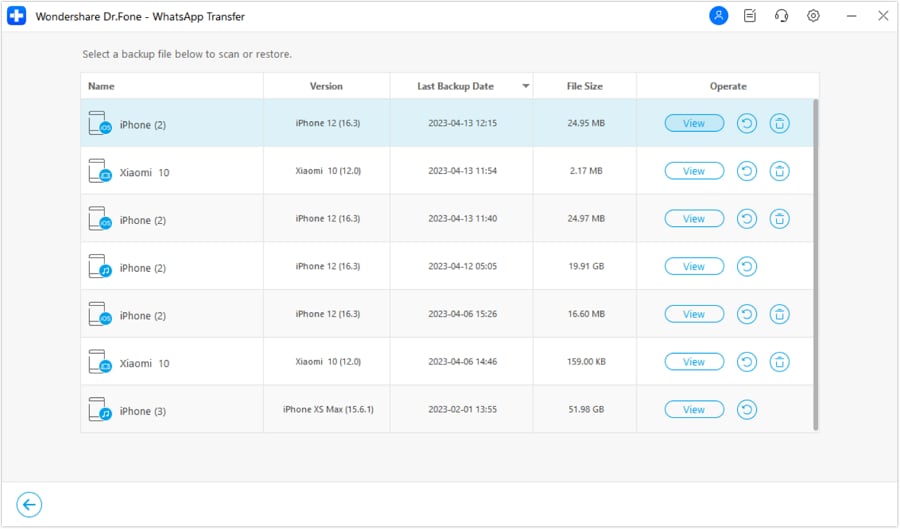
The backup files, which show the data that the system holds, are shown on the next screen. Find the data on your iDevice and hit the "View" button beside the file information.
Step 7: Look at the backup files and restore them to the device
The next screen shows the whole WhatsApp backup file, with categories to make it easy to find what you need. Choose a category to see particular messages, media, and other data that is relevant. Hit the "Restore to Device" icon in the bottom right corner of the screen to get the info back on your iPhone.
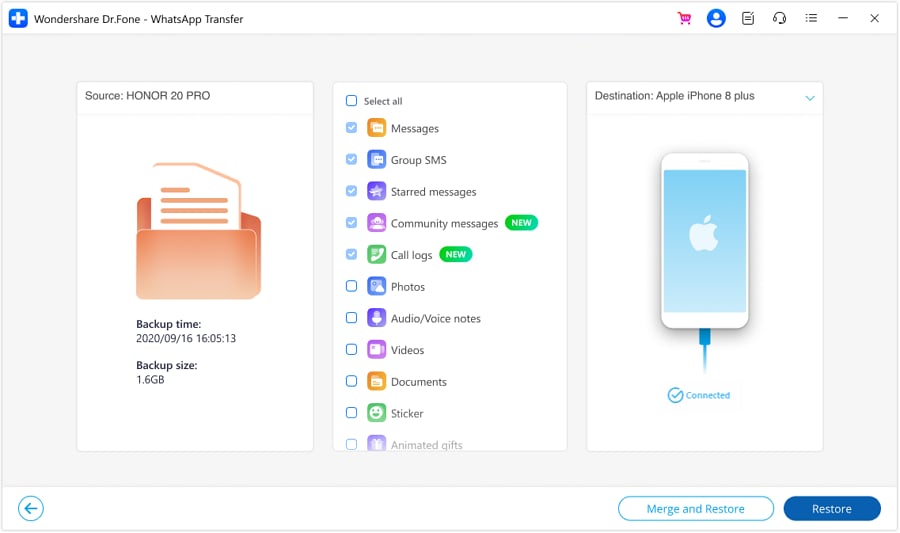
Step 8: Start restoring the device
The repair process will begin on the next interface; click the "Restore" icon to begin.

Step 9: Agree the prompt to back up the device's data.
Before you restore, make sure you have a copy of the WhatsApp data that is already on your iPhone or iPad. This procedure will replace it. To make a copy of the info, press "Backup." You can choose "Continue" to move forward with the repair even without a backup.

Step 10: Check on the status of the restoration of data
The following window shows how far along the data repair process is. To stop the procedure, select "Cancel".

Step 11: Turn Off "Find My iPhone"
A window that pops up will turn off your iPhone's "Find My iPhone" function. Open the Settings app on your iPhone, tap your name at the very top of the screen, and then go to the Find My section. Then, follow the on-screen directions. Turn off the Find My iPhone switch, and then press "OK" on your PC.

Step 12: Restore WhatsApp on your iPhone or iPad completely.
When you finish following the steps, the restore process will be over, and the notification will show that it was successful. Press "OK" to close out the process.

Conclusion:
Knowing how to share a Facebook video on WhatsApp can enhance your social sharing experience. Whether you prefer to share via link or by downloading the video, the steps are simple and efficient for both Android and iPhone users. Additionally, using tools like Wondershare Dr.Fone - WhatsApp Transfer ensures your WhatsApp data is safely backed up and easily restored, giving you peace of mind when managing your data across devices.
By following these methods, you can effortlessly share engaging and important videos from Facebook to your WhatsApp contacts, keeping the conversation flowing and your social interactions vibrant.




Daisy Raines
staff Editor