[2024] How to Retrieve Recently Deleted Messages on iOS 16 & iOS 17

Jul 12, 2024 • Filed to: Data Recovery Solutions • Proven solutions
As we now embrace the iOS 16 and wait for the upcoming iOS 17, it becomes essential to explore the features and functionalities they offer, especially regarding data recovery.
The importance of iOS data recovery cannot be overstated. Our iPhones store a lot of valuable information, including text messages. What should you do if you want to retrieve recently deleted messages on iOS 16? Fortunately, we have discovered a solution just for you.
Join us as we retrieve iOS 16 recently deleted messages and equip you with the knowledge to safeguard your data effectively.
Part 1: How to Recover Data on iOS 16 and iOS 17
Sometimes, we delete messages on purpose or by accident, thinking we no longer need them. But later on, we realize they are still important for business or sentimental reasons. It happens to all of us.
Fortunately, there is no significant difference between iOS 16 data recovery and the upcoming iOS 17. The methods and procedures for retrieving recently deleted messages remain largely the same across both versions. It's easier for users to adapt and utilize these techniques.
Now, let's explore the steps to recover recently deleted messages on iOS 16 (and also iOS 17):
Method 1: Restore via iMessage
If you accidentally delete messages and wish to recover them, you have a 30-day window to do so. Here's how you can retrieve them:
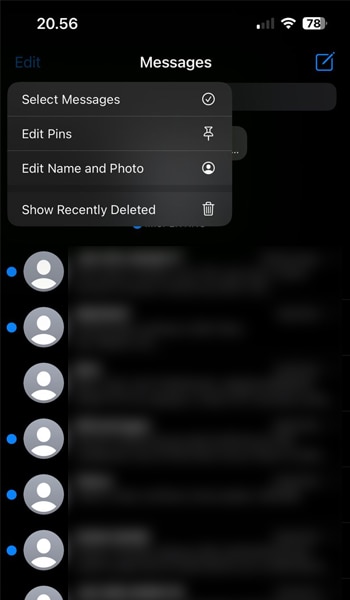
- Step 1: Open the iPhone Messages app and access the conversation list.
- Step 2: Tap "Edit" > "Show Recently Deleted," or you can tap "Filters" > "Recently Deleted."
If you are currently in a conversation, simply tap the "Back" button to return to the conversation list.
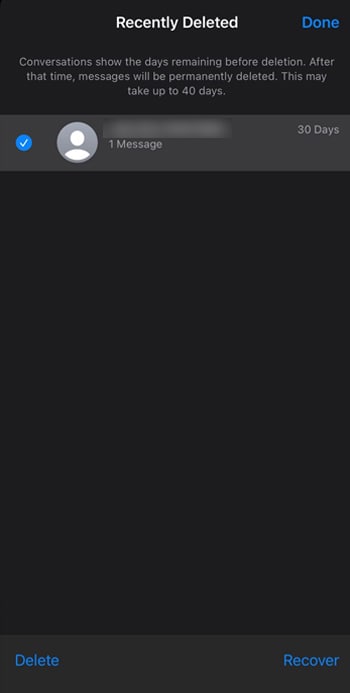
- Step 3: In the "Recently Deleted" section, select the conversations containing the messages you want to restore.
- Step 4: Once you have selected the relevant conversations, tap "Recover." Confirm your action by tapping "Recover Messages."
Method 2: Restore from an iCloud backup
With Messages in iCloud, deleting or recovering messages on your iPhone automatically syncs those changes across all your other Apple devices where Messages in iCloud is turned on. To restore recently deleted messages via iCloud, follow the steps below:
First, creating an iPhone backup:
- Step 1: Access your iPhone settings and tap on your Apple ID at the top of the screen.
- Step 2: Navigate to "iCloud" > "iCloud Backup."
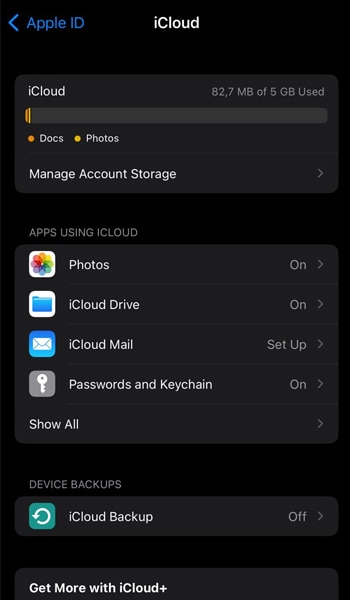
- Step 3: Toggle on the "iCloud Backup" option. Ensure your iPhone is connected to Wi-Fi to initiate the backup process.

Restoring your iPhone from a backup:
- Step 1: Reset your iPhone by opening Settings > General > Transfer or Reset iPhone.

- Step 2: Select “Erase All Content and Settings.” Don’t worry, your files are safe since you have backed them up.
- Step 3: Once the reset is complete, you'll see the "Apps & Data" screen. Choose "Restore from iCloud Backup."
- Step 3: Sign in to your Apple ID and select the backup you want to restore from. Then, allow the phone to complete the restoration process. Your data will be recovered.
Part 2: Advanced Solution: How to Use Wondershare Dr.Fone Data Recovery
If you find yourself in need of a more comprehensive solution to recover not just messages but other types of data, Wondershare Dr.Fone Data Recovery is an excellent choice.
Dr.Fone is a powerful and user-friendly software designed to help you retrieve a wide range of lost or deleted data from your iOS devices. The software is regularly updated, so you won’t have to be worried about compatibility with iOS 16 or iOS 17 data recovery.
Wondershare Dr.Fone
World's 1st iPhone and iOS data recovery software
- Provide with three ways to recover iPhone data.
- Scan iOS devices to recover photos, video, contacts, messages, notes, etc.
- Extract and preview all content in iCloud/iTunes backup files.
- Selectively restore what you want from iCloud/iTunes backup to your device or computer.
- Compatible with the latest iPhone models.
Features of Wondershare Dr.Fone Data Recovery:
- Ability to recover various types of data, including messages, contacts, photos, notes, and more.
- Preview and selectively recover the specific data you need, saving time and space on your device.
- The recovery process is safe, and no data will be lost or overwritten during the restoration.
How to do iOS 16 data recovery using Wondershare Dr.Fone:
- Step 1: Launch Dr.Fone Data Recovery and connect your iPhone
To begin the data recovery process, connect your iPhone and open Dr.Fone on your computer. From the "Toolbox" menu, select "Data Recovery."

- Step 2: Select Recover data from iOS.
In the following window, specify the device type as "iOS" and click on "Recover Data from iOS device."

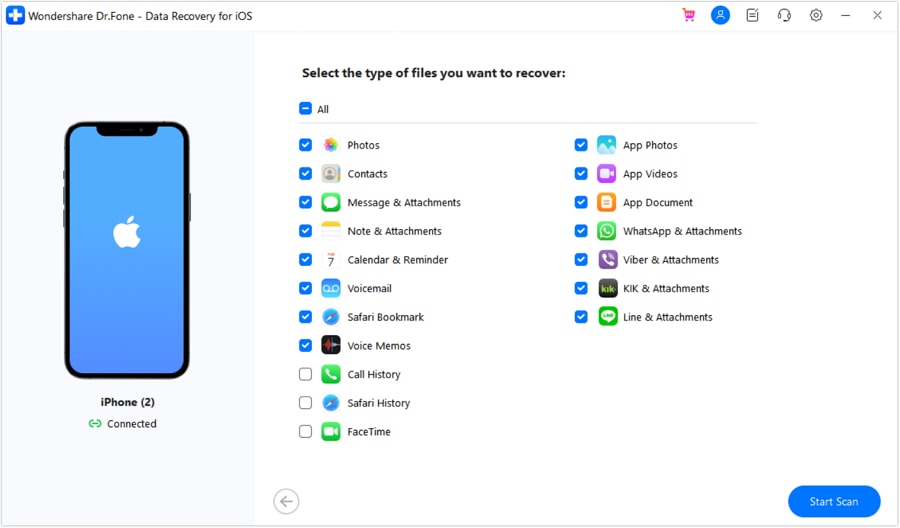
- Step 3: Choose file types for recovery
Now, your screen will showcase all the file types available for recovery. From the list, you can select the specific file types you wish to recover or exclude any that you don't need. Once you've made your selections, simply click "Start Scan" to begin the scanning process.
- Step 4: Filter and select data.
Once the scanning process is complete, you can browse through and preview the specific data you wish to recover. To filter the display results, use the tabs at the top to choose whether you want to view all the data or only the existing or deleted data.
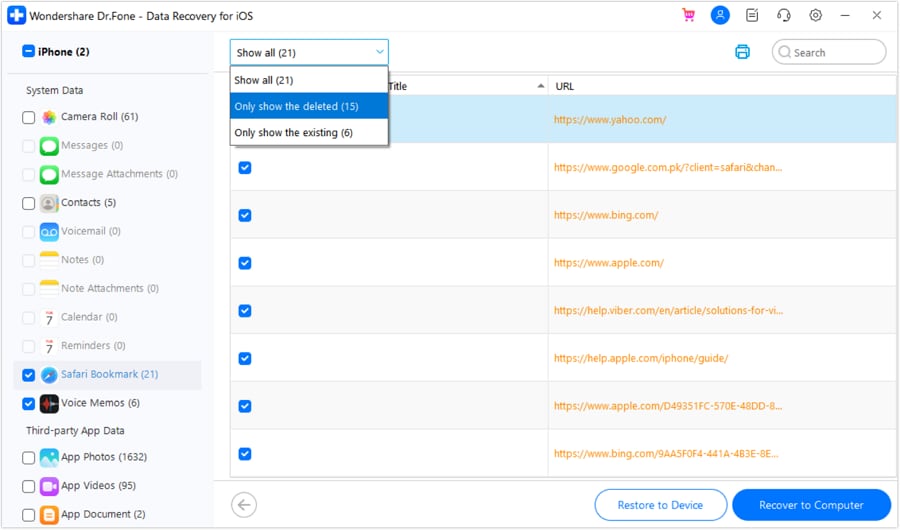
After selecting the data you want for recovery, click the "Restore to Device" button to initiate the restoration process. Then, set the location destination where you want to restore and click Continue.
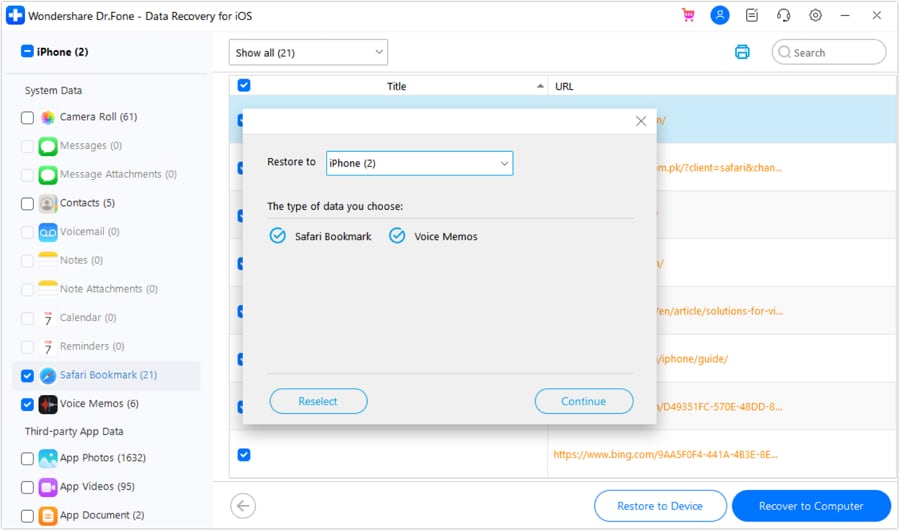
Please be aware that you need to disable the Find My service on your iDevice before restoring the data to the device. Once you have disabled it on your iDevice, proceed by clicking "OK" on the computer to continue with the restoration process.
Recover iPhone data to your computer:
To recover the data back to your computer, choose the desired data and click "Recover to Computer." You will see a prompt asking you to set a location for the recovered data. Define the location, and click "Recover" to start the process. Done! Your data is now safe.
Part 3: What types of data can be recovered from iOS devices?
Data recovery tools like Dr.Fone are designed to retrieve various file types that may have been accidentally deleted or lost for various reasons. These tools employ advanced algorithms to scan the storage of iOS devices thoroughly.
Files type that you can typically recover using data recovery tools:
- Contacts & Messages
- Videos, Audios & Photos
- Documents
- APK Recovery
- WhatsApp Recovery
After deleting files from a storage device, they don't just vanish instantly. Rather, the space they once occupied becomes open for storing new data. As long as this space isn't overwritten by other information, there remains a potential to retrieve these files back.
Conclusion
Data recovery plays a critical role in safeguarding valuable information as we embrace iOS 16 and anticipate iOS 17. Our iPhones hold a wealth of important data, including text messages, which may inadvertently get deleted or lost.
Thankfully, whether through iMessage or iCloud backups, users can recover messages within a 30-day window. For those seeking a more comprehensive data recovery solution, Wondershare Dr.Fone emerges as a powerful tool.
Safeguarding our data remains a top priority. With the right approach, we can ensure the longevity and security of our information.


Upgrade & Downgrade
- iOS Beta Install
- 1. Download iOS Beta Profile
- 2. Download the iOS 13 Beta
- 3. iOS 16 Beta Download
- 4. Uninstall iOS Beta
- 5. Install iPhone Beta Profile
- 6. Install Mac Beta Profile
- 7. Install iOS 15 Beta Profile
- 8. Upgrade iPad to iOS 14
- iOS News
- 1. Update iPhone 4s to iOS 9
- 2. Cheaper iPhone
- 3. Customize iPhone Home Screen
- 4. Know About iOS 15 Lock Screen
- 5. Add Lyrics to Song on Apple Music
- iPhone Downgrade Tips
- 1. Downgrade iOS Like a Pro
- 2. Roll Back to an Older iOS Version
- 3. Downgrade to iOS 15
- 4. Install Developer Profile
- 5. Downgrade iOS without iTunes
- 6. Downgrade to iOS 14
- 7. Download and Install the iOS 16
- iPhone Update Tips
- 1. iPhone & iPad Security Updates
- 2. Undo an Update on iPhone
- 3. Update iPhone with/without iTunes
- 4. Fix iPhone Checking for Update Stuck
- 5. Fix iPad Software Update Failed
- 6. Fix iPhone Stuck On Update
- 7. Fix iPhone Won't Update
- 8. Fix Update Server Not Be Contacted
- 9. Fix iPhone Stuck on Update Requested
- 10. Resolve iPhone Cellular
- 11. Resolve iPhone Error 1110
- 12. Fix iPhone Frozen
- iOS 11/12 Problems
- 1. Fix iPhone Stuck on Waiting
- 2. Fix iPhone Can't Make Calls
- 3. Fix iPhone Stuck on Logo
- 4. Fix Photos Disappeared from iPhone
- 5. Fix iPhone Keeps Freezing
- iOS 13 Problems
- 1. Fix CarPlay Not Connecting
- 2. Fix Resolve Apps Won't Open
- 3. Fix Song/Playlist Missing
- 4. Fix iPhone Asking for Passcode
- iOS 14 Problems
- 1. Fix Map Voice Navigation Won't Work
- 2. Fix iMessage Not Working
- 3. Recover Deleted Data on iOS 14
- 4. Recover Disappeared Notes on iOS 14
- iOS 15 Problems
- iOS 16 Problems
- 1. Fix iPhone Wi-Fi Not Working
- 2. Fix iOS 16 Battery Drain Issues
- 3. Fix Screen Mirroring Not Working
- 4. Fix Apple CarPlay is Not Supported
- 5. Fix iPhone Screen Not Responding
- 6. Fix iPhone Apps Keep Crashing
- 7. Fix Call Failed iPhone Issue
- 8. Fix iPhone Stuck On Apple Logo
- 9. Counter iPhone Heating Problems
- 10. Fix iPhone Stuck in Boot Loop
- 11. Fix iPhone Bluetooth Not Working
- iOS 17 Problems
- 1. iPhone Freezing After Update
- 2. iOS 17 Wallpapers Blurry at Top
- 3. Fix iPhone Charging Slow
- 4. Enable Live Activities iOS 17
- 5. Fix iOS 17 Apps Crashing
- 6. Fix iPhone Stuck on Verifying Update
- 7. Overheating after 17 Update
- 8. Fix iOS 17 Keyboard Bug
- 9. Fix iOS 17 Green Screen Issue
- 10. iOS 17 Bugs & Fixes
- 11. No iOS 17 Update on Your iPhone
- 12. iOS 17 Unable to Download
- 13. Missing contacts with iOS 17 update
Selena Lee
chief Editor