Solutions to Bypass 'This Device Was Reset to Continue Sign in with Google Account'

Jun 11, 2026 • Filed to: Screen Lock Removal • Proven solutions
 TL;DR:
To bypass the "this device was reset to continue sign in with a Google account" FRP lock, you can utilize the device's OEM unlocking feature, sideload an FRP Bypass APK, trigger a hard reset via recovery mode, or use Dr.Fone - Screen Unlock (Android) from a computer.
● Manual workarounds require either exploiting the keyboard settings to enable Developer options or connecting a USB flash drive via an OTG cable to install an APK that forces a secondary factory data reset.
● Dr.Fone - Screen Unlock (Android) supports devices running Android 6 through 14 and bypasses the verification by instructing users to access the emergency dialer menu (#0#) to authorize USB debugging.
● Unlocking the Factory Reset Protection (FRP) using these software tools or bypass procedures involves factory resetting the device again, which will result in complete data loss.
Ask AI for a summary
 ChatGPT
 Perplexity
 Gemini
 Claude
 Grok
Grok
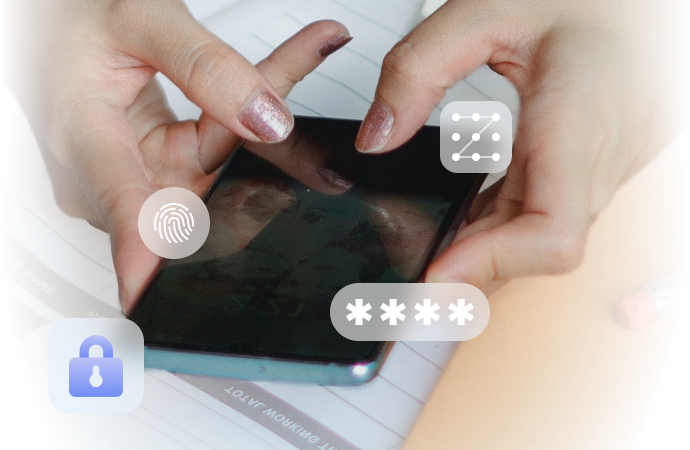
Did you factory reset your device? You might be stuck with the "this device was reset to continue to sign in with a Google account" message. This can also happen with second-hand Android phones if the previous owner didn’t remove their Google account. You won’t be able to use the device until you enter the correct account details.
It’s frustrating not having access, especially when finding the Google account info is difficult. This is a common error, usually after a factory reset. If this problem arises, refer to this guide for assistance. Let's get into it!
Part 1: What Does It Mean "This Device Was Reset to Continue Sign in with a Google Account"?
When an Android smartphone is reset to factory settings, the notice "this device was reset to continue to sign in with a Google account" shows. This is a security feature called Factory Reset Protection (FRP), introduced by Google after the release of Android 5.0. Its purpose is to improve security by preventing unauthorized access after a reset.

How Factory Reset Protection Works
When a phone is reset, you must sign in with the Google account that was previously synced on the device. This stops anyone from setting up the phone without the correct login details.
Why Is This Important?
Imagine someone steals your phone and tries to erase all data by resetting it. Without this phone reset, they can't access the device to continue the sign-in bypass unless they know your Google account information. In the event that the phone is reset, this function ensures that only authorized users are able to use it.
Part 2: Why Does Your Phone Show "This Device Was Reset to Continue Sign in With a Google Account"?
If you own a newer Android phone and have done these steps:
- Signed in using a Google account
- Set up a PIN, pattern, or password for screen lock
The phone's security feature will automatically turn on. Because of this feature, the device can only be accessed by the person who has been permitted to access it.
What Happens After a Factory Reset?
Someone must perform a factory reset to remove the screen lock if your phone is lost or stolen. However, after the reset, they will encounter the message "This device was reset to continue signing in with a Google account." At this point, they must enter the original account to unlock the phone.
Forgotten Google Account Details?
Forgetting your Google account or password is quite common. You may also face the frustrating situation where you can't sign in.
Can You Bypass Google Account Verification?
You can, of course! The best ways to get around Google account verification and the "this phone was reset to continue sign-in bypass" problem will be shown next.
Part 3: How to Fix "This Device Was Reset to Continue Sign in With a Google Account"
Forgetting your phone password and performing a factory reset can lead to the "this device was reset to continue to sign in with a Google account" error. Don’t worry! Here are four simple methods to bypass Google account verification.
Method 1: Use OEM Unlocking Feature
If you see the "this device was reset to continue to sign in with a Google account" message, try using the OEM unlocking feature on your Android phone. This feature helps you bypass Google account verification by using the bootloader. Here’s how to do it:
Step 1: Access Google Keyboard Settings
If you receive the error message "Verify your account," hit and hold the letter "@" on the keyboard to open a new window. Tap “Google Keyboard Settings.”
Step 2: Open Help & Feedback
In the upper right corner, choose the three dots. Proceed with "Support & Feedback." You can long-press any text to copy it. A search icon will appear; tap it and type “Settings.”
Step 3: Enable OEM Unlocking
To activate OEM unlocking, select "Developer options" after selecting "Settings." If you don’t see Developer options, tap the build number 7 times to unlock it.

Step 4: Reboot Your Phone
Hold the power button to reboot your phone. During setup, you will see “Add your account” instead of “Verify your account.”

Method 2: Use FRP Bypass APK
Another way to bypass the "this device was reset to continue sign in with a Google account" issue is using FRP Bypass APK. This method involves a third-party APK file. Here’s what you need:
- A laptop or computer
- A USB flash drive
- A USB OTG cable
Step 1: Prepare the APK File
Download the FRP Bypass APK on your computer and copy it to your USB flash drive.

Step 2: Connect Your Device
When the FRP problem appears, turn on your Android smartphone. Hold off until the toggle for "Verify your Google" shows up. Connect the OTG cable to your phone and USB.
Step 3: Install the APK
The file explorer will open on your phone. Find the APK file on the USB and install it.
Step 4: Access Settings
Once installed, open the app from the development settings. This will open the settings menu.
Step 5: Perform a Factory Reset
Select "Backup and Reset" by swiping down. After choosing "Factory Data Reset," verify. This will erase all data, including the previous Google account, allowing you to use your phone again.
Method 3: Hard Reset Your Device
If the above methods don’t work, try a hard reset. All data, including the Google account, will be deleted as a result. Here's how to manually perform a factory reset:
Step 1: Enter Recovery Mode
Push the Volume Up button, the Power button, and the Home button all at the same time. To see the boot screen, you must remain on.

Step 2: Wipe Data
Select “Wipe data/Factory Reset” from the menu. Confirm by choosing “Yes” when asked to delete all user data.
When you resume your device, this procedure will erase everything and fix the "this phone was reset to continue sign-in bypass" problem.
Method 4: Quick Google Account Bypass
If you need a fast and straightforward way to bypass the "this device was reset to continue sign in with a google account" issue, try Dr.Fone - Screen Unlock (Android). This tool is designed to tackle various Android problems efficiently.
Dr.Fone – Screen Unlock (Android) is a versatile solution for:
- Bypassing Google Account Verification: Easily skip the Google account check.
- Recovering Lost Data: Retrieve deleted or lost files.
- Extracting Google Backup Data: Access your data from Google backups.
- Unlocking Android Screens: Get past screen locks.
Supported Devices:
- Samsung: Works with all Samsung phones and tablets, including those with Android 14.
- Xiaomi, Redmi, OPPO, Realme, and Vivo: Check Dr.Fone's comprehensive guide for specific unlocking instructions for these devices.
Features of Dr.Fone – Screen Unlock:
- User-Friendly: Simple steps to bypass Google account verification with just a few clicks.
- Fast and Efficient: Resolve the issue in minutes, not days.
- Secure and Private: Uses encrypted technology to protect your information without harming your device.
- Highly compatible: It supports Android 6 through Android 14 and works on Windows and Mac.
Dr.Fone - Screen Unlock (Android)
Quick Google Account Bypass
- Completely unlinked from the previous Google account, it won’t be traced or blocked by it anymore.
- Remove all Android screen locks (PIN/pattern/fingerprints/face ID) in minutes.
- Compatible with various Android models.
- Provide specific removal solutions to promise good success rate.


Download Wondershare Dr.Fone now and follow the easy steps to bypass Google account verification quickly.
Step 1: Open the Screen Unlock Tool
Start by connecting your Android device or tablet to your computer and opening Wondershare Dr.Fone. Go to Toolbox and select Screen Unlock to open the toolkit in a new window.

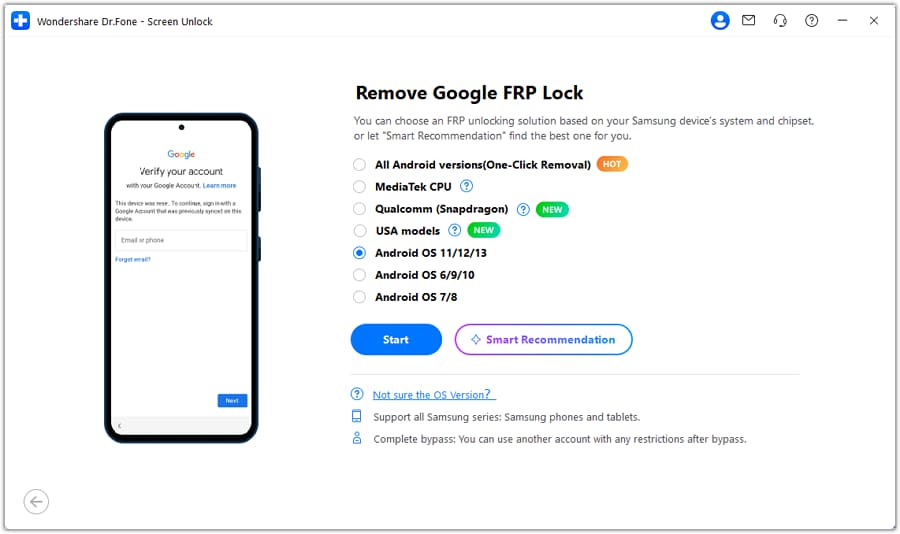
Step 2: Access the FRP Lock Function
On the next screen, choose Android to proceed.

Then select Remove Google FRP Lock.

Choose your desired mode (e.g. Samsung) and click the Start button to continue.

Note: Unlocking the FRP (Factory Reset Protection) may involve a factory reset, leadingleading to data loss. Ensure you back up your data before proceeding to avoid losing important files.
Step 3: Choose the Android Version for Quick Removal
If you don't know what version of the Android device has or want a quick fix for the "This device was reset to continue to sign in with a Google account" error, choose "All Android versions (One-Click Removal)" and press "Start." For devices with the latest Android versions like 11, 12, 13, or 14, Dr.Fone offers a specific method to bypass FRP. You can check the option for Android OS 11/12/13/14 and click Start to proceed.

Tip: If you're using a Samsung phone or tablet running Android 11/12/13/14, Dr.Fone makes it easy to turn off Google FRP. Check the relevant option and start the process.
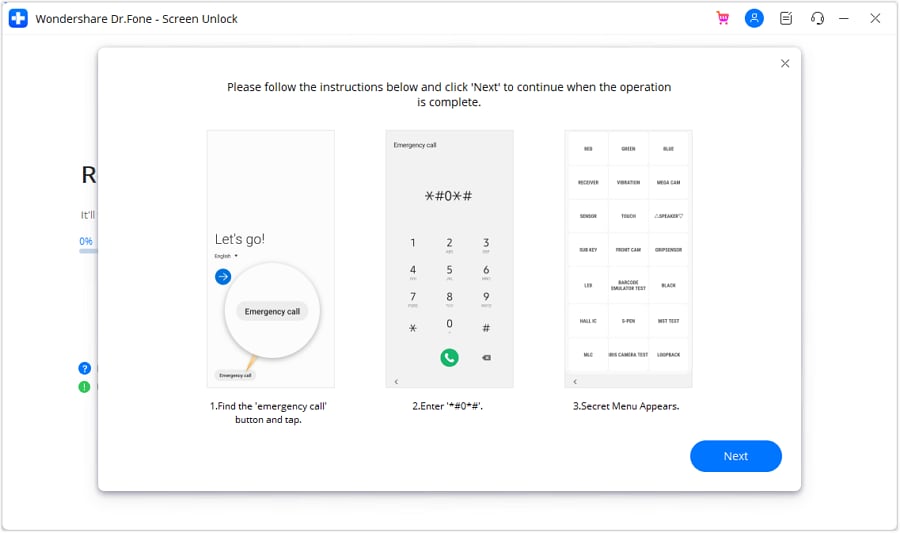
Step 4: Follow On-Screen Instructions
Follow the on-screen instructions to access the Emergency Call feature on your Android device. Tap on the Emergency Call button and enter #0# to open a secret menu. Hit Next on your PC display when finished.
Step 5: Enable USB Debugging
You'll be prompted to enable USB debugging on your Android smartphone. After turning it on, click Authorized on your computer screen.

Step 6: Remove the FRP Lock Successfully
The next screen on your computer will confirm the removal of the FRP lock from your Android device.
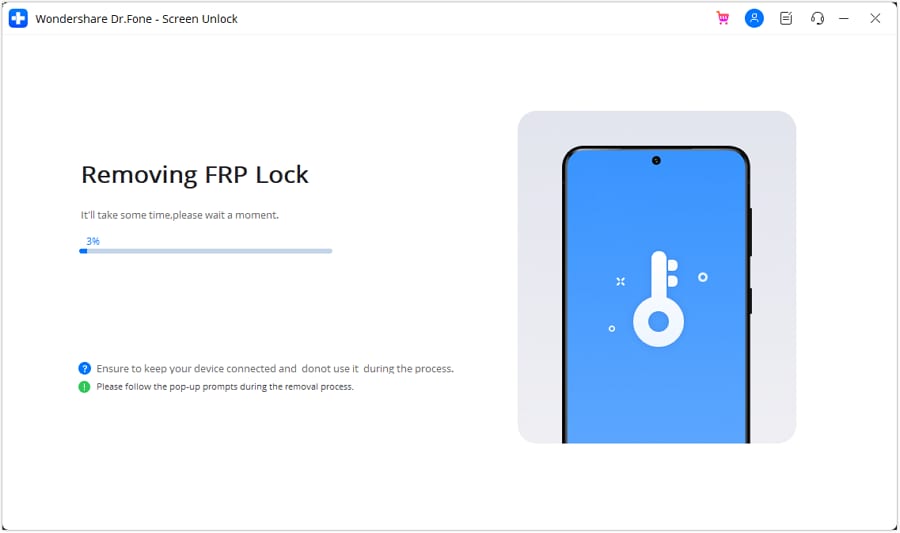
Upon successful removal of the FRP lock, a completion message will appear. Click Done to finish the process. If the issue persists, you can try again by selecting the Try Again option.

Conclusion:
It can be unpleasant to deal with the "this device was reset to continue to sign in with a Google account" error. Luckily, there are ways to fix this issue and avoid it. We hope the methods in this guide helped. For a quick and easy solution, "this phone was reset to continue sign-in bypass" using Dr.Fone-Screen Unlock (Android) is highly effective and convenient.
FAQs


Android Unlock
- Android Password Lock
- 1. Reset Lock Screen Password
- 2. Ways to Unlock Android Phone
- 3. Unlock Wi-Fi Networks
- 4. Reset Gmail Password on Android
- 5. Unlock Android Phone Password
- 6. Unlock Android Without Password
- 7. Emergency Call Bypass
- 8. Enable USB Debugging
- 9. Unlock Asus Phone
- 10. Unlock Asus Bootloader
- Android Pattern Lock
- Android Pin/Fingerprint Lock
- 1. Unlock Android Fingerprint Lock
- 2. Recover a Locked Device
- 3. Remove Screen Lock PIN
- 4. Enable or Disable Screen Lock PIN
- 5. Pixel 7 Fingerprint Not Working
- Android Screen Lock
- 1. Android Lock Screen Wallpapers
- 2. Lock Screen Settings
- 3. Customize Lock Screen Widgets
- 4. Apps to Reinvent Your Android
- 5. Lock Screen Wallpaper on Android
- 6. Unlock Android with Broken Screen
- 7. Unlock Google Find My Device Without Problems
- 8.Bypass Android Lock Screen Using Camera
- Android Screen Unlock
- 1. Android Device Manager Unlock
- 2. Unlocking Android Phone Screen
- 3. Bypass Android Face Lock
- 4. Bypass Android Lock Screen
- 5. Bypass Lock Screen By Emergency Call
- 6. Remove Synced Google Account
- 7. Unlock Android without Data Loss
- 8. Unlock Phone without Google Account
- 9. Unlock Android phone
- 10. Reset a Locked Android Phone
- 11. Turn On and Use Smart Lock
- 12. Best 10 Unlock Apps For Android
- 13. Remove Gmail Account
- 14. Unlock 30/30 Attempts Remaining
- 15. OEM Unlock Missing
- 16. Change Lock Screen Clock
- 17. OEM Unlocking on Android
- 18.Bypass Knox Enrollment Service
- 19. Unlock Google Pixel 6a, 6 or 7
- 20. Best Alternative to MCT Bypass Tool
- 21. Best Way to Unlock Your ZTE Phone
- Android SIM Unlock
- 1. Easily Unlock Android SIM
- 2. 5 Android Unlock Software
- 3. Carrier Unlock Phone to Use SIM
- 4. Change Android Imei without Root
- 5. How to Change SIM PIN on Android
- 6. Best Unlocked Android Phones
- Android Unlock Code
- 1. Lock Apps to Protect Information
- 2. Unlock Secret Features on Phone
- 3. Android SIM Unlock Code Generator
- 4. Ways to Sim Unlock Phone
- 5. Remove Sim Lock without Code
- 6. Updated Android Factory Reset Code
- Google FRP Bypass
- 1. Bypass Google Account Verification
- 2. Bypass Google FRP Lock On Phones
- 3. Bypass Google Pixel FRP
- 4. Huawei Bypass FRP Tools for PC
- 5. Bypass Samsung S22 Ultra FRP
- 6. Bypass Samsung S24 FRP Lock
- 7. Samsung S9 FRP Bypass Without PC
- 8. Unlock Micromax Lock Screen
- 9. Disable Google Smart Lock
- 10. Techeligible FRP Bypass
- 11. RootJunky FRP Bypass
- 12. What to Do When Locked Out of Google Account
- 13. Fix an Unauthorized Attempt to Factory Reset
- 14. Remove Google FRP Using Online Tools
- Unlock Bricked Phone
- 1. Restore Bricked Mobile Phone
- 2. Fix Motorola Bricked Phone
- 3. Fix Bricked Redmi Note
- 4. Unbrick Oneplus Easily
- 5. Unbrick Xiaomi Phone
- 6. Unbrick Huawei Phone
- 7. Unbrick Poco X3
- 8. Software to Unbrick Samsung
- 9. Unbrick 3DS
- 10. Unbrick PSP
- Android Unlock Tools
- 1. Griffin Unlocker Tool Review
- 2. BMB Unlock Tool Review
- 3. Android Multi Tools Review
- 4. Best Bootloader Unlock APKs
- 5. Top 5 Micromax FRP Tools
- 6. Pangu FRP Bypass
- 7. Google Account Manager APK FRP Review
- 8. D&G Password Unlocker Review
- 9. Android Multi Tools Review
- 10. Easy Samsung FRP Tool Review
- 11.Samfw FRP Tool
- Android MDM
- ● Manage/transfer/recover data
- ● Unlock screen/activate/FRP lock
- ● Fix most iOS and Android issues
- Unlock Now Unlock Now Unlock Now

Alice MJ
staff Editor