How To Unbrick Your PSP [Recover PSP 1000, 3000, and Go Models]

May 22, 2026 • Filed to: Phone Repair Solutions • Proven solutions
 TL;DR:
You can unbrick a soft-bricked PlayStation Portable by utilizing a Pandora battery for early models, hardware button sequences for the PSP Go, or the Baryon Sweeper software paired with an Arduino for the PSP 3000.
● The Pandora Battery method flashes the 5.00 OFW using a Magic Memory Stick but carries a risk of further system damage and is strictly limited to PSP 1000 and early PSP 2000 models.
● PSP 3000 models require the Baryon Sweeper tool and an Arduino connected directly to the console's power lines (GND, RX, and 5V) to safely emulate a service mode battery.
● PSP Go devices can be recovered without additional hardware or software by completely powering off the console and holding down the Home button while pressing the Power button until it boots.
Ask AI for a summary
 ChatGPT
 Perplexity
 Gemini
 Claude
 Grok
Grok
A software or hardware problem renders a PlayStation Portable (PSP) bricked or unusable. A soft brick PSP is a condition in which the PSP turns on, the green LED light stays on, but the screen remains blank, and the PSP does not boot up. Soft bricks are often caused by improper firmware updates or custom firmware installation.
Keep reading if you are looking for ways to fix your bricked PSP. This article teaches you how to unbrick PSP models 1000, 3000, and Go.

Part 1: How To Unbrick Your PSP With a Pandora Battery?
You can use a Pandora battery to unbrick PSP 1000 if yours has a soft-bricked system. When you insert a Pandora Battery into your PSP, it forces the PSP to enter Service Mode. It bypasses the NAND and allows the PSP to load the Initial Program Loader (IPL) from the Magic Memory Stick. The IPL then boots the PSP's firmware so you can use your PSP again.
To unbrick PSP 1000 with a Pandora Battery, you will need the following:
- 1. Pandora Battery
- 2. Memory Stick Pro Duo with the latest firmware installed
- 3. PC with a USB cable
Step-by-Step Guide on How To Unbrick PSP 1000
- Step 1: Turn off your PSP 1000. Remove your PSP standard battery and memory stick.
- Step 2: Insert the Magic Memory Stick Pro Duo card into your PSP 1000.
- Step 3: Connect your PSP to your desktop using the USB cable and build the Magic Memory Stick. You will need three files: the PSP Tool zip, the PSP Grader zip, and the verified PSP Firmware file.
- Step 3a: Extract the PSP Grader zip. Run the PSP Grader exe, and click Create Pandora Stick on the PSP Grader v008 pop-up window.

Wait until you see the Make MMS is Finished message appear. It will format your storage.

- Step 3b: Extract the PSP Tool zip. Copy the PSP folder and paste it to the root directory of the Memory Stick Duo.
- Step 3c: On your PC, open the firmware file for your PSP. Copy the firmware file to the root directory of the Memory Stick Duo. Eject your magic memory stick.
- Step 4: Power on your PSP and ensure the battery you want to flash is in place.
- Step 5: Go to Memory Stick > PSP Tool > Battery Options on your PSP.
- Step 6: Select Convert to Service Mode Battery, press the X button to enter, and exit. Now you have Pandora's battery.
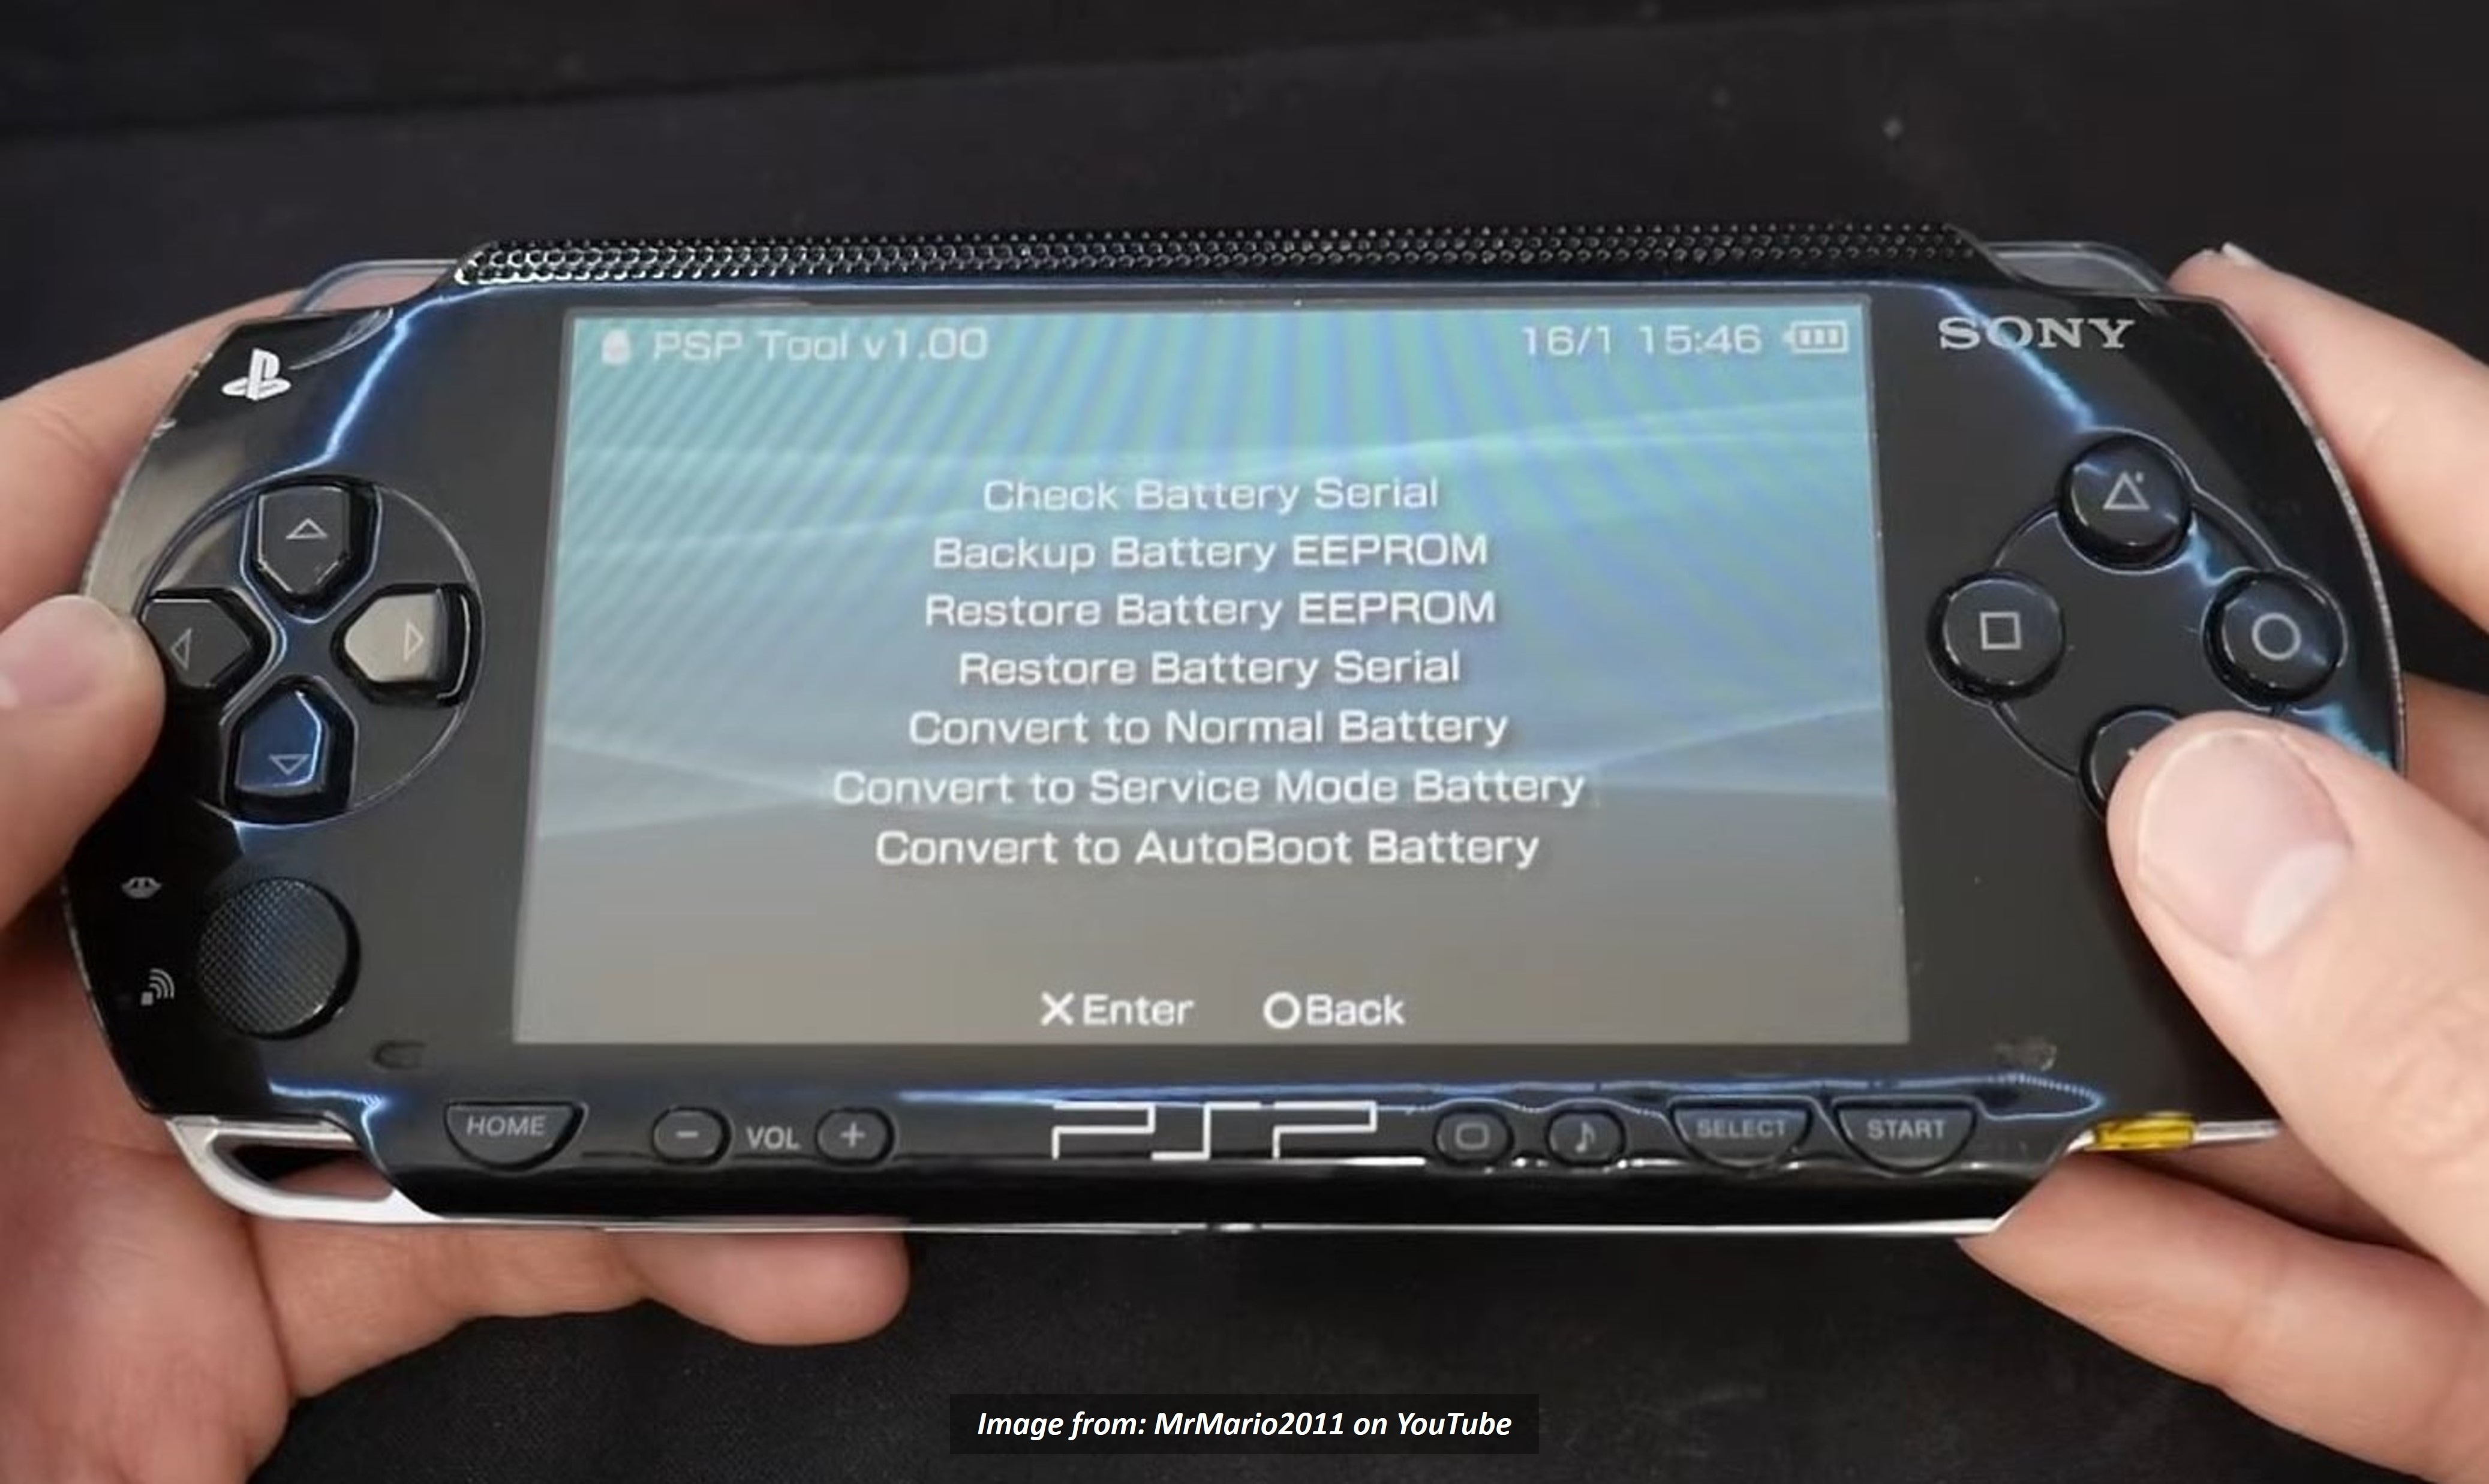
- Step 7: Remove Pandora's battery, place it back in, and then press and hold the button you chose from the previous PSP Grader. The default is left trigger if you didn't change it.
- Step 8: Select Install 5.00 OFW from the menu.

- Step 9: The PSP screen will display "Flashing files..."
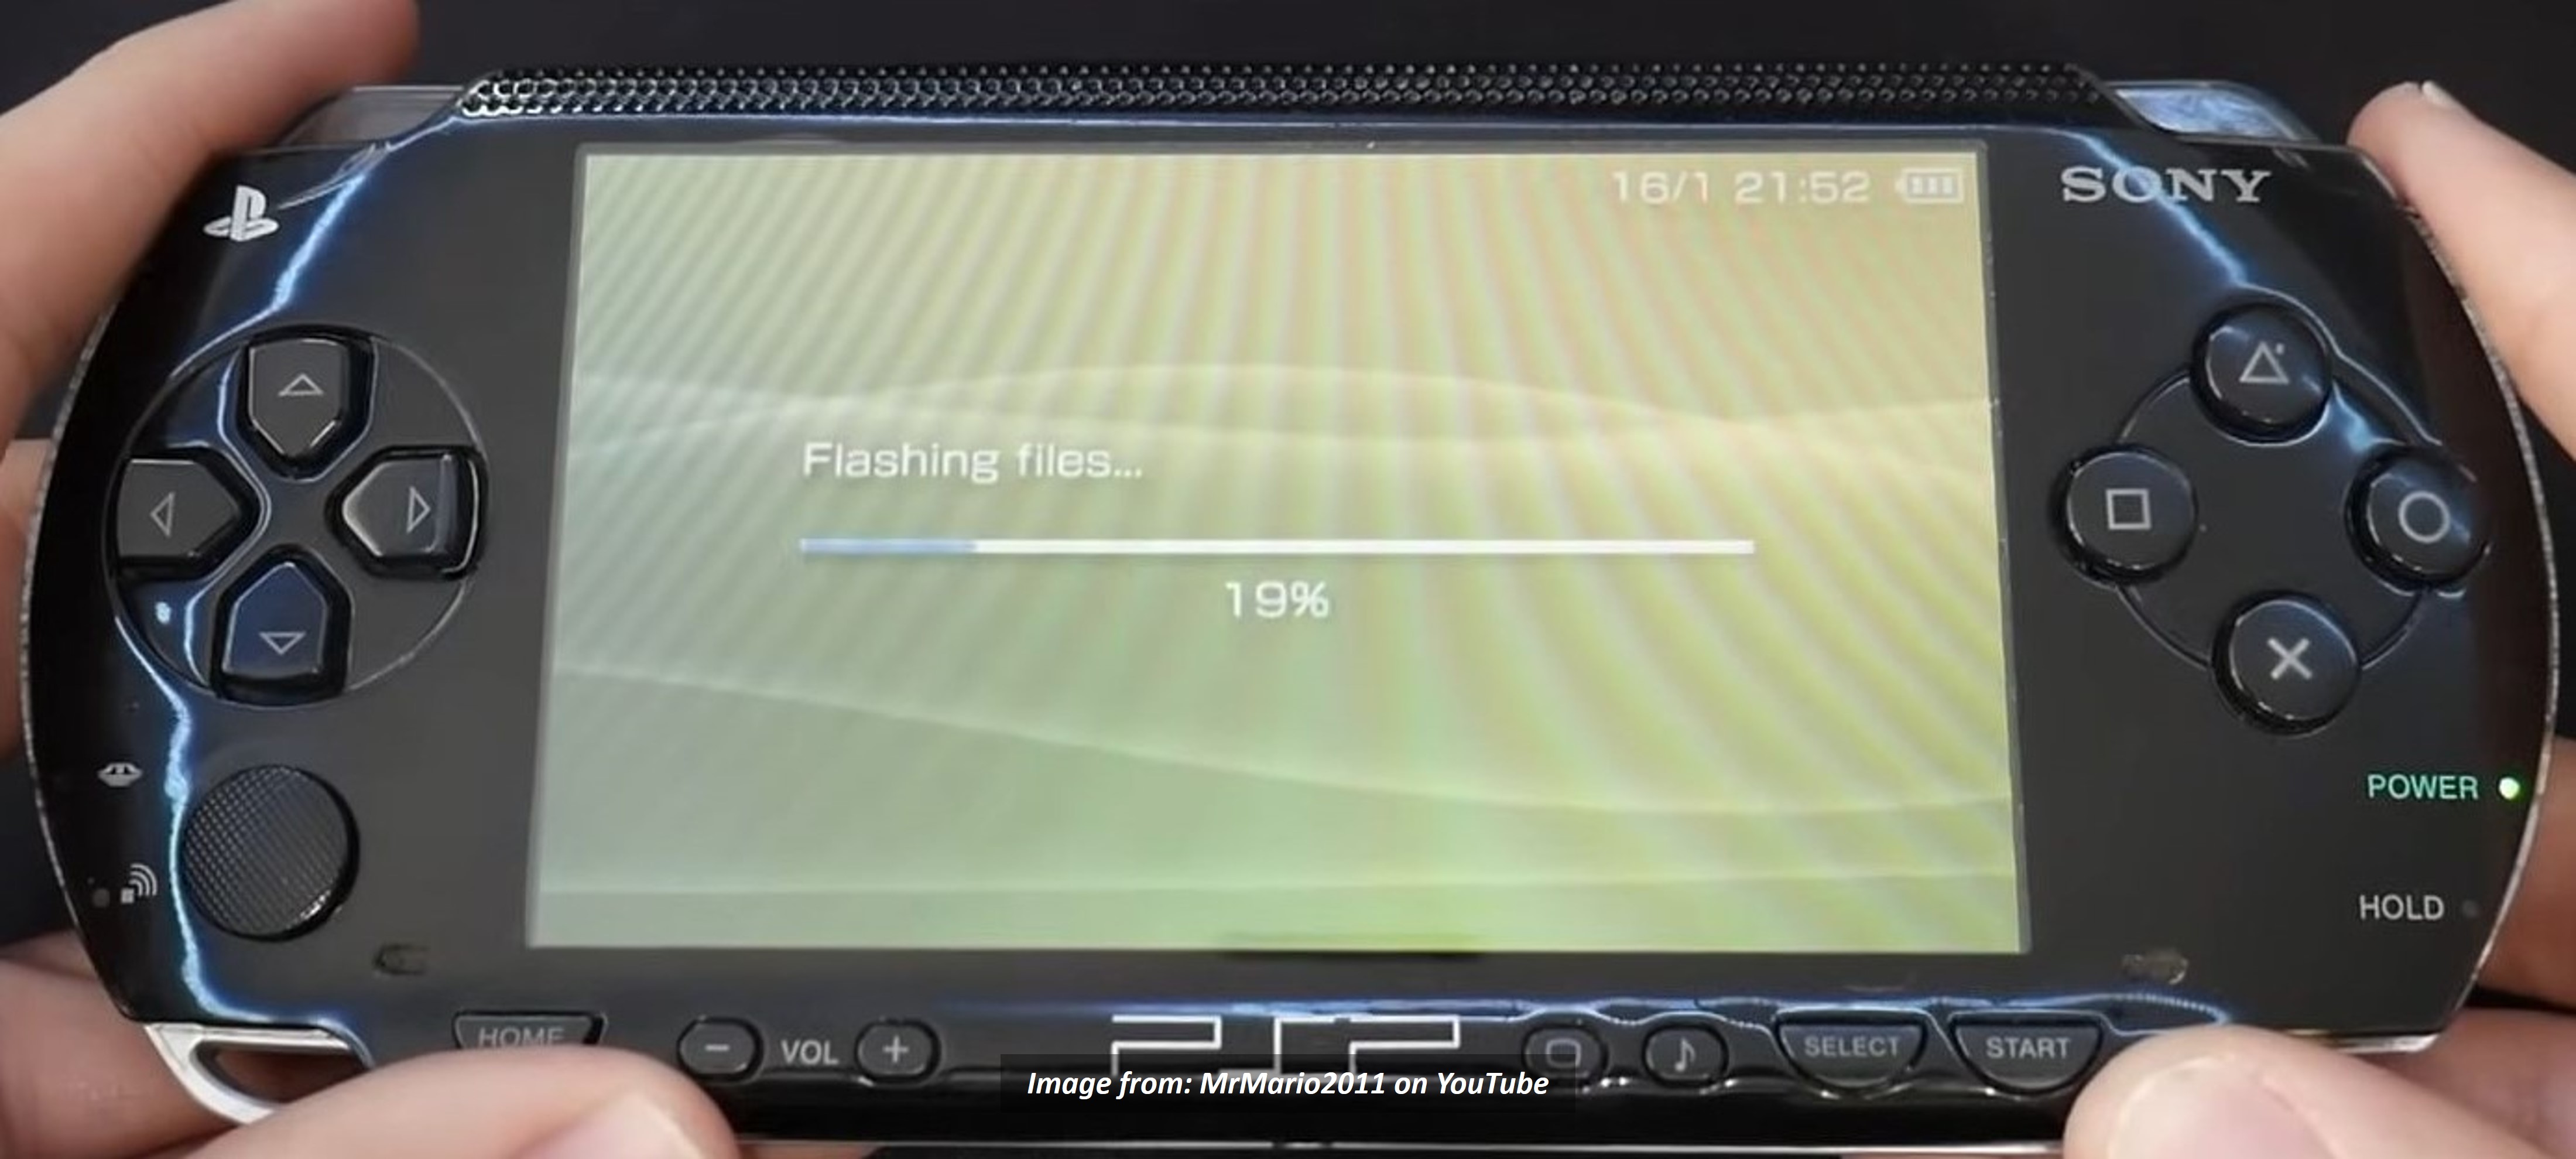
Please wait until the message "Install is complete" appears.

- Step 10: Press the X button to reboot the system of your PSP.
- Step 11: Put your regular battery and memory stick on your PSP.
- Step 12: If you installed the 5.00 OFW, you have unbricked your PSP.
Creating Pandora's battery and magic memory stick is challenging and may further damage your bricked PSP if you do not follow the instructions carefully. Also, Pandora's battery method can only unbrick PSP 1000 and early PSP 2000 models. If you have a different model of PSP, read on to the following section to find which solution can help you to unbrick it.
Part 2: How To Unbrick Your PSP Without a Pandora Battery?
Here are more alternative solutions to unbrick PSP devices for 3,000, Go, and 1,000 models without a Pandora battery.
Unbrick PSP Using a PSP Recovery Program
To unbrick PSP, you will need the following:
- 1. Memory card reader
- 2. PSP memory card
Follow these steps below to unbrick PSP using a recovery program:
- Step 1: Download and install a PSP recovery program on your computer. Choose one that is compatible with your PSP model and operating system.
- Step 2: Remove the PSP memory card from your PSP and connect your PSP to your computer using a USB cable.
- Step 3: Open the PSP memory card folder on your computer. Delete the contents of the Games folder.
- Step 4: Go to System > Update and copy the file to a new folder in the Games folder.
- Step 5: Extract the PSP recovery program file from your computer. Copy its content to the Games folder and eject the PSP memory card.
- Step 6: Insert the memory card into your PSP, then press and hold the trigger and turn on your PSP.
- Step 7: Select Run recovery program eboot on the Recovery menu and press X.
- Step 8: Follow the instructions on the screen to complete the unbricking process.
Unbrick PSP 1000
Follow these steps to unbrick PSP 1000 models without using Pandora's battery:
- Step 1: Press and hold Home + R + Power.
- Step 2: Press and hold Home + Select + Start + Square + Triangle + Power.
- Step 3: Remove the battery from your PSP. Then, connect the PSP to a power source.
- Step 4: Turn on your PSP and verify it is working.
- Step 5: Turn off your PSP and put in the battery.
Unbrick PSP 3000
Baryon Sweeper is a software tool you can use to unbrick PSP 3000 models. It emulates Pandora's battery, a hardware modification that allows you to enter service mode on a PSP. Follow these steps to unbrick PSP 3000 models using the Baryon Sweeper tool:
- Step 1: Remove the memory card from your PSP.
- Step 2: Insert the Magic Memory Stick into your bricked PSP.

- Step 3: Connect your Arduino to your computer using a USB cable.

- Step 4: Download and install the Baryon Sweeper software on your computer.
- Step 5: Run the software and select Service Mode in the Emulator Mode section. Select the COM of your Arduino from the Port drop-down list.

- Step 6: Click Start Service from the tk window.
- Step 7: Plug the charger into the PSP's power port.
- Step 8: Connect your Arduino/USB-TTL to the PSP Power lines.
- Touch the GND line to the left pin.
- Touch the RX line to the middle pin.
- Touch the 5V line to the right pin.
- Step 9: Hold all three lines together for a few seconds. The green light on the PSP should turn on.
- Step 10: Select Install 5.00 to complete the process.

Unbrick PSP Go
Follow these steps to unbrick PSP Go models in a few minutes:
- Step 1: Power off the PSP Go completely.
- Step 2: Press and hold down the Home button on the PSP Go.
- Step 3: While holding down the Home button, press and hold the power button until the PSP Go turns on. If the PSP Go boots up, then you have unbricked it.
PSP fans know a thing or two about fixing brick devices. They've developed all types of ways to unbrick PSP gaming consoles. But it's a complicated process. And most Android users can relate. Bricked Android phones are a real pain, but some tools are available to help you unbrick smartphones.
Related Topics:
How to Fix It If Your Samsung Phone Got Bricked?
Ways to Unbrick Your Android Device: Various Ways for Recovery
Part 3: Bonus: Wondershare Dr.Fone – System Repair for Bricked Android Devices
You may be an Android user who may not have experienced a bricked phone yet, but it's always a possibility. After all, bricked phones are not uncommon. Even if you haven't experienced it, you may know someone who has. And if you do happen to brick your device, Dr.Fone - System Repair (Android) is one of the best tools to unbrick smartphones.
Dr.Fone – System Repair is a powerful tool that can solve various Android problems, including brick devices. While you cannot use it for PSP, it can be a lifesaver if you are an Android user who might have bricked your phone.
Dr.Fone works by downloading the latest firmware for your phone and flashing it to your device. This process is safe and effective and is much easier to use than other methods of unbricking Android phones.

Here are some of the key features of Dr.Fone:
- Repairs a Wide Range of Android System Problems
Dr.Fone can repair a wide range of Android system problems, including bricked Android devices, boot loops, black screens of death, and more.
- Offers Free Trial
Dr.Fone offers a free trial. You can use the free trial to scan your device and see if Dr.Fone can help you repair your Android system problem.
- Supports 1000+ Android Models
Dr.Fone works on most Samsung models, unlocked or carrier-locked.
How To Unbrick Android Phones Using Dr.Fone – System Repair?
If you're an Android user, having Dr.Fone on hand is a good idea, just in case your device gets bricked. Follow the guide below to learn how to unbrick Android smartphones quickly and easily.
- Step 1: Go to the official website of Wondershare Dr.Fone and click Try For Free to download the app on your desktop.
- Step 2: Install and launch Dr.Fone on your desktop, then from the Toolbox homepage, click System Repair.
- Step 3: Select Android as your device type.
- Step 4: Click Start in the next window.

- Step 5: Click the Brand, Name, Model, Country, and Carrier drop-down list to select your correct device information.

- Step 6: Select the I agree with the warning, and I am ready to proceed checkbox in the lower navigation pane and click Next.
- Step 7: Follow the in-app instructions to put your device into Download mode and click Next.

- Step 8: Please be patient while the firmware downloads. The download will complete automatically.
- Step 9: Click Fix Now once the firmware is ready.

- Step 10: Once you have read the message in the dialogue box, enter 000000 in the input field and click Confirm.

- Step 11: The repair process is now underway. Once the process is complete, you will see a message that says Repair of the operating system is completed. Next, read the instructions and click Done to exit.

Conclusion
There are different ways to unbrick PSP models 1000, 3000, and Go. You can use a Pandora battery, recovery software, or a button combination. If all else fails, contact a professional.
Aside from the methods above, Dr.Fone System Repair is a good option for unbricking Android phones. Dr.Fone - System Repair (Android) can help you with various Android problems, including brick devices. Dr.Fone is easy to use and suitable for beginners like you.


Android Unlock
- Android Password Lock
- 1. Reset Lock Screen Password
- 2. Ways to Unlock Android Phone
- 3. Unlock Wi-Fi Networks
- 4. Reset Gmail Password on Android
- 5. Unlock Android Phone Password
- 6. Unlock Android Without Password
- 7. Emergency Call Bypass
- 8. Enable USB Debugging
- 9. Unlock Asus Phone
- 10. Unlock Asus Bootloader
- Android Pattern Lock
- Android Pin/Fingerprint Lock
- 1. Unlock Android Fingerprint Lock
- 2. Recover a Locked Device
- 3. Remove Screen Lock PIN
- 4. Enable or Disable Screen Lock PIN
- 5. Pixel 7 Fingerprint Not Working
- Android Screen Lock
- 1. Android Lock Screen Wallpapers
- 2. Lock Screen Settings
- 3. Customize Lock Screen Widgets
- 4. Apps to Reinvent Your Android
- 5. Lock Screen Wallpaper on Android
- 6. Unlock Android with Broken Screen
- 7. Unlock Google Find My Device Without Problems
- 8.Bypass Android Lock Screen Using Camera
- Android Screen Unlock
- 1. Android Device Manager Unlock
- 2. Unlocking Android Phone Screen
- 3. Bypass Android Face Lock
- 4. Bypass Android Lock Screen
- 5. Bypass Lock Screen By Emergency Call
- 6. Remove Synced Google Account
- 7. Unlock Android without Data Loss
- 8. Unlock Phone without Google Account
- 9. Unlock Android phone
- 10. Reset a Locked Android Phone
- 11. Turn On and Use Smart Lock
- 12. Best 10 Unlock Apps For Android
- 13. Remove Gmail Account
- 14. Unlock 30/30 Attempts Remaining
- 15. OEM Unlock Missing
- 16. Change Lock Screen Clock
- 17. OEM Unlocking on Android
- 18.Bypass Knox Enrollment Service
- 19. Unlock Google Pixel 6a, 6 or 7
- 20. Best Alternative to MCT Bypass Tool
- 21. Best Way to Unlock Your ZTE Phone
- Android SIM Unlock
- 1. Easily Unlock Android SIM
- 2. 5 Android Unlock Software
- 3. Carrier Unlock Phone to Use SIM
- 4. Change Android Imei without Root
- 5. How to Change SIM PIN on Android
- 6. Best Unlocked Android Phones
- Android Unlock Code
- 1. Lock Apps to Protect Information
- 2. Unlock Secret Features on Phone
- 3. Android SIM Unlock Code Generator
- 4. Ways to Sim Unlock Phone
- 5. Remove Sim Lock without Code
- 6. Updated Android Factory Reset Code
- Google FRP Bypass
- 1. Bypass Google Account Verification
- 2. Bypass Google FRP Lock On Phones
- 3. Bypass Google Pixel FRP
- 4. Huawei Bypass FRP Tools for PC
- 5. Bypass Samsung S22 Ultra FRP
- 6. Bypass Samsung S24 FRP Lock
- 7. Samsung S9 FRP Bypass Without PC
- 8. Unlock Micromax Lock Screen
- 9. Disable Google Smart Lock
- 10. Techeligible FRP Bypass
- 11. RootJunky FRP Bypass
- 12. What to Do When Locked Out of Google Account
- 13. Fix an Unauthorized Attempt to Factory Reset
- 14. Remove Google FRP Using Online Tools
- Unlock Bricked Phone
- 1. Restore Bricked Mobile Phone
- 2. Fix Motorola Bricked Phone
- 3. Fix Bricked Redmi Note
- 4. Unbrick Oneplus Easily
- 5. Unbrick Xiaomi Phone
- 6. Unbrick Huawei Phone
- 7. Unbrick Poco X3
- 8. Software to Unbrick Samsung
- 9. Unbrick 3DS
- 10. Unbrick PSP
- Android Unlock Tools
- 1. Griffin Unlocker Tool Review
- 2. BMB Unlock Tool Review
- 3. Android Multi Tools Review
- 4. Best Bootloader Unlock APKs
- 5. Top 5 Micromax FRP Tools
- 6. Pangu FRP Bypass
- 7. Google Account Manager APK FRP Review
- 8. D&G Password Unlocker Review
- 9. Android Multi Tools Review
- 10. Easy Samsung FRP Tool Review
- 11.Samfw FRP Tool
- Android MDM
- ● Manage/transfer/recover data
- ● Unlock screen/activate/FRP lock
- ● Fix most iOS and Android issues
- Unlock Now Unlock Now Unlock Now


James Davis
staff Editor
Generally rated4.5(105participated)