A Complete Guide to ASUS ZenFone Recovery Mode and Rooting

May 22, 2026 • Filed to: Data Recovery Solutions • Proven solutions
 TL;DR:
Rooting the ASUS ZenFone Max Pro M1 requires holding Volume Up and Power to access Fastboot mode, unlocking the bootloader, flashing a TWRP recovery image via a PC-based ADB terminal, and installing a Magisk ZIP file.
● The rooting process permanently voids the device warranty, completely wipes existing storage data, and carries inherent risks of permanently bricking the phone or exposing it to security vulnerabilities.
● Copying the necessary Magisk file to the phone's SD card requires connecting to a computer and manually enabling Media Transfer Protocol (MTP) inside the TWRP interface.
● Post-flashing bootloops can be fixed by installing a device-specific decrypt.zip file in TWRP, which irreversibly formats the data partition; wiped data can potentially be retrieved using the Wondershare Dr.Fone desktop software.
Ask AI for a summary
 ChatGPT
 Perplexity
 Gemini
 Claude
 Grok
Grok

Have you ever felt the need to explore more with your ASUS ZenFone but were held back by its limitations? Maybe you've wanted to access hidden features or personalize your phone into your style. Well, worry no more! This comprehensive guide will equip you with the knowledge to enter your ASUS ZenFone into Recovery Mode and explore the world of rooting. We'll dive into each concept, learn how to access Recovery Mode and master the steps to root your device.
But there's more! We understand that rooting can sometimes lead to accidental data loss. Fear not! This guide will also introduce a powerful tool, Wondershare Dr.Fone, to ensure you can easily return lost data. Read on to learn more!
- Part 1: ASUS ZenFone Recovery Mode
- Part 2: Rooting ASUS ZenFone Max Pro M1
- Part 3: How to Recover Lost Data after Rooting ASUS ZenFone Max Pro M1

Part 1: ASUS ZenFone Recovery Mode
Before diving into Recovery Mode, let's understand what it does. It might seem intimidating initially, but with a little knowledge, it becomes a valuable tool for personalizing your phone.
What is recovery mode?
Recovery mode is a handy tool built into Android devices that allows you to perform system-level tasks, such as troubleshooting, updating software, or performing a factory reset. This mode operates independently from the main operating system, so you can use it even when your phone won't boot normally. Here's what you can typically do in Recovery Mode:
- Wipe Data/Factory Reset:In recovery mode, you can perform a factory reset. This will erase your phone's data and settings and restore it to its original factory state.
- Apply Update from SD Card: Recovery Mode allows you to install system updates manually from an SD card.
- Wipe Cache Partition:In recovery mode, you can clear temporary system files to potentially resolve performance issues.
How to Access Asus ZenFone Recovery Mode?
Accessing recovery mode on your ASUS ZenFone may seem unfamiliar, but it is a straightforward process. Here’s how:
Hold the power button and select "Power off." After pressing power off, press and hold the Volume Up and Power buttons simultaneously. Keep holding them until the ASUS logo appears on the screen.
You should now see the recovery mode menu. In this menu, you can navigate using the volume buttons and select options with the power button.
Caution: Entering Recovery Mode on some models might require a computer connection and specific software from ASUS. Always double-check the method for your specific model before proceeding.
Part 2: Rooting ASUS ZenFone Max Pro M1
After exploring the functionalities of the Recovery Mode on your ASUS ZenFone, let’s proceed to rooting. Remember that entering the Recovery mode is crucial in rooting, so it’s best to understand the previous section first.
What is rooting?
Rooting in Android grants you "superuser" access to your ASUS ZenFone Max Pro M1's operating system. This unlocks a wider range of functionalities, allowing you to:
- Remove pre-installed bloatware.
- Install incompatible apps.
- Enhance performance and battery life with custom ROMs.
Important Note: Rooting can be risky if done incorrectly. It can void your warranty, brick your phone (render it unusable), and expose it to security vulnerabilities. Proceed with caution and only if you're comfortable with the risks involved.
Steps to Root ASUS ZenFone Max Pro M1
After learning about what rooting does and you’re sure about proceeding, here’s a guide to efficiently root your ASUS ZenFone Max Pro M1:
Important Note: The rooting methods for your ASUS ZenFone Max Pro M1 may change over time due to constant updates and changes. It is advisable to consult a trusted source for the latest and most reliable rooting instructions for your specific device model and Android version.
Preparation:
Before you begin, ensure you have backed up your data and charged your device. Backing up is important when rooting your device, as rooting can wipe all your data.
Download the unlock.rar file, TWRP recovery image compatible with your phone model, and the latest Magisk manager file (ZIP format) from the official source:https://github.com/topjohnwu/Magisk.

Extract the downloaded unlock.rar file on your computer. After extracting the file, open it, and you'll find drivers specific to your operating system (Windows, Mac, Linux). Choose and install the appropriate driver for your system to proceed.
First, Go to your phone's Settings > System > About Phone. Look for “Build Number” and tap on it seven times rapidly to enable Developer Options. Next, return to your Settings > System and the Developer Options will appear. Click it and enable the “USB Debugging” option.

Unlocking the Bootloader:
Turn off your ASUS ZenFone Max Pro M1 entirely. To enter Fastboot mode, press and hold the Volume Up + Power button simultaneously. Hold these buttons until the Fastboot logo appears on your phone's screen.
Use a USB cable to connect your phone to your computer.
After ensuring the connection is stable, navigate to the "Unlock" folder inside the "unlock.rar" file you extracted earlier. Find the "Unlock.cmd" file and double-click it to start unlocking.

Important Note: Unlocking instructions might differ depending on your phone model and where you got the "unlock.rar" file. Ensure that you follow the exact instructions provided in the file to avoid any issues.
Installing TWRP Recovery:
Ensure you downloaded the previous step's TWRP recovery image for your specific phone model.
To control your phone while it is in fast boot, you'll need ADB (Android Debug Bridge). Refer to a trusted online guide for setting up ADB on your computer. Once ADB is set up, locate the folder where ADB is installed on your computer. You'll need this location in the next step.
Once you’ve located the ADB folder on your file explorer, hold down the Shift key and right-click inside it. Select "Open PowerShell window here" from the context menu. This will launch a command prompt window directly within your ADB folder.

On your phone, press and hold the Volume Up + Power button again to enter Fastboot Mode. After entering Fastboot Mode, connect your phone to your PC using a USB cable.
In the ADB terminal window on your computer, type the following command (replace twrp-filename.img with the actual file name of your downloaded TWRP image):
fastboot flash twrp twrp-filename.img
Press Enter to execute the command. Wait for the process to complete. This command will flash the TWRP recovery image onto your phone.
Once flashing is successful, type the following command to reboot directly into TWRP:
fastboot reboot
Press Enter to execute the command. This will reboot your phone directly into TWRP recovery mode.
Rooting with Magisk:
Your phone should now be booted into TWRP recovery mode. In TWRP, navigate to the "Mount" menu, locate the " MTP " option, and swipe the slider to the right. This enables Media Transfer Protocol, allowing you to transfer files between your phone's storage and your computer.
With MTP enabled, connect your phone to your computer using a USB cable. On your computer, locate the downloaded Magisk Manager ZIP file you obtained in the preparation stage. Use your computer's file explorer to copy the Magisk ZIP file to your phone's SD card storage.
Go back to the main menu in TWRP and navigate to the "Install" menu. You'll see a list of files on your phone's storage. Locate the Magisk ZIP file you just copied to your SD card and tap on it to select it. Swipe right at the bottom of the TWRP screen to confirm flashing the ZIP file, and wait patiently for the flashing process to complete. TWRP will display a message indicating success or failure.
Assuming Magisk is flashed successfully, tap the "Reboot" button in TWRP. From the reboot options, select "System," this will reboot your phone back into the normal Android system.
Optional: Disabling Forced Encryption (if encountering bootloop):
If you’re stuck in a boot loop after flashing Magisk on your phone, don’t worry. We have a solution to your problem! Disabling forced encryption might fix it, but remember that doing this step may permanently erase all your data. Before proceeding with this step, consult online forums for your phone model or operating system.
Remember: After flashing that decrypt.zip file, you'll probably need to clean your phone's data in TWRP. Ensure you have a complete backup before proceeding. Once you're ready, head to the "Wipe" menu in TWRP and swipe right to confirm formatting the data partition. Use extreme caution, as this step is irreversible.
Verifying Root Access:
After your phone finishes rebooting, your ASUS ZenFone Max Pro M1 should now be rooted. You need to use a root checker app to verify whether the process was successful. Download and install a reputable root checker app from the Google Play Store (e.g., Root Checker by RootTools). Launch the app and follow the on-screen instructions to check for root access.
After checking that your phone has root access, you should now be the proud owner of a rooted ASUS ZenFone Max Pro M1. Remember, with great root power comes great responsibility. Use your newfound power responsibly and prioritize creating data backups before making any significant changes to your system.
Part 3: How to Recover Lost Data after Rooting ASUS ZenFone Max Pro M1
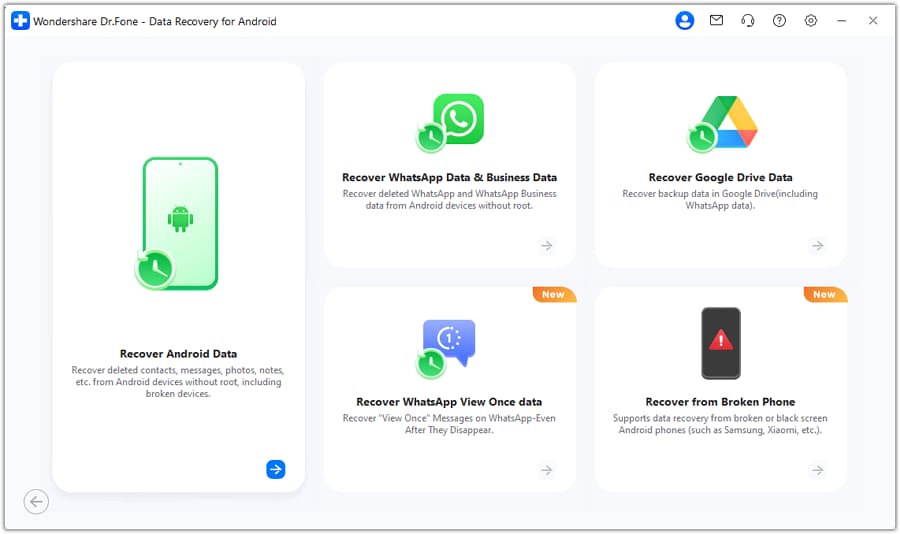
While rooting opens doors to customization, it's not without risks. Sometimes, the rooting process might go awry, leading to data loss. But fear not! Wondershare Dr.Fone can be your data recovery hero.
What is Wondershare Dr.Fone?
Wondershare Dr.Fone is a comprehensive data recovery software suite compatible with Android devices, including the ASUS ZenFone Max Pro M1. It allows you to recover a wide range of data types lost due to various scenarios, including rooting:
- Photos & Videos:Recover precious memories captured on your phone's camera or downloaded from the internet.
- Contacts & Messages:Restore your valuable contact list and retrieve important text messages.
- Call History & App Data:Recover your call history and even data associated with specific apps.
- And More:Fone supports many other data types, including music, documents, etc.
Here's how to use Wondershare Dr.Fone to save your lost ASUS ZenFone Max Pro M1 data:
First, you must download and install Wondershare Dr.Fone on your computer. After setting up the application, open it and navigate to the "Toolbox" section. Under the toolbox section, locate "Data Recovery" to begin the recovery process.

Note: The Mac version of Dr.Fone may have an older interface, but this does not affect the functionality.
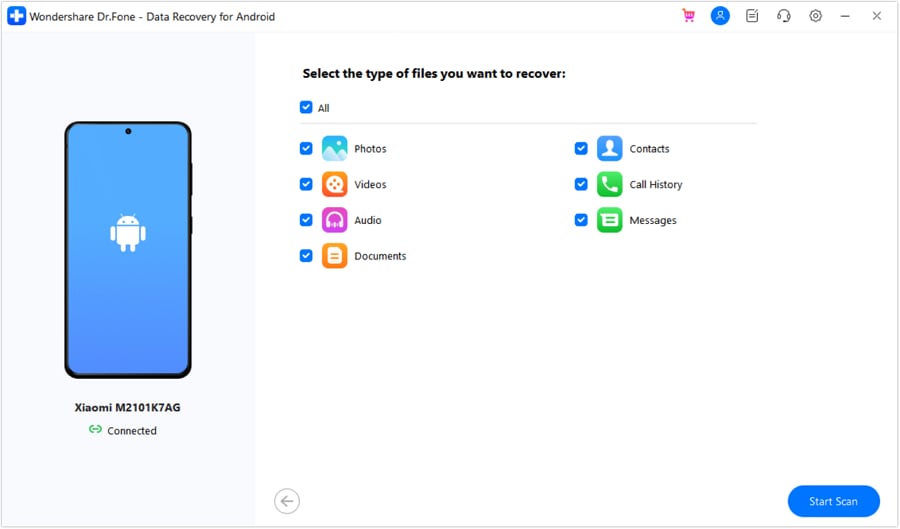
Select "Android" as your device type when the new window appears. This option will guide the tool in recovering data from an Android device. After selecting the operating system that runs on your phone, you will be prompted to connect your Android device to the computer using a USB cable. Ensure your device is detected by the platform.
After your device is connected, select the types of data you want to recover (e.g., photos, videos, contacts). Then, click "Start Scan" to initiate the scanning process.
Dr.Fone will begin scanning your device for the selected data types. Once the scan is complete, you can preview the recoverable data on the screen. Use the filter options to narrow down your search.
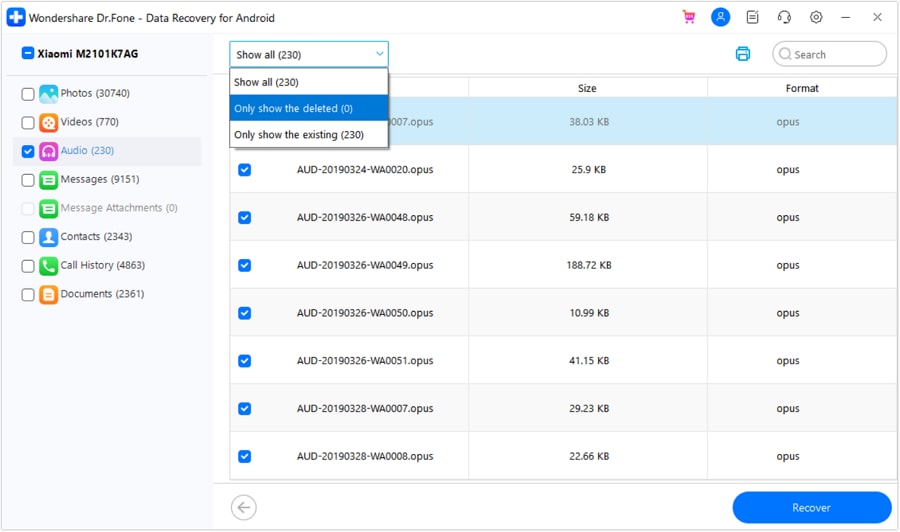
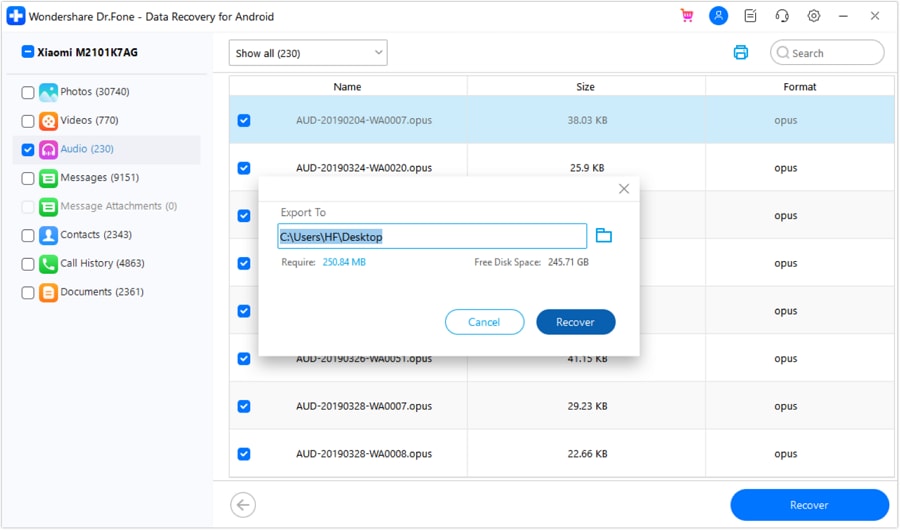
After reviewing the data, select the files you want to recover, then click the "Recover" button at the bottom right. Choose a location on your computer to save the recovered data and confirm by clicking "Recover" on the pop-up window.
Conclusion
Now that you know how to navigate ASUS ZenFone Recovery Mode and understand rooting, you're ready to take your ZenFone experience to the next level. We've also covered how Wondershare Dr.Fone can be your safety net if things don’t go as planned. Diving into Recovery Mode and rooting your device requires caution because you might lose your data. But with the right research and tools like Dr.Fone, you can unlock the full potential of your ASUS ZenFone without worry. So, go ahead and customize your ZenFone just the way you like it!


Android Recover
- Recover Apps
- 1. Data Recovery Software for Android
- 2. Top 4 Android Data Recovery Tools
- 3. Restore Deleted Files on Android
- 4. Coolmuster Android Data Recovery
- 5. Guide of Disk Drill for Android
- 6. Android Data Recovery Software
- 7. Gihosoft Android Data Recovery
- 8. Jihosoft Android Phone Recovery
- 9. Minitool Android Mobile Recovery
- 10. Recover Android Data from Fucosoft
- 11. Best Mobile Forensics Tools to Recover Data
- 12. PhotoRec Review
- 13. FoneDog Toolkit
- 14. TWRP Recovery
- Contacts Recover
- 1. Recover Contacts from Stolen phone
- 2. Recover Contacts from Android
- 3. Retrieve Contacts Without Backup
- Files Recover
- 1. Recover Files from Internal Memory
- 2. Recover Miscellaneous Files
- 3. Recover Android's Hidden Files
- 4. Recover Deleted Files from Android
- 4. Recover Deleted Files Without Root
- 5. Recover Files from SD Card
- 6. Undelete Files on Android
- Messages Recover
- Music/Videos Recover
- Photos Recover
- 1. DiskDigger Photo Recover Review
- 2. Recover Deleted Photos from Android
- 3. Recover Photo from Internal Storage
- 4. Recover Photos from Lost Phone
- 5. Restore Android Deleted Photos
- Broken Android Recover
- 1. View Files from Broken Phone Screen
- 2. Recover Data from Dead Phone
- 3. Recover Contacts with Broken Screen
- 4. Recover Text Messages from Android
- 5. Recover Data from Internal Memory
- Social Apps Recover
- 1. Recover Facebook Messages
- 2. Recover WhatsApp Messages
- 3. Recover WhatsApp Messages
- 4. Restore Deleted WhatsApp Messages
- Android Recover Tips
- 1. SD Card Recovery Tools
- 2. Fix Recovery Mode Not Working
- 3. Enter Recovery Mode on Android
- 4. Recover Calendar from Android
- 5. Recover Deleted Call Log on Android
- 6. Clear Cache Partition
- 7. Repair a USB Stick
- 8. USB Repair Tools
- Cloud Storage Tips
- ● Manage/transfer/recover data
- ● Unlock screen/activate/FRP lock
- ● Fix most iOS and Android issues
- Free Download Free Download Free Download


Daisy Raines
staff Editor
Generally rated4.5(105participated)