PCUnlocker Review: A Comprehensive Tool for Screen Unlock

Jun 25, 2026 • Filed to: Screen Lock Removal • Proven solutions
 TL;DR:
PCUnlocker is a data-preserving recovery tool for bypassing local and domain administrator passwords on Windows XP through 11, though its complex interface and technical prerequisites make UnlockGo a recommended alternative for beginners.
● The PCUnlocker free trial is strictly limited to viewing system accounts; purchasing the full version is mandatory to execute actual password removals or resets.
● The Windows unlock process requires a secondary accessible computer to burn the ISO file to a bootable CD/DVD or USB, followed by manually configuring the locked PC's BIOS boot priority to target the SAM registry or Active Directory database (ntds.dit).
● For locked mobile devices, the article introduces Dr.Fone - Screen Unlock (Android) to bypass PINs, patterns, and biometrics without data loss on brands like Samsung, Huawei, and Motorola by connecting via USB and utilizing Download Mode.
Ask AI for a summary
 ChatGPT
 Perplexity
 Gemini
 Claude
 Grok
Grok
In the dynamic and ever-evolving world of IT, time is precious, and recovering or bypassing a forgotten password shouldn't be a complex ordeal. That's where PCUnlocker comes in—a robust solution designed to simplify the password recovery process for IT professionals. In this review, we'll dive into the key features, advantages, drawbacks, and overall performance of PCUnlocker.
PCUnlocker is a powerful ally for anyone prone to forgetting their Windows passwords. This handy tool helps Windows users reset forgotten or lost local administrator passwords. But that's not all—it can also unlock domain administrator and other user account passwords, letting you regain access to your locked PC without the hassle of reinstalling the Windows operating system.
Join us in this comprehensive guide as we explore the impressive capabilities of PCUnlocker for Windows 10/11, complete with step-by-step instructions on how to use it. And for those looking for an even more user-friendly option, we’ll also introduce you to Dr.Fone—an invaluable resource for effortlessly unlocking your device. Get ready to unlock a world of convenience and efficiency!
Part 1: Is PCUnlocker Windows 10/11 Safe?
The simple answer is Yes. PCUnlocker works for Windows 11, 10, 8, 7, Vista, XP, and even 2003/2008/2012/2016 servers. The full version is super safe—experts have tested it against various anti-viruses to make sure it's secure. So, you can unlock your Windows PC without worrying about your data or personal information being compromised.
When you buy the paid version of PCUnlocker, you don’t have to stress about losing your credit card details. The transaction process is secure and trustworthy. Plus, you'll get the original tool, not some scammy imitation. If you run into any trouble or have questions, their customer support team is quick to help, making sure you have a smooth experience.
Part 2: PCUnlocker Windows 10/11 Free Download
As mentioned earlier, PCUnlocker is a paid tool, but you can give its trial version a spin to see if it meets your needs. This trial lets you explore the basic features and get a feel for what it can do before you decide to buy.
PCUnlocker makes it a breeze to reset and unlock forgotten Windows passwords, providing a seamless way to regain access to your system. Just install the software on your compatible PC, and follow the easy instructions to get started. Designed with user-friendliness in mind, PCUnlocker is perfect even for those who aren't very tech-savvy. Give it a try and see how effortlessly it can solve your password woes!
Part 3: PCUnlocker Free And Paid Version
Feeling torn between the paid and free versions? Let’s clear things up! The paid version unlocks advanced features and functionalities that boost your productivity and enhance your experience. On the other hand, the free version offers essential tools to get you started.
But wait, there's more! The trial version lets you explore all your accounts, though it doesn’t allow password removal from your Windows login. This means you can dive in and test the waters, but for complete access, the full paid version is the way to go.
Understanding these differences can help you choose the version that best fits your needs. Ready to make the leap?
Part 4: How to Use PCUnlocker Windows 10/11?
Ready to reclaim access to your Windows system? Give this password recovery tool a try! Follow the steps below to get started and experience a quick, efficient recovery. Be sure to carefully read each instruction for a seamless process. Let's get you back on track!
Step 1. Create a bootable CD/DVD or USB flash drive
Download PCUnlocker on another computer that you can easily access. Unzip the downloaded file and find the ISO image named PCUnlocker.iso. Use the BurnCDCC program to burn this ISO image to a blank CD/DVD, or you can use ISO2Disc to burn it to a USB flash drive.

Step 2. Set BIOS to Boot From CD/DVD or USB flash drive
Insert the bootable disk into your locked computer and start it up. Once it turns on, look for setup keys like the DELETE key, F8 key, or F2 key to enter the BIOS Setup Utility.
Go to the BOOT menu and find the Boot Device Priority option. Set the 1st Boot Device to CD/DVD-ROM if you are using a CD/DVD, or to Removable Device if you're using a flash drive. Finally, press the F10 button to save your changes.

Step 3. Boot Your Computer from CD/DVD or USB flash drive
Insert the newly burned CD/DVD or USB flash drive into your locked PC. Then, restart the computer, and the boot loading screen will appear immediately.

Note: Once the boot process completes, the PCUnlocker main window will appear on the screen.
Step 4. Reset Windows Password
The final step is to reset the Local Admin/User Password. Select the Windows SAM registry file, and PCUnlocker Windows 10 will list all user accounts. Click on the Reset Password button to set your password to blank.
Step 5. Reset Active Directory Password (For Domain Controller)
Now, select the ntds.dit file (Windows Active Directory Database). Click on the Reset Password button to set a new password.
Finally, restart your computer, remove the bootable device (either CD or USB Flash Drive), and log in with your new password.
PCUnlocker can reset a Windows password, but its complex procedure and unfriendly UI make it hard for new users. UnlockGo for Windows offers a simpler experience for both new and experienced users. It's the best choice for everyone.
Part 5: How to unlock your Android phone if the screen is locked?
The first method lets you unlock your Android device without risking your data. Unlike other processes, Dr.Fone - Screen Unlock (Android) avoids deep system operations, keeping your information safe. Curious to know how it works? Just follow the guidelines below:
Dr.Fone - Screen Unlock (Android)
Unlock Your Android Phone if the Screen is Locked
- Completely unlinked from the previous Google account, it won’t be traced or blocked by it anymore.
- Remove all Android screen locks (PIN/pattern/fingerprints/face ID) in minutes.
- Compatible with various Android models.
- Provide specific removal solutions to promise good success rate.


Step 1: Open the Screen Unlock Tool
Install the latest version of Wondershare Dr.Fone on your computer and connect your Android device using a USB cable. Once connected, go to Toolbox > Screen Unlock to access the unlock screen tool.

Step 2: Select Android Screen Unlocking
On the new screen, choose the Android option to proceed with unlocking your Android screen lock.

Step 3: Continue with the Operation
On the next screen, choose Unlock Android Screen from the two options.

Step 4: Choose to Remove Screen Lock Without Data Loss
Next, you'll see a screen where you need to select your device brand, Samsung. Then, choose Remove without Data Loss.

select to remove without data loss

Step 5: Define Device Details
Select the Brand, Device Name, and Device Model to unlock the Android screen. Check the box for I agree with the warning, and I am ready to proceed. Click Next to continue unlocking the screen.

Step 6: Confirm to Unlock Screen

You'll be asked to type "000000" to confirm. After entering the code, click Confirm to complete the process.
Step 7: Enter Download Mode on Android
Dr.Fone will guide you to put your Android device into Download Mode based on your model. After following the instructions, the platform will automatically proceed to the next step.

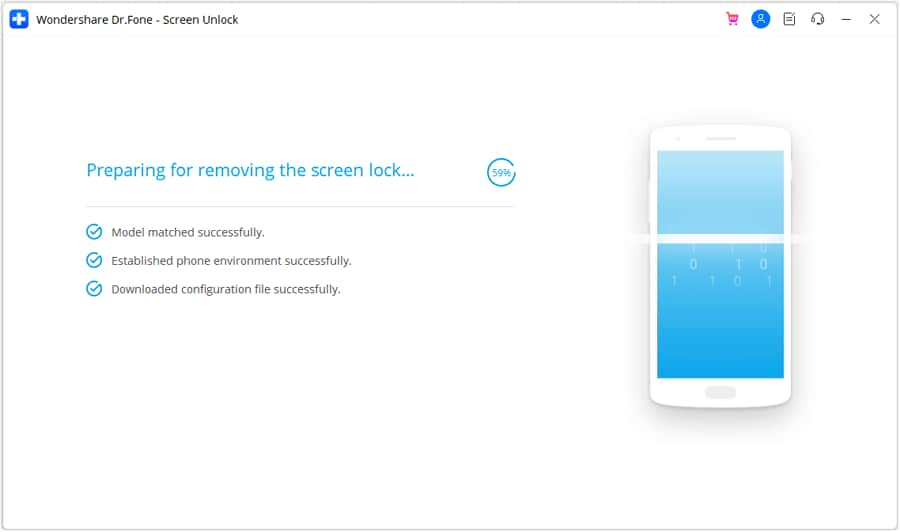
Step 8: Watch the Unlock Process
The next screen displays the progress of the unlocking process, as the necessary drivers and configuration file are downloaded to the platform.
Step 9: Screen Lock Removed Successfully
A new screen will confirm the process is complete.

Conclusion
With the above methods and tools, you can regain access to both your Windows and Android devices without the need for extensive technical knowledge. These tools provide a lifeline when you find yourself locked out of your system, helping you navigate past forgotten passwords quickly and efficiently. Whether you choose PCUnlocker for Windows or Dr.Fone - Screen Unlock (Android), rest assured that you are equipped with the best solutions to recover your system access seamlessly.
Remember, regularly updating and securely managing your passwords can prevent future lockouts and ensure your data remains protected. Investing a little time in understanding these security tools can save you a lot of hassle in the long run. Stay prepared and stay secure!
FAQs


Android Unlock
- Android Password Lock
- 1. Reset Lock Screen Password
- 2. Ways to Unlock Android Phone
- 3. Unlock Wi-Fi Networks
- 4. Reset Gmail Password on Android
- 5. Unlock Android Phone Password
- 6. Unlock Android Without Password
- 7. Emergency Call Bypass
- 8. Enable USB Debugging
- 9. Unlock Asus Phone
- 10. Unlock Asus Bootloader
- Android Pattern Lock
- Android Pin/Fingerprint Lock
- 1. Unlock Android Fingerprint Lock
- 2. Recover a Locked Device
- 3. Remove Screen Lock PIN
- 4. Enable or Disable Screen Lock PIN
- 5. Pixel 7 Fingerprint Not Working
- Android Screen Lock
- 1. Android Lock Screen Wallpapers
- 2. Lock Screen Settings
- 3. Customize Lock Screen Widgets
- 4. Apps to Reinvent Your Android
- 5. Lock Screen Wallpaper on Android
- 6. Unlock Android with Broken Screen
- 7. Unlock Google Find My Device Without Problems
- 8. Forgot Voicemail Password on Android
- 9. Unlock SafeSearch on Google
- Android Screen Unlock
- 1. Android Device Manager Unlock
- 2. Unlocking Android Phone Screen
- 3. Bypass Android Face Lock
- 4. Bypass Android Lock Screen
- 5. Bypass Lock Screen By Emergency Call
- 6. Remove Synced Google Account
- 7. Unlock Android without Data Loss
- 8. Unlock Phone without Google Account
- 9. Unlock Android phone
- 10. Reset a Locked Android Phone
- 11. Unlock Doogee Phones
- 12. Best 10 Unlock Apps For Android
- 13. Remove Gmail Account
- 14. Unlock 30/30 Attempts Remaining
- 15. OEM Unlock Missing
- 16. Change Lock Screen Clock
- 17. OEM Unlocking on Android
- 18.Bypass Knox Enrollment Service
- 19. Unlock Google Pixel 6a, 6 or 7
- 20. Best Alternative to MCT Bypass Tool
- 21. Best Way to Unlock Your ZTE Phone
- Android SIM Unlock
- 1. Easily Unlock Android SIM
- 2. 5 Android Unlock Software
- 3. Carrier Unlock Phone to Use SIM
- 4. Change Android Imei without Root
- 5. How to Change SIM PIN on Android
- 6. Best Unlocked Android Phones
- Android Unlock Code
- 1. Lock Apps to Protect Information
- 2. Unlock Secret Features on Phone
- 3. Android SIM Unlock Code Generator
- 4. Ways to Sim Unlock Phone
- 5. Remove Sim Lock without Code
- 6. Updated Android Factory Reset Code
- Google FRP Bypass
- 1. Bypass Google Account Verification
- 2. Bypass Google FRP Lock On Phones
- 3. Bypass Google Pixel FRP
- 4. Huawei Bypass FRP Tools for PC
- 5. Direct Open FRP MobileTech
- 6. Bypass Samsung S24 FRP Lock
- 7. EDL Cable Unlock FRP
- 8. Unlock OnePlus Nord FRP
- 9. Tecno FRP Bypass
- 10. Remove Infinix FRP Lock
- 11. FRP Itel Lock Removal
- 12. Itel A23 FRP Bypass Easy Guide
- 13. Itel A16 FRP Bypass
- 14. Remove Google FRP Using Online Tools
- Unlock Bricked Phone
- 1. Restore Bricked Mobile Phone
- 2. Fix Motorola Bricked Phone
- 3. Fix Bricked Redmi Note
- 4. Unbrick Oneplus Easily
- 5. Unbrick Xiaomi Phone
- 6. Unbrick Huawei Phone
- 7. Unbrick Poco X3
- 8. Software to Unbrick Samsung
- 9. Unbrick 3DS
- 10. Unbrick PSP
- Android Unlock Tools
- 1. Griffin Unlocker Tool Review
- 2. BMB Unlock Tool Review
- 3. Android Multi Tools Review
- 4. Best Bootloader Unlock APKs
- 5. Top 5 Micromax FRP Tools
- 6. Pangu FRP Bypass
- 7. Google Account Manager APK FRP Review
- 8. D&G Password Unlocker Review
- 9. Android Multi Tools Review
- 10. Easy Samsung FRP Tool Review
- 11.Samfw FRP Tool
- Android MDM
- ● Manage/transfer/recover data
- ● Unlock screen/activate/FRP lock
- ● Fix most iOS and Android issues
- Free Download Free Download Free Download

Daisy Raines
staff Editor