
How to Unlock iTunes Backup Encryption: Fix Encrypt iPhone Backups is Greyed Out Issue Today
Oct 13, 2025 • Filed to: Screen Lock Removal • Proven solutions
It's essential to back up your iPhone to protect your info, but what can you do when encrypted iPhone backups are greyed out in iTunes? Because of this annoying problem, you can't protect your backup with a password, which leaves your data open to attack. You're not the only one who has had the "iTunes encrypt local backup greyed out" trouble. Why does this happen? This guide will show you how to resolve it, whether you require that you uncheck encrypt local backup in iTunes or find a way to recover a forgotten encrypted backup password. Following these steps, you can regain control of your iPhone backups and keep your information safe.
Part 1: What is iPhone Backup Encryption?
A feature of iPhone backup encryption protects your data with a password, keeping it safe. The info you backed up on your PC with iTunes is encrypted this way. If you encrypt your iPhone backup, a password will be added to the backup file so somebody can't read it without the correct password. This procedure keeps private data like passwords, Wi-Fi settings, and browsing history safe from people who shouldn't have access to it.
Part 2: Why Is Encrypt Local Backup Greyed Out?
Before diving into solutions, it's essential to know why the encrypted local backup greyed-out problem occurs in iTunes. Understanding the causes will help you prevent this from happening again, ensuring you won't face the encrypted iPhone backups greyed out in the iTunes issue in the future.
Reason 1: Profile Issues on Your iPhone
One possible reason why you can't uncheck Encrypt local backup in iTunes is that a profile has been installed on your device. Profiles, such as those from the iOS beta program or certain VPN apps, can cause the encrypt backup iTunes option to be stuck. These profiles may interfere with iPhone backups, making disabling encrypted local backup iTunes impossible.
To avoid this, monitor the profiles installed on your iPhone. Reducing the number of unnecessary profiles can prevent the iTunes encrypt local backup greyed-out issue from recurring. Be cautious of apps that install profiles, which might contribute to the problem.
Reason 2: Forgotten Password Issue
Another reason you might find the encrypted iPhone backup greyed out is that you've forgotten your encrypted backup password. When setting up an iTunes backup, you must create a password. If you forget this password, iTunes won't let you disable iTunes backup encryption or turn off encryption on iPhone backups.
To avoid being stuck with the encrypt local backup greyed-out problem, ensure you store your iOS encryption password securely. Forgetting this password can prevent you from disabling encryption, forcing you to create only encrypted backups. If you find yourself in this situation, you might need to recover your forgotten encryption password for iPhone backup or consider alternative solutions to regain control over your backups.
Part 3: How to Fix Encrypt iPhone Backup Greyed Out?
If you're struggling with the "encrypt iPhone backup greyed out" issue, here are some practical solutions to help you resolve it.
Method 1: Remove Installed Configuration Profiles
The "encrypt local backup greyed out" condition is often caused by specific setup profiles on your iPhone. Follow these steps to remove them:
- Open the Settings app on your iPhone.
- Scroll down and select the General option.
- Tap on the profile to see a list of all installed profiles.
- Review the profiles and identify any suspicious ones.
- Tap the suspicious profile, then select Remove profile and confirm the deletion.

Tip: If you can't find any profiles, check under "Device Management" in the Settings app. The "Profiles" option may be renamed "Device Management." Be cautious and only delete profiles that you believe are causing issues, as removing profiles for frequently used apps could cause those apps to malfunction.
Method 2: Fix the Issue by Double-Clicking the Encrypt iPhone Backup Button
If the "encrypt iPhone backups is greyed out in iTunes" and your computer isn't responding correctly, you can try this:
- The "Automatically Back Up" setting should be selected as "This computer."
- Confirm that the "Encrypt local backup" or "Encrypt iPhone backup" button has not been selected.
Method 3: Delete All Existing iTunes Backups
Sometimes, corrupted backup files can cause the "encrypt local backup greyed out" issue. Here's how to fix it:
- Open iTunes and go to Preferences. On Windows, this is found under the Edit menu. Click on Devices.
- Locate your backup by right-clicking on it and selecting the option to show it in Finder (Mac) or File Explorer (Windows).
- On a PC, backups are stored in the following path: "Users," followed by your username, then "AppData," "Roaming," "Apple Computer," "MobileSync," and finally "Backup."
- On a Mac, backups can be found in the "Library" folder, then "Application Support," then "MobileSync," and finally "Backup."
- Move all existing backups from the "Backup" directory to another location on your computer.

Part 4: How to Uncheck Encrypt Local Backup in iTunes?
If you're having trouble with the encrypt local backup greyed-out option in iTunes, here's a quick way to check if it's working correctly.
- Connect Your iPhone
- You can use a USB cable to connect your iPhone to your PC.
- Open iTunes
- Start iTunes on your computer and locate your iPhone.
- Find the Encryption Option
- Look for "Encrypt iPhone Backup" on the right side of the screen and see if you can uncheck it.

Part 5: How to Turn Off Encrypt iPhone Backup Without Password?
Method 1: Remove iTunes Encrypted Backup Password with Dr.Fone - Screen Unlock (iOS)
Removing the iTunes encrypt local backup greyed-out issue with Dr.Fone - Screen Unlock (iOS) is a simple process that helps you regain access to your backup files. Dr. Fone - Screen Unlock (iOS) makes handling encrypted local backup greyed-out problems easy by offering a straightforward and easy-to-use interface. Open the software, choose "Remove iTunes Backup Encryption Password," and follow the straightforward steps. Dr. Fone-Screen Unlock (iOS) uses advanced technology to quickly and securely remove the encryption, allowing you to unlock your backup without losing any data. Whether you've forgotten the encrypted backup password or need smooth access to your backup, Dr.Fone - Screen Unlock (iOS) provides a dependable solution, making it easier to manage your iOS device backups without hassle.

Dr.Fone - Screen Unlock (iOS)
Remove iTunes Encrypted Backup Password with Dr.Fone - Screen Unlock
- Simple, click-through, process.
- Unlock screen passwords from all iPhones and iPads.
- No tech knowledge is required, everybody can handle it.
- It supports the latest iOS version fully!

Step 1: Launch the Dr.Fone Screen Unlock Tool
- Open Wondershare DrFone on your computer.
- Navigate to the Toolbox section.
- Go to Screen Unlock and then iOS to use the screen unlock feature.

Step 2: Select the Required Function
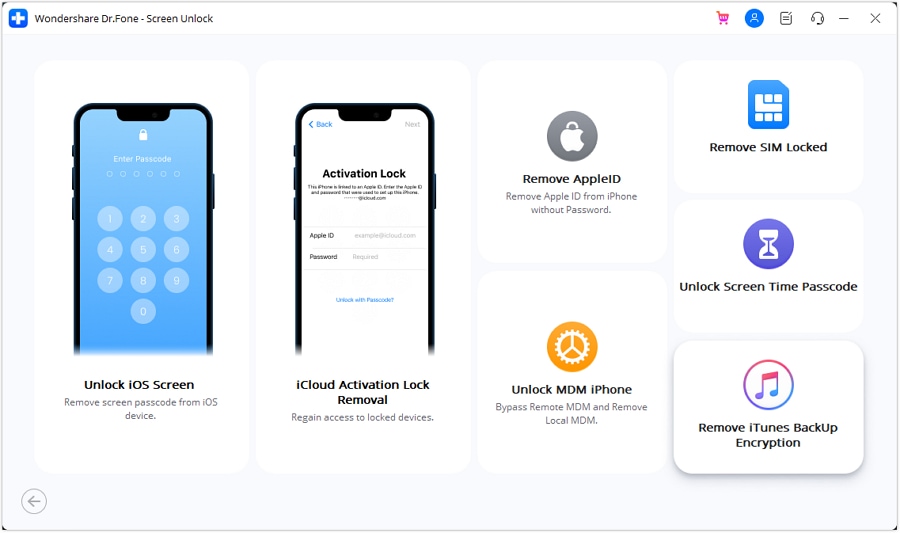
- When the tool opens a new window, locate and select Remove iTunes Backup Encryption.
- Proceed to the next step.
Step 3: Connect Your iOS Device
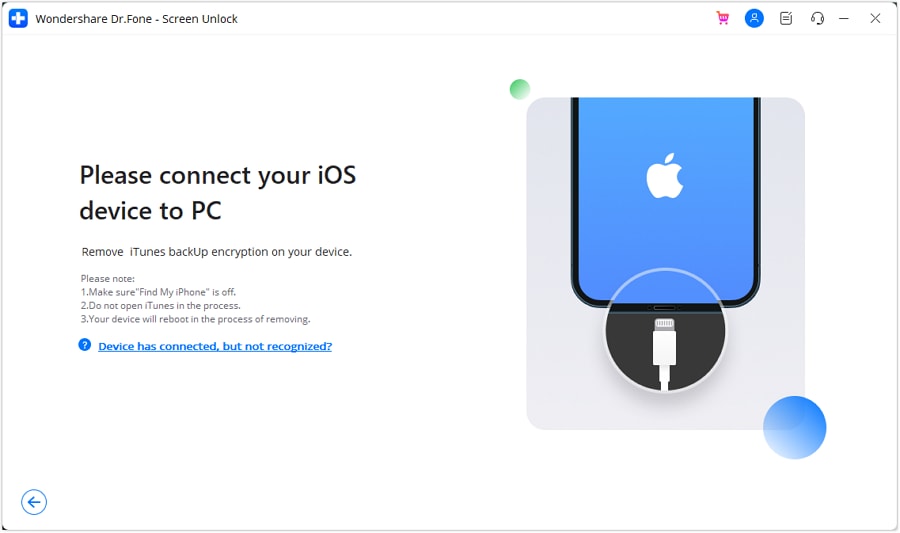
- For iOS devices, a USB cable is needed to link to a PC.
- Ensure the device is connected correctly and recognized by the tool.
Step 4: Execute the Password Removal Process
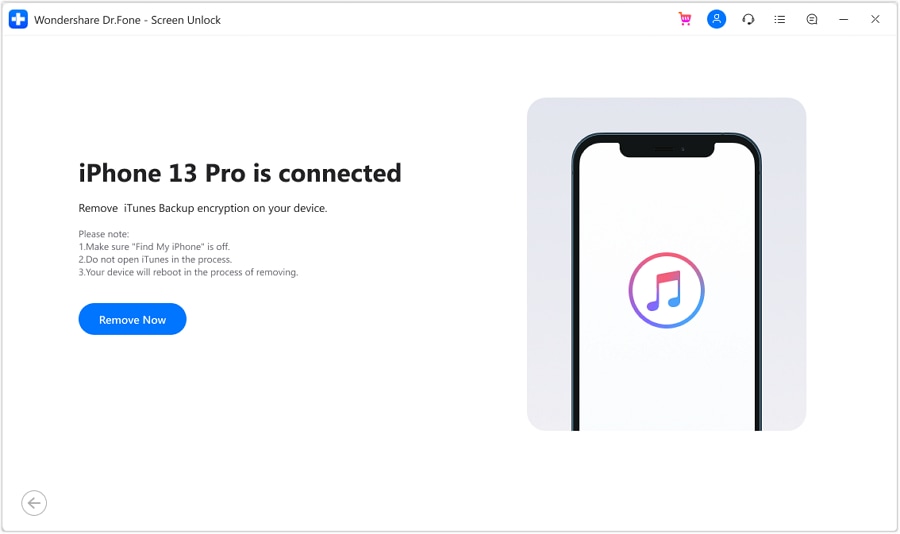
- Once your device is detected, a message will appear with the Remove Now button.
- Click the Remove Now button to start the password removal process.
- Before clicking, ensure Find My iPhone is off, iTunes is closed, and your device will reboot.
Step 5: Monitor the Progress
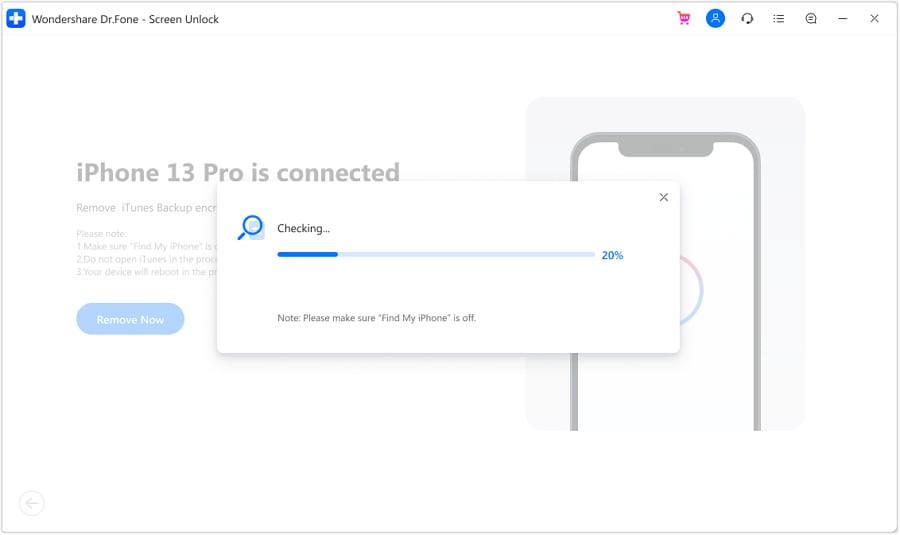
- A progress box will show how the password removal is progressing.
- If you need to stop the process, click the X button in the top right corner to cancel.
Step 6: Complete the Process
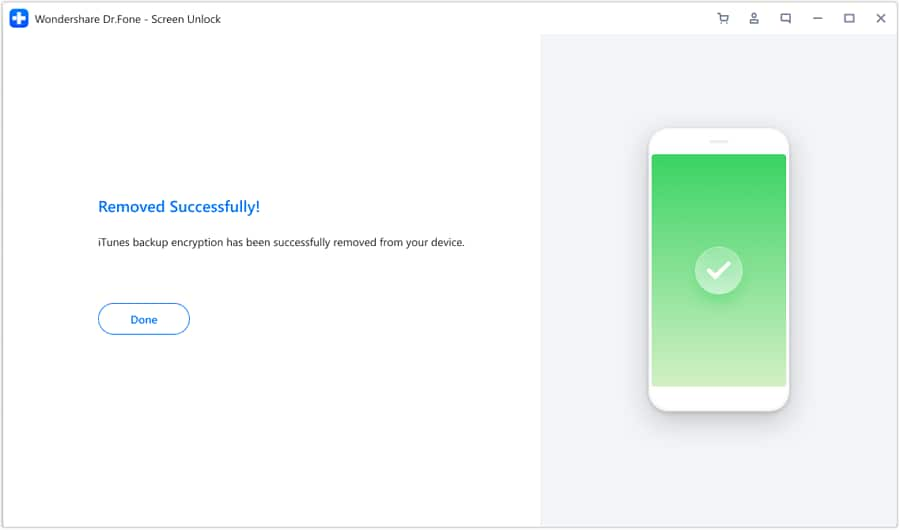
- After the password is successfully removed, a confirmation message will be displayed.
- Click Done to close the window and complete the process.
Method 2: Resetting Your iPhone Settings
If you're having trouble with your iPhone's encrypted backup, resetting your device's settings might help. This method can remove the iTunes encrypt local backup greyed-out issue without affecting your data, allowing you to start fresh with a new backup.
Step 1: Access the Reset Option:
- Open the Settings app.
- Navigate to General, then scroll down to "Reset." Press the button.

Step 2: Enter Your Passcode:
- Select "Reset All Settings."
- Enter your passcode when prompted.
Step 3: Follow the Reset instructions:
- Proceed with the on-screen instructions.
- It's important to know that your user data and passwords will stay safe, but settings like wallpaper, display brightness, and home page layout will be changed.
- This also removes the encrypted backup password.
Step 4: Reconnect to Finder or iTunes:
- Connect your device to Finder or iTunes.
- Follow the prompts to create a new encrypted backup.
- Remember that you can only create a new backup; restoring the old one is impossible with this method.
Method 3: Restoring from iCloud Backup
If you have an iCloud backup, you can use it to recover your data. This method is straightforward and effective if you have previously backed up your iPhone to iCloud and want to restore it.
Step 1: Prepare Your Device:
- Turn on your iPhone and look for the Hello Screen.
- You must erase all existing data if you have already set up your iPhone.
Step 2: Restore from iCloud Backup:
- In the Apps & Data menu, choose "Restore from iCloud Backup."
- Log in to your Apple ID and select the backup you want to use.
- Ensure that your Wi-Fi is enabled during the restoration process.
Method 4: Using iTunes Password Decryptor
For those who have forgotten their iTunes backup password, the iTunes Password Decryptor is a useful tool. It helps recover or bypass the encrypted backup password, allowing you to access your iTunes backups without data loss.
Step 1: Download and Install the Software:
- Get the iTunes Password Decryptor software on your Windows PC.

Step 2: Import Your Backup File:
- Open the software and add your iTunes backup file.
- Hit "Open," subsequently "Add file," and choose the manifest. List file via route:
- C:\Users(username)\AppData\Roaming\Apple Computer\MobileSync\Backup
Step 3: Choose a password attack type:
- Click on a list item to choose a type of password attack.
- Use mask or dictionary attacks if you remember part of the password or Brute-force if you have forgotten it completely.
Step 4: Start Password Recovery:
- To access your backup password, hit the "Start" option.
- The software will start working to recover your iTunes backup password.

Method 5: Trying Every Possible Passcode
If you're still locked out, trying every possible passcode might be an option. Although this method can be time-consuming, it's a simple approach to potentially unlock your encrypted backup by testing common or previously used passwords.
Consider Common Passcodes:
If you're unsure of the password, try common ones. Here's a list to start with:
- Default password like 0000
- Computer login password
- Apple ID password
- Hard Disk Encryption password
- Various website passwords
- Wi-Fi password
- Email Password
- Administrator passcode
- iPhone passcode
Conclusion:
The encrypted iPhone backup greyed-out issue can be frustrating, but it's manageable with the proper steps. You can regain control over your iPhone backups by removing restrictions, updating iTunes, or using a powerful tool like Dr. Fone—Screen Unlock (iOS). Always ensure your backups are secure, and if you encounter any issues, refer to the methods and solutions provided in this article to fix the problem.
FAQs
iPhone Unlock
- Access Locked iPhone
- 1. Reset Locked iPhone Without iTunes
- 2. Erase Locked iPhone
- 3. Get Into Locked iPhone
- 4. Factory Reset Locked iPhone
- 5. Reset Locked iPhone
- 6. iPhone Is Disabled
- 7. Fix iPhone Unavailable Issue
- 8. Forgot Locked Notes Password
- 9. Unlock Total Wireless Phone
- 10. Review of doctorSIM Unlock
- iPhone Lock Screen
- 1. Lock Apps on iPhone
- 2. Bypass iPhone Passcode
- 3. Unlock Disabled iPhone Without PC
- 4. Disable One More Minute Screen Time
- 5. Unlock iPhone Passcode Screen
- 6. Reset iPhone Password
- 7. Auto Lock Never on iPhone
- 8. Remove Carrier Lock/SIM Restrictions
- 9. Get iMei Number on Locked iPhone
- 10. Add a New Face ID
- 11. iPhone Passcode Expired Pop-Up
- 12. Control Display Rotation
- 13. Fix iPhone is Disabled Connect to iTunes
- 14. Fix Turn Passcode Off Greyed Out
- 15. Get iPhone out of Demo Mode
- 16. Unlock Unresponsive Screen
- 17. iPhone Ask for Passcode After Reset
- Remove iCloud Lock
- 1. Unlock an iPhone 7 Plus iCloud
- 2. iOS 18 iCloud Unlock
- 3. iOS 26 iCloud Unlock
- 4. Crack iCloud-Locked iPhones to Sell
- 5. Jailbreak iCloud Locked iPhone
- 6. What To Do If You Bought A Locked iPhone?
- 7. Fix iPhone Unavailable No Erase Option
- 8. Find iCloud Email Address on Apple Device
- 9. Broque Ramdisk iCloud Bypass
- Unlock Apple ID
- 1. Remove Payment Method on iPhone
- 2. Create a New Apple ID Account
- 3. Change Apple ID on iPad
- 4. Change Your Apple ID Password
- 5. Apple ID Not Active
- 6. Fix Wrong Apple ID Issue on iPhone
- 7. Fix This Person Is Not Active
- 8. New iCloud Terms and Conditions
- 9. Fix Apple ID Account Unavailable
- 10.Find Apple ID by IMEI
- 11. Unlink 2 iPhones with the Same Apple ID
- 12. Reset Password at appleid.apple.com
- 13. App Store Keep Asking for Password
- 14. Find Apple ID Password No Reset
- 15. Trusted Devices List Not Available
- Remove SIM Lock
- 1. Unlock iPhone Using Unlock Chip
- 2. Unlock iPhone for Free
- 3. Unlock iPhone Online
- 4. Factory Unlock iPhone
- 5. SIM Unlock iPhone
- 6. Unlock AT&T iPhone
- 7. Unlock iPhone with IMEI Code
- 8. Unlock iPhone without SIM Card
- 9. Unlock Cricket iPhone
- 10. Unlock iPhone with/without SIM Card
- 11. Unlock T-Mobile iPhone
- 12. Unlock Verizon iPhone
- 13. iPhone IMEI Checker
- 14. Unlock Xfinity iPhone
- 15. Unlock iPhone From The Carrier
- 16. Turbo SIM iPhone
- 17. Get the Sprint Unlock Codes
- 18. Unlock a Sprint Phone
- 19. Fix When iPhone Says No Sim
- Unlock iPhone MDM
- 1. Remove MDM from iPhone
- 2. Remote Management on iPhone
- 3. MDM VS MAM
- 4. Top MDM Bypass Tools
- 5. IoT Device Management
- 6. Unified Endpoint Management
- 7. Enterprise Mobility Management
- 8. Top 10 Proxy Websites
- 9. Hindilinks4u Alternatives
- Unlock Screen Time Passcode
- 1. Reset Screen Time Passcode
- 2. Turn Off Screen Time without Passcode
- 3. Screen Time Passcode Not Working
- 4. Disable Parental Controls
- 5. Bypass Screen Time on iPhone Without Password
- 6. Delete Screen Time History on iPhone
- 7. Turn Off Downtime on iPhone
- 8. Download Age Restricted Videos
- MDM Unblock Games/Websites
- 1. Basketball Stars Game Unblocked
- 2. Play Getaway Shootout Unblocked
- 3. Play Build Now GG Unblocked
- 4. BitLife Unblocked
- 5. 10 Best Unblocked Anime Websites
- 6. Best Unblocked Game Websites
- 7. 1v1 LOL Unblocked
- 8. Get Poly Track Unblocked
- 9. Music Websites Unblocked
- 10. Spotify Unblocked
- 11. Snow Rider 3D Unblocked
- Unlock Apple Watch
- Unlock iPod Touch
- ● Manage/transfer/recover data
- ● Unlock screen/activate/FRP lock
- ● Fix most iOS and Android issues
- Unlock Now Unlock Now Unlock Now




Alice MJ
staff Editor