
Easy Steps on How To Create a New Apple ID Account

Jun 11, 2026 • Filed to: Screen Lock Removal • Proven solutions
 TL;DR:
You can create a new Apple ID through the official account management page using a fresh email and phone number, and remove an inaccessible old account from an iOS device using Wondershare Dr.Fone - Screen Unlock (iOS).
● Registering a new Apple ID requires passing a potential CAPTCHA, verifying a phone number via a confirmation code, establishing security questions, and clicking an email activation link.
● To successfully remove a previous owner's ID using Wondershare Dr.Fone - Screen Unlock (iOS), the target device must already have an active screen lock and Two-Factor Authentication enabled.
● The third-party removal sequence requires manually putting the device into Recovery or DFU Mode, downloading the corresponding iOS system firmware, and executing the unlock with a final confirmation code.
Ask AI for a summary
 ChatGPT
 Perplexity
 Gemini
 Claude
 Grok
Grok
Your Apple ID is the key to unlocking a world of apps, music, iCloud storage, and more. Whether you're new to Apple or just want a fresh start, creating a new Apple ID is a simple step that gives you full access to all Apple services.
In this friendly guide, you’ll learn how to create a new Apple ID account from scratch. We’ll walk you through every step—from choosing your email to setting up security settings—so you feel confident and ready.
You don’t need to be a tech expert. With just a few taps, you’ll be all set to enjoy everything your Apple device has to offer. Let’s get started and make your Apple experience seamless!
Part 1: Why Create a New Apple ID?
You might need to create a new Apple ID to enhance your Apple experience. Let's dive into why it's a good idea:
1. Reasons for Creating a New Apple ID Account
Here's a breakdown of the reasons why you should create a new Apple ID for your iPhone:
- Your Apple ID is like your digital identity. Creating a new one lets you choose a unique email address that suits you, adding a personal touch to your Apple journey.
- Maybe you've been using an email for your Apple ID that you don't want to use anymore. Creating a new one helps keep your personal and Apple-related emails separate.
- Switching Devices. When you switch to a new Apple device, like getting a new iPhone or iPad, creating a unique Apple ID ensures a fresh start tailored to your new gadget.
- Separation of Accounts. Sometimes, you may want to keep your work-related apps and data separate from your ones. Creating a new Apple ID helps you achieve this separation.
- If you're using Apple services for different purposes, such as work and personal use, having separate Apple IDs can help keep everything organized and distinct.
2. Scenarios Where a New ID Is Needed
Below are the common scenarios where a new Apple ID might be needed:
- New Apple Device.When you purchase a new Apple device, like an iPhone or iPad, you'll need a new Apple ID to set it up and make it truly yours.
- Shared Device.If multiple people use the same device, creating a new Apple ID for each user ensures that everyone has their own personalized experience.
- Change of Email.If your current email address associated with your Apple ID is changed or you prefer a new one, creating a unique Apple ID with the updated email is the solution.
- Work and Personal.To keep your work-related apps and data separate from your personal ones, having separate Apple IDs for each purpose is practical and organized.
- Starting Fresh.Sometimes, you might want a fresh start with your Apple experience, and creating a new Apple ID provides a clean slate.
Creating a new Apple ID isn't just about getting a new email; it's about tailoring your Apple experience to your needs, whether for personalization, privacy, or organization. Now that you know why it's essential, let's explore how to create it in the next section.
You May Also Like:
How to Remove an Old Apple ID on iPhone
Part 2: Step-by-Step Guide: How To Create a New Apple ID Account
Creating a new Apple ID for free is a straightforward process. Let's break it down into simple steps:
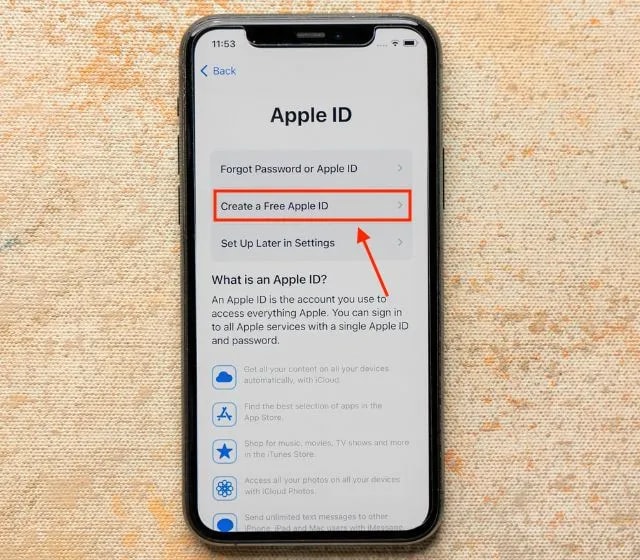
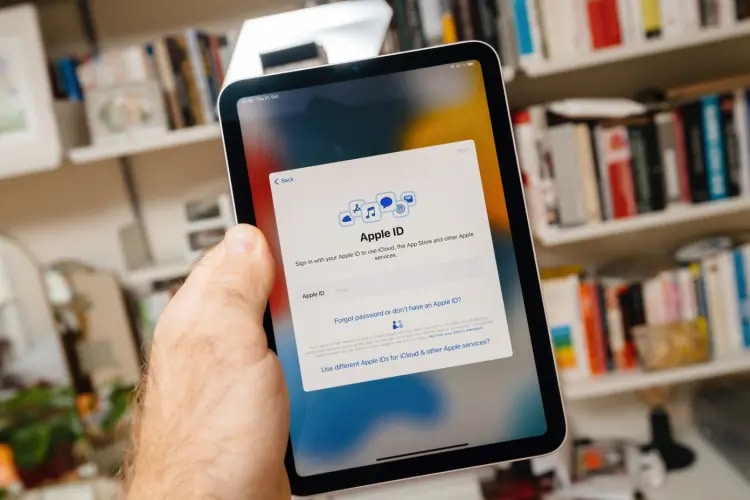
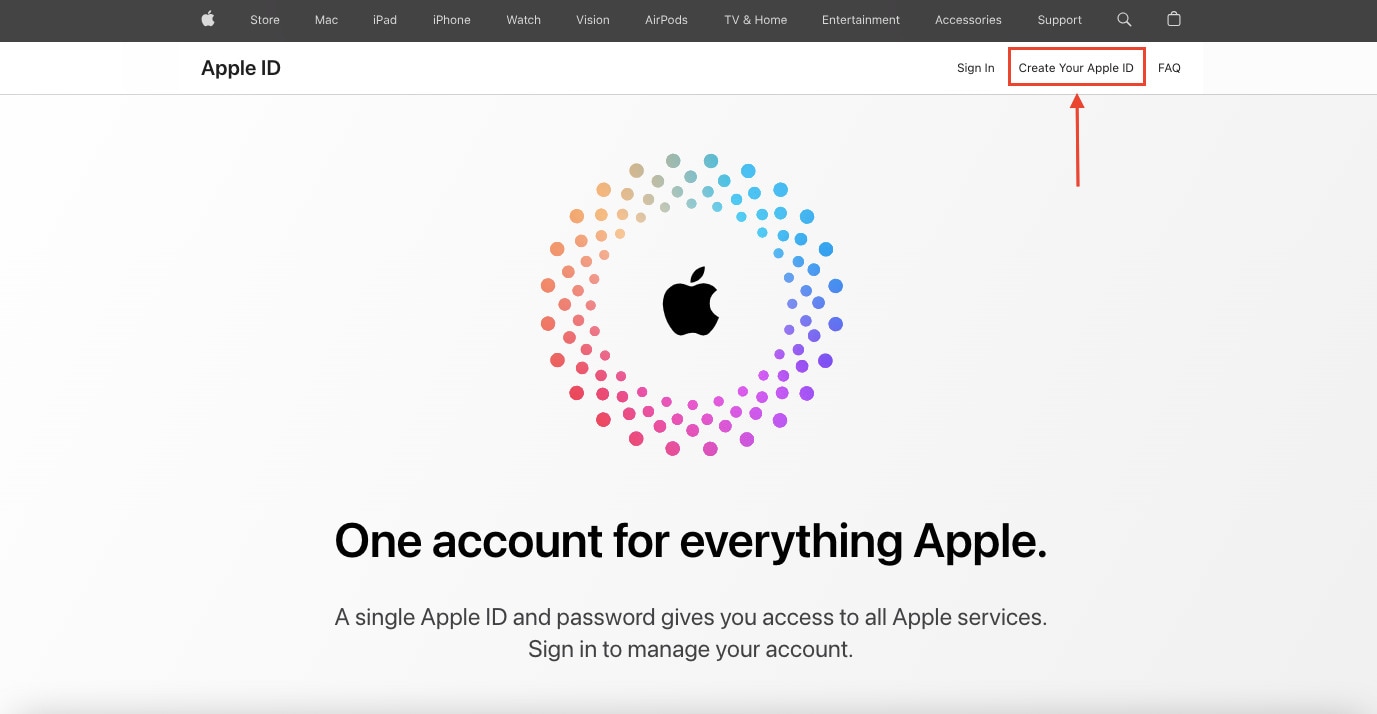
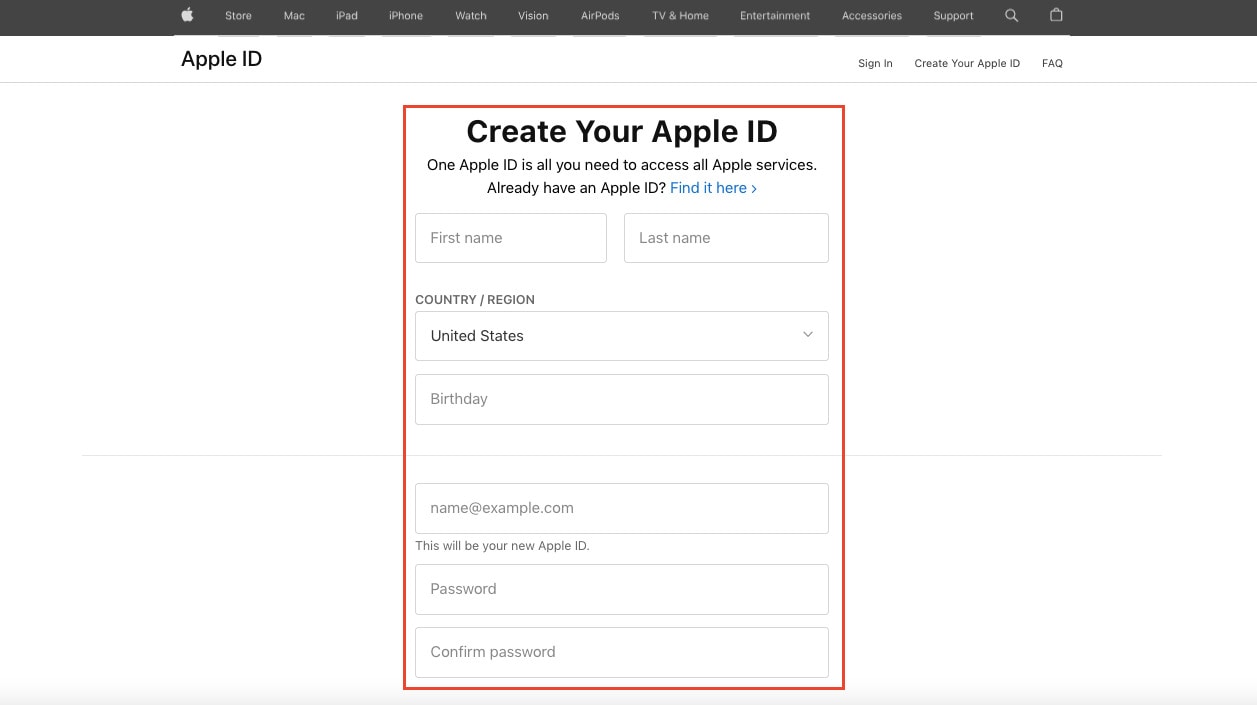
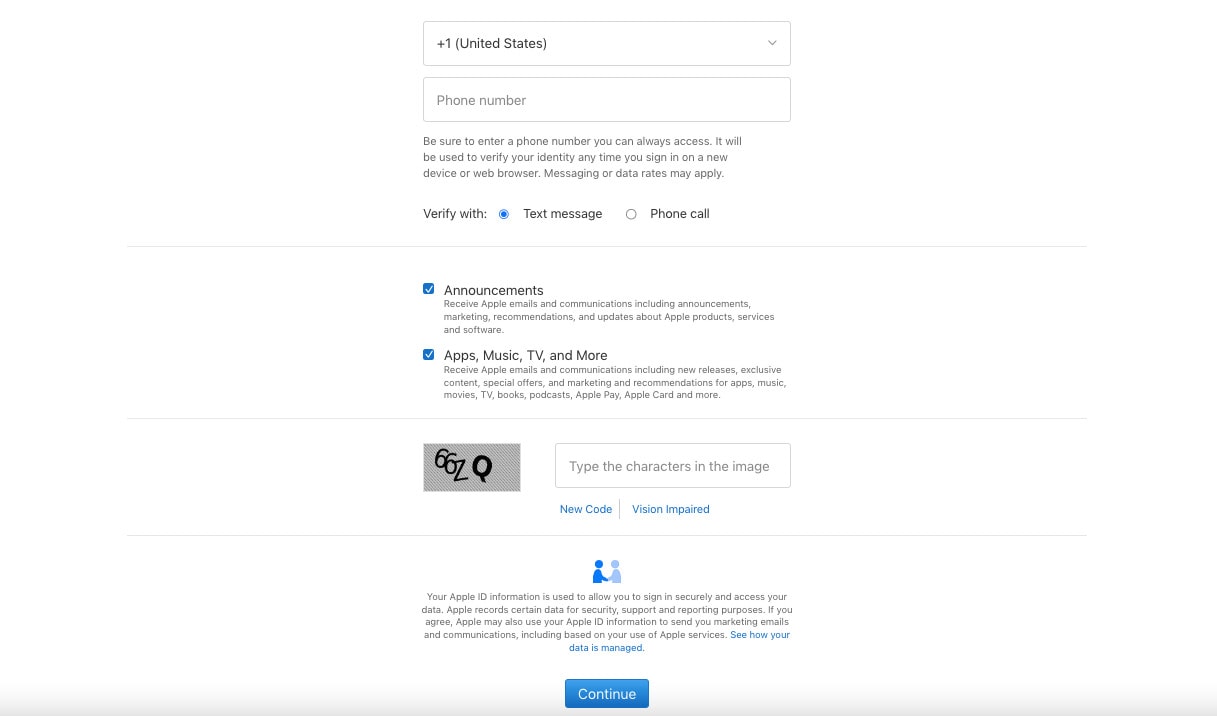
Step 1: Visit the Apple ID Account Management Page
Open your browser and go to the Apple ID account management page. Click Create Your Apple ID, then enter your name and a preferred email address—this becomes your new Apple ID. Choose a strong password and confirm it.
Tip: Choose an email that's easy to remember and access.
Step 2: Verifying Your Identity
Enter a valid phone number to receive a verification code. Input the code when prompted. Apple may also require a CAPTCHA to confirm you're not a bot.
Step 3: Set Up Security Questions
Choose and answer security questions that are easy for you to remember but hard for others to guess. This helps protect your account.
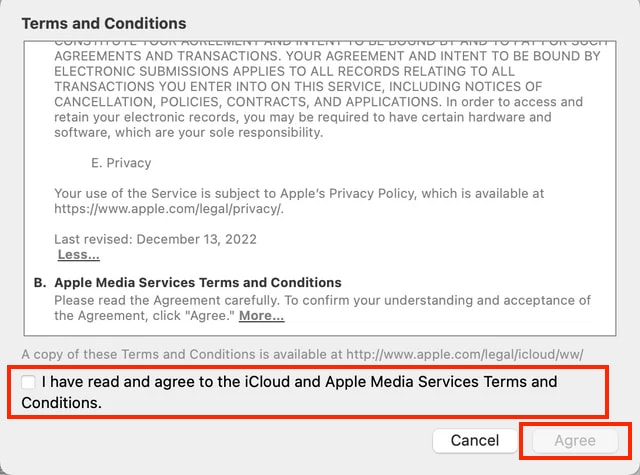
Step 4: Agree to Terms and Verify Email
Review Apple’s Terms and Conditions, check the agreement box, and click Agree. Then, open your email and click the verification link to activate your new account.
Congratulations! You've successfully created a new Apple ID. With this account, you can now access Apple's services, including the App Store, iCloud, and more. Remember to keep your login credentials secure and use them to personalize your Apple experience fully.
Part 3: Effortlessly Remove Your Apple ID Using Wondershare Dr.Fone - Screen Unlock (iOS)
You can embark on an enhanced Apple experience after successfully creating your new Apple ID. Removing the previous one is essential when you create it, especially if you've acquired a second-hand device or no longer want the previous user's associated credentials.
This step ensures that your new Apple ID takes center stage, granting you full control over your device and its associated services. But if you encounter difficulties when removing the previous Apple ID from your device, Dr.Fone - Screen Unlock (iOS) is a reliable and user-friendly solution.

Key Features of Dr.Fone - Screen Unlock (iOS)
This versatile tool offers the following key features in the context of Apple ID issues:
- User-Friendly Interface. Dr.Fone - Screen Unlock (iOS) is designed to be straightforward, making it accessible to users of all levels of technical expertise.
- It is usable with a wide range of iOS devices, ensuring you can remove the previous Apple ID from your device, regardless of the model.
- Multiple Unlock Modes. Dr.Fone offers various unlock modes to cater to different scenarios, including removing the previous Apple ID. This flexibility ensures that you have the right solution for your specific situation.
- Data Security. Dr.Fone - Screen Unlock (iOS) prioritizes data security, ensuring that your personal information and content remain intact during the Apple ID removal process.
Dr.Fone - Screen Unlock (iOS)
One click to Effortlessly Remove Your Apple ID.
- Simple, click-through, process.
- Unlock screen passwords or Apple ID from all iPhones and iPads.
- No tech knowledge is required, everybody can handle it.
- Supports almost all iPhones and the latest iOS version fully!


Step-by-Step Guide on Using Dr.Fone Screen Unlock (iOS)
Check out the steps on how to remove an Apple ID account using Dr.Fone below:
- Step 1: Launch Wondershare Dr.Fone on your PC to use the Screen Unlock function and then navigate to Toolbox. Click the Screen Unlock section, then choose iOS.

- Step 2: Click Remove Apple ID, then connect your iOS device. Once detected, click Unlock Now to proceed.

- Step 3: Ensure your device has a screen lock and Two-Factor Authentication enabled. Confirm both to move forward.

- Step 4: After you have confirmed these settings, you will be taken to a screen with on-screen instructions for entering Recovery Mode on your iDevice. If the steps for your specific iOS device don't work, try tapping Try DFU Mode in the app's bottom left corner. To continue with the unlocking process, this will launch the DFU Mode instructions.

- Step 5: Once the Device Model has been identified, all that remains is to choose the appropriate System Version and click Start. The appropriate iOS firmware begins downloading, showing its status on the following screen. Click the Copy button to copy the direct URL to download iOS firmware for systems with sluggish firmware download speeds.

- Step 6: Once the firmware is verified, click Unlock Now, enter the confirmation code, and follow the prompts. When complete, click Done or retry if needed.

Conclusion
This guide has simplified the process of creating a new Apple ID, ensuring you can effortlessly personalize, secure, and organize your digital experience. Creating a new Apple ID is easy, and it allows you to tailor your Apple journey to your preferences. Remember, it's all about you, your privacy, and your convenience.
Should you encounter any challenges while managing your Apple ID, such as removing a previous one, consider Dr.Fone - iOS Screen Unlock tool. This user-friendly resource stands ready to assist, ensuring a seamless and secure Apple experience. Explore the possibilities and make the most of your Apple adventure!


iPhone Unlock
- Access Locked iPhone
- 1. Reset Locked iPhone Without iTunes
- 2. Erase Locked iPhone
- 3. Get Into Locked iPhone
- 4. Factory Reset Locked iPhone
- 5. Reset Locked iPhone
- 6. iPhone Is Disabled
- 7. Fix iPhone Unavailable Issue
- 8. Forgot Locked Notes Password
- 9. Unlock Total Wireless Phone
- 10. Review of doctorSIM Unlock
- iPhone Lock Screen
- 1. Lock Apps on iPhone
- 2. Bypass iPhone Passcode
- 3. Unlock Disabled iPhone Without PC
- 4. Disable One More Minute Screen Time
- 5. Unlock iPhone Passcode Screen
- 6. Reset iPhone Password
- 7. Disable iOS Call Recording Notification
- 8. Remove Carrier Lock/SIM Restrictions
- 9. Get iMei Number on Locked iPhone
- 10. Add a New Face ID
- 11. iPhone Passcode Expired Pop-Up
- 12. Control Display Rotation
- 13. Fix iPhone is Disabled Connect to iTunes
- 14. Fix Turn Passcode Off Greyed Out
- 15. Get iPhone out of Demo Mode
- 16. Unlock Unresponsive Screen
- 17. iPhone Ask for Passcode After Reset
- Remove iCloud Lock
- 1. Unlock an iPhone 7 Plus iCloud
- 2. iOS 18 iCloud Unlock
- 3. iOS 26 iCloud Unlock
- 4. Crack iCloud-Locked iPhones to Sell
- 5. Jailbreak iCloud Locked iPhone
- 6. What To Do If You Bought A Locked iPhone?
- 7. Fix iPhone Unavailable No Erase Option
- 8. Find iCloud Email Address on Apple Device
- 9. Broque Ramdisk iCloud Bypass
- Unlock Apple ID
- 1. Remove Payment Method on iPhone
- 2. Create a New Apple ID Account
- 3. Change Apple ID on iPad
- 4. Change Your Apple ID Password
- 5. Apple ID Not Active
- 6. Fix Wrong Apple ID Issue on iPhone
- 7. Fix This Person Is Not Active
- 8. New iCloud Terms and Conditions
- 9. Fix Apple ID Account Unavailable
- 10.Find Apple ID by IMEI
- 11. Unlink 2 iPhones with the Same Apple ID
- 12. Reset Password at appleid.apple.com
- 13. App Store Keep Asking for Password
- 14. Find Apple ID Password No Reset
- 15. Trusted Devices List Not Available
- Remove SIM Lock
- 1. Unlock iPhone Using Unlock Chip
- 2. Unlock iPhone for Free
- 3. Unlock iPhone Online
- 4. Factory Unlock iPhone
- 5. SIM Unlock iPhone
- 6. Unlock AT&T iPhone
- 7. Unlock iPhone with IMEI Code
- 8. Unlock iPhone without SIM Card
- 9. Unlock Cricket iPhone
- 10. Unlock iPhone with/without SIM Card
- 11. Unlock T-Mobile iPhone
- 12. Unlock Verizon iPhone
- 13. iPhone IMEI Checker
- 14. Unlock Xfinity iPhone
- 15. Unlock iPhone From The Carrier
- 16. Turbo SIM iPhone
- 17. Get the Sprint Unlock Codes
- 18. Unlock a Sprint Phone
- 19. Fix When iPhone Says No Sim
- Unlock iPhone MDM
- 1. Remove MDM from iPhone
- 2. Remote Management on iPhone
- 3. MDM VS MAM
- 4. Top MDM Bypass Tools
- 5. IoT Device Management
- 6. Unified Endpoint Management
- 7. Enterprise Mobility Management
- 8. Top 10 Proxy Websites
- 9. Hindilinks4u Alternatives
- Unlock Screen Time Passcode
- 1. Reset Screen Time Passcode
- 2. Turn Off Screen Time without Passcode
- 3. Screen Time Passcode Not Working
- 4. Disable Parental Controls
- 5. Bypass Screen Time on iPhone Without Password
- 6. Delete Screen Time History on iPhone
- 7. Turn Off Downtime on iPhone
- 8. Download Age Restricted Videos
- MDM Unblock Games/Websites
- 1. Basketball Stars Game Unblocked
- 2. Play Getaway Shootout Unblocked
- 3. Play Build Now GG Unblocked
- 4. BitLife Unblocked
- 5. 10 Best Unblocked Anime Websites
- 6. Best Unblocked Game Websites
- 7. 1v1 LOL Unblocked
- 8. Get Poly Track Unblocked
- 9. Music Websites Unblocked
- 10. Spotify Unblocked
- 11. Interstellar Proxy Review
- Unlock Apple Watch
- Unlock iPod Touch
- ● Manage/transfer/recover data
- ● Unlock screen/activate/FRP lock
- ● Fix most iOS and Android issues
- Free Download Free Download Free Download

Daisy Raines
staff Editor