100% Security Verified | No Subscription Required | No Malware

 :
: 
 ChatGPT
 Perplexity
 Gemini
 Claude
 Grok
Grok
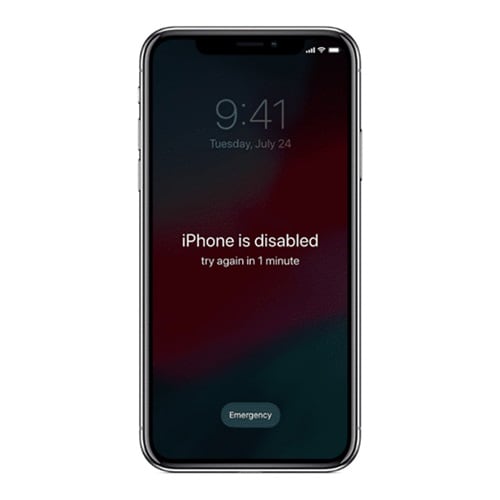
Seeing the "iPhone is disabled" message can be alarming. You're locked out, and you're likely worried about your data and what to do next. The good news is that you've come to the right place. This guide will walk you through exactly why this happens and provide clear, step-by-step solutions to regain access to your device.
Whether you've forgotten your passcode or a child has entered the wrong one too many times, a disabled iPhone is a fixable problem. We will explore four reliable methods, including using dedicated software, Apple's official tools, and even a way to unlock it without a computer. Let's get your iPhone back in working order.
In this article
Part 1. Why Is My iPhone Disabled and Can I Unlock It?
An iPhone becomes disabled as a security measure after too many consecutive incorrect passcode entries. It's designed to protect your personal information from unauthorized access. Initially, you'll be locked out for a minute, but the lockout time increases with each subsequent wrong attempt until the device displays "iPhone is disabled. Connect to iTunes," effectively locking you out permanently.
So, is it possible to unlock a disabled iPhone? The short and direct answer is **yes**. You can absolutely get your iPhone working again. However, there's a critical catch: the only way to remove the disabled screen is to completely erase the device. This process, known as a factory reset or restore, will wipe all your data, including photos, contacts, apps, and settings. There is no official or third-party method to unlock it without this data loss.
Part 2. Four Proven Methods to Unlock a Disabled iPhone
Now that you understand the situation, let's dive into the solutions. We'll cover four distinct methods for how to unlock a disabled iPhone. Each has its own requirements, so you can choose the one that best fits your circumstances. Remember, all of these methods will erase your device's data.
Method 1: Using Dr.Fone - Screen Unlock (Easiest Method)
If you're looking for the quickest and most user-friendly solution, Wondershare Dr.Fone - Screen Unlock is your best option. This tool is specifically designed to handle lock screen issues with a simple, guided process, making it ideal for users who aren't tech-savvy.
Dr.Fone is a comprehensive mobile toolkit that helps with system repair, data recovery, phone transfers, and, most importantly, screen unlocking. It works seamlessly on both Windows and macOS, supporting the latest iOS versions, including the one for iPhone 16. It simplifies the entire process, removing the need to manually enter recovery mode or deal with complex iTunes errors. You can download Wondershare Dr.Fone to get started.
-
Step 1 Launch Dr.Fone and Connect Your iPhone
Download and install Dr.Fone on your computer. Open the program and select the "Screen Unlock" module from the main interface. Connect your disabled iPhone to the computer using a USB cable.

-
Step 2 Select the Unlock iOS Screen Option
In the next window, click the "Unlock iOS Screen" button to begin the process for your iPhone.

-
Step 3 Enter Recovery Mode
Dr.Fone will provide clear, animated on-screen instructions to guide you through putting your specific iPhone model into Recovery Mode. Follow these steps carefully.

-
Step 4 Confirm Device Information and Download Firmware
Once your device is in Recovery Mode, Dr.Fone will automatically detect its model and iOS version. Verify that this information is correct, then click "Start" to download the appropriate firmware for your device.

-
Step 5 Unlock Your Disabled iPhone
After the firmware download is complete, click the "Unlock Now" button. Dr.Fone will begin removing the passcode. Keep your iPhone connected until you see a confirmation message indicating the unlock was successful.

 Unlock iPhone/iPad passcode in minutes.
- Remove Face ID, Touch ID, and screen lock.
- Bypass iCloud Activation Lock easily.
- Support all iOS versions and devices.
- Simple steps, no technical skills needed.

Method 2: Using iTunes or Finder (The Official Apple Way)
If you prefer to use Apple's official method, you can use iTunes (on older macOS and Windows PCs) or Finder (on macOS Catalina and newer) to restore your disabled iPhone. This method requires you to manually put your iPhone into Recovery Mode.
-
Step 1 Connect Your iPhone to a Computer
Launch iTunes or Finder and connect your disabled iPhone to your computer using its USB cable.
-
Step 2 Enter Recovery Mode
The button combination to enter Recovery Mode varies by iPhone model. For modern iPhones (iPhone 8 and later), quickly press and release the Volume Up button, then quickly press and release the Volume Down button. Finally, press and hold the Side (Power) button until the Recovery Mode screen appears on your iPhone.
-
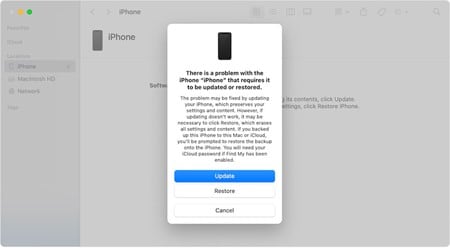
Step 3 Restore Your iPhone
iTunes or Finder will detect your iPhone in Recovery Mode and show a pop-up window. Click the "Restore" option. This will erase all data and settings on your iPhone and install the latest iOS version. After the process finishes, your iPhone will restart, and you can set it up as a new device.
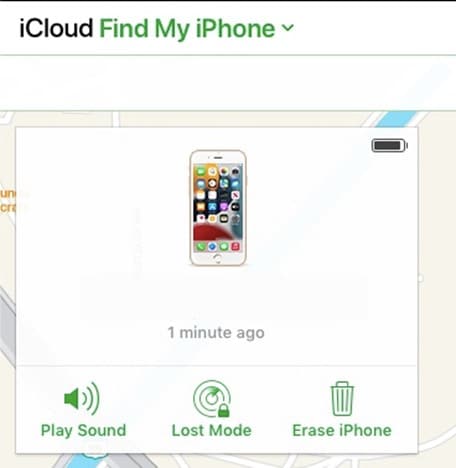
Method 3: Using iCloud's Find My iPhone Website
If you have the "Find My" feature enabled on your disabled iPhone and you know your Apple ID and password, you can erase it remotely using any web browser. This is a great option if you don't have access to your primary computer.
-
Step 1 Log in to iCloud
On any computer or mobile device, open a web browser and go to icloud.com. Sign in with the same Apple ID that is used on your disabled iPhone. This is crucial; using a different ID will not show your device.
-
Step 2 Access Find My
Once logged in, click on the "Find My" icon. You will see a map displaying the location of all your Apple devices linked to that account.
-
Step 3 Erase the Disabled iPhone
Click on "All Devices" at the top of the screen and select your disabled iPhone from the list. A small window will appear with several options. Click "Erase iPhone" and confirm your choice. The iPhone will begin to erase itself remotely as soon as it connects to the internet.
Method 4: Using the Find My App (No Computer Needed)
In today's mobile-first world, it's possible you may not have immediate access to a computer. Fortunately, if you own another Apple device like an iPad or a family member's iPhone, you can use the built-in Find My app to unlock your disabled device.
This method works similarly to the iCloud website but uses the native app instead. The key requirement is that the other Apple device is signed in with the same Apple ID as your disabled iPhone, or you can sign in to it temporarily.
-
Step 1 Open the Find My App
On your other iPhone, iPad, or Mac, launch the Find My app. Ensure you are signed into the correct Apple ID.

-
Step 2 Select and Erase Your Device
Tap on the "Devices" tab at the bottom of the screen. Select your disabled iPhone from the list. Scroll down and tap "Erase This Device." Follow the on-screen prompts to confirm the erasure. Your disabled iPhone will be wiped and restored to factory settings, allowing you to set it up again.
Part 3. Pro Tip: How to Prevent Your iPhone From Being Disabled Again
Now that you've unlocked your iPhone, the last thing you want is to go through this process again. Preventing your iPhone from being disabled in the future comes down to good passcode management and making use of modern security features.
- Choose a Memorable Passcode: Select a passcode that is easy for you to remember but difficult for others to guess. Avoid common combinations like "123456" or your birthdate. Consider using a longer 6-digit passcode or an alphanumeric one for enhanced security.
- Utilize Face ID or Touch ID: These biometric features significantly reduce the number of times you need to manually enter your passcode. By setting them up, you minimize the risk of incorrect entries while maintaining high security.
- Maintain Regular Backups: Since unlocking a disabled iPhone always results in data loss, having a recent backup is your safety net. Enable iCloud Backup to automatically back up your data whenever your iPhone is connected to Wi-Fi, power, and locked. Alternatively, perform regular backups to your computer via Finder or iTunes.
Conclusion
While facing a disabled iPhone can be frustrating, it's a solvable issue. The key takeaway is that unlocking the device requires a full restore, which will erase all your data. We've covered four effective methods to get you back in. Dr.Fone - Screen Unlock offers the most straightforward, guided experience. Alternatively, Apple's native tools like iTunes/Finder and the Find My feature (via website or app) are reliable, free options. By following the steps in this guide and implementing preventative measures like regular backups, you can confidently manage this situation and secure your device for the future.
FAQ
-
1. What does the "iPhone is disabled, connect to iTunes" message mean?
This message appears after multiple incorrect passcode attempts. It's a permanent security lockout, and the only way to use the phone again is to connect it to a computer (or use a remote method) to restore it to its factory settings. -
2. Can I unlock a disabled iPhone without losing my data?
Unfortunately, no. Every legitimate method for unlocking a disabled iPhone—including those from Apple and trusted third-party tools—involves erasing the device. This is a fundamental security feature to protect your data from unauthorized access. The only way to recover your data is by restoring it from a backup you made before the device was disabled. -
3. How long will my iPhone stay disabled?
The disable time increases with each wrong passcode entry. It starts at 1 minute, then 5, 15, and 60 minutes. After about 10 incorrect attempts, the iPhone will be permanently disabled, displaying the "Connect to iTunes" message, and will require a full restore. -
4. What should I do if I don't have a computer to unlock my iPhone?
If you don't have a computer, your best option is to use the Find My feature, provided it was enabled on your iPhone beforehand. You can either use the Find My app on another Apple device (like an iPad or a friend's iPhone) or log into icloud.com from any web browser to remotely erase and unlock your device.
 Add Wondershare Dr.Fone as a preferred source on Google