Why Apple iPhone Passcode Expired Pop-Ups Appear and How to Fix Them
Oct 13, 2025 • Filed to: Screen Lock Removal • Proven solutions

Your iPhone passcode expired notification might feel like an unwelcome surprise, leaving you wondering what went wrong. Is it a security feature? A system glitch? Or something more concerning? This unexpected message can confuse you, especially when you’re unsure how to respond.
But here’s the good news: fixing the iPhone passcode expired warning is simpler than you think. Whether it’s due to outdated software, device management policies, or other technical quirks, there’s a clear path to resolving it. In this guide, we’ll explore why this issue occurs and how to tackle it effectively. Plus, you’ll discover how a third-party tool can make the process effortless, ensuring your phone is secure and functioning perfectly again.
- Part 1: Why Does Your iPhone Display a “Passcode Expired” Notification?
- Part 2: Resolving the “iPhone Passcode Expired” Issue
- Method 1: Remove the Device Management Profile
- Method 2: Delete a Work or School Email Account
- Method 3: Reset the Passcode Using iCloud
- Method 4: Update iPhone Using iTunes
- Method 5: Perform a Force Restart on Your iPhone
- Method 6: Update Expired Passcode Directly on Your iPhone

- Method 7: Resolve Expired Passcode Issues Using iPhone Unlocker (Recommended)
Part 1: Why Does Your iPhone Display a “Passcode Expired” Notification?
If you’ve recently seen an iPhone passcode expired notification, you might wonder why this happens and what it means for your device's security. We can simplify it by examining its three main parameters.
1.1 What Causes the “Passcode Expired” Message on iPhones?
Normally, your iPhone passcode remains valid until you decide to change it. However, if your device shows a passcode expired message, the issue often traces back to third-party apps or email configurations. Many apps and accounts require periodic password updates for enhanced security. These systems may rely on the iPhone passcode for access, triggering an iPhone passcode expired warning when their policies demand an update.
If you’re using an iPhone provided by your workplace, it’s also possible that your company’s IT department has applied configuration settings that mandate regular passcode changes. In such cases, contacting your IT administrator is the best course of action to resolve the iPhone unlock passcode expired message.
1.2 Why Is It Necessary to Regularly Change Your iPhone Passcode?
The iPhone unlock passcode is a cornerstone of your device’s security. It safeguards sensitive data like emails, personal notes, and financial information. Regularly updating your passcode adds an extra layer of protection, making it harder for unauthorized individuals to access your device. By frequently changing your passcode, you reduce the risk of data breaches and help prevent potential security threats.
1.3 How Long Does an iPhone Passcode Stay Valid?
Typically, your iPhone passcode remains valid for up to three months, provided you don’t reset or modify it during that time. However, if you forget the passcode, its validity will extend until you create and set a new one. This timing can occasionally result in an iPhone passcode expired notification, especially if device or account settings require periodic updates.
Part 2: Resolving the “iPhone Passcode Expired” Issue
If you encounter an iPhone passcode expired message, don’t worry. You can resolve it using straightforward methods without much hassle. Here are a few workable solutions to this problem.
Method 1: Remove the Device Management Profile
If your iPhone is issued by your organization, school, or workplace, it might include a Mobile Device Management (MDM) profile. This profile is likely prompting the iPhone passcode expired pop-up to ensure compliance with security policies. If the constant reminders are bothersome, you can attempt to remove the MDM profile. Note that some devices allow easy removal, while others have restrictions.
Step 1: Access Device Management Settings
Open the Settings app, go to General, and scroll down to find VPN & Device Management.
Step 2: Locate and Remove the Profile
Select the profile installed on your device and tap Remove Management.
Step 3: Enter Credentials to Confirm
If prompted, provide the account credentials and password associated with the profile to complete the removal.

Method 2: Delete a Work or School Email Account
If your iPhone is linked to a work or school email account, such as Microsoft Exchange, the administrator might enforce passcode updates. This can trigger the iPhone passcode expired notification. Deleting the managed account can stop the prompts.
Step 1: Open Mail Settings
To access the Mail section, open the Settings app.
Step 2: Access Account Settings
Select Accounts to view all email accounts configured on your device.
Step 3: Remove the Managed Account
Identify the account managed by your school or workplace and tap Delete Account to remove it from your iPhone.

Method 3: Reset the Passcode Using iCloud
If the iPhone unlock passcode expired message persists, you can reset the device via iCloud. This process erases all data and settings, including the expired passcode. Make sure you have a copy of critical files saved before moving forward.
Step 1: Log into iCloud
Log in with your Apple ID at www.icloud.com.
Step 2: Open the “Find My” Feature
After logging in, click Find My and select the All Devices option.
Step 3: Select Your iPhone
To proceed, find your device in the list and select your iPhone.
Step 4: Erase the Device
Choose the Erase This Device option to begin resetting.
Step 5: Set a New Passcode
Once the process is complete, all data, including the earlier passcode, will be removed. You can then set a new passcode for your iPhone.

Method 4: Update iPhone Using iTunes
Using an outdated iOS version can cause your iPhone to act unpredictably, sometimes resulting in an iPhone passcode expired notification or other unusual errors. In such cases, updating your iPhone’s software to the latest version can resolve these issues. Follow these steps to update your iPhone using iTunes.
Step 1: Attach the iPhone to the PC
Use a USB cable to connect your iPhone to a computer and open iTunes.
Step 2: Detect Your Device in iTunes
Once connected, iTunes will recognize your iPhone, and you’ll see the device icon at the top of the iTunes window.
Step 3: Back Up Your iPhone
Click the Back Up Now option to create a secure backup of your data and content before proceeding with the update.
Step 4: Check for Updates
Select the Check for Update option. Follow the prompts to complete the update process and ensure your iPhone is running the latest software.

Method 5: Perform a Force Restart on Your iPhone
A force restart can address various bugs, refresh your iPhone, and fix issues like the iPhone passcode expired warning. This method is straightforward and effective for resolving many minor problems. Use the steps below to perform a force restart based on your device model.
- For iPhone 8 and Later Models
Quickly press and release the Volume Up button, then do the same for the Volume Down button. Afterward, press and hold the Power button until the Apple logo shows up.
- For iPhone 7 or 7 Plus
Press and hold the Power and Volume Down buttons together. Release both buttons when the Apple logo is displayed.
- For iPhone 6s and Earlier Models
Press and hold the Home and Power buttons simultaneously. Release them when the Apple logo appears.

Method 6: Update Expired Passcode Directly on Your iPhone
If you receive a passcode expired message iPhone, you may see a "Change Passcode" button on the screen. If you remember your old passcode, you can easily update it using this option. Alternatively, you can change the passcode through the Settings app if the prompt isn’t available. Follow these steps to update your expired passcode.
Step 1: Access Passcode Settings
Go to the Settings app on your iPhone and select either Touch ID & Passcode or Face ID & Passcode, depending on your device.
Step 2: Enter Current Passcode
Input your existing passcode and then select the Change Passcode option.
Step 3: Create a New Passcode
Re-enter your old passcode and proceed to set a new one. This action will replace the expired passcode.
Step 4: Expire the Previous Passcode
Tap Expire Previous Passcode Now to ensure your new passcode remains valid and doesn’t trigger another iPhone passcode expired pop-up.

Method 7: Resolve Expired Passcode Issues Using iPhone Unlocker (Recommended)
For a hassle-free and efficient way to address the iPhone passcode expired error, consider using Dr.Fone - Screen Unlock (iOS). This powerful tool simplifies unlocking your iPhone, iPad, or iPod touch without requiring the passcode. It effectively handles scenarios like the iPhone passcode expired pop-up or continuous iPhone Passcode Requirement prompts. Whether your passcode, Face ID, or Touch ID is unavailable, this software ensures a high success rate for unlocking your device.
In addition to resolving the passcode expired message iPhone, Dr.Fone - Screen Unlock (iOS) offers versatile features, including deleting Apple ID without data loss and bypassing Screen Time or MDM restrictions in just a few clicks.

Dr.Fone - Screen Unlock (iOS)
Resolve Expired Passcode Issues Without Hassle.
- Simple, click-through, process.
- Remove screen passcodes, Face ID, Touch ID and Apple ID at ease.
- Bypass iCloud Activation Locks without Password.
- Bypass MDM and screen time without data loss.
- Supports the latest iOS version fully!

Detailed Steps:
Step 1: Open Wondershare Dr.Fone on your computer. In the Toolbox, choose Screen Unlock, then select the iOS devices option.

Step 2: Click Unlock iOS Screen to begin unlocking your iPad and bypassing the screen lock.

Step 3: Press Start to begin the process. Ensure your iPad is sufficiently charged to avoid interruptions.
Step 4: Follow the on-screen instructions to put your iPad into Recovery Mode. If you're unable to, try using DFU Mode for assistance.

Step 5: Once in Recovery Mode, confirm your iPad's model and iOS version. If everything is correct, click Start to continue.
Step 6: The iOS firmware will begin downloading. Monitor the progress bar. If the download is slow, click Copy to manually download the file.

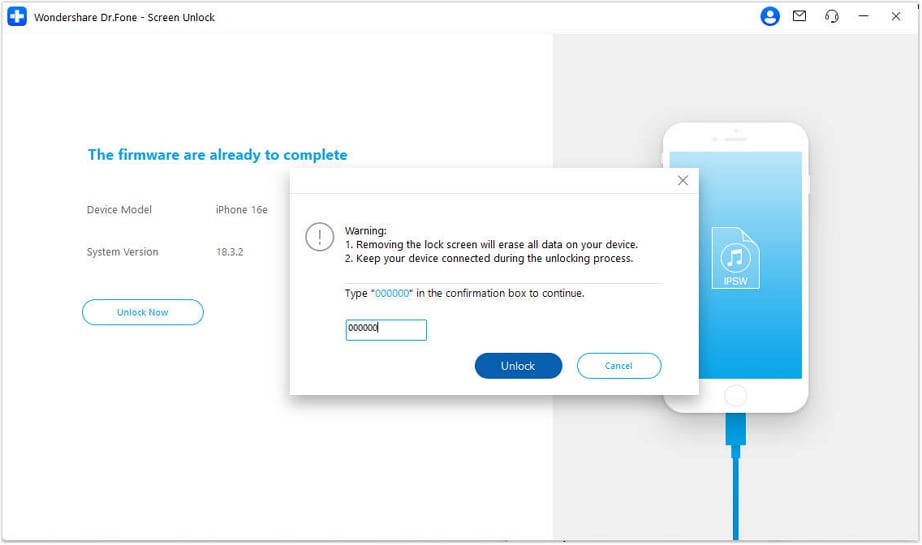
Step 7: After the firmware is verified, click Unlock Now to initiate the unlocking process.
Step 8: A prompt will appear for confirmation. Enter the code displayed, then select Unlock to remove the screen lock.

Step 9: Keep your iPad connected during the firmware installation. Disconnecting could cause problems.
Step 10: Once the process finishes, click Done. If the iPad is still locked, click Try Again to repeat the process.

4,624,541 people have downloaded it
Conclusion:
Dealing with an iPhone passcode expired notification can be frustrating, but it’s often manageable with the right steps. From updating your device to removing MDM profiles, this guide has outlined practical solutions for resolving this issue. Each method ensures your iPhone remains secure and functional.
For those seeking a seamless approach, tools like Dr.Fone - Screen Unlock (iOS) offer an efficient way to handle complex passcode errors while maintaining a high success rate. By understanding the causes and applying these fixes, you can keep your device secure and free from unnecessary interruptions.
4,624,541 people have downloaded it
iPhone Unlock
- Access Locked iPhone
- 1. Reset Locked iPhone Without iTunes
- 2. Erase Locked iPhone
- 3. Get Into Locked iPhone
- 4. Factory Reset Locked iPhone
- 5. Reset Locked iPhone
- 6. iPhone Is Disabled
- 7. Fix iPhone Unavailable Issue
- 8. Forgot Locked Notes Password
- 9. Unlock Total Wireless Phone
- 10. Review of doctorSIM Unlock
- iPhone Lock Screen
- 1. Lock Apps on iPhone
- 2. Bypass iPhone Passcode
- 3. Unlock Disabled iPhone Without PC
- 4. Disable One More Minute Screen Time
- 5. Unlock iPhone Passcode Screen
- 6. Reset iPhone Password
- 7. Auto Lock Never on iPhone
- 8. Remove Carrier Lock/SIM Restrictions
- 9. Get iMei Number on Locked iPhone
- 10. Add a New Face ID
- 11. iPhone Passcode Expired Pop-Up
- 12. Control Display Rotation
- 13. Fix iPhone is Disabled Connect to iTunes
- 14. Fix Turn Passcode Off Greyed Out
- 15. Get iPhone out of Demo Mode
- 16. Unlock Unresponsive Screen
- 17. iPhone Ask for Passcode After Reset
- Remove iCloud Lock
- 1. Unlock an iPhone 7 Plus iCloud
- 2. iOS 18 iCloud Unlock
- 3. iOS 26 iCloud Unlock
- 4. Crack iCloud-Locked iPhones to Sell
- 5. Jailbreak iCloud Locked iPhone
- 6. What To Do If You Bought A Locked iPhone?
- 7. Fix iPhone Unavailable No Erase Option
- 8. Find iCloud Email Address on Apple Device
- 9. Broque Ramdisk iCloud Bypass
- Unlock Apple ID
- 1. Remove Payment Method on iPhone
- 2. Create a New Apple ID Account
- 3. Change Apple ID on iPad
- 4. Change Your Apple ID Password
- 5. Apple ID Not Active
- 6. Fix Wrong Apple ID Issue on iPhone
- 7. Fix This Person Is Not Active
- 8. New iCloud Terms and Conditions
- 9. Fix Apple ID Account Unavailable
- 10.Find Apple ID by IMEI
- 11. Unlink 2 iPhones with the Same Apple ID
- 12. Reset Password at appleid.apple.com
- 13. App Store Keep Asking for Password
- 14. Find Apple ID Password No Reset
- 15. Trusted Devices List Not Available
- Remove SIM Lock
- 1. Unlock iPhone Using Unlock Chip
- 2. Unlock iPhone for Free
- 3. Unlock iPhone Online
- 4. Factory Unlock iPhone
- 5. SIM Unlock iPhone
- 6. Unlock AT&T iPhone
- 7. Unlock iPhone with IMEI Code
- 8. Unlock iPhone without SIM Card
- 9. Unlock Cricket iPhone
- 10. Unlock iPhone with/without SIM Card
- 11. Unlock T-Mobile iPhone
- 12. Unlock Verizon iPhone
- 13. iPhone IMEI Checker
- 14. Unlock Xfinity iPhone
- 15. Unlock iPhone From The Carrier
- 16. Turbo SIM iPhone
- 17. Get the Sprint Unlock Codes
- 18. Unlock a Sprint Phone
- 19. Fix When iPhone Says No Sim
- Unlock iPhone MDM
- 1. Remove MDM from iPhone
- 2. Remote Management on iPhone
- 3. MDM VS MAM
- 4. Top MDM Bypass Tools
- 5. IoT Device Management
- 6. Unified Endpoint Management
- 7. Enterprise Mobility Management
- 8. Top 10 Proxy Websites
- 9. Hindilinks4u Alternatives
- Unlock Screen Time Passcode
- 1. Reset Screen Time Passcode
- 2. Turn Off Screen Time without Passcode
- 3. Screen Time Passcode Not Working
- 4. Disable Parental Controls
- 5. Bypass Screen Time on iPhone Without Password
- 6. Delete Screen Time History on iPhone
- 7. Turn Off Downtime on iPhone
- 8. Download Age Restricted Videos
- MDM Unblock Games/Websites
- 1. Basketball Stars Game Unblocked
- 2. Play Getaway Shootout Unblocked
- 3. Play Build Now GG Unblocked
- 4. BitLife Unblocked
- 5. 10 Best Unblocked Anime Websites
- 6. Best Unblocked Game Websites
- 7. 1v1 LOL Unblocked
- 8. Get Poly Track Unblocked
- 9. Music Websites Unblocked
- 10. Spotify Unblocked
- 11. Snow Rider 3D Unblocked
- Unlock Apple Watch
- Unlock iPod Touch
- ● Manage/transfer/recover data
- ● Unlock screen/activate/FRP lock
- ● Fix most iOS and Android issues
- Unlock Now Unlock Now Unlock Now


James Davis
staff Editor