
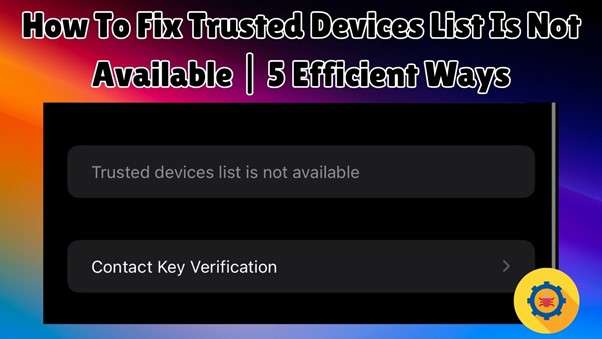
How To Fix Trusted Devices List Is Not Available | 5 Efficient Ways

Jun 30, 2026 • Filed to: One-Stop Complete Mobile Solution • Proven solutions
 TL;DR:
Restore access to your Apple ID trusted devices list by toggling your network connection, force restarting your iPhone or iPad, reauthenticating your account, updating the iOS firmware, or performing a factory reset.
● If the sign-out button is greyed out, bypassing the Apple ID using Dr.Fone - Screen Unlock (iOS) requires a computer, an active screen lock, two-factor authentication, and putting the device into Recovery Mode.
● Force restarting clears minor software bugs blocking the list, requiring specific hardware actions like sequentially pressing Volume Up, Volume Down, and holding the Side key for iPhone 8 and newer models.
● Opting for a factory reset via the Erase All Content and Settings menu removes all potential system glitches but will permanently delete device data, making a prior backup strictly necessary.
Ask AI for a summary
 ChatGPT
 Perplexity
 Gemini
 Claude
 Grok
Grok
The Apple ecosystem lets you link your different devices using the official account to get certain benefits. These are referred to as trusted devices, and they allow you to do things like receive 2FA codes. Hence, encountering the "Trusted Devices List is Not Available" issue can be frustrating for many users. This feature is vital for the security of your digital ecosystem, letting you control devices that can access your accounts.
Thus, resolving the issue promptly is crucial to prevent unauthorized access and keep your account secure. This guide will walk you through five proven methods to resolve the "Trusted Devices List is Not Available" error. Follow along to ensure you can regain control over your trusted devices quickly and efficiently.
Part 1. Why Is the Trusted Devices List Not Available?
Finding the reasons behind this issue is critical to locate and implement a quick and effective solution. The error usually occurs due to many factors, potentially disrupting access to this vital security feature. Understanding these causes can help you prevent it from happening again. Here are the main reasons why the trusted devices list is not available for iPhone issue:
- Outdated Software: Your device's operating system or associated applications are not up to date. These compatibility issues can prevent the trusted devices list from appearing.
- Account Settings Misconfiguration: Wrong security or privacy settings in your account can be the cause. These may restrict access to the trusted devices list on your iOS device.
- Temporary Glitches: System bugs, cache corruption, or weak internet can become a problem. All these factors have the capacity to temporarily block this feature.
- Account Synchronization Issues: Your official account is not properly synced across linked devices. When that happens, the trusted devices list may fail to load.
- Security Conflicts: Using third-party security tools or apps can sometimes lead to this issue. These can interfere with your account’s security features, including the trusted devices list.
Part 2. Effective Ways on How To Fix Trusted Devices List Is Not Available
When such issues arise, taking immediate action is essential to restore access and maintain your account’s security. There are several effective methods to address this problem, regardless of its causes. From updating your system to factory resetting the phone, these fixes will guide you through regaining full control. Detailed below are the top 5 solutions to deal with the trusted devices list is not available iPad issue:
Way 1. Check Your Internet Connection
Your device needs to communicate with the servers to get the list of trusted devices and display it. Hence, you can fail to get this list if the internet connection of your phone is weak or not working. Ensuring strong and reliable network access is often the first step in resolving this issue. Whether you’re on Wi-Fi or mobile data, even minor disruptions can cause this problem.
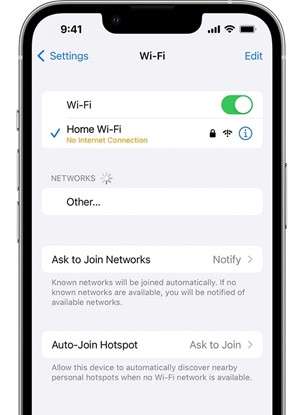
You can choose to switch to mobile data when using the Wi-Fi or vice versa to resolve the issue. Furthermore, power cycle your router or restart your device to refresh the network connection. Afterward, try to access the list again to see if the Apple ID trusted devices are not available issue is resolved.
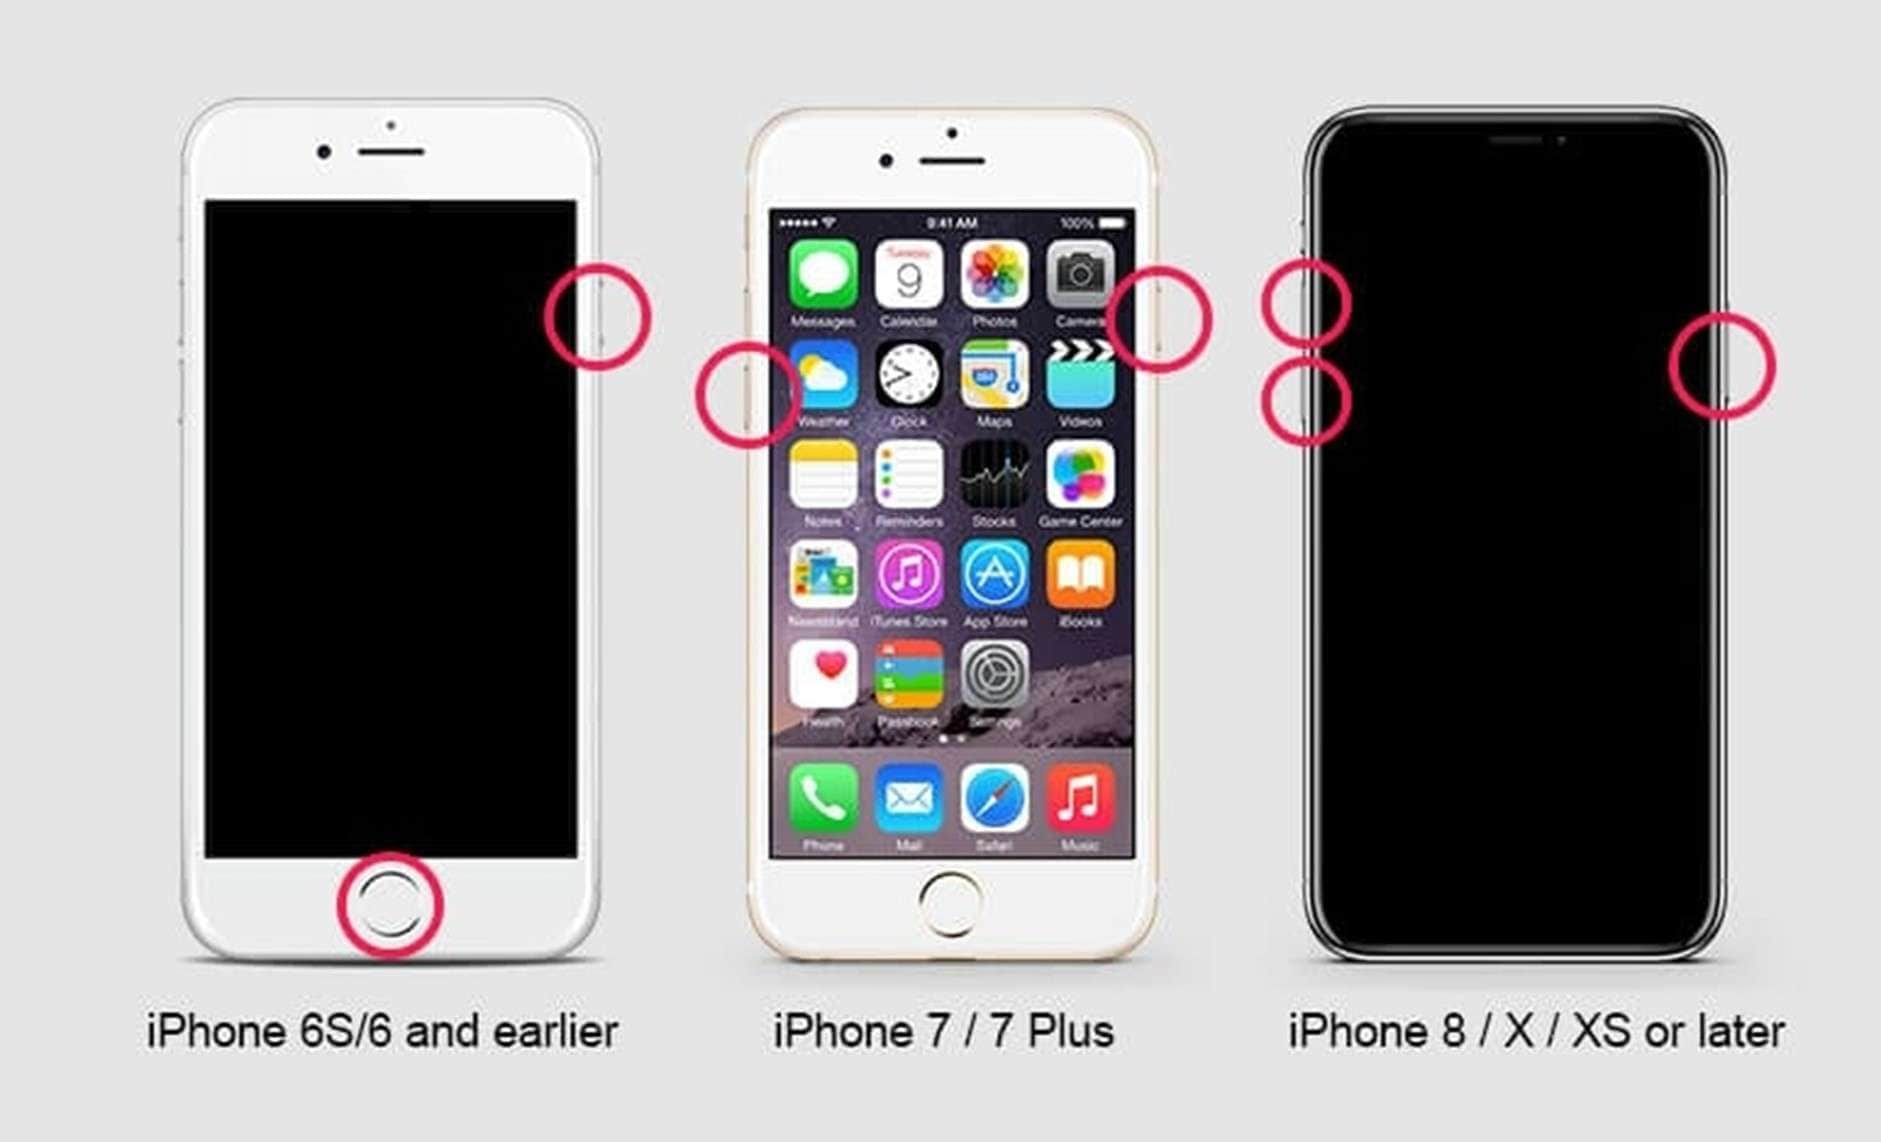
Way 2. Force Restart Your iPhone
Sometimes, the temporary glitches or bugs on your mobile device can cause a current dilemma. Hence, performing a force restart can help flush them out, restoring normal device functions. Doing so clears minor software bugs and refreshes your device's system processes. Follow one of these instructions to force reboot your phone:
- iPhone 8 and Later: Run a quick press and release operation on the “Volume Up” button, then on the “Volume Down” button. Finally, hold down the “Side” key until the Apple logo shows itself.
- iPhone 7/7 Plus: Long-press both the “Volume Down” and “Sleep/Wake” buttons simultaneously until you detect the Apple emblem.
- iPhone 6s and Earlier: Get a solid hold on both the “Home” and “Sleep/Wake” keys at the same time until the Apple icon becomes visible.
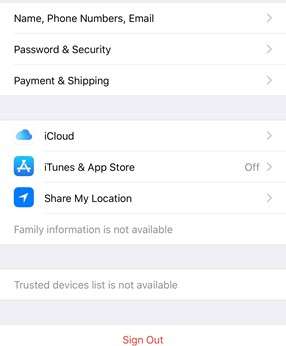
Way 3. Sign Out and Sign In with Apple ID
Account-related issues can also sometimes lead to the "Trusted Devices List is Not Available" error. One way to deal with them is by signing out and back into your Apple ID on your iOS device. Doing so refreshes your account’s link with the servers, fixing any synchronization issues or corrupted session data. Reauthenticating account and security settings using this guide ensures they are fully updated:
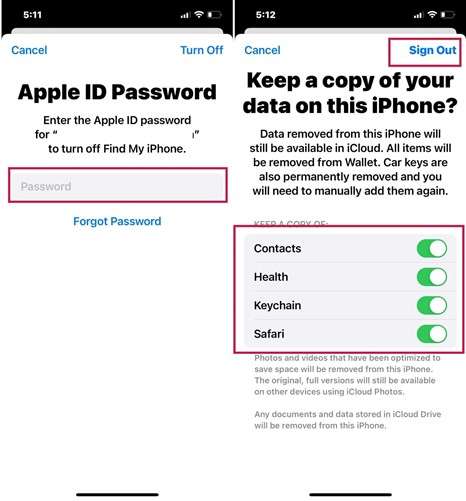
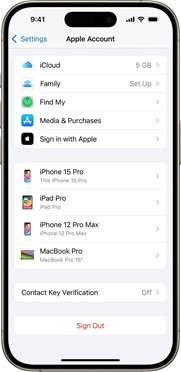
Step 1. On your iOS device, move to launch the Settings app and tap your name at the top of the screen. Following that, scroll to the bottom to press "Sign Out" and enter your account password for confirmation.

Step 2. After entering the password, hit the “Turn Off” button and select the data whose copy you wish to save on your phone. Now, press “Sign Out” and do it once more to log out of your account from the iDevice.
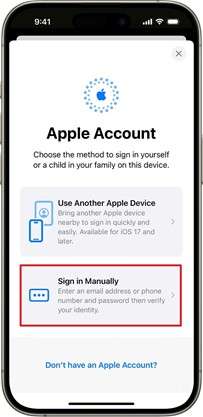
Step 3. Next, reboot your phone and access the Settings app again to tap the “Apple Account” option. Then, choose “Sign in Manually” and enter your Apple credentials to complete the process.
Way 4. Update Your iPhone Firmware
Running your mobile on an outdated iOS version is a recipe for a disaster waiting to happen. Using older firmware results in the accumulation of junk data and system bugs on your device. These can badly affect your phone performance, causing issues like the list of trusted devices not being available and iPhone errors. Updating the firmware of your iDevice using these instructions should help resolve this dilemma:
Instructions: Make your way to the “General” tab in the Settings app on your phone and tap the “Software Update” Option. Doing so will result in your device checking if a new firmware upgrade is available for you. When you find one available, hit the “Update Now” button to commence the device updating operation. For this task, make sure your phone has enough charged and is connected to a stable network.

Way 5. Reset iPhone to Factory Settings
A complex system glitch or issue is likely responsible if no solution has resolved the current problem. In such a scenario, restoring the device to its default settings is the best option. This step removes all data, settings, and potential software glitches.
However, backing up your data beforehand is crucial to avoid losing important files. Utilize the following steps to deal with the trusted devices list is not available iPad problem:
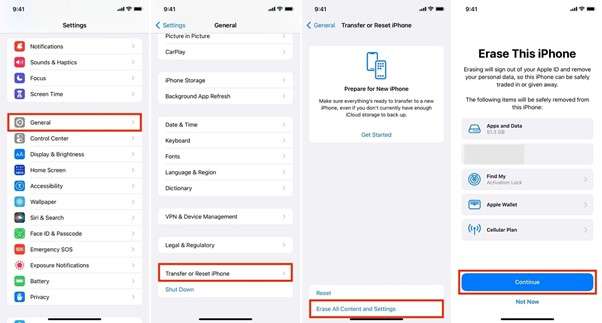
Step 1. As you launch the Settings app on your phone, access the “General” tab and scroll to the bottom to choose “Transfer or Reset iPhone.” Following that, tap “Erase All Content and Settings” and press “Continue” to proceed.
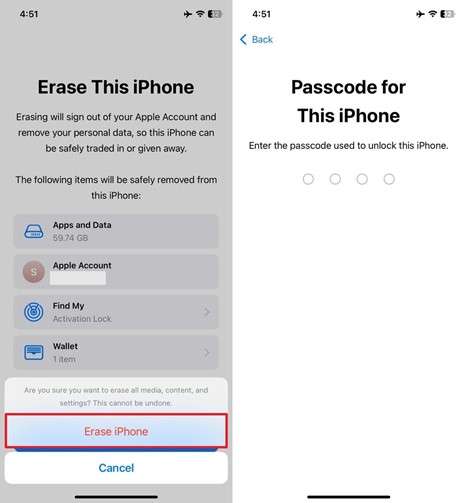
Step 2. Afterward, hit the “Erase iPhone” button and enter the phone or account password when prompted. Let the device complete the reset operation, which may require several minutes.
Part 3. How To Unlock and Remove Apple ID if Sign Out Button Is Greyed Out
At times, you will find that you are unable to do so when trying to log out of your official account. In such situations, the “Sign Out” button is usually greyed out and stops you from completing the task. This problem usually arises due to restrictions, software glitches, or security features. In such cases, unlocking and removing the Apple ID can be the most effective solution.
To achieve this, using Dr.Fone - Screen Unlock (iOS) can make the process effortless and secure. This versatile tool offers a reliable way to bypass various iDevice locks, including the Apple ID. It simplifies the process by offering step-by-step guidance during the whole procedure. Moreover, the program ensures your device remains safe throughout the unlocking operation.
With Dr.Fone, managing your Apple ID becomes effortless in challenging scenarios. It supports unlocking all types of screen locks, including passcodes, Face ID, and Touch ID. Moreover, the tool can bypass MDM and other iOS-related restrictions without data loss. It also uses advanced algorithms to ensure successful operation in most cases.
Dr.Fone - Screen Unlock (iOS)
Unlock iPhone/iPad Lock Screen Without Hassle.
- Simple, click-through, process.
- Remove screen passcodes, Face ID, Touch ID and Apple ID with ease.
- Bypass iCloud Activation Locks without Password.
- Bypass MDM and screen time without data loss.
- Supports the latest iOS version fully!


Manual Needed to Remove Apple ID from Your Device Without a Password
This software guarantees the protection of your device during the process without causing harm. Given its capabilities, it is ideal for dealing with most account-related issues in just a few minutes. You can follow these elaborate restrictions from your phone to remove the Apple account:
Step 1. Proceed to Choose the Remove AppleID Option in the Tool
As you launch Dr.Fone – Screen Unlock (iOS) on your computer, approach the “Toolbox” tab to click the “Screen Unlock” option. Next, select “iOS” when asked for the device type and tap the “Remove AppleID” button to proceed. Now, use a cable to link your iOS device to the system and hit the “Unlock Now” option to commence the operation.

Step 2. Answer the Queries About Your Device’s Security Features
Following that, the program will inquire about your phone having a screen lock and activated two-factor authentication. In a case where these options are not already active, enable them and choose “Yes” on the screen. After doing that, move to enable Recovery Mode on your phone using the instructions listed on the screen.

Step 3. Get the Suitable iOS System File to Remove the Apple ID
Next, you will be asked to choose a firmware version for your mobile after the tool detects your “Device Model.” Here, use “System Version” to select the file and tap “Start” to begin downloading. Once the iOS file is ready, hit “Unlock Now” and enter the provided code to agree to the warning prompt. Lastly, press “Unlock” and wait as the software removes the old Apple ID from your device.

Pro Tip. How To Add or Remove Trusted Devices From Your iPhone
Managing trusted devices is crucial for maintaining your account’s security and account access. Adding or removing such devices allows you to monitor which ones are linked to your Apple ID. When you want to add a new device or remove one you no longer use, the process is straightforward and ensures your account remains secure. Below are the steps to efficiently manage your trusted devices directly from your phone:
Add Device
Instructions. To add a trusted device, sign in to your Apple ID on the desired device. This will automatically register it as trusted. You can do that by accessing the device settings and pressing “Apple Account” from the top.
Remove Device
Instructions. Proceed to approach the “Apple ID” settings on your phone and scroll down to view the list of trusted devices. Here, tap the one you wish to remove and opt for “Remove from Account” to delete it from the list.

Conclusion
In summary, addressing the "Trusted Devices List is Not Available" issue is crucial for maintaining the security of your Apple ID. By following the effective solutions outlined in this guide, you can resolve the problem and regain full control. Additionally, managing trusted devices proactively ensures that your account remains secure.
When facing Apple ID issues, Dr.Fone - Screen Unlock (iOS) offers a reliable way to remove it. This powerful tool simplifies the process of resolving account-related challenges quickly and securely. For a hassle-free experience, consider it your go-to tool for managing your iOS devices effectively.
4,624,541 people have downloaded it


iPhone Unlock
- Access Locked iPhone
- 1. Reset Locked iPhone Without iTunes
- 2. Erase Locked iPhone
- 3. Get Into Locked iPhone
- 4. Factory Reset Locked iPhone
- 5. Reset Locked iPhone
- 6. iPhone Is Disabled
- 7. Fix iPhone Unavailable Issue
- 8. Forgot Locked Notes Password
- 9. Unlock Total Wireless Phone
- 10. Review of doctorSIM Unlock
- iPhone Lock Screen
- 1. Lock Apps on iPhone
- 2. Bypass iPhone Passcode
- 3. Unlock Disabled iPhone Without PC
- 4. Disable One More Minute Screen Time
- 5. Unlock iPhone Passcode Screen
- 6. Reset iPhone Password
- 7. Disable iOS Call Recording Notification
- 8. Remove Carrier Lock/SIM Restrictions
- 9. Get iMei Number on Locked iPhone
- 10. Add a New Face ID
- 11. iPhone Passcode Expired Pop-Up
- 12. Control Display Rotation
- 13. Fix iPhone is Disabled Connect to iTunes
- 14. Fix Turn Passcode Off Greyed Out
- 15. Get iPhone out of Demo Mode
- 16. Unlock Unresponsive Screen
- 17. iPhone Ask for Passcode After Reset
- Remove iCloud Lock
- 1. Unlock an iPhone 7 Plus iCloud
- 2. iOS 18 iCloud Unlock
- 3. iOS 26 iCloud Unlock
- 4. Crack iCloud-Locked iPhones to Sell
- 5. Jailbreak iCloud Locked iPhone
- 6. What To Do If You Bought A Locked iPhone?
- 7. Fix iPhone Unavailable No Erase Option
- 8. Find iCloud Email Address on Apple Device
- 9. Broque Ramdisk iCloud Bypass
- Unlock Apple ID
- 1. Remove Payment Method on iPhone
- 2. Create a New Apple ID Account
- 3. Change Apple ID on iPad
- 4. Change Your Apple ID Password
- 5. Apple ID Not Active
- 6. Fix Wrong Apple ID Issue on iPhone
- 7. Fix This Person Is Not Active
- 8. New iCloud Terms and Conditions
- 9. Fix Apple ID Account Unavailable
- 10.Find Apple ID by IMEI
- 11. Unlink 2 iPhones with the Same Apple ID
- 12. Reset Password at appleid.apple.com
- 13. App Store Keep Asking for Password
- 14. Find Apple ID Password No Reset
- 15. Trusted Devices List Not Available
- Remove SIM Lock
- 1. Unlock iPhone Using Unlock Chip
- 2. Unlock iPhone for Free
- 3. Unlock iPhone Online
- 4. Factory Unlock iPhone
- 5. SIM Unlock iPhone
- 6. Unlock AT&T iPhone
- 7. Unlock iPhone with IMEI Code
- 8. Unlock iPhone without SIM Card
- 9. Unlock Cricket iPhone
- 10. Unlock iPhone with/without SIM Card
- 11. Unlock T-Mobile iPhone
- 12. Unlock Verizon iPhone
- 13. iPhone IMEI Checker
- 14. Unlock Xfinity iPhone
- 15. Unlock iPhone From The Carrier
- 16. Turbo SIM iPhone
- 17. Get the Sprint Unlock Codes
- 18. Unlock a Sprint Phone
- 19. Fix When iPhone Says No Sim
- Unlock iPhone MDM
- 1. Remove MDM from iPhone
- 2. Remote Management on iPhone
- 3. MDM VS MAM
- 4. Top MDM Bypass Tools
- 5. IoT Device Management
- 6. Unified Endpoint Management
- 7. Enterprise Mobility Management
- 8. Top 10 Proxy Websites
- 9. Hindilinks4u Alternatives
- Unlock Screen Time Passcode
- 1. Reset Screen Time Passcode
- 2. Turn Off Screen Time without Passcode
- 3. Screen Time Passcode Not Working
- 4. Disable Parental Controls
- 5. Bypass Screen Time on iPhone Without Password
- 6. Delete Screen Time History on iPhone
- 7. Turn Off Downtime on iPhone
- 8. Download Age Restricted Videos
- MDM Unblock Games/Websites
- 1. Basketball Stars Game Unblocked
- 2. Play Getaway Shootout Unblocked
- 3. Play Build Now GG Unblocked
- 4. BitLife Unblocked
- 5. 10 Best Unblocked Anime Websites
- 6. Best Unblocked Game Websites
- 7. 1v1 LOL Unblocked
- 8. Get Poly Track Unblocked
- 9. Music Websites Unblocked
- 10. Spotify Unblocked
- 11. Interstellar Proxy Review
- Unlock Apple Watch
- Unlock iPod Touch
- ● Manage/transfer/recover data
- ● Unlock screen/activate/FRP lock
- ● Fix most iOS and Android issues
- Free Download Free Download Free Download


Daisy Raines
staff Editor