
How to Erase Data After 10 Failed Attempts on iPhone Without Hassle
Oct 13, 2025 • Filed to: Screen Lock Removal • Proven solutions
If you don't enter the correct passcode and fail repeatedly, your iPhone will lock itself. It can also delete all data after 10 failed attempts at the passcode if you've configured it to do so. While that does a good job of protecting your data, it leaves you open to accidental data loss in the event that you forget your passcode.
There is a way to unlock an iPhone securely, so there's no need to worry. Here you can find comprehensive information regarding the most effective methods for securing your data or regaining access to your iPhone. Additionally, you will have complete knowledge about Apple's "erase data after 10 failed attempts" function. Repairing an iPhone is easy than you would expect, so you can do it immediately.
- Part 1. What Does "Erase iPhone after 10 Attempts" Mean?
- Part 2: What Happens When iPhone Erase Data After 10 Attempts?
- Part 3: How to Erase Data on iPhone After 10 Failed Attempts
- Part 4: Post-Erase Data Recovery on the iPhone

- Part 5: Unlock iPhone in "Erase All Data After 10 Failed Attempts" Screen
Part 1. What Does "Erase iPhone after 10 Attempts" Mean?
The ""Erase Data after 10 failed attempts"" feature on iPhone s is a crucial security measure designed to protect your personal information. If someone attempts to forcefully break into your iPhone by guessing your passcode, this option ensures your data stays safe. When your iPhone reaches the maximum of 10 failed passcode attempts, it will initiate the procedure to delete all data.
By removing the encryption key, all data, media, and settings are erased from the device. Essentially, this protects your device against unauthorized access, making it highly secure and future-proof from potential data breaches.
Part 2: What Happens When iPhone Erase Data After 10 Attempts?
If you've set your iPhone to erase all data after 10 failed attempts, then the device will do a factory reset the moment the passcode is entered incorrectly ten times. This means it will erase all data on the iPhone after 10 failed attempts, ensuring that sensitive information doesn't fall into the wrong hands.
But there's a catch: your iPhone will reset and erase all of your data if you enter the wrong passcode or forget it. Keep this in mind if you're thinking about whether to enable the option to erase data from your iPhone after 10 unsuccessful attempts.
Part 3: How to Erase Data on iPhone After 10 Failed Attempts
Enhancing your iPhone's security is crucial, especially if it contains sensitive information. One effective measure is to configure your device to erase all data after 10 unsuccessful passcode attempts automatically. An extra layer of protection against unwanted visitors is provided by this function. Here's how to set it up:
1. Open Settings: On the home screen of your iPhone, access the "Settings" application.
2. Access Passcode Settings:
- For iPhones with Face ID: Tap "Face ID & Passcode."
- For iPhones with Touch ID: Tap "Touch ID & Passcode."
3. Insert Your Passcode: type your passcode to carry on the process.
4. Enable 'Erase Data':
- Scroll to the bottom of the Passcode settings page.
- Toggle on the "Erase Data" option.
- A prompt will appear confirming that all data will be erased after 10 failed passcode attempts; tap "Enable" to confirm.

Tips:
- Data Backup: Whether you use iCloud or a computer, you should back up your iPhone regularly. This precaution allows you to recover your data in the event that the device is permanently deleted after multiple unsuccessful attempts.
- Passcode Security: Choose a safe and easy-to-remember PIN. A complicated code is safer, but it also increases the likelihood of forgetting it, which could cause you to lose data accidentally.
Part 4: Post-Erase Data Recovery on the iPhone
Having your iPhone erase all data after 10 failed passcode attempts can reduce some anxiety about potential data security concerns. While this may be a problem, there are simple solutions to restore data from backups. The following instructions will show you how to use iCloud or iTunes to retrieve data that has been erased from your mobile device.
Way 1: Recover Data from iCloud Backup
You may simply restore your data if you have backed up your iPhone using iCloud:
- Go to Settings on your iPhone.
- Tap on Your Name > iCloud > Storage.
- Select Manage Storage.
- To view the most recent backup, select your device from the Backups menu. Check that it contains up-to-date information before using it.
- Restore the backup to recover your data.

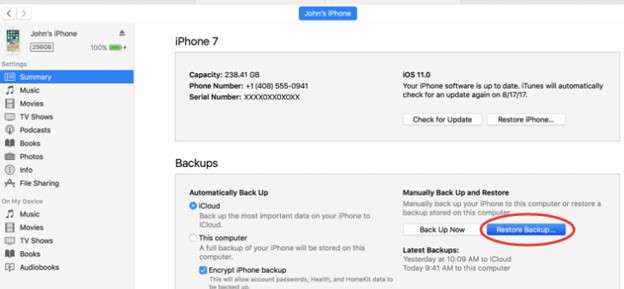
Way 2: Recover Data from iTunes Backup
Here are the steps to take if you have already backed up your iPhone with iTunes:
- To access the backup, launch iTunes on the computer or Mac.
- Link your iPhone to your PC via a USB cord. To proceed, make sure you've chosen "Trust This Computer."
- Pick up your iPhone as soon as it shows up on iTunes.
- Choose the Restore Backup option.
- Review the available backups by checking the date and size, then select the one you want.
- After you've clicked Restore, just wait for it to finish.
Part 5: Unlock iPhone in "Erase All Data After 10 Failed Attempts" Screen
On rare occasions, accessing your iPhone might require the availability of the "Erase" option. Utilizing a variety of tools becomes essential in these cases. Dr.Fone - Screen Unlock (iOS) is a great way to bypass any kind of security lock on your iPhone screen.
If you've locked your iPhone due to the enabled setting ''erase all data after 10 failed attempts'', you can trust Dr.Fone for help. If you're having trouble resetting your iPhone passcode after 10 attempts or have enabled the feature that erases all data after 10 attempts, Dr.Fone is the best tool for the job. This can be considered as an absolute alternative when you cannot receive support from the inherent options.
Not only does Dr.Fone help open the screen, but it can also remove Apple ID, MDM (Mobile Device Management), and Screen Time passcodes. It can remove both number and alphabetic passcodes, as well as Face ID and Touch ID. Recovering access to your iPhone is straightforward with this program, regardless of the model or configuration of your lock screen.

Dr.Fone - Screen Unlock (iOS)
Unlock iPhone in "erase all data after 10 failed attempts" Screen.
- Simple, click-through, process.
- Unlock screen passwords from all iPhones and iPads.
- No tech knowledge is required, everybody can handle it.
- Supports the latest iOS version fully!

Step 1: Launch Dr.Fone and Select Screen Unlock
Open Wondershare Dr.Fone on your computer. In the Toolbox, choose Screen Unlock, then select the iOS devices option.

Step 2: Unlock iOS Screen
Click Unlock iOS Screen to begin unlocking your iPad and bypassing the screen lock.

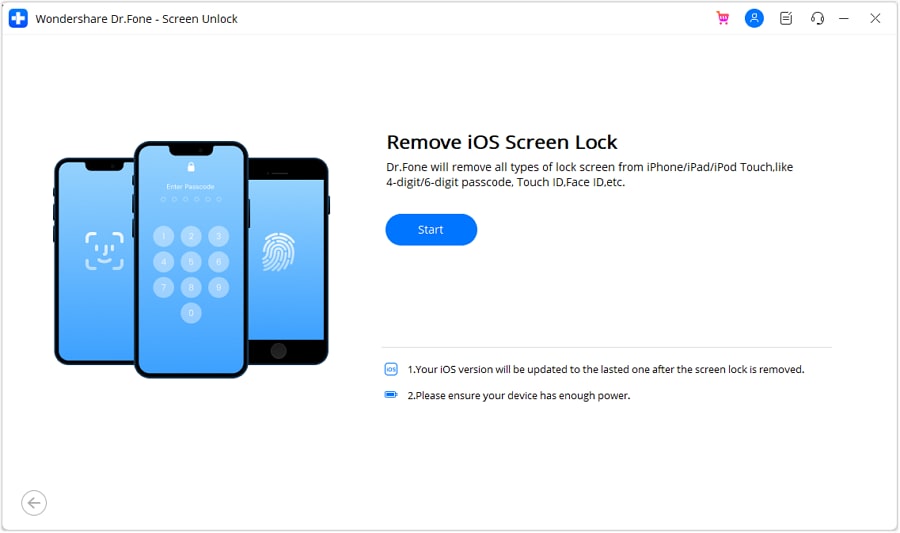
Step 3: Start the Process
Press Start to begin the process. Ensure your iPad is sufficiently charged to avoid interruptions.
Step 4: Enter Recovery Mode
Follow the on-screen instructions to put your iPad into Recovery Mode. If you're unable to, try using DFU Mode for assistance.
Step 5: Confirm iPad Model and OS Version
Once in Recovery Mode, confirm your iPad's model and iOS version. If everything is correct, click Start to continue.
Step 6: Download iOS Firmware
The iOS firmware will begin downloading. Monitor the progress bar. If the download is slow, click Copy to manually download the file.

Step 7: Unlock the iPad
After the firmware is verified, click Unlock Now to initiate the unlocking process.
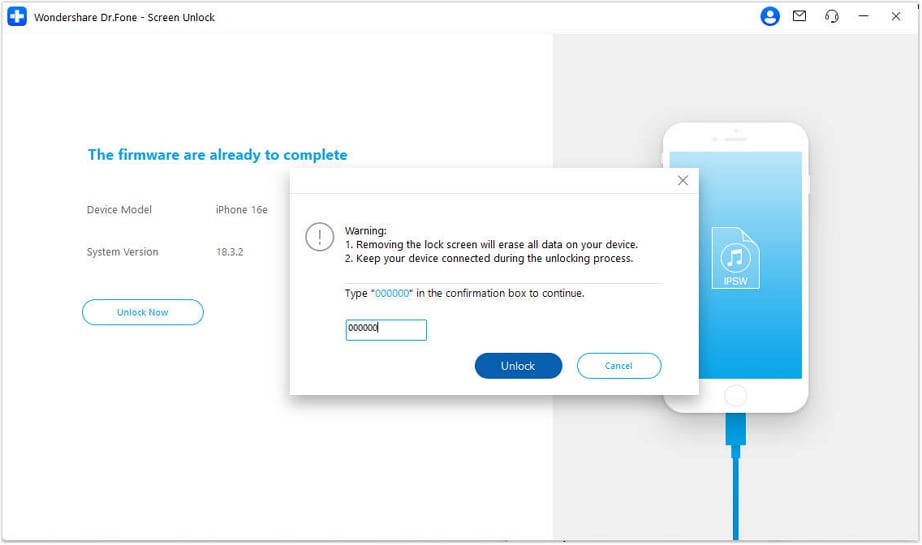
Step 8: Confirm Unlock
A prompt will appear for confirmation. Enter the code displayed, then select Unlock to remove the screen lock.
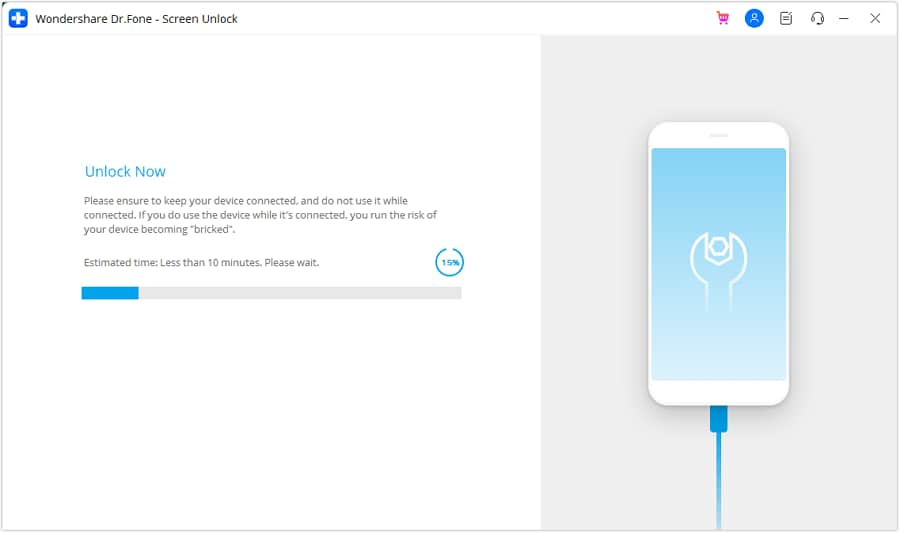
Step 9: Monitor Firmware Installation
Keep your iPad connected during the firmware installation. Disconnecting could cause problems.
Step 10: Complete the Process
Once the process finishes, click Done. If the iPad is still locked, click Try Again to repeat the process.

Conclusion:
There are possibilities when accidentally losing data is possible with this iPhone's feature that erases all data after 10 failed attempts. Still, there's no need to worry because there are safe tools like Dr.Fone - Screen Unlock (iOS) that can help you unlock your iPhone without any risk. If you forget your iPhone password, make sure you back up your data so you don't lose any important files, and think about using a good unlocking tool like Dr.Fone for iOS. You can use Dr.Fone to unlock your iPhone safely after 10 ten failed attempts at the passcode or if you just need to get in.
iPhone Unlock
- Access Locked iPhone
- 1. Reset Locked iPhone Without iTunes
- 2. Erase Locked iPhone
- 3. Get Into Locked iPhone
- 4. Factory Reset Locked iPhone
- 5. Reset Locked iPhone
- 6. iPhone Is Disabled
- 7. Fix iPhone Unavailable Issue
- 8. Forgot Locked Notes Password
- 9. Unlock Total Wireless Phone
- 10. Review of doctorSIM Unlock
- iPhone Lock Screen
- 1. Lock Apps on iPhone
- 2. Bypass iPhone Passcode
- 3. Unlock Disabled iPhone Without PC
- 4. Disable One More Minute Screen Time
- 5. Unlock iPhone Passcode Screen
- 6. Reset iPhone Password
- 7. Auto Lock Never on iPhone
- 8. Remove Carrier Lock/SIM Restrictions
- 9. Get iMei Number on Locked iPhone
- 10. Add a New Face ID
- 11. iPhone Passcode Expired Pop-Up
- 12. Control Display Rotation
- 13. Fix iPhone is Disabled Connect to iTunes
- 14. Fix Turn Passcode Off Greyed Out
- 15. Get iPhone out of Demo Mode
- 16. Unlock Unresponsive Screen
- 17. iPhone Ask for Passcode After Reset
- Remove iCloud Lock
- 1. Unlock an iPhone 7 Plus iCloud
- 2. iOS 18 iCloud Unlock
- 3. iOS 26 iCloud Unlock
- 4. Crack iCloud-Locked iPhones to Sell
- 5. Jailbreak iCloud Locked iPhone
- 6. What To Do If You Bought A Locked iPhone?
- 7. Fix iPhone Unavailable No Erase Option
- 8. Find iCloud Email Address on Apple Device
- 9. Broque Ramdisk iCloud Bypass
- Unlock Apple ID
- 1. Remove Payment Method on iPhone
- 2. Create a New Apple ID Account
- 3. Change Apple ID on iPad
- 4. Change Your Apple ID Password
- 5. Apple ID Not Active
- 6. Fix Wrong Apple ID Issue on iPhone
- 7. Fix This Person Is Not Active
- 8. New iCloud Terms and Conditions
- 9. Fix Apple ID Account Unavailable
- 10.Find Apple ID by IMEI
- 11. Unlink 2 iPhones with the Same Apple ID
- 12. Reset Password at appleid.apple.com
- 13. App Store Keep Asking for Password
- 14. Find Apple ID Password No Reset
- 15. Trusted Devices List Not Available
- Remove SIM Lock
- 1. Unlock iPhone Using Unlock Chip
- 2. Unlock iPhone for Free
- 3. Unlock iPhone Online
- 4. Factory Unlock iPhone
- 5. SIM Unlock iPhone
- 6. Unlock AT&T iPhone
- 7. Unlock iPhone with IMEI Code
- 8. Unlock iPhone without SIM Card
- 9. Unlock Cricket iPhone
- 10. Unlock iPhone with/without SIM Card
- 11. Unlock T-Mobile iPhone
- 12. Unlock Verizon iPhone
- 13. iPhone IMEI Checker
- 14. Unlock Xfinity iPhone
- 15. Unlock iPhone From The Carrier
- 16. Turbo SIM iPhone
- 17. Get the Sprint Unlock Codes
- 18. Unlock a Sprint Phone
- 19. Fix When iPhone Says No Sim
- Unlock iPhone MDM
- 1. Remove MDM from iPhone
- 2. Remote Management on iPhone
- 3. MDM VS MAM
- 4. Top MDM Bypass Tools
- 5. IoT Device Management
- 6. Unified Endpoint Management
- 7. Enterprise Mobility Management
- 8. Top 10 Proxy Websites
- 9. Hindilinks4u Alternatives
- Unlock Screen Time Passcode
- 1. Reset Screen Time Passcode
- 2. Turn Off Screen Time without Passcode
- 3. Screen Time Passcode Not Working
- 4. Disable Parental Controls
- 5. Bypass Screen Time on iPhone Without Password
- 6. Delete Screen Time History on iPhone
- 7. Turn Off Downtime on iPhone
- 8. Download Age Restricted Videos
- MDM Unblock Games/Websites
- 1. Basketball Stars Game Unblocked
- 2. Play Getaway Shootout Unblocked
- 3. Play Build Now GG Unblocked
- 4. BitLife Unblocked
- 5. 10 Best Unblocked Anime Websites
- 6. Best Unblocked Game Websites
- 7. 1v1 LOL Unblocked
- 8. Get Poly Track Unblocked
- 9. Music Websites Unblocked
- 10. Spotify Unblocked
- 11. Snow Rider 3D Unblocked
- Unlock Apple Watch
- Unlock iPod Touch
- ● Manage/transfer/recover data
- ● Unlock screen/activate/FRP lock
- ● Fix most iOS and Android issues
- Unlock Now Unlock Now Unlock Now




Alice MJ
staff Editor