How to Unlock Bootloader on Samsung Devices [Easy Solutions]

May 15, 2026 • Filed to: Screen Lock Removal • Proven solutions
 TL;DR:
To unlock your Samsung device's bootloader for custom ROMs or recoveries, you must enable OEM Unlocking in Developer Options and confirm the action in Download Mode, which alters the device's trust state and triggers a complete data wipe.
● If the OEM Unlocking toggle is missing or greyed out, your specific regional or carrier variant restricts unlocking, and generic PC tools or ADB commands cannot bypass this limitation.
● To access the unlock prompt, power off the phone, hold Volume Up and Volume Down simultaneously while connecting it to a PC via USB to enter Download Mode, and press Volume Up to confirm.
● Proceeding with the unlock may void your warranty eligibility and can permanently alter the behavior or availability of certain security-dependent Samsung services.
Ask AI for a summary
 ChatGPT
 Perplexity
 Gemini
 Claude
 Grok
Grok
Unlocking your Samsung device’s full potential starts with one gatekeeper: the bootloader. If you want to install a custom ROM, flash a custom recovery, or experiment with advanced Android tweaks, you’ll need to unlock bootloader Samsung first. However, bootloader unlocking is not a “free upgrade”—it typically triggers a full data wipe, can affect security protections, and may change how certain Samsung services behave. In this guide, you’ll learn how to unlock bootloader in Samsung using the most common official path (OEM Unlocking + Download Mode confirmation), plus what people mean when they search for a Samsung bootloader unlock tool and “ADB unlock bootloader Samsung” workflows—without confusing Samsung-specific steps with generic Android fastboot instructions.
Android is popular with developers and power users because it supports deep customization. But Android customization also increases risk: the more control you gain, the more responsibility you take for backups, device security, and compatibility. That’s why manufacturers lock bootloaders by default. Below, we’ll define what a bootloader is, explain when bootloader unlocking makes sense, and walk through safe, beginner-friendly steps—so you can make an informed decision before you proceed.
- Part 1. What is Bootloader Unlock on Samsung Devices?
- Part 2. When Should You Unlock Your Samsung Bootloader?
- Pros of Unlocking Samsung Bootloader
- Cons of Unlocking Samsung Bootloader
- Pre-Requisites for Unlocking Samsung Bootloader
- Part 3. Steps to Unlock Bootloader on Samsung Devices
- Method 1. How to Unlock Bootloader on Samsung Through Enable OEM Unlocking?
- Method 2. How to Unlock Bootloader on Samsung Using Samsung Bootloader Unlock Tool?
- Part 4. FAQs About Bootloader Unlock
Part 1. What is Bootloader Unlock on Samsung Devices?
Direct answer: The bootloader is the first program that runs when your Samsung phone starts. Bootloader unlock means removing manufacturer restrictions so the device can boot or flash non-official images (for example, a custom recovery or custom ROM). In other words, it’s the switch that controls whether your phone will accept “official-only” software or allow advanced modifications.
The Samsung Galaxy bootloader acts as your device’s startup manager. Before you even see the Samsung logo, the bootloader checks device integrity and decides what to load next: the normal Android system, recovery, or Download Mode. Because it sits between hardware and Android, the bootloader is a core part of Android bootloader unlock workflows, especially for developers and advanced users who want deeper control.
By default, Android devices ship with a locked bootloader. This improves security and privacy by preventing unauthorized system images from being installed. It also helps protect user data if the device is lost or stolen, and it keeps official updates and verified boot behavior consistent. Bootloader locking is one of the main reasons “random flashing” is harder on modern phones—and that’s intentional.
It’s also important to understand terminology: many users say “bootloader settings” when they mean Developer Options (OEM Unlocking), Download Mode prompts, or recovery menus. On Samsung, the unlock confirmation usually happens on the phone screen in Download Mode after you enable OEM Unlocking—so you should treat the on-screen warnings as the source of truth.
Part 2. When Should You Unlock Your Samsung Bootloader?
Direct answer: Unlock your Samsung bootloader only if you have a clear goal—such as flashing a custom ROM, installing a custom recovery, or testing kernels—and you accept the trade-offs (data wipe, security changes, and potential service limitations). If your goal is just to speed up the phone or free storage, you usually don’t need bootloader unlocking.
A bootloader is a lightweight loader that places the operating system into memory and starts Android. Unlocking it is the “permission step” that makes deeper changes possible. But because it changes trust and verification behavior, it’s not recommended for casual users who rely on maximum security and hassle-free official updates.
Pros of Unlocking Samsung Bootloader
- Flash custom ROMs to extend device life and try new Android features.
- Install a custom recovery (for advanced backups, restores, and system maintenance).
- Enable root workflows (for power users who understand permission and security impact).
- Use developer-friendly testing setups for apps, kernels, and performance tuning.
Cons of Unlocking Samsung Bootloader
- Your warranty or service eligibility may be affected depending on region and policy.
- Some security-dependent features may behave differently after system modifications.
- A mistake (wrong files/steps) can lead to boot loops, soft-bricks, or a device that won’t start.
- Your threat model changes: a less restricted device can be easier to tamper with if you don’t secure it.
- Expect a full data wipe during unlocking on most modern devices—plan your backup first.
Pre-Requisites for Unlocking Samsung Bootloader
- Back up everything that matters (photos, messages, authenticator codes, work profiles).
- Charge the device to at least 60% to avoid shutdown during critical prompts.
- Use a reliable USB cable and stable PC connection if you plan to use ADB tools.
- Enable Developer Options and understand where OEM Unlocking is located.
- Consider using Dr.Fone – Phone Backup (Android) to create a clearer backup workflow before you begin.
Follow the steps below to make a backup of your contents using Dr.Fone – Phone Backup (Android):
Step 1: Install Dr.Fone on your computer, connect your Android phone/tablet, then open “Backup & Restore” on the main screen so you can choose what to save before bootloader unlocking.

Step 2: If the device asks to allow USB debugging, confirm it. Then select “Backup” to start a full pre-unlock backup (recommended even if you think you “don’t have important files”).

Step 3: Review the categories that can be backed up (photos, contacts, messages, app data where supported). This is your last chance to reduce risk before a factory reset.

Step 4: After the backup completes, use “View Backup History” to verify the backup exists and is readable—this prevents unpleasant surprises after the bootloader is unlocked.

Part 3. Steps to Unlock Bootloader on Samsung Devices
Direct answer: On most Samsung devices that allow it, you unlock the bootloader by (1) enabling OEM Unlocking in Developer Options, then (2) entering Download Mode and confirming “Unlock Bootloader” on the phone screen. This usually triggers a full wipe and reboot.
Before you start, note two common blockers: (1) Some regional/carrier variants may not support bootloader unlocking at all; (2) OEM Unlocking can be missing or delayed (for example, after a fresh setup period). If you don’t see OEM Unlocking, stop and troubleshoot first—forcing random tools increases the risk of data loss without success.
Method 1. How to Unlock Bootloader on Samsung Through Enable OEM Unlocking?
This method follows the most common Samsung flow: enable OEM Unlocking, then confirm unlock inside Download Mode. If your goal is “bootloader unlock samsung” with the least confusion, start here.
Step 1: Connect to Wi‑Fi, confirm the device has stable internet, and ensure it has enough battery. This reduces setup-related interruptions and improves the chance OEM Unlocking appears correctly.
Step 2: Update the phone if an official update is pending (Settings > Software update). Outdated firmware can cause missing toggles or confusing prompts.
Step 3: Enable Developer Options (this is where many “bootloader settings” questions come from):
- Stage 1: Open Settings on your Samsung device.
- Stage 2: Tap About phone.
- Stage 3: Open Software information and tap Build number 7 times.
- Stage 4: Go back to the main Settings screen.
- Stage 5: Open Developer options.
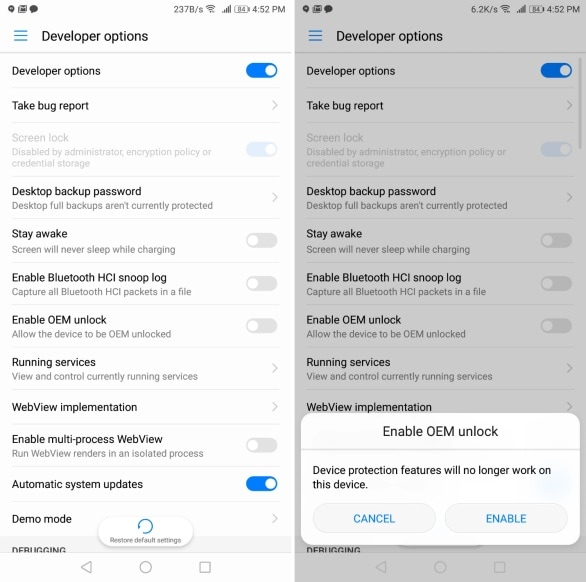
- Stage 6: Find OEM Unlocking.
- Stage 7: Toggle OEM Unlocking on, then confirm any warning prompts.
Step 4: Power off the phone completely. Then press and hold Volume Up + Volume Down together, and connect the phone to your computer via USB.
Note: This usually boots the device into Download Mode (the exact key combo can vary by model). Always follow the on‑screen Download Mode instructions on your device.
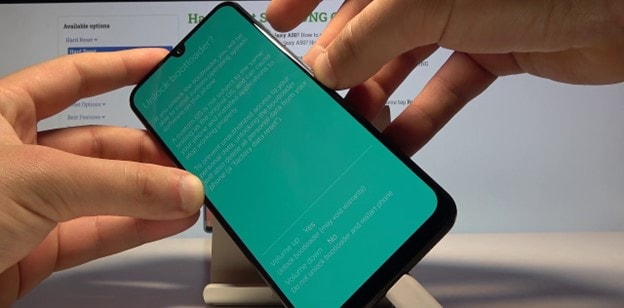
Step 5: When you see the “Unlock Bootloader” screen, press Volume Up to enter the unlock confirmation prompt.
Step 6: Press and hold Volume Up again to confirm unlocking. Read the warning carefully: unlocking typically wipes data and changes the device’s trust state.
Step 7: Wait for the device to complete the process and reboot. After reboot, set up Android again and verify your backups before installing any modifications.
Method 2. How to Unlock Bootloader on Samsung Using Samsung Bootloader Unlock Tool?
Many users search for a “Samsung bootloader unlock tool” expecting a one-click app. In reality, on Samsung the decisive step is usually the on-device confirmation in Download Mode after OEM Unlocking is enabled. PC tools are mainly used to help with preparation (ADB detection, rebooting into modes) or later flashing workflows—not to magically bypass unlock restrictions.
Also remember the consequences: unlocking can affect security posture and may change availability of certain Samsung services after system modifications. Treat this as an advanced operation, not a casual tweak.
Let’s proceed carefully:
Step 1: Make sure Developer Options are enabled and OEM Unlocking is turned on (see Method 1). Without OEM Unlocking, most devices will deny unlocking.
Step 2: Enable USB debugging (also in Developer Options) so your PC can communicate via ADB when needed.
Step 3: Install ADB tools on your computer, then open a command prompt/terminal in the ADB folder.
Step 4: Verify the phone is recognized:
adb devices
Step 5: Reboot into the boot/Download flow using ADB (naming differs by vendor). If your Samsung does not enter the expected screen, use the hardware key combo described in Method 1:
adb reboot bootloader
Step 6: When the device shows Download Mode / unlock prompts, follow the on-screen instructions. On many Samsung models, this is where you confirm unlock with Volume keys.
Step 7: About fastboot: the standard Android unlock command is shown below, but it only applies if your device actually supports fastboot mode. If your PC shows fastboot help text or the device never enters fastboot, do not force it—use the Download Mode confirmation path instead.
fastboot flashing unlock
Step 8: Confirm the on-screen question using the volume keys to navigate and the power key to accept (exact keys vary). Expect warnings and a factory reset prompt.
Important Warning: Unlocking typically wipes all user data. Back up first, and only continue if you fully accept the risk.
Step 9: After the reboot, your phone should start Android again. At this stage, “bootloader unlocked” simply means the device allows advanced flashing; it does not guarantee every custom ROM or modification will work on your exact model/region.
Part 4. FAQs About Bootloader Unlock
1. Can I Unlock the Samsung Phone Bootloader Without Losing Data?
In most cases, no. Bootloader unlocking is designed to protect user data from unauthorized access, so devices typically perform a factory reset during the unlock process. Plan for a full wipe and back up everything important before you begin.
2. What Will Happen If I Reboot to Bootloader on Samsung Phones?
Rebooting into the bootloader/Download Mode does not automatically unlock anything. It simply puts the phone into a special state where you can view device warnings, enter recovery/download menus, or confirm bootloader actions. Think of it as a “maintenance gateway” rather than normal Android.
3. What to Do If I’m Stuck on FRP After Bootloader Unlock (Legit Owner Tips)?
If you are the rightful owner and your device requests Google account verification (FRP) after a reset, the safest approach is to recover access through official channels: confirm you’re signing in with the last synced Google account, use Google account recovery if needed, and keep proof of ownership for carrier/manufacturer support. Avoid untrusted “bypass” instructions—those often lead to scams or further lockouts.
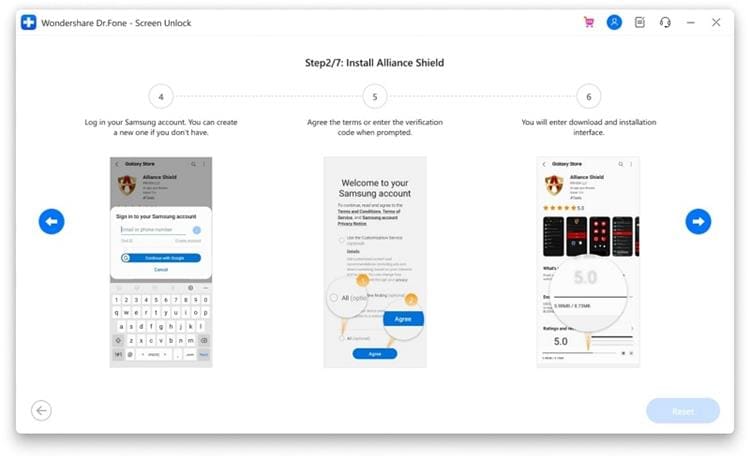
If you’re locked out of your Android screen (forgotten password, damaged screen, etc.), you can check Dr.Fone – Screen Unlock (Android) as an access-recovery option and follow the in-app guidance carefully.
Step 1: Go to Dr.Fone’s main page and choose “Screen Unlock” from the menu.
Note: A stable internet connection is important for account verification flows after a reset. If your goal is bootloader unlocking, always plan account access before you wipe.
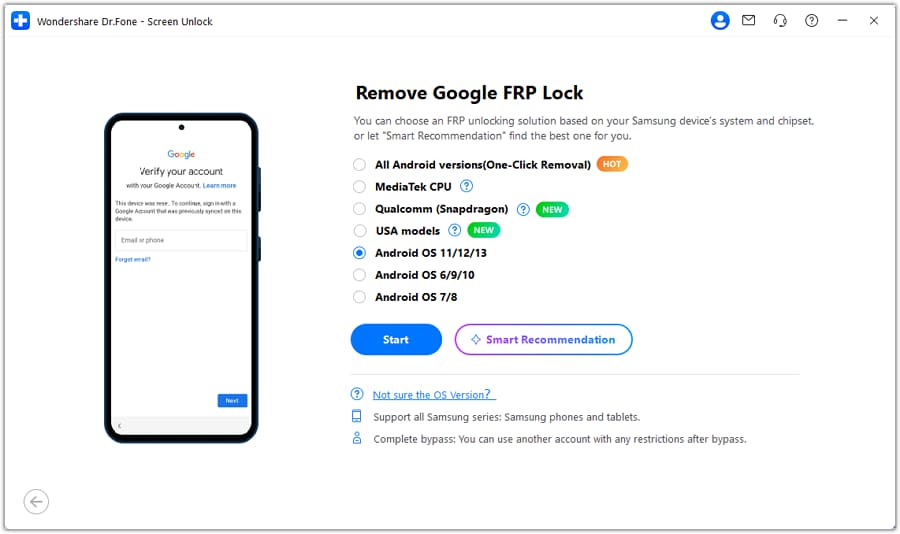
Step 2: Choose the relevant unlock/recovery feature in the tool and follow on-screen instructions that match your device model and Android version.

Step 3: Select the Android version shown in the interface and proceed only if it matches your device. Mismatched selections are a top reason for failure.
Step 4: Confirm prompts on both PC and phone. Always read warnings about data loss and device state changes.
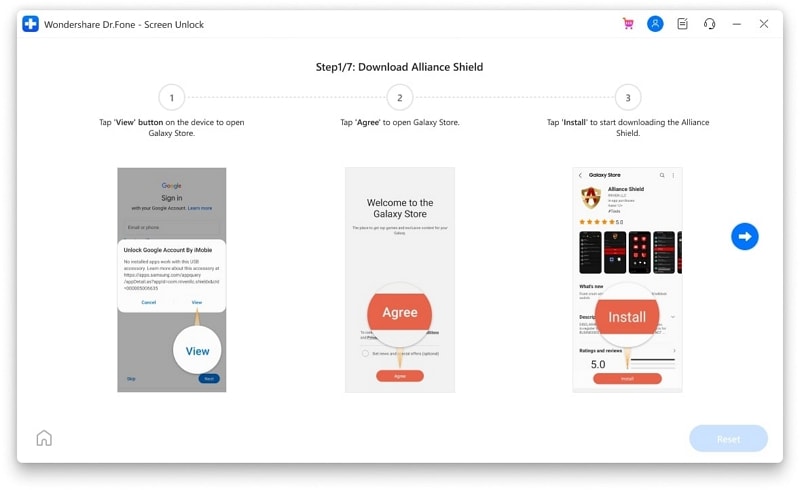
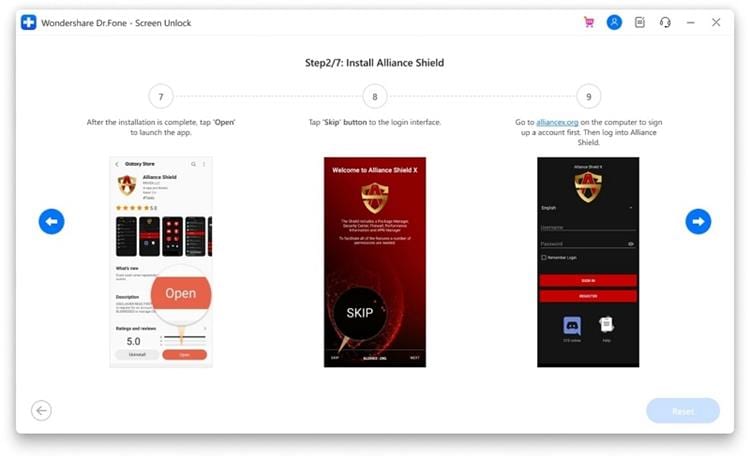
Step 5: If the workflow requires app installation or permissions, review each permission request and avoid granting unnecessary access.
Step 6: Keep the device connected and do not interrupt the process once it starts.
Step 7: If account sign-in is required, use the correct credentials and complete verification prompts (email/phone/2FA) to avoid repeated lockouts.
Step 8: After installation, follow the tool’s guided steps. If anything looks suspicious or unrelated to your goal, stop and reassess.
Tip: Name your device clearly, keep records of what you changed, and store backups safely. This makes troubleshooting easier after bootloader unlocking and resets.
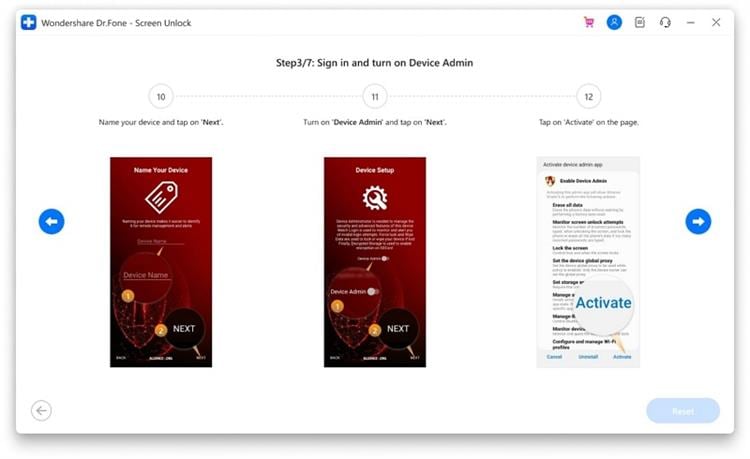
Step 9: Confirm final prompts carefully. Avoid repeating resets unnecessarily, as repeated resets can complicate account verification timelines.
Step 10: If you see terms and conditions prompts, review them and proceed only if you understand the implications.
Step 11: Finish the setup flow and verify you can access the home screen normally.
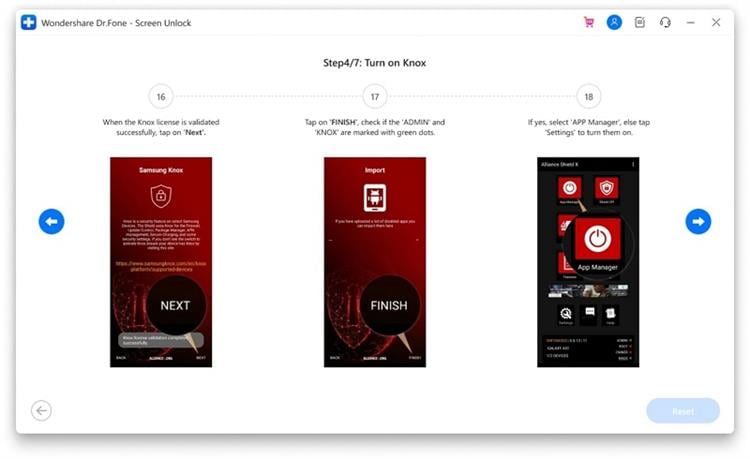
Step 12: Use search and settings responsibly—only enable what is necessary for your legitimate recovery goal.
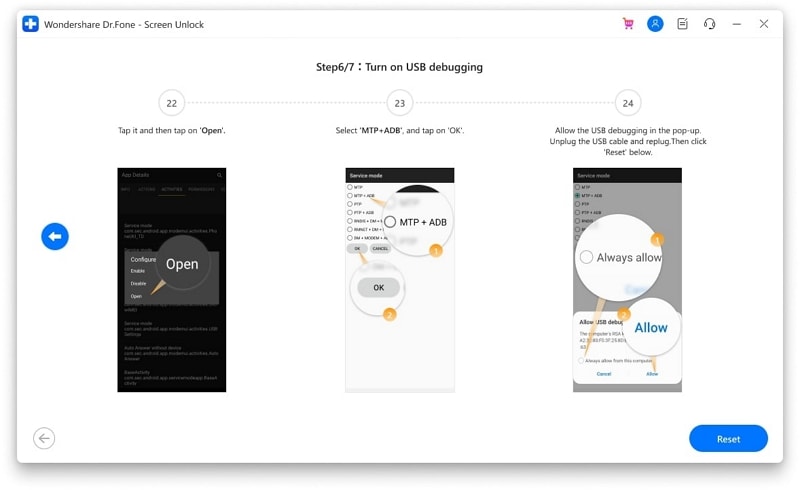
Step 13: If USB debugging prompts appear, only allow them when you trust the connected PC and understand why you need ADB access.
Note: If you’re unsure, prioritize official account recovery and manufacturer support rather than risky “quick fixes”.
Step 14: Restart your device if required and verify basic functions (calls, Wi‑Fi, updates) after recovery/unlock related operations.
Step 15: Confirm the device is stable and your accounts are accessible. Then decide whether bootloader unlocking is still necessary for your goal.
Dr. Fone App-Screen Unlock (Android)
Tips: If you’re locked out of an Android screen and can’t access Settings/Developer Options (so you can’t even reach OEM Unlocking), Wondershare Dr.Fone App-Screen Unlock (Android) can help you regain access so you can back up data and continue safely. For bootloader-related work, the safest order is always: regain access → back up → then decide whether to unlock.
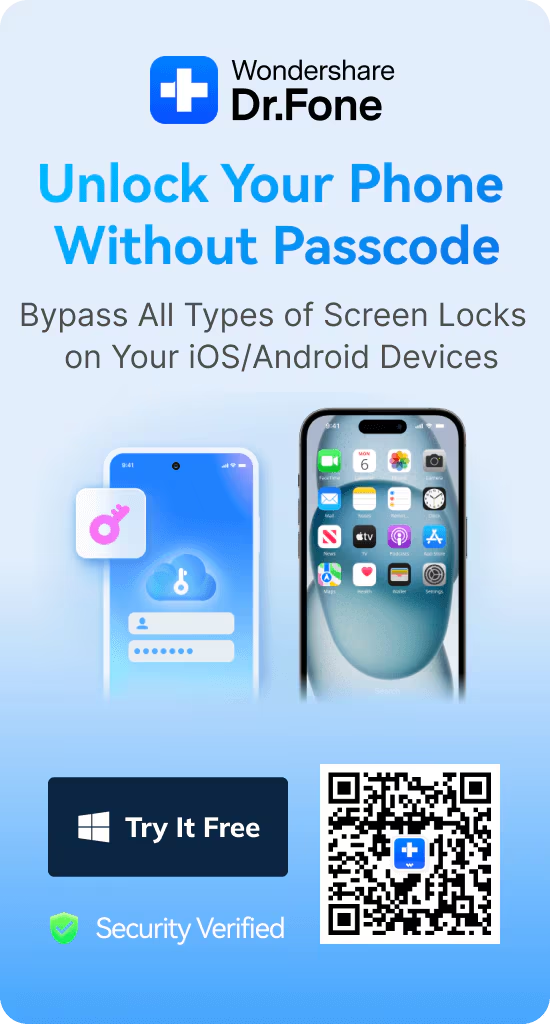
Dr.Fone App - Unlock Android Screen
The Ultimate Android Screen Unlock Tool!
- Supports various types of Android locks (PIN, pattern, password, biometrics depending on device).
- Compatible with over 10+ Android brands, including many Samsung models.
- Designed for a guided, beginner-friendly recovery flow.
- Convenient & Fast, so you can regain access and focus on proper backups.


Conclusion
Key takeaway: If your Samsung model supports it, unlocking the bootloader is usually a two-part process: enable OEM Unlocking, then confirm unlock in Download Mode—expect a data wipe. Once the phone is in a bootloader unlocked state, you can explore custom recoveries/ROMs, but you should prioritize verified downloads, careful model matching, and strong backups.
If you get stuck (locked screen, account verification issues, or confusing prompts), regain access and back up first. Tools like Dr.Fone – Screen Unlock (Android) can be an option for legitimate owner recovery so you can proceed safely.
FAQ: Samsung Bootloader Unlock
Q1. Where can I find bootloader settings like OEM Unlocking on Samsung?
A1. Enable Developer Options first (tap Build number 7 times), then open Developer options and look for OEM Unlocking. This switch controls whether the device is allowed to be unlocked on the next Download Mode confirmation screen.
Q2. Does bootloader unlock Samsung erase data? Can I avoid it?
A2. In most cases, unlocking triggers a factory reset to protect your personal data from unauthorized access. Plan for a full wipe and back up everything before you proceed. The standard Android unlock flow is designed to wipe data during unlock confirmation.
Q3. Why is OEM Unlocking missing or greyed out on my Samsung phone?
A3. Common causes include regional/carrier restrictions, device policy/enterprise controls, or setup-related waiting requirements on some models. Make sure you’re online, updated to the latest firmware, and using a supported variant—otherwise the option may not appear.
Q4. How do I know if my device is bootloader unlocked, and can I relock it?
A4. After a successful unlock, the device usually shows an unlock warning on boot or indicates unlocked state in Download Mode screens. Relocking may be possible on some devices, but it won’t magically restore every security state if you’ve flashed unofficial images—always read on-screen warnings and verify model-specific guidance.


Samsung Unlock
- Samsung Code
- 1. Samsung Unlock Code List
- 2. Samsung Reset Code List
- 3. Samsung Secret Code List
- 4. Check Screen Using Secret Codes
- 5. Samsung Unlock Code Generators
- 6. Free Samsung Unlock Code
- 7. Free Samsung Unlock Code Generators
- 8. Samsung Galaxy S2 Unlock Code
- Samsung A Series FRP Bypass
- 1. Samsung A01 FRP Bypass
- 2. Samsung A01 Core FRP Bypass
- 3. Samsung A02/A02s FRP Bypass
- 4. Samsung A2 Core FRP Bypass
- 5. Samsung A10/A10s FRP Bypass
- 6. Samsung A11 FRP Bypass
- 7. Samsung A12 FRP Bypass
- 8. Samsung A20/A20S FRP Bypass
- 9. Samsung A14 FRP Bypass
- 10. Samsung A30/30s FRP Bypass
- 11. Samsung A50 FRP Bypass
- 12. Samsung A51 FRP Bypass
- Samsung J Series FRP Bypass
- 1. Samsung J2 FRP Bypass
- 2. Samsung J4 FRP Bypass
- 3. Samsung J5 Prime FRP Bypass
- 4. Samsung J6 FRP Bypass
- 5. Samsung J7 FRP Bypass
- 6. Samsung J7 Prime FRP Bypass
- 7. Samsung J250 FRP Bypass
- Samsung S Series FRP Bypass
- 1. Samsung S7 FRP Bypass
- 2. Samsung S22 FRP Bypass
- 3. Bypass Samsung S24 FRP Lock
- 4. Samsung S25 FRP Bypass
- 5. Samsung S26 FRP Bypass
- Samsung FRP Bypass for Others
- 1. Samsung M01 FRP Bypass
- 2. Samsung M11 FRP Bypass
- 3. Samsung G532F FRP Bypass
- 4. Samsung G531F/G531H FRP Bypass
- 5. Samsung Google Verification Bypass
- 6. HushSMS APK FRP Unlock
- 7. Samsung Android 11 FRP Bypass
- 8. Samsung FRP Bypass Without PC
- Samsung Factory/Hard Reset
- 1. Reboot Samsung
- 2. Hard Reset Samsung
- 3. Reset Locked Samsung Phone
- 4. Reset Samsung Tablet
- 5. Reset Samsung Without Password
- 6. Reset Samsung Account Password
- 7. Reset Samsung Galaxy S3
- 8. Reset Samsung Galaxy S4
- 9. Reset Samsung Galaxy S5
- 10. Reset Samsung Galaxy S9/S10
- 11. Reset Samsung Galaxy J5/J7
- 12. Reset Samsung A12
- 13. Factory Reset Samsung Tablet
- Samsung S Series Screen Unlock
- 1. Samsung S2 Screen Unlock
- 2. Samsung S3 Screen Unlock
- 3. Samsung S4 Screen Unlock
- 4. Samsung S5 Screen Unlock
- 5. Samsung S6 Screen Unlock
- 6. Samsung S7/S8 Screen Unlock
- 7. Samsung S20 Screen Unlock
- 8. Samsung S22 Ultra Screen Unlock
- 9. Unlock Samsung S25
- Samsung Screen Unlock
- 1. Best Samsung Unlock Software
- 2. Forgot Samsung Galaxy Password
- 3. Bypass Samsung Lock Screen PIN
- 4. Unlock Samsung Galaxy Phones
- 5. Unlock Bootloader on Samsung
- 6. Unlock Home Screen Layout
- 7. Unlock Samsung Password
- 8. Remove Google Account
- 9. MDM Remove Tools
- 10. Remove Samsung MDM Lock
- 11. Samsung Reactivation Lock
- Samsung SIM Unlock
- ● Manage/transfer/recover data
- ● Unlock screen/activate/FRP lock
- ● Fix most iOS and Android issues
- Free Download Free Download Free Download

James Davis
staff Editor