How to Remove Google Account from Samsung Without Password
Oct 13, 2025 • Filed to: Screen Lock Removal • Proven solutions
Getting locked out of your Samsung phone due to a forgotten Google account can be frustrating. Whether it’s after a factory reset or because you purchased a second-hand device, this common issue can leave you stuck. Security features like Factory Reset Protection (FRP) are designed to protect your data, but they can also prevent you from accessing your own phone.
If you’re wondering how to remove Google account from Samsung without password, don’t worry! There are effective methods to help you out. This guide will walk you through simple ways to resolve this issue. From using official settings to exploring third-party tools, you’ll find step-by-step solutions to regain access.
No matter your situation, you’ll discover how to remove Google account from Samsung smoothly and efficiently. Keep reading to learn how to unlock your device without hassle!
-
- Method 1: Fastest Way to Remove Google Account from Samsung Without Password - Dr.Fone - Screen Unlock (Android 11/12/13/14)

- Method 2: Remove Google Account Without Password from Phone Settings
- Method 3: Factory Reset to Remove Google Account from Samsung Without Password
- Method 4: Remove Gmail Account Remotely from Samsung with Find My Device
- Method 5: How to Remove a Google Account from Samsung with Recovery Mode
- Method 1: Fastest Way to Remove Google Account from Samsung Without Password - Dr.Fone - Screen Unlock (Android 11/12/13/14)
Part 1. Important Facts Before You Remove Google Account from Samsung
It is possible to delete Google accounts linked to Samsung devices, but be mindful, the data cannot be recovered. Furthermore, unlocking a Samsung device without the proper data backup method can be quite troublesome.
What Happens When You Remove Google Account from Samsung Phone?
- Loss of Data: Disable your account on the device and you will notice files and photos, along with calendar events will be gone.
- Restricted Access: Services like Gmail, Google Drive, and Play Store will no longer work with that account.
- Subscription Loss: Purchases made on Google Play or YouTube with that account will be inaccessible.
What to Do Before Removing a Google Account on Samsung?
- Backup Important Data: Download files, emails, and contacts before proceeding.
- Update Linked Services: If the account is used for apps, banking, or social media, add a new email.
- Check Account Recovery Options: Updating recovery details might help if you need to access the account later.
Once you're ready, follow the best methods in the next section to remove the Google account from the Samsung without a password.
Tips: Having trouble getting past Google’s Factory Reset Protection on your Samsung device? Dr.Fone Online Unlock is here to help—completely online, no PC or software download required. In just three easy steps (and under 10 minutes!), you can bypass FRP on every Samsung model—from the latest Galaxy S25 series to tablets—and in any region worldwide.
- Zero risk: Device remains unharmed and fully functional.
- Super-fast: Unlock completes in as little as 10 minutes.
- Proven reliability: 99% success rate validated by real users.
- Satisfaction guaranteed: Full refund if unlocking fails.
Take back control of your Samsung device now—unlock FRP faster than ever!
Part 2. How to Remove a Google Account from Samsung
There are several ways to remove a Google account from a Samsung without a password. Some methods work within settings, while others require advanced tools. The right solution depends on your phone model and software version. Below are the best ways to remove a Google account on Samsung safely and effectively.
Method 1: Fastest Way to Remove Google Account from Samsung Without Password - Dr.Fone - Screen Unlock (Android 11/12/13/14)
If you’ve forgotten your Google account password or bought a second-hand Samsung phone still linked to the previous owner’s account, getting locked out can be a real headache. Thankfully, Dr.Fone - Screen Unlock (Android) is here to save the day. This powerful tool allows you to remove Google account from Samsung without password effortlessly, giving you full access to your device.
Dr.Fone isn’t just another program; it’s your go-to solution for unlocking FRP across multiple phone brands, including all Samsung Snapdragon models running Android 11 to 15. Its standout feature? Full support for Android 15 and a remarkable 100% success rate for Samsung devices.
With Dr.Fone, you can bypass the “verify your account” error and unlock forgotten credentials with ease. Say goodbye to frustration and hello to a fully functioning phone. Try it now and take control of your Samsung device in just a few clicks!
Why Use Dr.Fone - Screen Unlock (Android)?
- Bypass FRP lock on Samsung without needing a password.
- Unlock all Android screen locks, including PIN, pattern, or password.
- Remove the Google account on Samsung and sign in with a new one.
- Instant access to Samsung devices after being locked out.
Dr.Fone - Screen Unlock (Android)
A powerful tool for removing FRP on Samsung devices
- Bypass Google Account on OnePlus without a PIN or Google account.
- Remove 5 screen lock types: pattern, PIN, password, ingerprints & Face ID.
- 100% success rate for FRP bypass on Samsung Snapdragon devices.

- Unlock mainstream Android brands like Samsung, Huawei, OnePlus, Xiaomi, etc.
- No tech knowledge required, Simple, click-through, process.
Step-by-Step Guide to Remove Google Account from Samsung Phone with Dr.Fone
Step 1: Launch Dr.Fone - Screen Unlock
Download and launch Dr.Fone - Screen Unlock (Android) on your computer. Use a USB cable to connect your Samsung phone. On the main menu, click Toolbox and then Screen Unlock to unlock your device features.

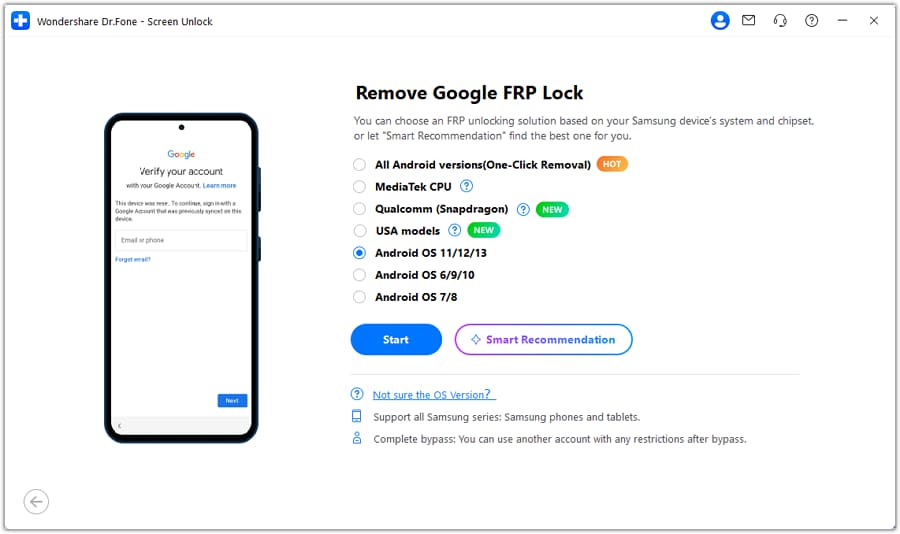
Step 2: Select FRP Lock Removal and samsung device
Choose "Android" from the options. Click "Remove Google FRP Lock" to proceed. Select Samsung, then click Start. Choose your device's Android version (11/12/13/14) and confirm.

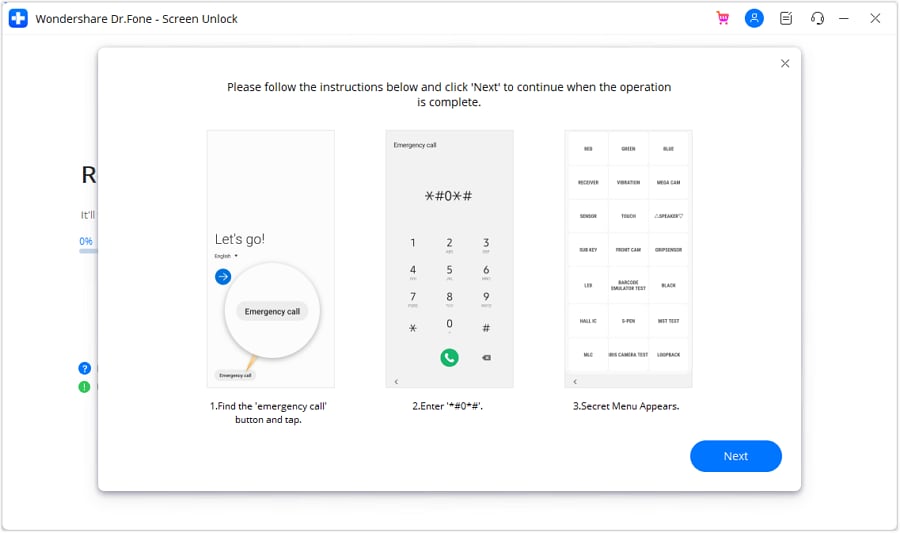
Step 3: Access Emergency Call Menu
Follow the on-screen instructions carefully. Tap Emergency Call on your Samsung device. Dial #0# to open the secret menu. Click Next on your computer screen.

Step 4: Enable USB Debugging
Your phone will prompt you to activate USB debugging. Allow the permission on your Samsung device. Click Authorized on the computer screen to continue.
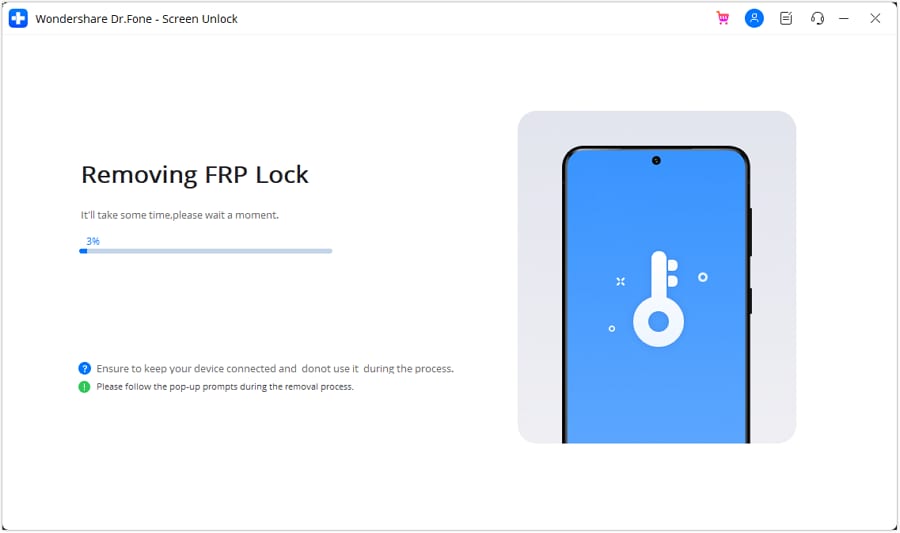
Step 5: Remove FRP Lock
The software will start the FRP lock removal process. Once completed, a confirmation screen will appear. Click Done, and restart your Samsung phone.

Method 2: Remove Google Account Without Password from Phone Settings
Removing the Google account password from Samsung directly is also possible if you are able to access the settings section of your Samsung device. This approach will work for you even in situations where you cannot remember the password. However, it only applies if you can navigate through the device settings.
Steps to Remove Google Account from Samsung Phone via Settings
Step 1: Open Account Settings
Unlock your Samsung phone and go to Settings. Tap Accounts and Backup > Manage Accounts.
Step 2: Select the Google Account
Find and tap the Google account you want to remove. Tap Remove account to continue.
Step 3: Confirm Removal
Tap Remove account again, and then it is OK to finalize. If there are multiple accounts, the selected one will be deleted immediately. If it's the only Google account on Samsung, you may need to enter your screen lock password, PIN, or pattern to confirm.
Method 3: Factory Reset to Remove Google Account from Samsung Without Password
If you need to remove a Google account from Samsung without a password, a factory reset is an option. This method is applicable only for certain Samsung makes and models. It deletes everything, so do not forget to save important information before proceeding any further.
Option 1: Factory Reset Through Settings (If Device is Accessible)
Step 1: Open Settings on your Samsung phone.
Step 2: Go to Accounts & Backup > Reset. Select Factory Data Reset.
Step 3: Confirm the reset and wait for the device to reboot.
Option 2: Factory Reset Through Recovery Mode (If Locked Out)
Step 1: Put the device into Recovery Mode: Press and hold Power + Volume Up + Home (button combination may vary by model).
Step 2: Use the volume keys to highlight Wipe data/factory reset, then press Power to select.
Step 3: Choose Yes – delete all user data. Select Reboot system now once the reset is complete.
Method 4: Remove Gmail Account Remotely from Samsung with Find My Device
Samsung devices come with Find My Device, a feature designed to track lost phones. However, it can also help remotely remove the Google account from a Samsung phone by performing a full reset. This method works if the device is still connected to the internet and you can access the associated Google account.
Steps to Remove a Google Account on a Samsung Using Find My Device
Step 1: Access Find My Device: Access the website for Find My Device provided by Android.
Step 2: Access Google Account: Log in using the Google-connected credentials for the Samsung phone.
Step 3: Select Your Device: Pick the Samsung phone from the available options.
Step 4: Delete the Item: To begin the reset option, select “Erase Device.”
The mobile device will reboot itself while simultaneously disabling the Google account.
Method 5: How to Remove a Google Account from Samsung with Recovery Mode
Recovery Mode is a built-in Android feature that helps fix system issues. It can also remove a Google account from Samsung by performing a factory reset. However, this method erases all data and may trigger FRP lock on newer devices.
Steps to Remove Google Account from Samsung Phone via Recovery Mode
Step 1: Enter Recovery Mode
Turn off your Samsung phone. Press and hold Volume Up + Power until the recovery menu appears.
Step 2: Select Wipe Data/Factory Reset
Use Volume Down to navigate the options. Highlight Wipe data/factory reset and press Power to select. Choose Yes – delete all data to proceed.
Step 3: Reboot the System
Select Reboot system now to restart the device. Once it powers on, the Google account on Samsung will be removed.
Pro Tips: Remove Google Account Remotely with the Password
If you still have access to your Google account password, you can remove Google account from Samsung phone remotely. This method ensures you don't lose essential data and is the safest way to delete an account permanently.
Steps to Delete Gmail Account Permanently Without Password Issues
Step 1: Access Google Account Settings
Open a web browser on your computer. Go to Google My Account and sign in. Click on "Data & Privacy" from the left panel.
Step 2: Select Google Account Deletion
Scroll down and find the option "Delete a Google service." Click on it to proceed.
Step 3: Verify Your Identity
Enter your Google account password to confirm ownership. Once verified, look for the "Gmail" option. Click the Trash icon to remove your Gmail account.
Step 4: Provide an Alternative Email
A pop-up will appear, asking for another email address to stay connected to Google services. Enter a valid email and click "Send verification email." The Google account on Samsung will not be removed until you verify the email.
Step 5: Backup Your Gmail Data (Optional)
If you want to save emails and files, select "Download your data." This opens Google Takeout, where you can choose what to keep. Define the file type, frequency, and export destination for your backup.
Conclusion
If you’re struggling to regain access to your Samsung device, there are several ways to remove Google account from Samsung without password. From simple settings adjustments to advanced tools, this article has covered all the best options.
Among these, Dr.Fone - Screen Unlock stands out as the smartest solution. It’s user-friendly, supports FRP unlocking for multiple phone brands, and works seamlessly with all Samsung Snapdragon devices, including Android 15. With a 100% success rate, Dr.Fone ensures you can unlock your device with ease. Try it today and take back control of your phone effortlessly!
4,624,541 people have downloaded it
Samsung Unlock
- Samsung Code
- 1. Samsung Unlock Code List
- 2. Samsung Reset Code List
- 3. Samsung Secret Code List
- 4. Check Screen Using Secret Codes
- 5. Samsung Unlock Code Generators
- 6. Free Samsung Unlock Code
- 7. Free Samsung Unlock Code Generators
- 8. Samsung Galaxy S2 Unlock Code
- Samsung A Series FRP Bypass
- 1. Samsung A01 FRP Bypass
- 2. Samsung A01 Core FRP Bypass
- 3. Samsung A02/A02s FRP Bypass
- 4. Samsung A2 Core FRP Bypass
- 5. Samsung A10/A10s FRP Bypass
- 6. Samsung A11 FRP Bypass
- 7. Samsung A12 FRP Bypass
- 8. Samsung A20/A20S FRP Bypass
- 9. Samsung A14 FRP Bypass
- 10. Samsung A30/30s FRP Bypass
- 11. Samsung A50 FRP Bypass
- 12. Samsung A51 FRP Bypass
- Samsung J Series FRP Bypass
- 1. Samsung J2 FRP Bypass
- 2. Samsung J4 FRP Bypass
- 3. Samsung J5 Prime FRP Bypass
- 4. Samsung J6 FRP Bypass
- 5. Samsung J7 FRP Bypass
- 6. Samsung J7 Prime FRP Bypass
- 7. Samsung J250 FRP Bypass
- Samsung S Series FRP Bypass
- 1. Samsung S7 FRP Bypass
- 2. Samsung S22 FRP Bypass
- 3. Bypass Samsung S24 FRP Lock
- 4. Samsung S25 FRP Bypass
- Samsung FRP Bypass for Others
- 1. Samsung M01 FRP Bypass
- 2. Samsung M11 FRP Bypass
- 3. Samsung G532F FRP Bypass
- 4. Samsung G531F/G531H FRP Bypass
- 5. Samsung Google Verification Bypass
- 6. HushSMS APK FRP Unlock
- 7. Samsung Android 11 FRP Bypass
- 8. Samsung FRP Bypass Without PC
- Samsung Factory/Hard Reset
- 1. Reboot Samsung
- 2. Hard Reset Samsung
- 3. Reset Locked Samsung Phone
- 4. Reset Samsung Tablet
- 5. Reset Samsung Without Password
- 6. Reset Samsung Account Password
- 7. Reset Samsung Galaxy S3
- 8. Reset Samsung Galaxy S4
- 9. Reset Samsung Galaxy S5
- 10. Reset Samsung Galaxy S9/S10
- 11. Reset Samsung Galaxy J5/J7
- 12. Reset Samsung A12
- 13. Factory Reset Samsung Tablet
- Samsung S Series Screen Unlock
- 1. Samsung S2 Screen Unlock
- 2. Samsung S3 Screen Unlock
- 3. Samsung S4 Screen Unlock
- 4. Samsung S5 Screen Unlock
- 5. Samsung S6 Screen Unlock
- 6. Samsung S7/S8 Screen Unlock
- 7. Samsung S20 Screen Unlock
- 8. Samsung S22 Ultra Screen Unlock
- 9. Unlock Samsung S25
- Samsung Screen Unlock
- 1. Best Samsung Unlock Software
- 2. Forgot Samsung Galaxy Password
- 3. Bypass Samsung Lock Screen PIN
- 4. Unlock Samsung Galaxy Phones
- 5. Unlock Bootloader on Samsung
- 6. Unlock Home Screen Layout
- 7. Unlock Samsung Password
- 8. Remove Google Account
- 9. MDM Remove Tools
- 10. Remove Samsung MDM Lock
- 11. Samsung Reactivation Lock
- Samsung SIM Unlock
- ● Manage/transfer/recover data
- ● Unlock screen/activate/FRP lock
- ● Fix most iOS and Android issues
- Unlock Now Unlock Now Unlock Now


James Davis
staff Editor