
Quick Ways To Factory Reset Your Samsung Galaxy Tab [All Models]
Oct 24, 2025 • Filed to: Phone Repair Solutions • Proven solutions
Dr.Fone Basic:
Better Control for Your Phone
Manage, transfer, back up, restore, and mirror your device
The act of erasing your device can be an effective way to solve various performance issues or prepare it for a fresh start. Doing so can prove helpful when you're planning to sell or give away your tablet or simply want to clear out accumulated data. Being able to factory reset the Samsung Galaxy tab can bring the device back to how it was when you first bought it.
This deep dive will walk you through the quick and easy steps to erase your device in various scenarios. From navigating the settings menu to using remote methods, it will cover all the methods you can use to reset your tab. Furthermore, you will learn about an advanced tool to back up or securely erase your data.
- Part 1. Why Should You Reset a Samsung Tablet?
- Part 2. What Is the Difference Between Soft and Hard Reset Samsung Galaxy Tab?
- Part 3. How to Soft Reset Samsung Tab To Resolve Temporary Issues
- Part 4. How To Hard Reset Samsung Galaxy Tab
- Part 5. Pro Tip: How To Secure Samsung Galaxy Tab Data Before Hard or Factory Reset?

- Part 6. Other Ways To Factory Reset Samsung Galaxy Tab
Part 1. Why Should You Reset a Samsung Tablet?
Since you can be forced to perform this task repeatedly, it is critical to learn it. Resetting a Samsung tablet is an essential troubleshooting step for resolving various issues. Over time, devices can accumulate unnecessary files, conflicting settings, or software glitches.
A soft or hard reset helps restore your tablet to its optimized state. Summarized below are some common reasons why you should reset the Samsung tab:
- Fixing Performance Issues: Your Samsung tablet might be lagging, freezing, or crashing frequently. Performing a soft reset can eliminate software-related problems and improve performance.
- Removing Malware or Viruses: A reset is a reliable way to remove malicious software from your tablet. Doing a hard reset can prove useful where standard antivirus tools fail.
- Preparing for Resale: When selling or giving your tablet away, wiping all personal content becomes vital. With a factory reset, you can ensure that all data and accounts are deleted.
- Persistent Software Bugs: New updates or app installations can lead to temporary glitches. Using a soft or hard reset can provide a fresh start and resolve compatibility issues.
- Starting Fresh After Major Updates: Following significant system updates, a reset can help a lot. It ensures optimal performance by eliminating residual files or incompatible configurations.
Part 2. What Is the Difference Between Soft and Hard Reset Samsung Galaxy Tab?
When troubleshooting your device, you will come across two different terms for resetting. These are known as soft reset and hard reset, with each serving a different purpose. Although both serve to optimize your tab, they differ in process and impact on your data. Explored below is the difference when asked to perform a soft reset or hard reset on a Samsung tablet:
2-1. Soft Reset
Commonly referred to as restart or reboot, it essentially involves switching off the device and then turning it on. A soft reset does not delete any data or settings and is primarily used to resolve minor issues such as app freezes or unresponsiveness. This process is quick and safe, making it a good first step when troubleshooting.
2-2. Hard Reset
Known as factory reset or device erasure, this act is a more drastic measure. A hard reset completely erases all data, including apps, accounts, and custom settings, restoring the device to its original factory state. With it, you can resolve issues like persistent software bugs or crashes and remove malware. It is important to note that a factory reset done via Recovery Mode is commonly referred to as a hard reset.
2-3. Key Differences
|
Aspect |
Soft Reset |
Hard Reset |
| Data Impact | No data loss | Erases all data and settings |
| Use Cases | Resolving minor glitches | Fixing major issues or clearing data |
| Process Complexity | Simple restart procedure | Requires more steps via settings or recovery |
Part 3. How to Soft Reset Samsung Tab To Resolve Temporary Issues
As mentioned, it refreshes the device’s system without deleting any personal data, apps, or settings. A soft reset is the easiest and safest way to fix minor glitches or unresponsiveness on your tab. Performing it means you will not have to do anything complex if it works. The instructions needed to soft reset or restart the Samsung Galaxy tablet are below to help you out:
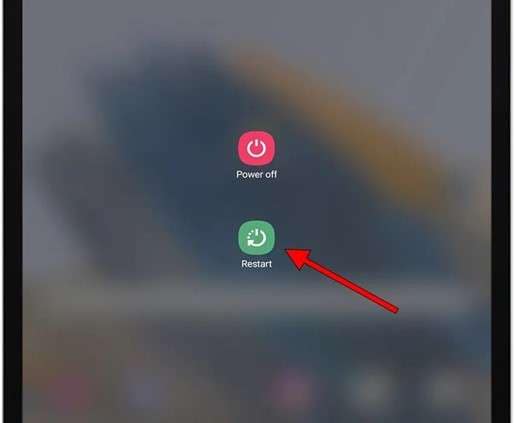
Instructions. Identify the “Power” button on your tab and long-press it to bring up the power menu. From the available options, hit “Restart” to perform a soft reset on your device.
Part 4. How To Hard Reset Samsung Galaxy Tab
This process removes all personal data, apps, and system settings to revert your device to its default condition. Hence, a hard reset is a powerful solution for resolving persistent issues or preparing the device for resale. Before proceeding, ensure that you back up any important data since the procedure is irreversible. The steps you need to follow to do a hard or master reset Samsung tablet are these:
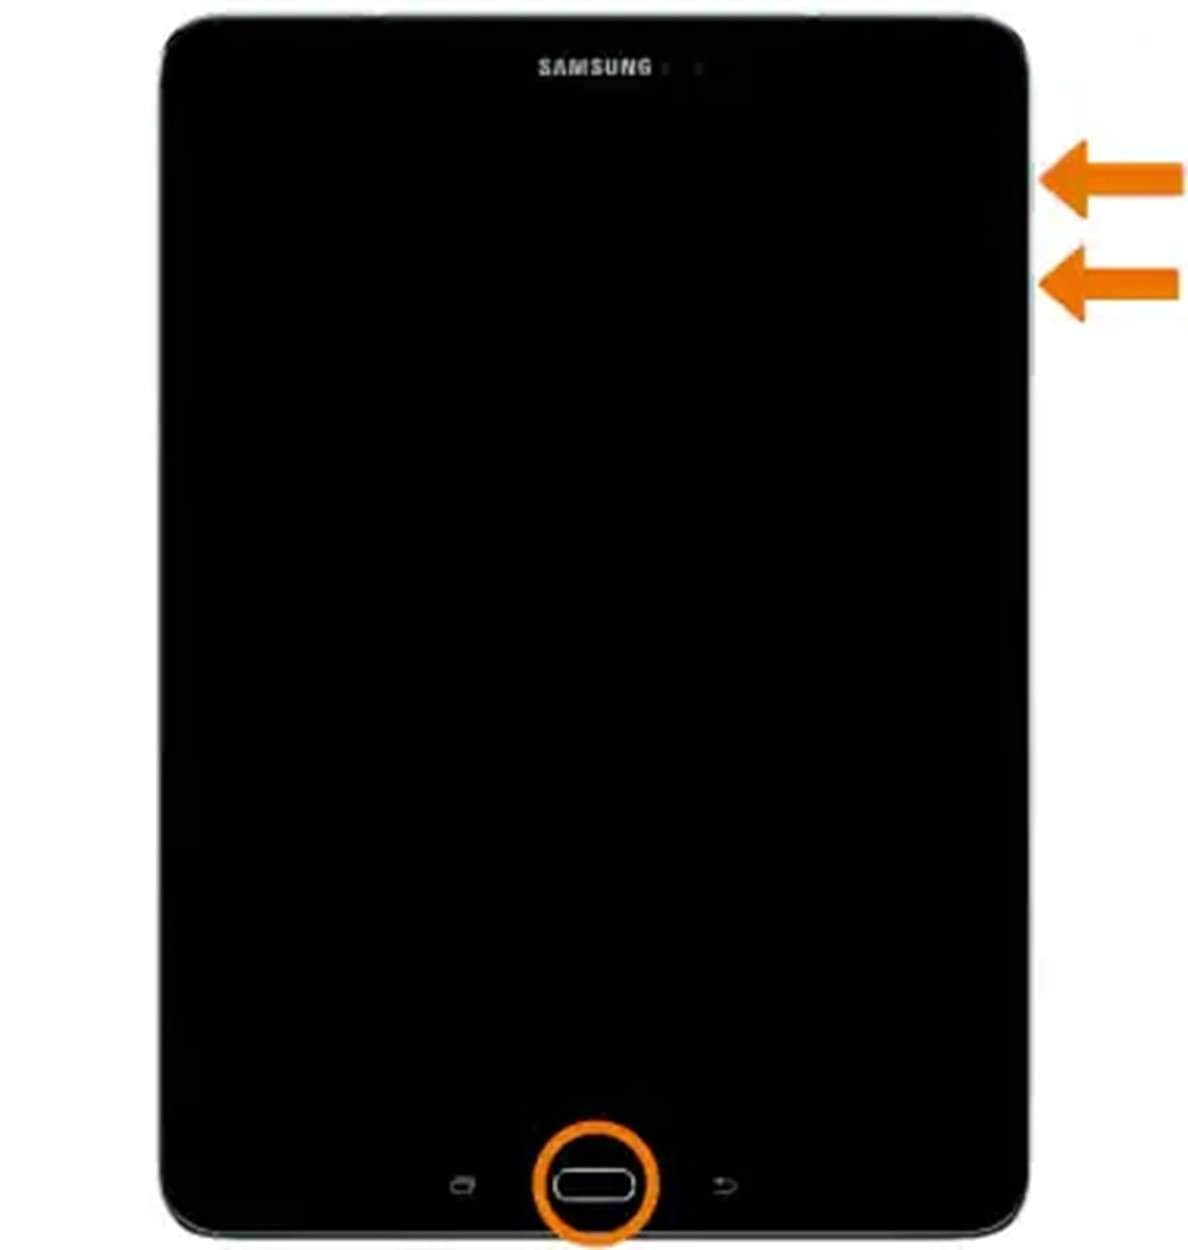
Step 1. Begin by powering off your tab and pressing the “Volume Up” and “Power” keys simultaneously. Once the Samsung logo shows up, release the “Power” button but hold the other one until the device transitions to Recovery Mode.
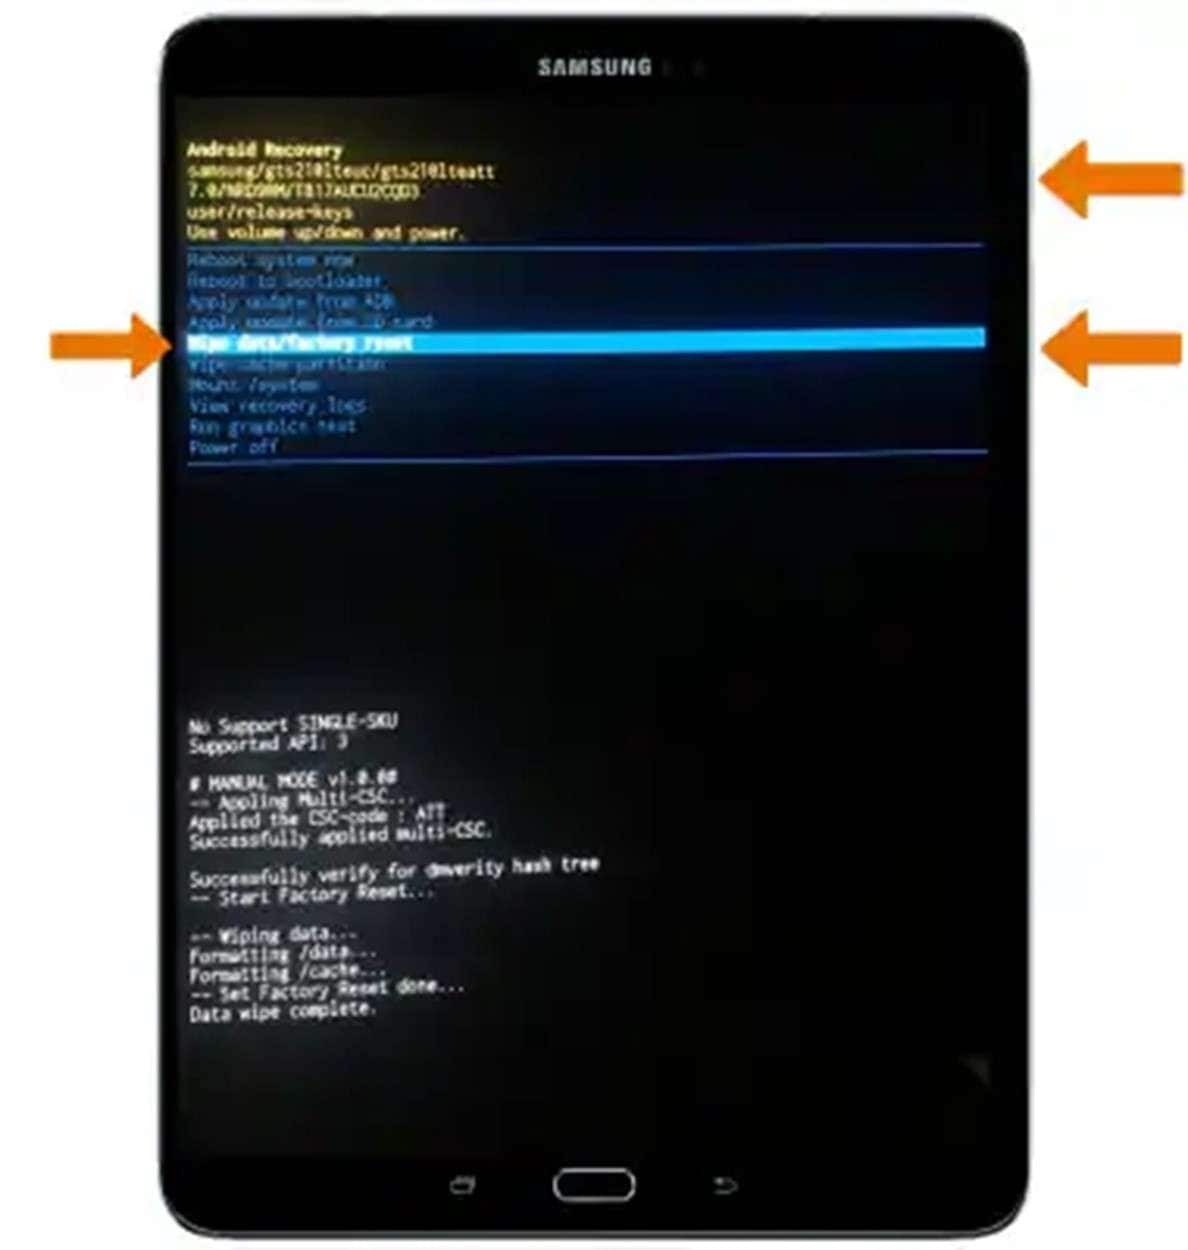
Step 2. Now, use the volume keys to navigate to “Wipe Data/Factory Reset” and select it with the “Power” button. On the following screen, choose “Factory data reset” to confirm and erase the tablet.
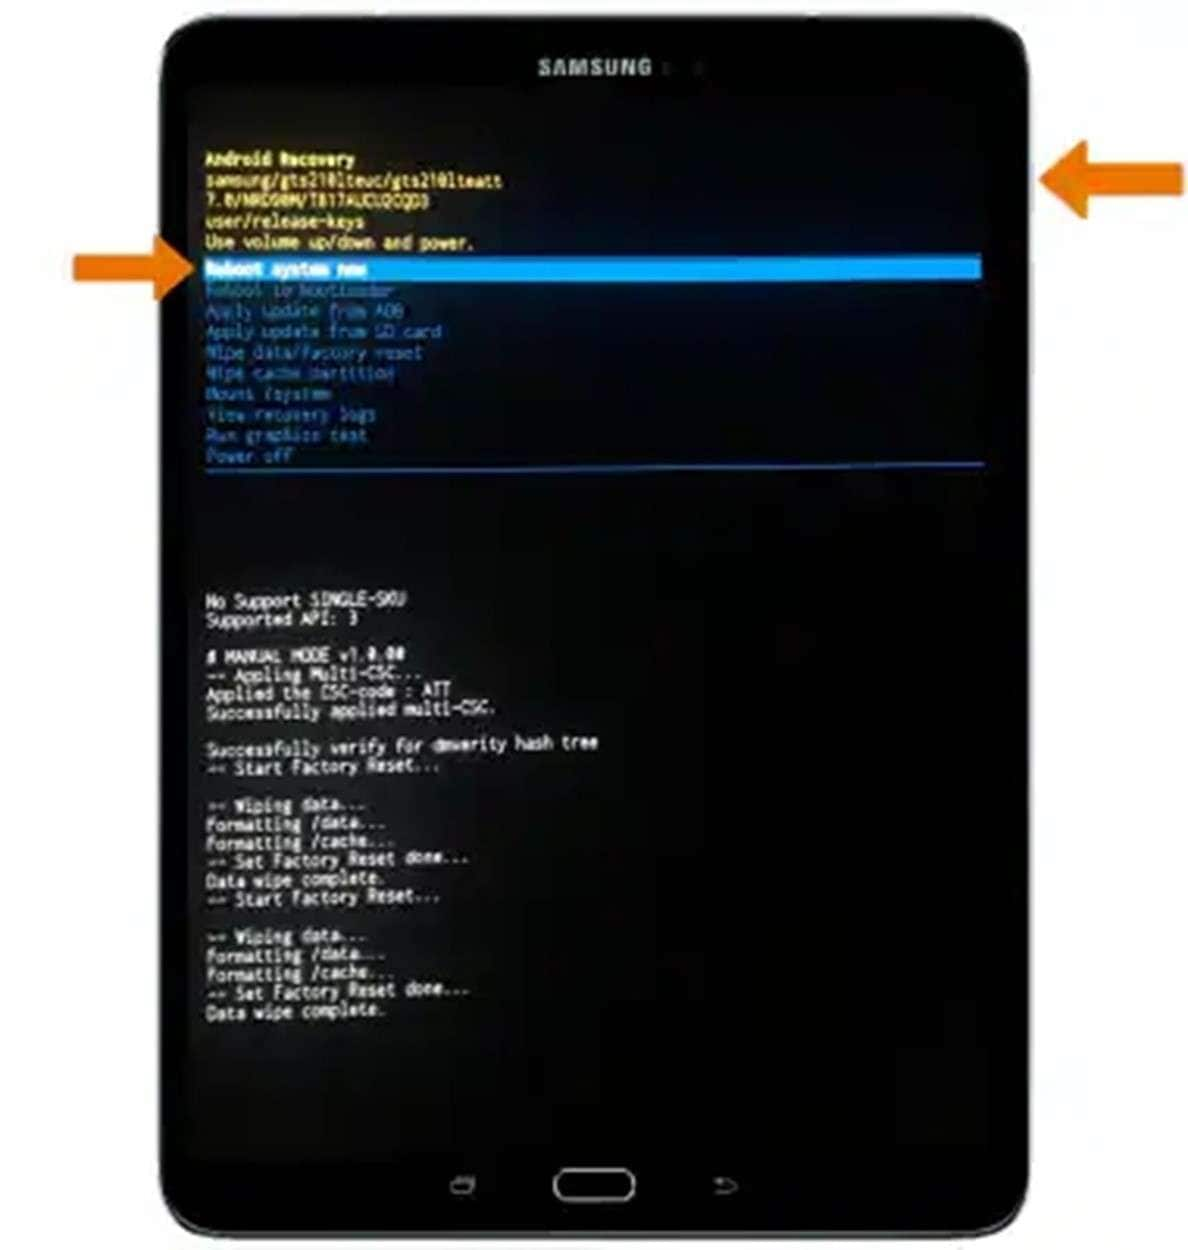
Step 3. After the factory reset has been completed, move to select the “Reboot System Now” option from the menu. Finally, use the “Power” key again to turn on the device and set it up from scratch.
Part 5. Pro Tip: How To Secure Samsung Galaxy Tab Data Before Hard or Factory Reset?
There is no doubt that this feature can prove helpful when used appropriately. The biggest concern when trying to factory reset a Samsung Galaxy tablet is data loss. To ensure your important content is not permanently erased, creating a reliable backup is essential. Doing so also makes restoring the data to a new or freshly reset device effortless. One such solution to achieve this is Wondershare Dr.Fone.
Its advanced features allow users to selectively back up data, including photos, videos, contacts, messages, and app data. This level of control ensures you only save what matters most, avoiding unnecessary clutter in your backup. Unlike manual methods, this software automates the backup process to reduce the chances of errors or overlooked files.
Another significant advantage is its effortless restoration feature. As it supports a wide range of Android devices, it becomes a versatile choice for users with multiple gadgets. By choosing this advanced app, you can confidently perform a hard reset, knowing that your data is safe and can be restored in just a few clicks.

Wondershare Dr.Fone
Secure Samsung Galaxy Tab Data Before Hard or Factory Reset.
- Selectively backup Android data to the computer with one click.
- Preview and restore the backup to any Android device.
- Supports 8000+ Android devices.
- There is no data lost during backup, export, or restoration.
Quick Tutorial: How To Secure Samsung Galaxy Tab Data via Dr.Fone
Using it provides a secure offline option to protect your data from cloud-related risks. Plus, it processes backups and restorations quickly to minimize downtime during transitions or resets. You can follow these steps for the successful execution of the hard reset tab operation:
Step 1. Decide Upon Content for Backup
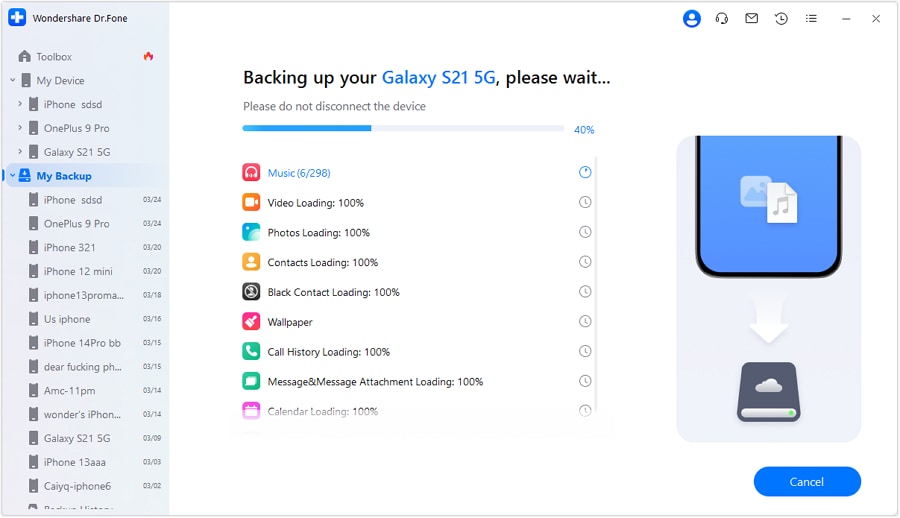
You begin by getting Dr.Fone on your system and launching it while attaching the Samsung tablet. Once the program detects the device, click “My Backup” from the left-hand panel. Doing so will take you to the screen with possible categories of data you can back up by pressing “Back Up Now.”

Step 2. Follow the On-Screen Instructions to Include Texts in the Backup
At this point, you will need to install the Dr.Fone Link app on your tab if you want to back up text messages. After getting the app, follow the provided instructions to set it up as the default messaging app. When the backup procedure is near its completion, you will need to set the original app as the default one again to back up your texts.
Step 3. Approach the Newly Stored Data on Your System
Once you have done that, the backup process of your device content will be complete in a few moments. Afterward, use the “Open in Folder” option to view the location of the newly created tab backup. Additionally, you can access all the previous backups of the same device via “View Backups.”

Part 6. Other Ways To Factory Reset Samsung Galaxy Tab
Along with the described standard methods, there are additional approaches you can consider for this task. These alternative methods provide flexibility and can be particularly helpful in unique scenarios. Detailed below are 4 other effective ways to factory reset the Galaxy tab, ensuring you have the right solution for any situation:
Way 1. Use Dr.Fone – Data Eraser (Android) To Remove Data Deeply From System Level
Conventional factory resets leave recoverable traces of personal content that can be retrieved using specialized tools. Hence, Dr.Fone - Data Eraser (Android) is an excellent option if you want to permanently remove device data. It ensures that everything is deleted at the system level, making it an ideal choice for those prioritizing security.
Doing so lets you sell or hand over the tab to someone without worrying about any risks. The software is designed to securely and thoroughly wipe all data when you want to format Samsung Galaxy Tab, leaving no chance of recovery. It removes personal information, such as login credentials, media files, and app data, to ensure your digital footprint is entirely cleared.
Unlike standard reset options, this method offers peace of mind for users concerned about the potential recovery of sensitive data. In addition to its robust security features, this tech marvel is incredibly user-centric. Plus, it supports all Samsung Galaxy Tab models to ensure compatibility and reliability. By using this tool, you can confidently reset your tablet, knowing that your personal data is completely removed.

Dr.Fone - Data Eraser (Android)
Fully Erase Everything on Samsung to Factory Reset Samsung Galaxy Tab
- Simple, click-through process.
- Wipe your Android completely and permanently.
- Erase photos, contacts, messages, call logs, and all private data.
- Supports all Android devices available in the market.
Elaborate Manual on Using Dr.Fone – Data Eraser (Android) To Erase Data Permanently
Its straightforward approach guides users step-by-step, eliminating the guesswork often associated with deep data erasure. Adhere to the following instructions to format the Samsung tab with permanent content removal:
Step 1. Start the Process of Deleting Data Using the Data Eraser Feature
Link your Galaxy tablet to your computer with the help of a secure connection and launch Dr.Fone – Data Eraser (Android). Then, approach the “Data Eraser” from the “Toolbox” tab and opt for “Android” to denote the platform type. On the subsequent screen, click “Start” and commence the operation by confirming your choice.

Step 2. Agree to Permanent Removal of Your Device Content
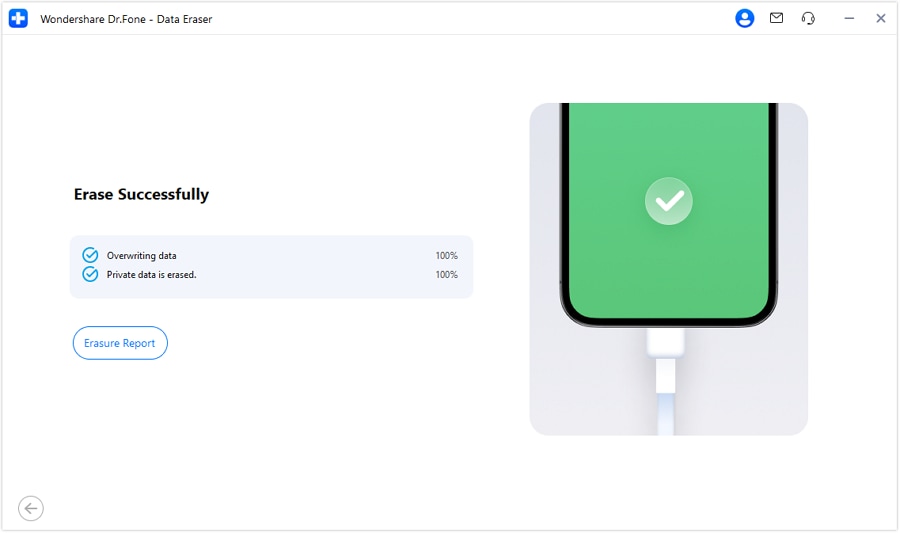
To confirm your intent, you will need to enter the provided code in the respective field and hit “Erase Now.” Doing so will result in the program methodically eliminating your tab content whose progress you can view on the screen. Once it is completed, tap the “Erasure Report” button to view a thorough report of this operation.
Way 2. Via Samsung Galaxy Tab Settings
The simplest and most straightforward way to erase your device is to employ the reset button on a Samsung tablet. This method requires no additional tools or technical expertise, making everything much easier. It’s a great option if your tablet is functioning normally and you have access to the settings menu. Use these steps to navigate the settings menu and initiate a factory reset:
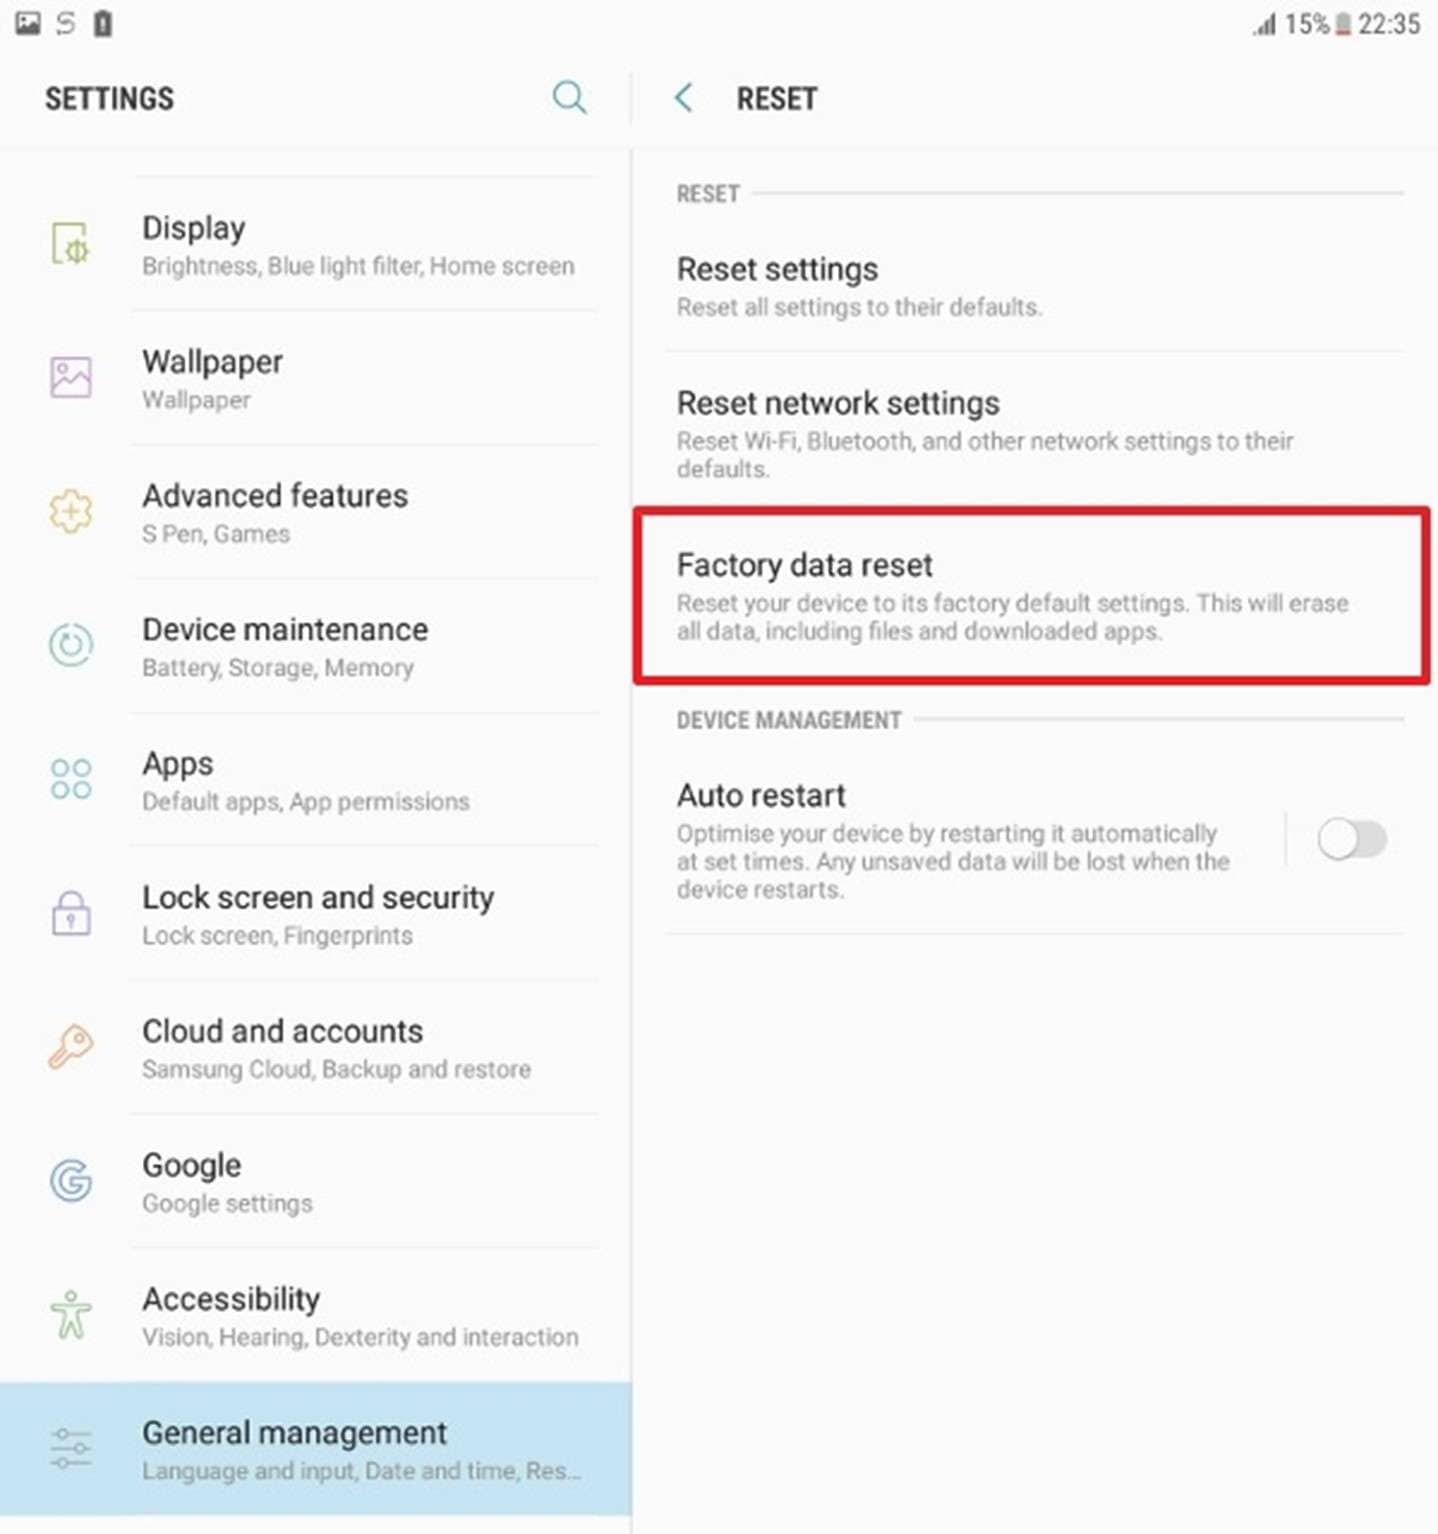
Step 1. Move to access the tab Settings and approach the “General Management” tab to opt for “Reset.” On the subsequent screen, scroll to the bottom and hit the “Factory Data Reset” option.
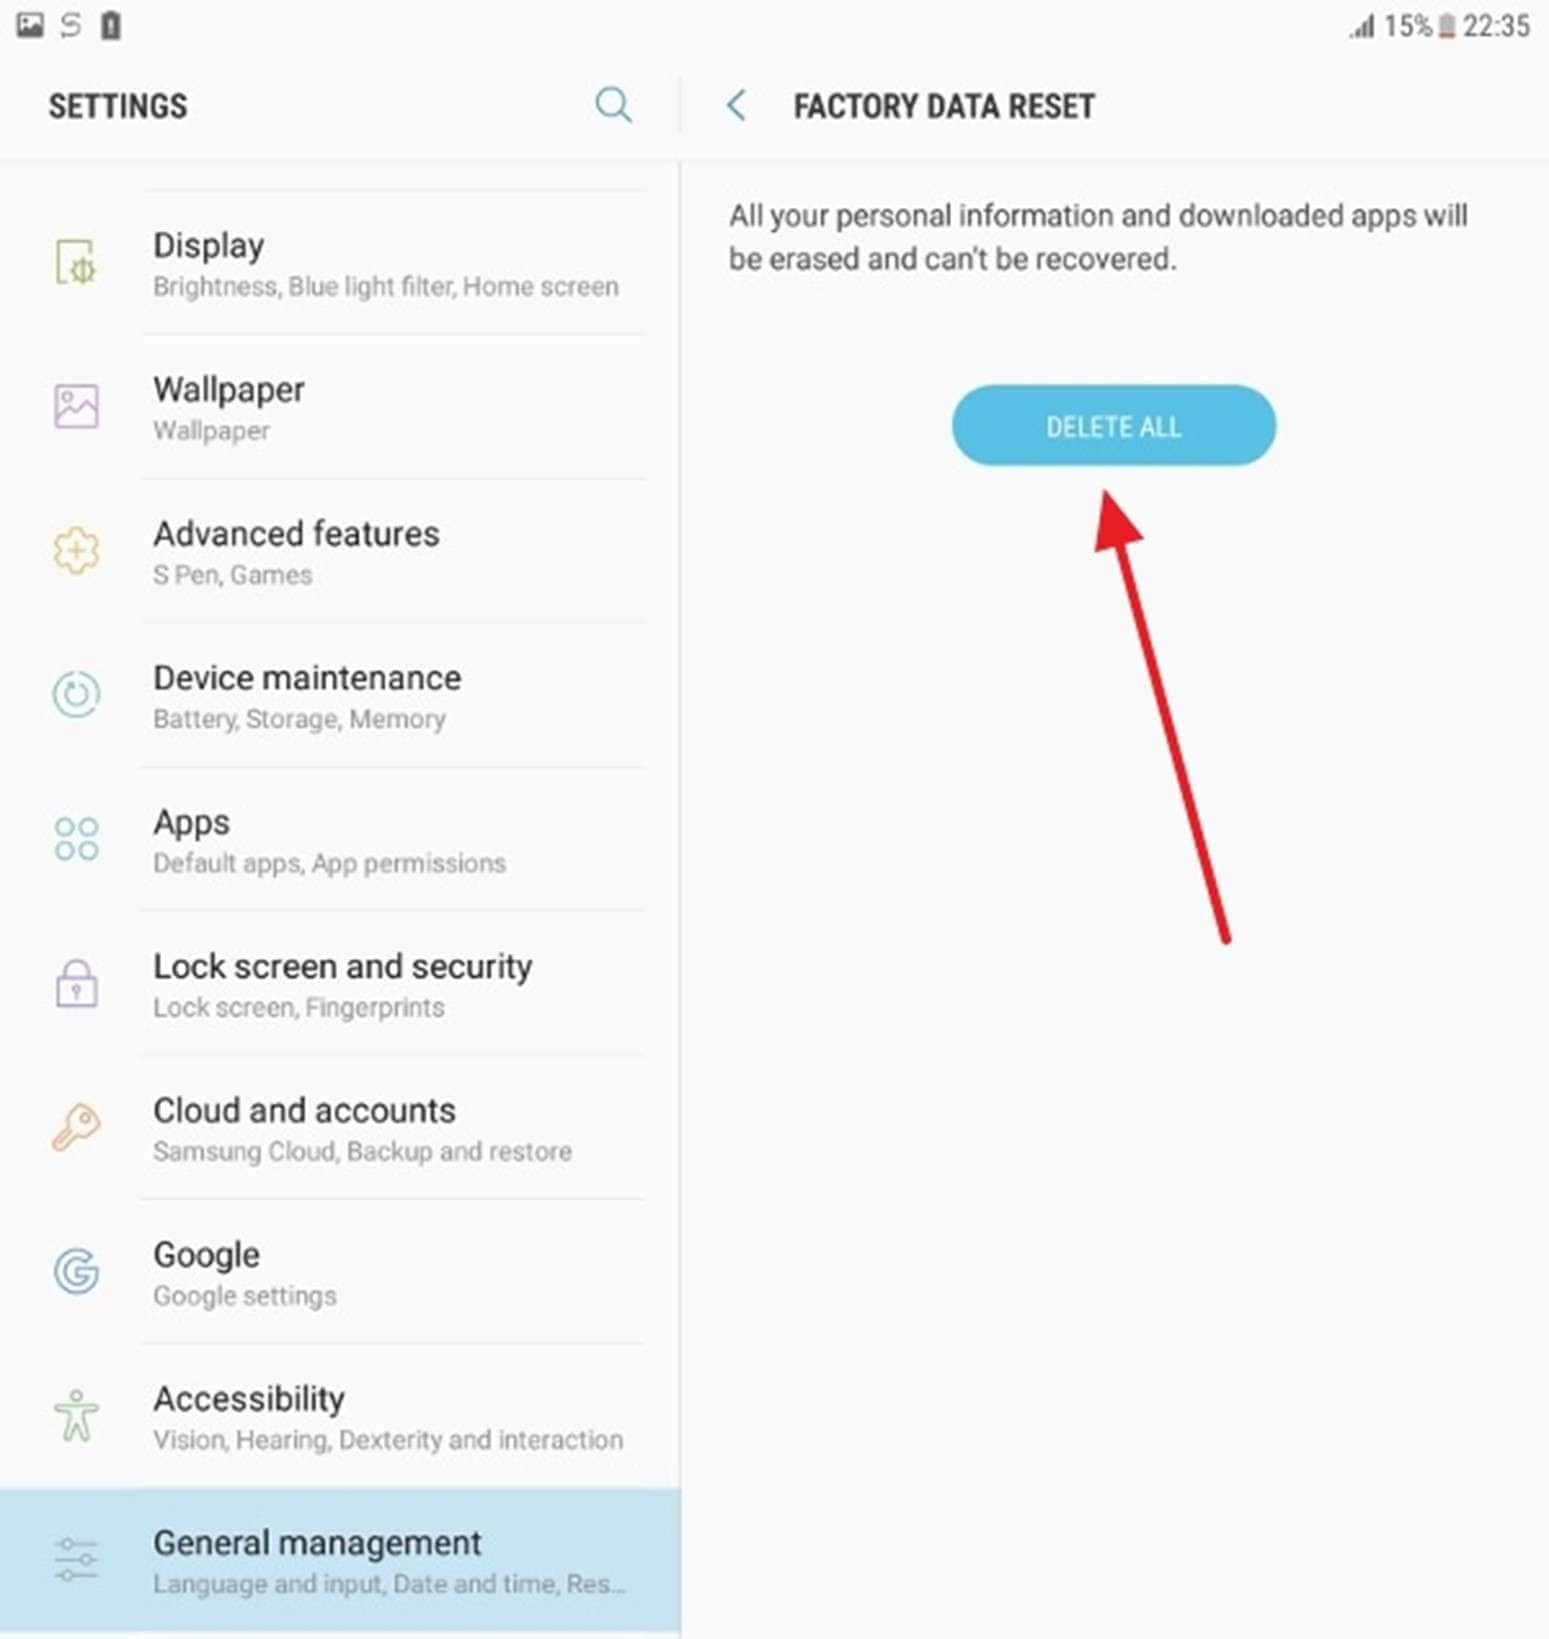
Step 2. After that, tap "Reset" and provide your tablet’s security password or PIN to confirm the action. When done, press the "Delete All" button to commerce the device, erasing operation.
Way 3. Utilize Google Find My Device
It offers a remote solution to perform the Samsung tab factory reset without password operation. This method is advantageous if your device is lost, stolen, or inaccessible. By utilizing your Google account linked to the tab, you can erase all data on your tablet and restore it to factory settings. The following is the process of using Google Find My Device to perform a remote device erasure:
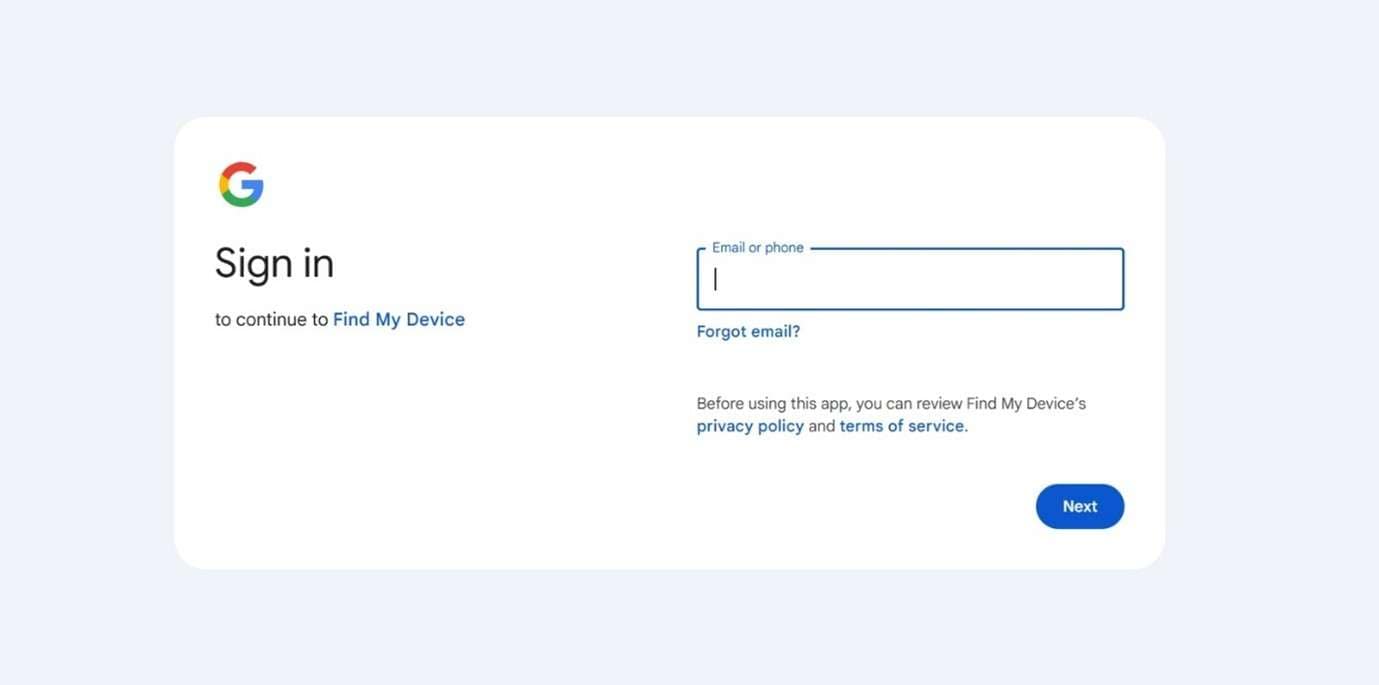
Step 1. Open a web browser on another device or computer and go to Google Find My Device to log in using the targeted account. Once signed in, the service will attempt to locate your tablet and provide a set of options.
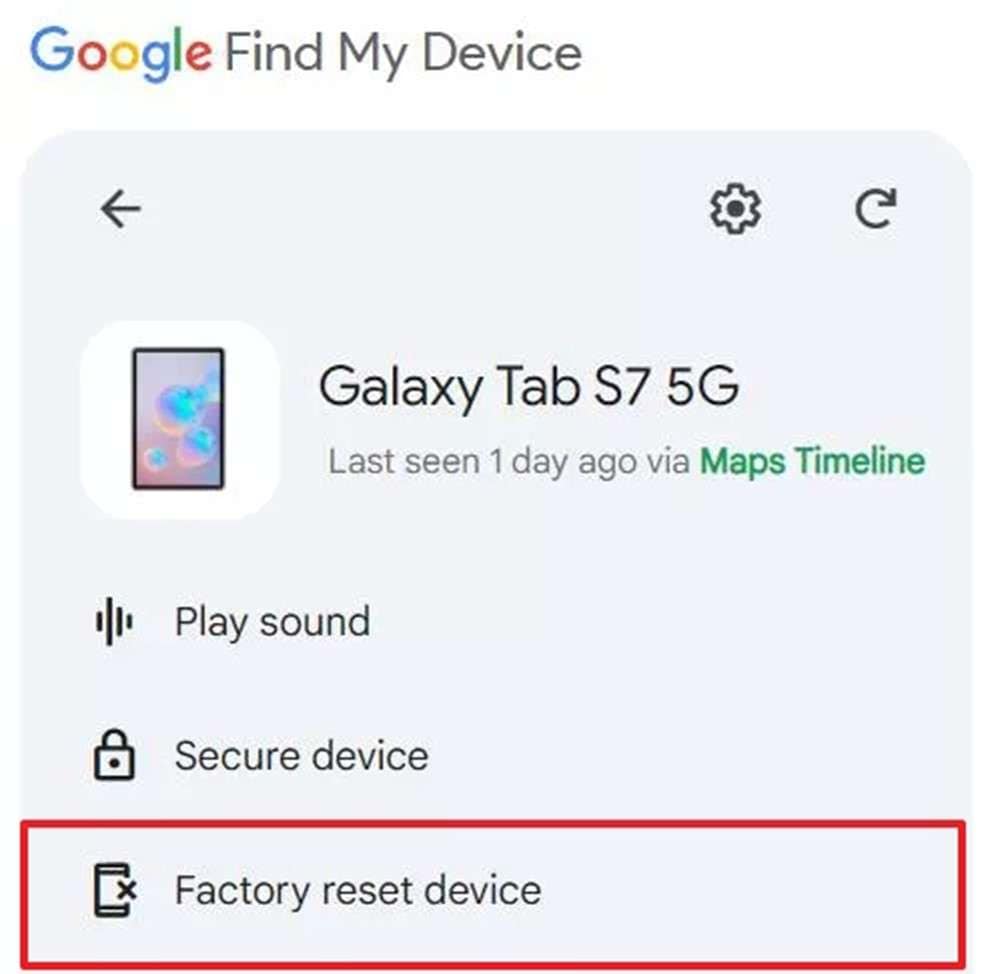
Step 2. From the left side of the screen, click “Factory Reset Device” and tap “Next” to proceed with the procedure. Lastly, confirm your intent to erase the tab by providing the account password and waiting for it to complete.
Way 4. Try Samsung Find My
Like Google’s Find My Device, this feature is designed specifically for Samsung users to manage their devices. Now known as SmartThings Find, it allows you to erase all data remotely to ensure your personal information remains secure. To use this method, your tab must be registered with your Samsung account and connected to the internet. These steps should make Samsung Galaxy tab factory reset without a password much easier:
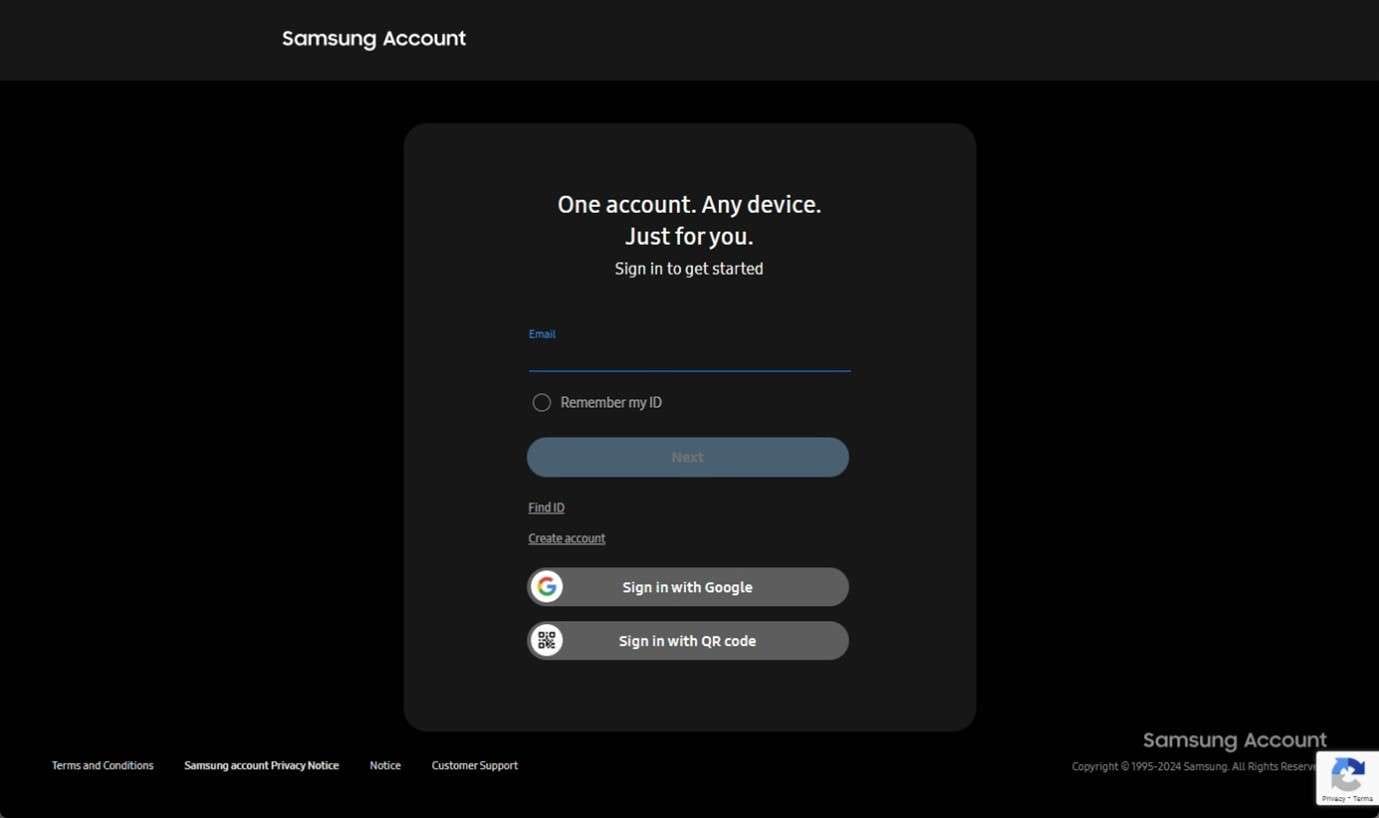
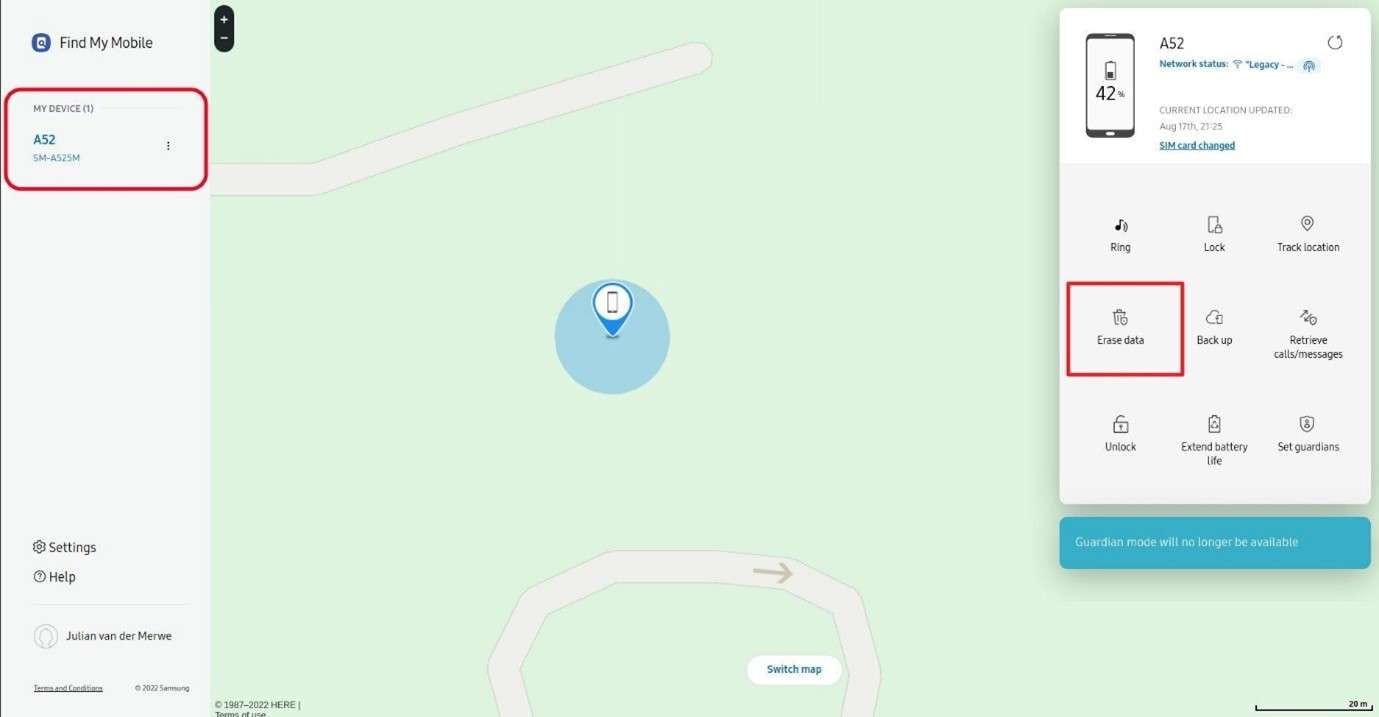
Step 1. Access a secure browser on a device with the internet and visit the SmartThings Find website. Now, log in using the Samsung account linked to the targeted tab and choose it from “My Devices” on the next page.
Step 2. Following that, click “Erase Data” from the available options on the right-hand device menu. You will need to enter the account password to confirm and commence the factory reset operation.
Conclusion
In summary, the Samsung Galaxy Tab reset process is an effective way to resolve issues and improve performance. You can choose a soft reset, hard reset, or alternative method, and each approach serves specific needs. For those seeking a secure and efficient solution, Wondershare Dr.Fone stand out.
They ensure your data is safely backed up and permanently erased, offering peace of mind and unmatched convenience. Choose it for a reliable experience to manage your Samsung Galaxy Tab with ease.
Dr.Fone Basic:
Better Control for Your Phone
Manage, transfer, back up, restore, and mirror your device
Samusng Unlock
- Samsung Code
- 1. Samsung Unlock Code List
- 2. Samsung Reset Code List
- 3. Samsung Secret Code List
- 4. Check Screen Using Secret Codes
- 5. Samsung Unlock Code Generators
- 6. Free Samsung Unlock Code
- 7. Free Samsung Unlock Code Generators
- 8. Samsung Galaxy S2 Unlock Code
- Samsung A Series FRP Bypass
- 1. Samsung A01 FRP Bypass
- 2. Samsung A01 Core FRP Bypass
- 3. Samsung A02/A02s FRP Bypass
- 4. Samsung A2 Core FRP Bypass
- 5. Samsung A10/A10s FRP Bypass
- 6. Samsung A11 FRP Bypass
- 7. Samsung A12 FRP Bypass
- 8. Samsung A20/A20S FRP Bypass
- 9. Samsung A30/30s FRP Bypass
- 10. Samsung A50 FRP Bypass
- 11. Samsung A51 FRP Bypass
- Samsung J Series FRP Bypass
- 1. Samsung J2 FRP Bypass
- 2. Samsung J4 FRP Bypass
- 3. Samsung J5 Prime FRP Bypass
- 4. Samsung J6 FRP Bypass
- 5. Samsung J7 FRP Bypass
- 6. Samsung J7 Prime FRP Bypass
- 7. Samsung J250 FRP Bypass
- Samsung FRP Bypass for Others
- 1. Samsung S7 FRP Bypass
- 2. Samsung S22 FRP Bypass
- 3. Samsung M01 FRP Bypass
- 4. Samsung M11 FRP Bypass
- 5. Samsung G532F FRP Bypass
- 6. Samsung G531F/G531H FRP Bypass
- 7. Samsung Google Verification Bypass
- 8. HushSMS APK FRP Unlock
- 9. Samsung Android 11 FRP Bypass
- 10. Samsung FRP Bypass Without PC
- 11. Bypass Samsung S24 FRP Lock
- Samsung Factory/Hard Reset
- 1. Reboot Samsung
- 2. Hard Reset Samsung
- 3. Reset Locked Samsung Phone
- 4. Reset Samsung Tablet
- 5. Reset Samsung Without Password
- 6. Reset Samsung Account Password
- 7. Reset Samsung Galaxy S3
- 8. Reset Samsung Galaxy S4
- 9. Reset Samsung Galaxy S5
- 10. Reset Samsung Galaxy S9/S10
- 11. Reset Samsung Galaxy J5/J7
- 12. Reset Samsung A12
- 13. Factory Reset Samsung Tablet
- Samsung S Series Screen Unlock
- 1. Samsung S2 Screen Unlock
- 2. Samsung S3 Screen Unlock
- 3. Samsung S4 Screen Unlock
- 4. Samsung S5 Screen Unlock
- 5. Samsung S6 Screen Unlock
- 6. Samsung S7/S8 Screen Unlock
- 7. Samsung S20 Screen Unlock
- 8. Samsung S22 Ultra Screen Unlock
- 9. Hack Samsung Galaxy S6/S5/S4/S3
- Samsung Screen Unlock Tools
- 1. Best Samsung Unlock Software
- 2. Forgot Samsung Galaxy Password
- 3. Bypass Samsung Lock Screen PIN
- 4. Unlock Samsung Galaxy Phones
- 5. Unlock Bootloader on Samsung
- 6. Unlock Home Screen Layout
- 7. Unlock Samsung Password
- 8. Remove Google Account
- 9. MDM Remove Tools
- 10. Samsung Knox Disable Guide
- 11. Samsung Reactivation Lock
- Samsung SIM Unlock
- ● Manage/transfer/recover data
- ● Unlock screen/activate/FRP lock
- ● Fix most iOS and Android issues
- Unlock Now Unlock Now Unlock Now


Daisy Raines
staff Editor