How To Find Hidden Photos On iPhone?[2026 Updated]
Dec 31, 2025 • Filed to: Screen Lock Removal • Proven solutions
Dr.Fone Basic:
Better Control for Your Phone
Manage, transfer, back up, restore, and mirror your device
Have you ever had a feeling that there might just be some photographs that are hiding and some that appear to be obscured by literal means? Users could have personal private photos secretly saved to their iPhones or iPads and create hidden albums, which are not quickly discernible. If you want to find the hidden pictures on your iPhone view the secret folders or just access those hidden albums with these methods, then you can find a way to unhide those personal pics you want.
Through finding the stolen images and the secretly stored album of anything you have an idea about, you'll learn multiple skills to find hidden photos on your iPhone whether you have the latest iPhone 11 or any previous version.
We will discuss how to check and where to find hidden photos and albums inside the Photos app, as well as some, but not all, tips and tricks on how to show your iPhone any hidden photos in a simple way.
Part 1: Why Can't I Find Hidden Pictures On My iPhone?

There could be several reasons why you're unable to find hidden pictures on your iPhone. Here are some potential explanations:
1. Hidden Album Not Enabled
- The first thing to check is whether the "Hidden" album feature is enabled on your iPhone.
- By default, this feature is turned off, which means that any photos or videos you hide will not be moved to a separate "Hidden" album.
- If the Hidden album is not enabled, you won't be able to find a dedicated space for your concealed media.
2. Accidental Hiding
- You may have accidentally hidden some photos or videos without realizing it.
- The iOS Photos app has a simple gesture for hiding images – just tap on the Share button and select "Hide."
- If you've inadvertently hidden pictures this way, they won't be visible in your main album views.
3.Storage Optimization
- If you have iCloud Photos enabled and have chosen to "Optimize iPhone Storage," your device may have offloaded full-resolution versions of your photos and videos to iCloud.
- In this case, you'll only see optimized, lower-resolution versions of your media on your iPhone.
- Hidden photos and videos could be among the offloaded files, making them harder to find on your device.
4. Deleted from Recently Deleted Album
- When you hide a photo or video on your iPhone, it's moved to the "Recently Deleted" album.
- However, if you've permanently deleted items from this album, those hidden files will be gone for good.
- Always double-check the Recently Deleted album before emptying it, as this is where your hidden media is initially stored.
5. Third-Party Photo Vault Apps
- Some users choose to store private or sensitive photos and videos in third-party "photo vault" apps, which are designed to keep media files hidden and secure.
- If you've used such an app and can't remember which one, or have forgotten the login credentials, you may be unable to access those hidden pictures.
6. Restrictions or Parental Controls
- If you've enabled restrictions or parental controls on your iPhone, access to certain photo albums or the ability to view hidden photos may have been restricted.
- Check your Screen Time settings to see if any photo-related restrictions are in place.
By understanding these potential reasons, you can troubleshoot more effectively and increase your chances of finding those elusive hidden pictures on your iPhone.
Part 2: How To Find Hidden Photos On iPhone/iPad/iPod?
2-1 Using The "Photo" App
The Photos app integrally is part of your iPhone or iPad, or iPod touch. Here’s how you can find hidden apps using this feature:
Step 1: First of all, open the Photos app and just go to the albums tab at the bottom of the app.
Step 2: Continue scrolling until you find a cover characterized as "Hidden." If an album is not on your list, it usually means that you have not hidden any photos.

Step 3: Hiding photos requires you to go to the main library, click "Select" at the upper right side, and then click to choose the photos or videos you'd like to be hidden.
Step 4: Subsequently, the Share button (the square with a triangle facing up) should be tapped with a hidden set as an option in the menu. That stuff now gets moved to the cover album.
When you already have such pictures in your Hidden album, you can view them by tapping on that specific section. Again, please note that the images stay covered by this folder until you manually unhide them.
2-2 Using The Setting
You can also get your hidden pictures from your personal iPhone or iPad through the system Settings app. Here's how:
Step 1: Turn on the Photos app and navigate to the Settings page by tapping on the Photos option.
Step 2: Just scroll down and then select the "Hidden Album'' which is located just below the "Photos'' section.
Step 3: Check if the option "Hidden Album" is active or not.

Step 4: With that, it will provide you with an additional menu item named "Hidden Album".
Pressing this button pre-installs the Hidden album into the Photos app for you to quickly reach any hidden image with just one touch.
Part 3: How To See/View Hidden Photos On iPhone - Using Dr.Fone?
While the built-in Photos app allows you to hide and unhide pictures, sometimes you need a more comprehensive tool to truly master your iPhone's photo library. Enter Wondershare Dr.Fone which puts you in complete control of your device's data, including photos.

Dr.Fone - Phone Manager (iOS)
See/View Hidden Photos On iPhone
- Transfer, manage, export/import your music, photos, videos, contacts, SMS, Apps, etc.
- Back up your music, photos, videos, contacts, SMS, Apps, etc., to the computer and restore them easily.
- Transfer music, photos, videos, contacts, messages, etc., from one smartphone to another.
- Transfer media files between iOS devices and iTunes.
- Fully compatible with the newest iOS system.
Here's how you can use Dr.Fone's handy features to view, organize, and manage your hidden photo collection with ease:
Step 1: Access the Photos Section
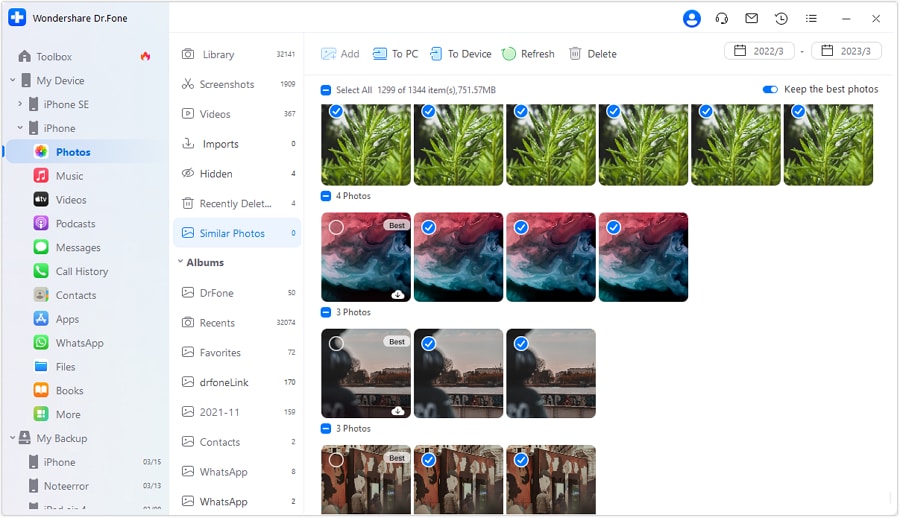
After launching Dr.Fone on your computer and connecting your iPhone, navigate to My Device > Photos from the left panel. You'll see your entire photo gallery neatly organized into albums and categories right on your screen.
Looking for those elusive hidden shots? No problem! Simply browse the album list until you find the "Hidden" album. All your privately stashed images and videos will be waiting for you there.
Step 2: Manage Photos with Dr.Fone
The real magic happens when you start using Dr.Fone's robust management capabilities. Let's say you want to find all those duplicate selfies cluttering your hidden album. Just use the "Similar Photos" filter to instantly display all nearly identical shots in one view.
From there, you can select any photos and export them to your computer, transfer them to another device like a new iPhone, or permanently delete them with a click. Decluttering has never been so easy!
Step 3: Preview and Search Photos
Double-click on any thumbnail to open and preview that photo in full quality. You can even search for specific images if you know the filename or other metadata.

With Dr.Fone's versatile toolset, your hidden photo vault is just an album away. Unhide those private moments, organize them, and keep your photo library looking spotless - all from one convenient software. Why settle for just peeking when you can take total control!
Part 4: How To Unhide Photos On iPhone/iPad/iPod?

We've all been there - you hide some photos on your iPhone thinking you'll never need them again, only to realize later that you actually do want to see them. Maybe it was that funny candid shot of your friend or those vacation pics you thought you'd never look at again. Whatever the reason, unhiding photos on your iOS device is a simple process.
Step 1: First things first, open up the Photos app on your iPhone or iPad. Now, at the bottom of the screen, you'll see different tabs like "Photos", "Albums" etc.
Step 2: Tap on "Albums." This will show you all the different albums and collections on your device.
Step 3: Scroll down until you see an album titled "Hidden" under the "Utilities" section. Go ahead and tap on that. This special album contains all the photos and videos you previously hid from view.
Step 4: Take a look through the hidden images. When you find one (or more) that you want to unhide and bring back into your main photo library, just tap to select it. You can tap multiple photos to unhide several at once.
Step 5: Once you've selected what you want, look at the top of the screen - you should see a few options like "Share," "Delete," etc. Tap the "More" button (it looks like three little dots in a circle).
Step 6: From the menu that pops up, simply tap "Unhide." That's it! The photos will be instantly restored to your photo library and other albums where they originally lived.
It's that easy to unhide pics on your iPhone or iPad. No more wondering where those missing photos went - the Hidden Album keeps them safely tucked away until you're ready to bring them back.
Part 5: Bonus Tip-How To Recover Hidden Photos On An iPhone?
While Apple's built-in methods for unhiding pictures can be limiting, there's a powerful tool that can help you recover any type of lost or hidden data from your iOS device - Dr.Fone.
Dr.Fone-Data Recovery(iOS) is a comprehensive data recovery suite for iOS that gives you a robust way to get back hidden photos, videos, messages, notes, and more. Even if you've deleted those personal snaps from the Hidden album, Dr.Fone can likely still dig them up. Here's how it works:
Dr.Fone - Data Recovery (iOS)
The Best Tool to Recover Hidden Photos On An iPhone!
- Designed with the technology of recovering files from iTunes, iCloud or phone directly.
- Capable of recovering data in serious scenarios like device damage, system crash or accidental deletion of files.
- Provision of exporting the files recovered from Dr.Fone - Data Recovery (iOS) to your computer easily.
- Users can speedily recover selective data types without having to load the entire chunk of data altogether.
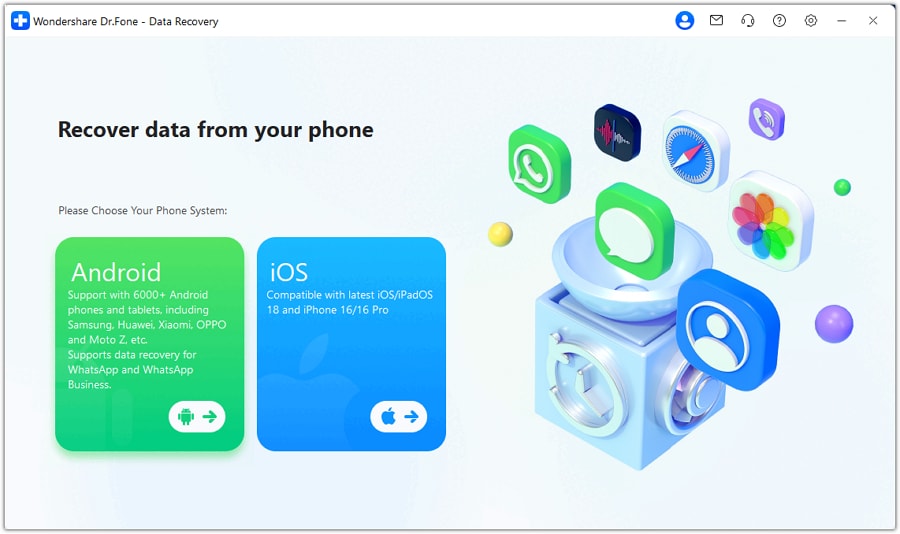
Step 1: First, download and install Dr.Fone on your computer. Once it's fired up, head over to the "Data Recovery" module from the toolkit. This handy recovery tool will walk you through retrieving your missing photos step-by-step.

Step 2: When prompted, select the option to "Recover from iOS Device" since you're trying to recover data directly from your iPhone's storage. Connect your iPhone to the computer using a USB cable so Dr.Fone can detect it.
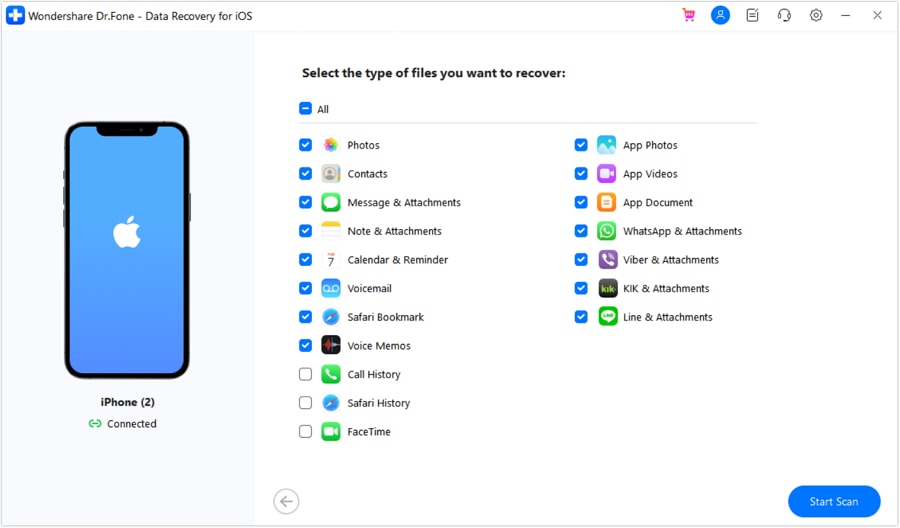
Step 3: On the next screen, you'll see a bunch of file types you can choose to scan for - make sure to tick the box for "Photos" and any other types of media you want to recover. Hit that "Start Scan" button and let Dr.Fone work its magic.
Step 4: Within minutes, the scan results will pop up showing any hidden and deleted photos lingering in your iPhone's storage. You can even preview the images before recovering them!
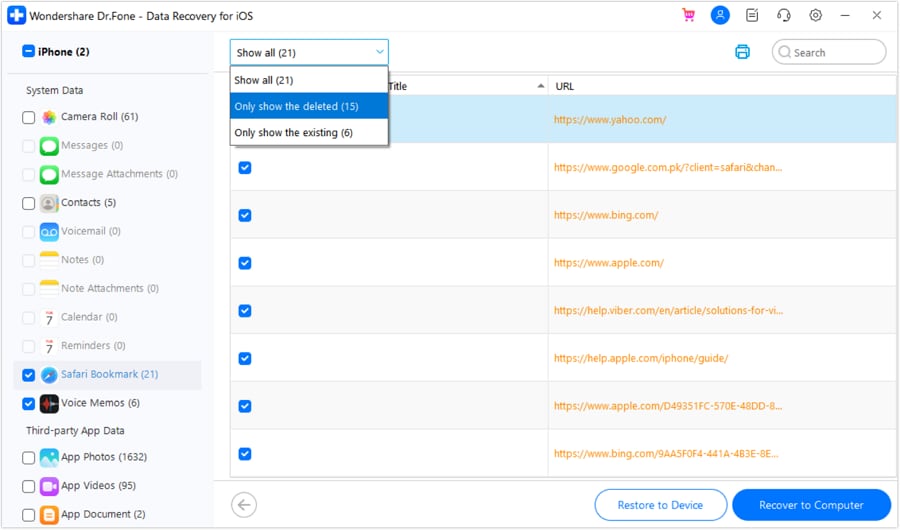
Step 5: Simply select the pics you want back and click "Recover to Computer" or "Recover to Device" depending on where you want those photos restored. It's that easy!
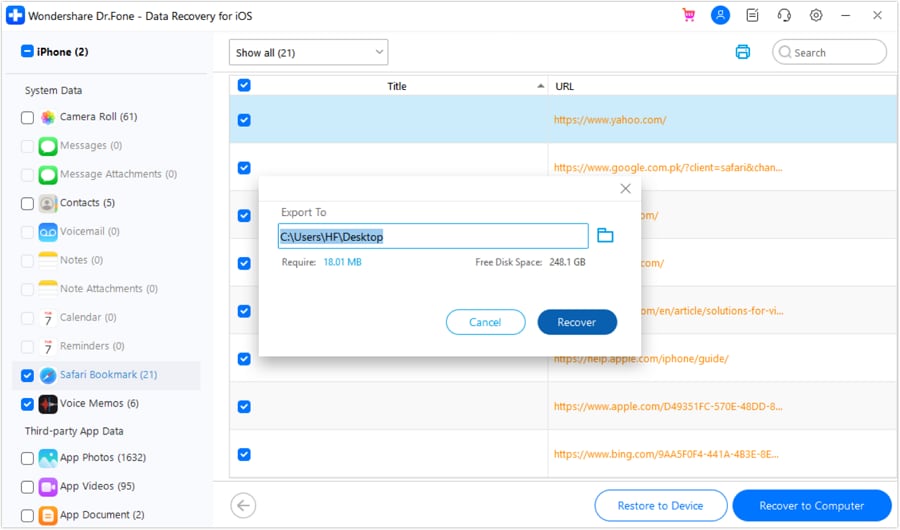
Whether you hide personal photos on purpose or simply misplaced some old vacation shots, Dr.Fone gives you a comprehensive way to get that visual data back safely and securely. Never lose those special snapshots again!
Conclusion
At the end of the day, having some private photos tucked away doesn't mean they need to stay buried forever. Whether you hid those snapshots intentionally or they just got lost in the shuffle, there are easy ways to dig them back up when you need them.
With just a few taps in the Photos app, you can unhide any pictures from that elusive Hidden album and bring them back into your main photo library. Or take things a step further by using Wondershare Dr.Fone to fully manage, search, recover, and even transfer those hidden photos on iPhone however you need.
Dr.Fone Basic:
Better Control for Your Phone
Manage, transfer, back up, restore, and mirror your device
iPhone Unlock
- Access Locked iPhone
- 1. Reset Locked iPhone Without iTunes
- 2. Erase Locked iPhone
- 3. Get Into Locked iPhone
- 4. Factory Reset Locked iPhone
- 5. Reset Locked iPhone
- 6. iPhone Is Disabled
- 7. Fix iPhone Unavailable Issue
- 8. Forgot Locked Notes Password
- 9. Unlock Total Wireless Phone
- 10. Review of doctorSIM Unlock
- iPhone Lock Screen
- 1. Lock Apps on iPhone
- 2. Bypass iPhone Passcode
- 3. Unlock Disabled iPhone Without PC
- 4. Disable One More Minute Screen Time
- 5. Unlock iPhone Passcode Screen
- 6. Reset iPhone Password
- 7. Auto Lock Never on iPhone
- 8. Remove Carrier Lock/SIM Restrictions
- 9. Get iMei Number on Locked iPhone
- 10. Add a New Face ID
- 11. iPhone Passcode Expired Pop-Up
- 12. Control Display Rotation
- 13. Fix iPhone is Disabled Connect to iTunes
- 14. Fix Turn Passcode Off Greyed Out
- 15. Get iPhone out of Demo Mode
- 16. Unlock Unresponsive Screen
- 17. iPhone Ask for Passcode After Reset
- Remove iCloud Lock
- 1. Unlock an iPhone 7 Plus iCloud
- 2. iOS 18 iCloud Unlock
- 3. iOS 26 iCloud Unlock
- 4. Crack iCloud-Locked iPhones to Sell
- 5. Jailbreak iCloud Locked iPhone
- 6. What To Do If You Bought A Locked iPhone?
- 7. Fix iPhone Unavailable No Erase Option
- 8. Find iCloud Email Address on Apple Device
- 9. Broque Ramdisk iCloud Bypass
- Unlock Apple ID
- 1. Remove Payment Method on iPhone
- 2. Create a New Apple ID Account
- 3. Change Apple ID on iPad
- 4. Change Your Apple ID Password
- 5. Apple ID Not Active
- 6. Fix Wrong Apple ID Issue on iPhone
- 7. Fix This Person Is Not Active
- 8. New iCloud Terms and Conditions
- 9. Fix Apple ID Account Unavailable
- 10.Find Apple ID by IMEI
- 11. Unlink 2 iPhones with the Same Apple ID
- 12. Reset Password at appleid.apple.com
- 13. App Store Keep Asking for Password
- 14. Find Apple ID Password No Reset
- 15. Trusted Devices List Not Available
- Remove SIM Lock
- 1. Unlock iPhone Using Unlock Chip
- 2. Unlock iPhone for Free
- 3. Unlock iPhone Online
- 4. Factory Unlock iPhone
- 5. SIM Unlock iPhone
- 6. Unlock AT&T iPhone
- 7. Unlock iPhone with IMEI Code
- 8. Unlock iPhone without SIM Card
- 9. Unlock Cricket iPhone
- 10. Unlock iPhone with/without SIM Card
- 11. Unlock T-Mobile iPhone
- 12. Unlock Verizon iPhone
- 13. iPhone IMEI Checker
- 14. Unlock Xfinity iPhone
- 15. Unlock iPhone From The Carrier
- 16. Turbo SIM iPhone
- 17. Get the Sprint Unlock Codes
- 18. Unlock a Sprint Phone
- 19. Fix When iPhone Says No Sim
- Unlock iPhone MDM
- 1. Remove MDM from iPhone
- 2. Remote Management on iPhone
- 3. MDM VS MAM
- 4. Top MDM Bypass Tools
- 5. IoT Device Management
- 6. Unified Endpoint Management
- 7. Enterprise Mobility Management
- 8. Top 10 Proxy Websites
- 9. Hindilinks4u Alternatives
- Unlock Screen Time Passcode
- 1. Reset Screen Time Passcode
- 2. Turn Off Screen Time without Passcode
- 3. Screen Time Passcode Not Working
- 4. Disable Parental Controls
- 5. Bypass Screen Time on iPhone Without Password
- 6. Delete Screen Time History on iPhone
- 7. Turn Off Downtime on iPhone
- 8. Download Age Restricted Videos
- MDM Unblock Games/Websites
- 1. Basketball Stars Game Unblocked
- 2. Play Getaway Shootout Unblocked
- 3. Play Build Now GG Unblocked
- 4. BitLife Unblocked
- 5. 10 Best Unblocked Anime Websites
- 6. Best Unblocked Game Websites
- 7. 1v1 LOL Unblocked
- 8. Get Poly Track Unblocked
- 9. Music Websites Unblocked
- 10. Spotify Unblocked
- 11. Snow Rider 3D Unblocked
- Unlock Apple Watch
- Unlock iPod Touch
- ● Manage/transfer/recover data
- ● Unlock screen/activate/FRP lock
- ● Fix most iOS and Android issues
- Unlock Now Unlock Now Unlock Now


James Davis
staff Editor