How To Trust a Computer When iPhone Is Disabled: 3 Proven Ways
Oct 13, 2025 • Filed to: Screen Lock Removal • Proven solutions
“There was a time when I forgot my iPhone passcode. And after several unsuccessful attempts to unlock it, my device became disabled. Then, as I try to connect my iPhone to a computer to fix it, I encounter another problem—my iPhone refuses to "trust" the computer.”
Does this situation sound familiar to you? We found that some people have problems with the “Trust this computer” message not showing up after connecting their devices to the computer. But here's the thing: even if your iPhone is disabled, it can still trust the computer.
So, how do you trust a computer when iPhone is disabled? Don't worry; we've got all the answers you need.
Part 1. What Is “Trust This Computer”? Can I Trust a New Computer on a Disabled iPhone?
When you connect your iPhone to a computer or another device for the first time, you will encounter a prompt asking if you trust the computer. This prompt is a security feature implemented by Apple to protect your device's data from unauthorized access.
This is because connecting your iPhone to another device means establishing a connection that allows data transfer between the two devices. The ""Trust This Computer"" prompt ensures that you are aware of this and explicitly grants permission for this data transfer to occur.
Tapping "Trust" on your iPhone means the iPhone trusts the computer, and it’s okay for the computer to access your iPhone's data. This trust remains unless you change it or erase your device.

Is it possible to trust a new computer on a disabled iPhone?
When an iPhone becomes disabled due to multiple incorrect passcode entries, establishing a trust connection with a new computer or device may become difficult. However, it’s still possible to trust a new computer on a disabled iPhone.
In the following sections, we will explore various methods of how to trust a computer when iPhone is disabled.
Part 2. Trust Computer on Disabled iPhone with Recovery Mode
For the first method, you can use Recovery Mode on iPhone to reset the device and establish trust with a computer. Apple usually recommends this solution when you are locked out of your iPhone.
While effective for most devices, it's crucial to note that it won't preserve any data. Moreover, you’ll need functional physical buttons, iTunes, and patience since you might need to attempt them a few times before successfully entering recovery mode.
How to trust a computer on iPhone with Recovery Mode:
Step 1: Connect your iPhone and launch iTunes on your computer.
Step 2: While your iPhone is connected to iTunes, perform a force restart:
- For iPhone 8/8 Plus or iPhone X and later: Press and release the Volume Up button, then press and quickly release the Volume Down button. After that, long-press the Side button until the recovery mode screen appears.
- For iPhone 7 or 7 Plus: Long-press both the Side button and Volume Down simultaneously until the recovery mode screen appears.
- For iPhone 6S Plus or earlier: Long-press both the Home and Side buttons together until the recovery mode screen appears.

Step 3: Select "Restore," and iTunes will proceed to wipe your iPhone and download the latest version of iOS onto it. Wait for the process to complete before setting up your iPhone.

Once the restoration is finished, you can set up the disabled iPhone as a new device and easily establish trust with the connected computer.
Part 3. Trust Computer on Disabled iPhone with Find My iPhone
As you may be aware, the Find My iPhone feature was initially created to track lost iOS devices and allows users to remotely erase the device's content and settings if it's lost or stolen. However, not many people know that you can also use Find My iPhone to manually reset your iPhone and remove the disabled mode. Then, you can try to trust the device again.
But before you use it, make sure the following conditions are met:
- The disabled iPhone is Image nameed with an Apple ID
- The disabled iPhone has the "Find My iPhone" feature activated
- The disabled iPhone is connected to the internet
- You have the Apple ID credentials, including the password and security questions
Here's a step-by-step guide on how to reset your iPhone and bypass trust this computer using Find My iPhone:
Step 1: Access icloud.com and go to the "Find My" section on the website. Then, select "Locate your device on iCloud.com."
Step 2: Sign in using the same Apple ID Image nameed to your disabled device.

Step 3: Select the "Find iPhone" option. This feature not only helps locate the device, regardless of its disabled status but also allows you to erase it.
Step 4: Choose "Erase this iPhone" on the card representing your disabled device. Make sure to select the correct device if multiple devices are associated with the Apple ID.

Step 5: After clicking "Erase," a confirmation window will appear. Proceed by clicking "Erase" and providing the Apple ID password along with the answers to the security questions. This step will initiate the erasing process for the disabled device.
Step 6: Once the iPhone is erased using this method, it can be set up as a new device. You can then establish a new passcode and successfully trust your computer when connecting it.
Now, if you don’t remember your Apple ID password, we recommend using Wondershare Dr.Fone – Screen Unlock, which is simpler and requires less of your information.
Part 4. Trust Computer on Disabled iPhone with Dr.Fone Screen Unlock (iOS)
Forgetting the passcode on your iOS device happens to many of us. When this occurs, it might seem like your device is unusable. But there are options available to unlock iPhones through a computer with Wondershare Dr.Fone - Screen Unlock (iOS).
Dr.Fone – Screen Unlock can help bypass the passcode on your disabled iPhone without losing your data. Then, you can trust the new computer without problems. You won’t have to worry about your iPhone being disabled again.

Dr.Fone - Screen Unlock (iOS)
Bypass the Passcode on Your Disabled iPhone.
- Simple, click-through, process.
- Unlock screen passwords from all iPhone and iPad.
- No tech knowledge is required, everybody can handle it.
- Supports the latest iOS version fully!

To bypass iPhone lock screen without a passcode with Dr.Fone – Screen Unlock (iOS) tool, you can follow these steps:
Step 1: Launch Dr.Fone – Screen Unlock Tool
Install Wondershare Dr.Fone on your computer and connect your iPhone. Then, navigate to Toolbox > Screen Unlock > iOS to initiate the tool in a separate window.

Step 2: Select the Unlock iOS Option
Choose "Unlock iOS Screen" and proceed by clicking "Start" in the following window.

Step 3: Entering Recovery Mode
Follow the provided instructions from Dr.Fone to place your iOS device into either Recovery Mode or DFU Mode, depending on your device model.

Step 4: Verifying Device Details
Dr.Fone will automatically identify your device model. You only need to verify and adjust the model and system version if required. Then, click "Start" to initiate the unlocking process for your iPhone's screen.

Step 5: Downloading iOS Firmware
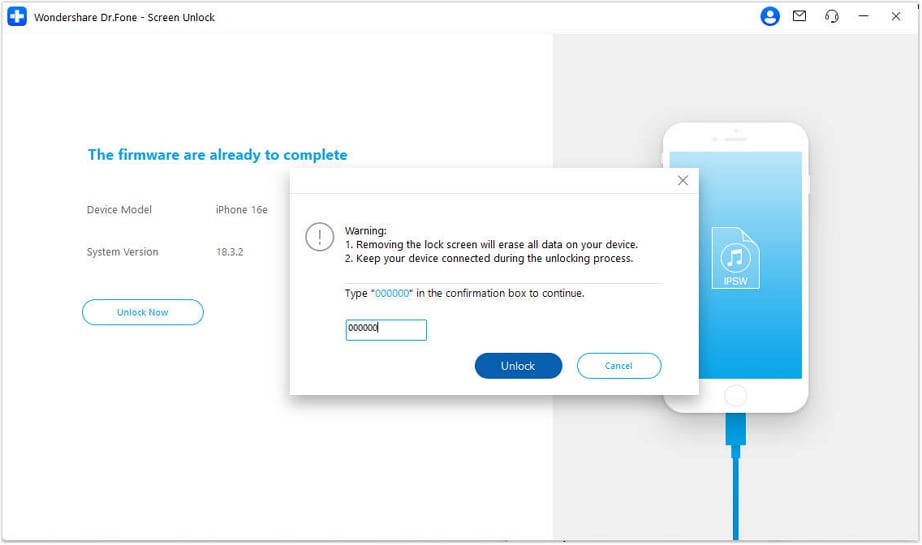
Keep an eye on the progress of the iOS firmware download. Once the firmware is downloaded, click "Unlock Now."

Step 6: Confirming the Unlocking Process
Input the provided code on the screen to confirm the unlocking process. Ensure that your iPhone remains connected throughout to prevent any potential issues. After the unlocking process is finished, click "Done."

Now that you've successfully bypassed your iPhone lock screen, you can try again connecting your iPhone to your computer. Then, see if you can “trust” the computer to your iPhone.
Conclusion
Encountering issues with a disabled iPhone, coupled with difficulties in establishing trust with a computer, can be frustrating. But don't worry; we have outlined the solutions to these problems.
One way to fix this is by using Recovery Mode. It erases your iPhone data but helps establish trust with your computer again. But if you prefer not to lose any data, you can try Dr.Fone - Screen Unlock (iOS). It helps you bypass the passcode on your disabled iPhone and allows it to reconnect to your computer with ease.
FAQs
iPhone Unlock
- Access Locked iPhone
- 1. Reset Locked iPhone Without iTunes
- 2. Erase Locked iPhone
- 3. Get Into Locked iPhone
- 4. Factory Reset Locked iPhone
- 5. Reset Locked iPhone
- 6. iPhone Is Disabled
- 7. Fix iPhone Unavailable Issue
- 8. Forgot Locked Notes Password
- 9. Unlock Total Wireless Phone
- 10. Review of doctorSIM Unlock
- iPhone Lock Screen
- 1. Lock Apps on iPhone
- 2. Bypass iPhone Passcode
- 3. Unlock Disabled iPhone Without PC
- 4. Disable One More Minute Screen Time
- 5. Unlock iPhone Passcode Screen
- 6. Reset iPhone Password
- 7. Auto Lock Never on iPhone
- 8. Remove Carrier Lock/SIM Restrictions
- 9. Get iMei Number on Locked iPhone
- 10. Add a New Face ID
- 11. iPhone Passcode Expired Pop-Up
- 12. Control Display Rotation
- 13. Fix iPhone is Disabled Connect to iTunes
- 14. Fix Turn Passcode Off Greyed Out
- 15. Get iPhone out of Demo Mode
- 16. Unlock Unresponsive Screen
- 17. iPhone Ask for Passcode After Reset
- Remove iCloud Lock
- 1. Unlock an iPhone 7 Plus iCloud
- 2. iOS 18 iCloud Unlock
- 3. iOS 26 iCloud Unlock
- 4. Crack iCloud-Locked iPhones to Sell
- 5. Jailbreak iCloud Locked iPhone
- 6. What To Do If You Bought A Locked iPhone?
- 7. Fix iPhone Unavailable No Erase Option
- 8. Find iCloud Email Address on Apple Device
- 9. Broque Ramdisk iCloud Bypass
- Unlock Apple ID
- 1. Remove Payment Method on iPhone
- 2. Create a New Apple ID Account
- 3. Change Apple ID on iPad
- 4. Change Your Apple ID Password
- 5. Apple ID Not Active
- 6. Fix Wrong Apple ID Issue on iPhone
- 7. Fix This Person Is Not Active
- 8. New iCloud Terms and Conditions
- 9. Fix Apple ID Account Unavailable
- 10.Find Apple ID by IMEI
- 11. Unlink 2 iPhones with the Same Apple ID
- 12. Reset Password at appleid.apple.com
- 13. App Store Keep Asking for Password
- 14. Find Apple ID Password No Reset
- 15. Trusted Devices List Not Available
- Remove SIM Lock
- 1. Unlock iPhone Using Unlock Chip
- 2. Unlock iPhone for Free
- 3. Unlock iPhone Online
- 4. Factory Unlock iPhone
- 5. SIM Unlock iPhone
- 6. Unlock AT&T iPhone
- 7. Unlock iPhone with IMEI Code
- 8. Unlock iPhone without SIM Card
- 9. Unlock Cricket iPhone
- 10. Unlock iPhone with/without SIM Card
- 11. Unlock T-Mobile iPhone
- 12. Unlock Verizon iPhone
- 13. iPhone IMEI Checker
- 14. Unlock Xfinity iPhone
- 15. Unlock iPhone From The Carrier
- 16. Turbo SIM iPhone
- 17. Get the Sprint Unlock Codes
- 18. Unlock a Sprint Phone
- 19. Fix When iPhone Says No Sim
- Unlock iPhone MDM
- 1. Remove MDM from iPhone
- 2. Remote Management on iPhone
- 3. MDM VS MAM
- 4. Top MDM Bypass Tools
- 5. IoT Device Management
- 6. Unified Endpoint Management
- 7. Enterprise Mobility Management
- 8. Top 10 Proxy Websites
- 9. Hindilinks4u Alternatives
- Unlock Screen Time Passcode
- 1. Reset Screen Time Passcode
- 2. Turn Off Screen Time without Passcode
- 3. Screen Time Passcode Not Working
- 4. Disable Parental Controls
- 5. Bypass Screen Time on iPhone Without Password
- 6. Delete Screen Time History on iPhone
- 7. Turn Off Downtime on iPhone
- 8. Download Age Restricted Videos
- MDM Unblock Games/Websites
- 1. Basketball Stars Game Unblocked
- 2. Play Getaway Shootout Unblocked
- 3. Play Build Now GG Unblocked
- 4. BitLife Unblocked
- 5. 10 Best Unblocked Anime Websites
- 6. Best Unblocked Game Websites
- 7. 1v1 LOL Unblocked
- 8. Get Poly Track Unblocked
- 9. Music Websites Unblocked
- 10. Spotify Unblocked
- 11. Snow Rider 3D Unblocked
- Unlock Apple Watch
- Unlock iPod Touch
- ● Manage/transfer/recover data
- ● Unlock screen/activate/FRP lock
- ● Fix most iOS and Android issues
- Unlock Now Unlock Now Unlock Now


James Davis
staff Editor