100% Security Verified | No Subscription Required | No Malware

 :
: 
 ChatGPT
 Perplexity
 Gemini
 Claude
 Grok
Grok
I recently factory reset my Redmi Note, but now I'm stuck on the Google account verification screen because I forgot my password. How can I bypass the FRP lock on my Xiaomi device?
Xiaomi User Forum, 2026

Google's Factory Reset Protection (FRP) is a critical security feature designed to prevent unauthorized access to your Xiaomi, Redmi, or Poco phone after a factory reset. While effective at protecting your data, it can become a major obstacle if you lose your Google credentials. In 2026, with the evolution of MIUI and HyperOS, regaining access requires specific, updated techniques.
This comprehensive guide explores the most effective tools and manual strategies to bypass Google account verification on Redmi, Xiaomi, and Poco devices, ensuring you can return to your digital life without stress.
In this article
Part 1. Essential Preparation for Xiaomi FRP Bypass
Before you begin the Xiaomi FRP bypass process, proper preparation is vital to avoid soft-bricking your device or encountering errors mid-way. Follow these prerequisites:
- Battery Levels: Ensure your device is charged to at least 50%. A sudden shutdown during the security bypass can cause system corruption.
- Stable Connectivity: A strong Wi-Fi connection is mandatory for downloading drivers or accessing cloud-based services.
- SIM Status: Keep a working SIM card inserted. Some manual bypass methods rely on cellular network triggers.
- Data Awareness: Remember that a successful bypass usually involves a full factory reset. Back up your data beforehand if possible to avoid permanent loss.


Part 2. How to Bypass FRP on Xiaomi/Redmi/Poco With Professional Tools
In 2026, the most reliable way to bypass Google FRP lock on Xiaomi, Redmi, and Poco phones is through specialized software. These tools are designed to navigate complex security patches that manual methods might fail to crack.
2-1. Using Wondershare Dr.Fone (Recommended)
Dr.Fone - Screen Unlock (Android) remains the gold standard for removing FRP locks. It provides a guided, click-through interface that bypasses Google verification on brands like Xiaomi, Redmi, Samsung, and OPPO without requiring deep technical knowledge.
 Unlock Android phone in seconds.
- Remove PIN, pattern, password, fingerprint.
- Bypass Google FRP lock easily.
- Works on all Android brands & models.
- No tech skills required – user-friendly.
Step 1 Initiate the Unlock
Open Wondershare Dr.Fone on your PC and navigate to Toolbox > Screen Unlock > Android.
Step 2 Target FRP Lock
Select the option Remove Google FRP Lock to begin the specialized bypass procedure.

Step 3 Select Brand
Choose Xiaomi. Dr.Fone will automatically identify and download the necessary drivers for your device.

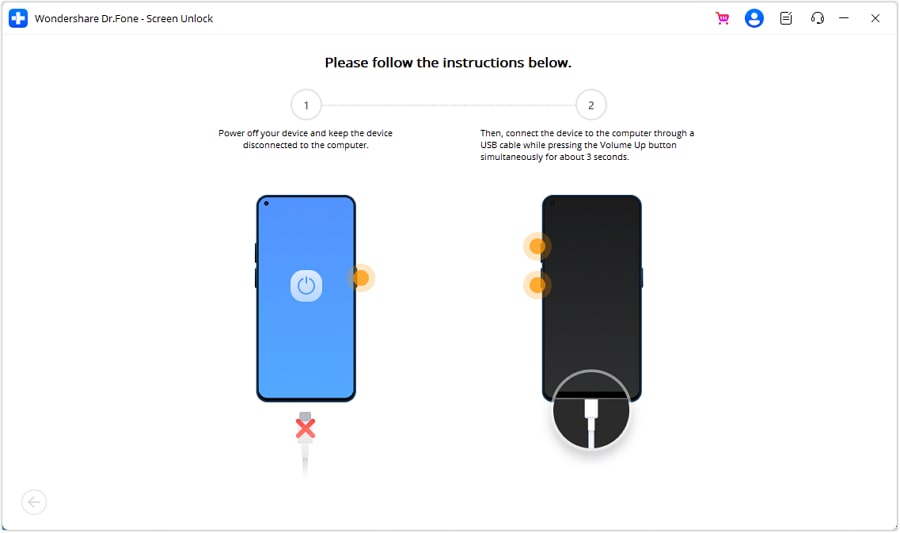
Step 4 Connect and Finish
Power off your phone and connect it to the PC. Hold the Volume Up and Down buttons simultaneously for 3 seconds during connection. Once the tool completes the process, your device is ready.
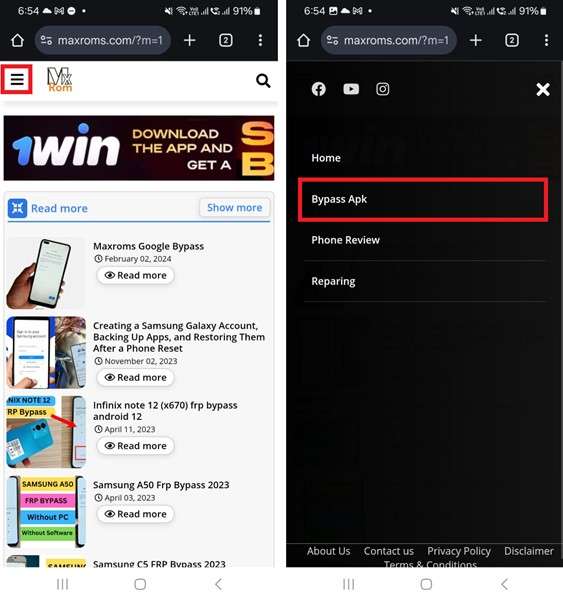
2-2. Using QuickShortcutMaker APK
This is a popular method for users who prefer an FRP bypass apk approach without a PC. It exploits gaps in the network settings to access the device's developer options.
- Step 1: Access network settings and tap "Add Network." Type "www.youtube.com" in the SSID field. Select the text and tap the "Chain" icon to force open YouTube.
- Step 2: From YouTube, navigate to the browser (Chrome). Search for and install QuickShortcutMaker APK.
- Step 3: Open the app, go to Settings, and tap "Try." Under "About Phone," tap the MIUI version 7 times to enable Developer Mode.
- Step 4: Enable OEM Unlocking in Additional Settings and perform a factory reset from within the menu to permanently remove the lock.
2-3. Using Apex Launcher Strategy
Apex Launcher can act as a bridge to reach the core settings of a locked Xiaomi device. By substituting the default launcher, you can gain temporary access to system controls.
Step 1 Browser Access
Use the YouTube link trick via Messaging to reach the Chrome browser as detailed in previous methods.
Step 2 Install Launcher
Download and install the latest version of Apex Launcher. You will need to grant permission for "Unknown Sources" during this step.
Step 3 System Override
Once inside Apex Launcher, go to Settings > Additional Settings > Developer Options. Enable OEM Unlock and perform a system-level Factory Reset to clear the Google account requirement.
2-4. FRP Bypass APK Method
Direct installation of an FRP bypass tool via OTG is another effective route for older Redmi 5A models and similar devices.

- OTG Connection: Save the FRP Bypass APK on a flash drive and connect it via OTG cable.
- Installation: The File Explorer should open automatically. Install the APK and follow the prompts to override the Google login screen.
Part 3. How to Bypass FRP on Xiaomi/Redmi/Poco Without Tools
If you prefer a manual approach to Redmi FRP bypass without downloading third-party software, follow this sequence. This method utilizes the built-in Accessibility Menu and system service disabling.
Step 1 Initial Setup
On the FRP screen, skip Wi-Fi and setup pages until you reach the "Set Password" screen. Choose to "Skip this step."
Step 2 Accessibility Trigger
Use the SSID "Add Network" trick to type any text, share it via Gmail, and navigate to "Help and Feedback." Search for "Delete or disable apps on Android."
Step 3 Disable Core Services
Go to Application Settings and show system apps. You must Force Stop and Disable the following: Android Setup, Carrier Services, and Google Play Services.
Step 4 Final Bypass
Enable the Accessibility Menu shortcut. Return to the Wi-Fi page and proceed. When the screen hangs on "Checking for updates," use the Accessibility icon to trigger Google Assistant, jump to Settings, and re-enable Google Play Services to finish the setup.
Part 4. Expert Tips: Unlocking Mi Account Lock Without Passwords
Locked out of your Poco or Xiaomi phone because of a forgotten Mi Account password? In addition to Google FRP, Mi Activation locks are common. Dr.Fone Unlock Online offers a remote service to remove Mi Account without password, supporting MIUI and the new HyperOS.
1. 100% Success on Xiaomi/Redmi/POCO
Removes Activation Lock without needing the original phone number or email associated with the account.
2. Wide Compatibility
Supports all versions of HyperOS and MIUI. The process is handled remotely and usually takes less than 24 hours.
Step 1 Get Unlock Code
Boot into Recovery Mode (Volume Up + Power). Select "Wipe Data." An Unlock Code will appear on the screen.
Step 2 Submit Online
Visit the Dr.Fone Unlock Online portal. Input your Unlock Code and device region.
Step 3 Wait for Access
You will receive an email confirmation once the bypass is successful. Restart your phone to enjoy full access.
Conclusion
Dealing with a Google verification lock is frustrating, but whether you are looking for a Redmi 5A FRP bypass or a fix for the latest Poco flagship, solutions exist. For a guaranteed and fast result, we recommend the Dr.Fone - Screen Unlock (Android) tool. For those comfortable with manual steps, the APK and system setting tricks provide a free alternative. Always ensure you have a backup of your data before performing these advanced security overrides.
FAQ
1. Is it legal to bypass Google FRP on my Xiaomi phone?
Yes, it is legal to bypass the FRP lock on a device you legally own if you have forgotten your own credentials. However, bypassing a stolen device is illegal.2. Will a factory reset remove the Google FRP lock?
No, a standard factory reset from the recovery menu actually triggers the FRP lock. You must perform a reset from the system settings menu with OEM unlocking enabled to avoid it.3. Can I bypass FRP on the latest Xiaomi HyperOS?
Yes, but security is tighter. Tools like Dr.Fone are updated to handle newer security patches that older APK methods might no longer support.4. Does Dr.Fone require technical knowledge to use?
No, Dr.Fone is designed for non-technical users with a simple step-by-step interface that guides you through the entire connection and unlocking process.
 Add Wondershare Dr.Fone as a preferred source on Google