How to Fix Random Find My iPhone Alerts in 4 Easy Ways
Dec 03, 2025 • Filed to: Screen Lock Removal • Proven solutions
Find My iPhone is a useful security feature that helps to locate a lost or stolen iPhone. But sometimes it may go off randomly. If you're getting startled by a random Find My iPhone alert, we get it!
Many iPhone users have reported that the Find My iPhone alert went off by itself even when they haven’t lost their device. It can be a frustrating experience and can lead to doubts about your device’s security.
If you're wondering what this alert means, we've got you covered. In this article, we will tell you all about what is a Find iPhone alert and why you're getting it. We will also introduce the best fixes for it, so you can regain control of your device.
Let’s get started!
- Part 1. What does "Find My iPhone Alert" Mean?
- Part 2. Why am I Getting a Find My iPhone Alert?
- Part 3. How to Fix Random Find My iPhone Alerts [4 Ways]
- Solution 1. Update Your iOS
- Solution 2. Check iCloud Settings
- Solution 3. Turn off Find My iPhone
- Solution 4. Change Apple ID and Password

- Part 4. Bonus Tip: How to Fix Random Find My iPhone Alert if You Forgot Passcode
Part 1. What does "Find My iPhone Alert" Mean?
So, What is a Find My iPhone alert? It is a feature of Apple's iCloud service that helps to locate your Apple devices that are lost or stolen including iPhone iPad, iPod, Mac, and Apple watch. Once activated, it lets you track your iPhone's location using GPS.
When you get a "Find My iPhone alert iPhone has been found", it usually means that your lost phone has been traced by Find My iPhone.
This alert can also be customized with a display message. It portrays that the phone is lost or stolen along with the owner's contact information. However, it may also go off when your device is not stolen or lost. There are various reasons for this. Read on to explore them below.
Part 2. Why am I Getting a Find My iPhone Alert?
"Find My iPhone alert went off randomly", "Why am I getting a lost iPhone alert?" If you're getting unsettled by these questions, we're here to help you out. Go through the following reasons to find the culprit behind a random Find iPhone alert.
- System Problems
An outdated operating system or a deeper issue with your device software can be a likely culprit behind the random alerts.
- Incorrect iCloud Settings
Find My can be configured for your iPhone in your iCloud settings. Signing out of iCloud or changing the Apple ID associated with your device can also trigger Find My iPhone alerts.
- Wrong Passcode Attempts
Sometimes remote hacking attempts using brute force attacks or phishing scams can be a culprit. They attempt to access your phone’s data by entering an incorrect passcode too many times.
- Hardware Issues
A physically damaged iPhone that has trouble connecting to a network may also trigger random Find My alerts.
Once you’ve identified the root cause for the random alerts, it can be fixed easily. Continue below to find the best solutions for it.
Part 3. How to Fix Random Find My iPhone Alerts [4 Ways]
Find My iPhone alert can be fixed easily once you've made sure that your iPhone has no hardware issues. Below we have provided the four best ways to fix the lost iPhone alert by Find My. Whatever the reason behind the alerts, these solutions can help you out!
Go through all of them to find the one that works the best for you.
Solution 1. Update Your iOS
Sometimes an outdated operating system can cause random glitches including the Find My Phone alert on iPhone. The best way to fix it is to check if your iOS is up to date. This can be achieved easily with the following steps.
Step 1. Start by creating a backup of your device using your PC or iCloud. Then, plug your iPhone into a power outlet and connect it to WiFi.
Step 2. Head over to the Settings app on your iPhone and select General.
Step 3. Tap on Software Update and look for any available updates.
Step 4. Tap the download and install option and enter your passcode. Then tap "Install Now" to begin.

Solution 2. Check iCloud Settings
Find My is automatically turned on when you connect a new device to iCloud. Disabling Find My or signing out of iCloud can trigger a Find My Phone alert on the iPhone. These actions raise the concern of whether someone is purposely attempting to disable the tracking of your device.
In that case, Find My will send an alert about possible unauthorized access to your device. If you're wondering how to alert Find My iPhone and check iCloud settings, here are the steps to do it.
Step 1. Access the Settings app on your iPhone and tap on your name found at the very top.
Step 2. Tap on Find My and check if it's turned on or not. If turned off, switch the toggle on next to Find My iPhone.

Step 3. Now check your iCloud account settings. For this, go to iCloud.com and sign in with your Apple ID and password.
Step 4. Click on "Account Settings" under your name and navigate to "My Devices".
Step 5. Look for your device’s name listed under the devices signed in without your Apple ID.

If you’ve taken all these steps and are still getting random Find My Alerts, you can try out the next fix.
Solution 3. Turn off Find My iPhone
If you’re getting randing Find My alerts with it being turned on, It may just be a random glitch. And you can easily rid of it by turning Find My iPhone off. Follow the steps below If you do not know how to do it.
Step 1. Open up the Settings of your iPhone and tap on your name displayed at the top.
Step 2. Select "Find My" and press "Find My iPhone". Then, Switch off the toggle next to "Find My iPhone". On older iPhone devices, you can find "Find My iPhone" under the iCloud settings.
Step 3. Enter your passcode to verify that you want to turn Find My off.

Once you have turned off Find My, restart your iPhone and this should fix the problem for you. Now, let's move forward to our next fix.
Solution 4. Change Apple ID and Password
An infallible way to fix random Find My iPhone alerts is by changing your Apple ID and password. This is useful in case of hacking attempts to your Apple account. Switching to a different Apple ID and password can ensure your account is protected against malicious activities.
Just make sure you've created a new Apple ID by going to appleid.apple.com. Then use the following steps to get started.
Step 1. Access the Settings app on your iPhone and tap your name located at the very top.
Step 2. Scroll down and tap "Sign Out". Then type in your password and tap "Turn Off".
Step 3. Choose if you wish to keep a copy of your data. Then, press "Sign out" on the top right and tap "Yes".

Step 4. Back on the main Settings page, tap "Sign in to your iPhone" to sign in with your new Apple ID.
Step 5. Enter your new Apple ID and password in the required field and press "Next".

Now you will be signed in to your device with a new Apple ID and password and can be assured that your phone is secure from possible data breaches.
All of these fixes offer a great solution to fix Find My iPhone sending off random alerts. However, the only caveat for all these fixes is entering a correct passcode. If you cannot recall your passcode, too many wrong attempts can lock you out of your phone.
But, don’t panic. There is an easy way out. Keep on reading to explore it!
Part 4. Bonus Tip: How to Fix Random Find My iPhone Alert if You Forgot Passcode
iPhone’s passcode is another security feature that ensures no one else tempers with your device settings. But what happens if you cannot remember your passcode? You may end up with several wrong attempts resulting in getting locked out of your phone.
For times like these, Dr.Fone - Screen Unlock (iOS) offers a reliable way to remove passcodes from your iOS device. Whether it's a 4-digit or a stronger 6-digit passcode, Dr.Fone handles them all.
And not only the passcodes, it is a powerful desktop solution to unlock all types of iOS screen locks in a few clicks. From iCloud Activation lock to FaceID or Touch ID, Dr.Fone has everything under control.

Dr.Fone - Screen Unlock (iOS)
Fix Random Find My iPhone Alert if You Forgot Passcode
- Simple, click-through, process.
- Unlock screen passwords from all iPhones and iPads.
- No tech knowledge is required, everybody can handle it.
- Supports the latest iOS version fully!

Here is how to remove the passcode with Dr.Fone Screen Unlock.
Step 1. Download and install Dr.Fone on your PC and launch it once done. Click on the Toolbox from the left menu and select the "Screen Unlock" feature.

Step 2. A new window will open up on your screen. Select the Unlock Ios Screen option and click on "Start".

Step 3. Follow the instructions on your screen to put your iPhone into Recovery Mode. Or, click "Try DFU Mode" to open the guidelines for it.

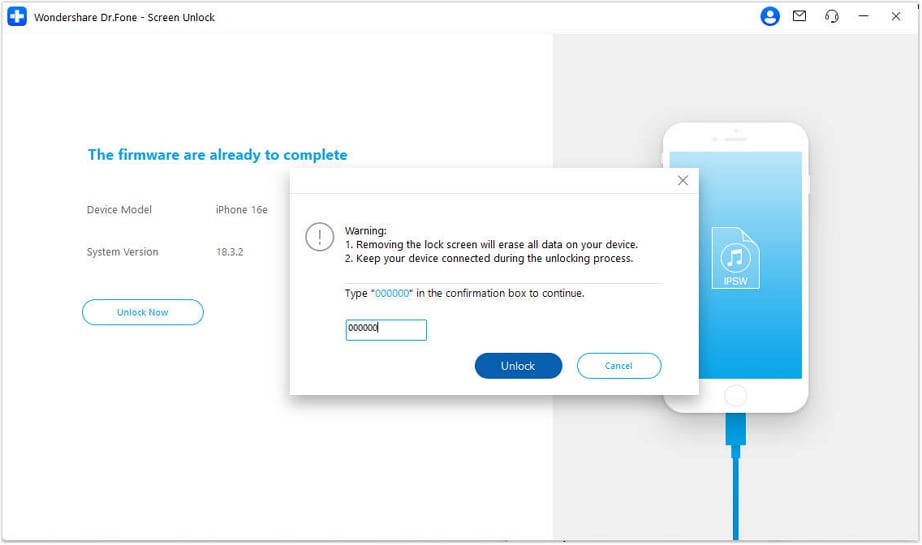
Step 4. Confirm the Device Model and System Version and click "Start" to download the firmware for your device. Once it’s done, click “Unlock Now” to initiate the passcode removal process.

Step 5. Type in the required code in the new prompt window and click "Unlock" to proceed.

Step 6. You can visualize the progress on your screen. Once it's all done you be notified with the screen as shown below. Click "Done" to finish the process.

That’s it! Now you have successfully removed the passcode lock from your screen. Dr.Fone makes it effortless without requiring any technical knowledge on your part.
Still have questions about Find My iPhone alerts? See if the following FAQs help you out.
Conclusion
Find My iPhone can help you locate lost or stolen phones as well as keep your phone’s security in check. It’s a useful feature that may become a nuisance when it goes off randomly. An outdated system, hacking attempts, and an incorrect passcode may trigger this security alert.
If you want to rid of the Find My iPhone alert, you can fix it by updating the software, configuring iCloud correctly, and changing your Apple ID or password. Just make sure to use the correct passcode to verify your settings.
If incorrect passcode attempts on your behalf or as a result of a phishing scam lock you out of your iPhone, let Dr.Fone-Screen Unlock(iOS) fix it quickly. It offers a fast and reliable way to remove passcodes and all other types of iOS locks in a few clicks!
FAQs
iPhone Unlock
- Access Locked iPhone
- 1. Reset Locked iPhone Without iTunes
- 2. Erase Locked iPhone
- 3. Get Into Locked iPhone
- 4. Factory Reset Locked iPhone
- 5. Reset Locked iPhone
- 6. iPhone Is Disabled
- 7. Fix iPhone Unavailable Issue
- 8. Forgot Locked Notes Password
- 9. Unlock Total Wireless Phone
- 10. Review of doctorSIM Unlock
- iPhone Lock Screen
- 1. Lock Apps on iPhone
- 2. Bypass iPhone Passcode
- 3. Unlock Disabled iPhone Without PC
- 4. Disable One More Minute Screen Time
- 5. Unlock iPhone Passcode Screen
- 6. Reset iPhone Password
- 7. Auto Lock Never on iPhone
- 8. Remove Carrier Lock/SIM Restrictions
- 9. Get iMei Number on Locked iPhone
- 10. Add a New Face ID
- 11. iPhone Passcode Expired Pop-Up
- 12. Control Display Rotation
- 13. Fix iPhone is Disabled Connect to iTunes
- 14. Fix Turn Passcode Off Greyed Out
- 15. Get iPhone out of Demo Mode
- 16. Unlock Unresponsive Screen
- 17. iPhone Ask for Passcode After Reset
- Remove iCloud Lock
- 1. Unlock an iPhone 7 Plus iCloud
- 2. iOS 18 iCloud Unlock
- 3. iOS 26 iCloud Unlock
- 4. Crack iCloud-Locked iPhones to Sell
- 5. Jailbreak iCloud Locked iPhone
- 6. What To Do If You Bought A Locked iPhone?
- 7. Fix iPhone Unavailable No Erase Option
- 8. Find iCloud Email Address on Apple Device
- 9. Broque Ramdisk iCloud Bypass
- Unlock Apple ID
- 1. Remove Payment Method on iPhone
- 2. Create a New Apple ID Account
- 3. Change Apple ID on iPad
- 4. Change Your Apple ID Password
- 5. Apple ID Not Active
- 6. Fix Wrong Apple ID Issue on iPhone
- 7. Fix This Person Is Not Active
- 8. New iCloud Terms and Conditions
- 9. Fix Apple ID Account Unavailable
- 10.Find Apple ID by IMEI
- 11. Unlink 2 iPhones with the Same Apple ID
- 12. Reset Password at appleid.apple.com
- 13. App Store Keep Asking for Password
- 14. Find Apple ID Password No Reset
- 15. Trusted Devices List Not Available
- Remove SIM Lock
- 1. Unlock iPhone Using Unlock Chip
- 2. Unlock iPhone for Free
- 3. Unlock iPhone Online
- 4. Factory Unlock iPhone
- 5. SIM Unlock iPhone
- 6. Unlock AT&T iPhone
- 7. Unlock iPhone with IMEI Code
- 8. Unlock iPhone without SIM Card
- 9. Unlock Cricket iPhone
- 10. Unlock iPhone with/without SIM Card
- 11. Unlock T-Mobile iPhone
- 12. Unlock Verizon iPhone
- 13. iPhone IMEI Checker
- 14. Unlock Xfinity iPhone
- 15. Unlock iPhone From The Carrier
- 16. Turbo SIM iPhone
- 17. Get the Sprint Unlock Codes
- 18. Unlock a Sprint Phone
- 19. Fix When iPhone Says No Sim
- Unlock iPhone MDM
- 1. Remove MDM from iPhone
- 2. Remote Management on iPhone
- 3. MDM VS MAM
- 4. Top MDM Bypass Tools
- 5. IoT Device Management
- 6. Unified Endpoint Management
- 7. Enterprise Mobility Management
- 8. Top 10 Proxy Websites
- 9. Hindilinks4u Alternatives
- Unlock Screen Time Passcode
- 1. Reset Screen Time Passcode
- 2. Turn Off Screen Time without Passcode
- 3. Screen Time Passcode Not Working
- 4. Disable Parental Controls
- 5. Bypass Screen Time on iPhone Without Password
- 6. Delete Screen Time History on iPhone
- 7. Turn Off Downtime on iPhone
- 8. Download Age Restricted Videos
- MDM Unblock Games/Websites
- 1. Basketball Stars Game Unblocked
- 2. Play Getaway Shootout Unblocked
- 3. Play Build Now GG Unblocked
- 4. BitLife Unblocked
- 5. 10 Best Unblocked Anime Websites
- 6. Best Unblocked Game Websites
- 7. 1v1 LOL Unblocked
- 8. Get Poly Track Unblocked
- 9. Music Websites Unblocked
- 10. Spotify Unblocked
- 11. Snow Rider 3D Unblocked
- Unlock Apple Watch
- Unlock iPod Touch
- ● Manage/transfer/recover data
- ● Unlock screen/activate/FRP lock
- ● Fix most iOS and Android issues
- Unlock Now Unlock Now Unlock Now


Daisy Raines
staff Editor