
How to Backup WhatsApp to Gmail: A Step-by-Step Guide
WhatsApp Manage
- WhatsApp Transfer
- 1. Save Whatsapp Audio
- 2. Transfer WhatsApp Photos to PC
- 3. WhatsApp from iOS to iOS
- 4. WhatsApp from iOS to PC
- 5. WhatsApp from Android to iOS
- 6. WhatsApp from iOS to Android
- 7. Whatsapp Communities Messages
- 8. Switch Between WhatsApp and GBWhatsApp
- 9. Recover Deleted WhatsApp Call History
- 10. Delete Call History on WhatsApp
- 11. Starred Messages in WhatsApp
- 12. Send Bulk SMS on WhatsApp
- 13. Download Whatsapp Audio Notes
- 14. Saving Videos from WhatsApp
- WhatsApp Backup
- 1. Access WhatsApp Backup
- 2. WhatsApp Backup Extractor
- 3. Backup WhatsApp Messages
- 4. Backup WhatsApp Photos/Videos
- 5. Backup WhatsApp to PC
- 6. Backup WhatsApp to Mac
- 7. WhatsApp Backup Stuck
- 8. Restore WhatsApp Backup from Google Drive to iCloud
- 9. Find the Best WhatsApp Clone App
- WhatsApp Restore
- 1. Top Free WhatsApp Recovery Tools
- 2. Best WhatsApp Recovery Apps
- 3. Recover WhatsApp Messages Online
- 4. Recover Deleted WhatsApp Messages
- 5. Restore Deleted WhatsApp Messages
- 6. Retrieve Deleted WhatsApp Messages
- 7. Recover Deleted WhatsApp Images
- 8. WhatsApp Restoring Media Stuck
- 9. Restore Old WhatsApp Backup
- 10. See Deleted WhatsApp Messages
- WhatsApp Tips
- 1. Best WhatsApp Status
- 2. Best WhatsApp Messages
- 3. Most Popular WhatsApp Ringtones
- 4. Best WhatsApp Mod Apps
- 5. What is Blue WhatsApp
- 6. 234 Country Code WhatsApp
- 7. Delete WhatsApp Account
- 8. Hide WhatsApp Ticks
- 9. Hack WhatsApp Account
- 10. Verify WhatsApp without SIM
- 11. Blue Ticks on WhatsApp
- 12. WhatsApp Plus Download
- 13. Grey Tick on WhatsApp
- 14. Does WhatsApp Notify Screenshots
- WhatsApp Problems
- 1. WhatsApp Common Problems
- 2. WhatsApp Calls Not Working
- 3. Whatsapp Not Working on iPhone
- 4. WhatsApp Backup Stuck
- 5. WhatsApp Not Connecting
- 6. WhatsApp Not Downloading Images
- 7. WhatsApp Not Sending Messages
- 8. Couldn‘t Restore Chat History
- 9. WhatsApp Not Showing Contact Names
- WhatsApp Business Manage
- 1. WhatsApp Business for PC
- 2. WhatsApp Business Web
- 3. WhatsApp Business for iOS
- 4. Add WhatsApp Business Contacts
- 5. Backup & Restore WhatsApp Business
- 6. Convert a WhatsApp Account to a Business Account
- 7. Change A WhatsApp Business Account to Normal
- 8. WhatsApp Notifications Are Not Working
- Other Social Apps Manage
- ● Manage/transfer/recover data
- ● Unlock screen/activate/FRP lock
- ● Fix most iOS and Android issues
- Free Download Free Download

Jun 30, 2026 • Filed to: Social App Management • Proven solutions
 TL;DR:
You can back up your WhatsApp messages to your Google account automatically using Google Drive, manually export specific conversations as TXT files directly to Gmail, or utilize desktop software like Dr.Fone - WhatsApp Transfer for complete and selective cross-platform backups.
● Google Drive provides automatic, full-history backups but consumes cloud storage, while exporting chats via email is a manual process best suited for saving individual conversations as TXT files without relying on automated cloud syncing.
● Local device backups occur automatically at 2 AM, but transferring them to Gmail requires connecting your device to a computer via USB, locating the specific backup files within the WhatsApp/Databases folder, and manually emailing them.
● Using Dr.Fone - WhatsApp Transfer on Windows or Mac enables data transfer between Android and iOS, but restoring a backup to an iOS device will delete its existing WhatsApp data and requires you to turn off the Find My iPhone feature first.
Ask AI for a summary
 ChatGPT
 Perplexity
 Gemini
 Claude
 Grok
Grok
In our digital age, preserving important conversations has never been more crucial. Whether it's cherished memories, critical business communications, or vital personal information, ensuring your WhatsApp messages are safely backed up can save you from potential data disasters. This blog post will guide you through the most effective methods to back up WhatsApp to Gmail, offering practical advice and highlighting the best tools for the job.
Part 1: Why You Should Back Up Your WhatsApp Messages
Losing personal or professional messages due to phone malfunctions, accidental deletions, or app glitches can be devastating and lead to significant disruptions in communication. Important information, cherished memories, and critical business data can all vanish in an instant. Backup ensures you have a safety net, allowing you to restore your chats seamlessly whenever needed, without the stress of permanent loss.
By backing up WhatsApp to Google Drive, you not only secure your messages but also make them accessible across different devices, offering an added layer of convenience and peace of mind. This way, you can retrieve important conversations whether you're at home, at work, or on the go, ensuring that your communications remain uninterrupted and your data stays intact.
Part 2: Common Methods to Back Up WhatsApp
Method 1: Back Up WhatsApp To Google Drive
Google Drive is one of the most popular options for backing up WhatsApp messages. It’s a straightforward method that provides robust cloud storage solutions, ensuring your data is securely stored and easily accessible. With Google Drive, you can automatically back up your conversations, media files, and documents, allowing you to restore them seamlessly whenever needed. This integration not only simplifies the backup process but also offers peace of mind knowing your important information is safe in the cloud. For those using an iPhone, iPhone WhatsApp backup to Google Drive is a reliable choice to ensure your chats and media are securely stored.

Step 1: Open WhatsApp
Firstly, open the WhatsApp application on your device. To navigate to the settings menu, click on the three dots located in the upper right corner of the screen. From the drop-down menu, select 'Settings' and then proceed to 'Chats'. This will take you to the chat settings where you can manage various options for your messaging experience.
Step 2: Select Chat Backup
In the 'Chats' section, you'll find an option labeled 'Chat backup'. Click on it to access the backup settings. Here, you can manage how your chat history and media files are backed up. This step is crucial to ensure that your messages are saved and can be restored if needed.
Step 3: Choose Google Drive
Within the chat backup settings, you'll see an option to back up your data to Google Drive. Select the frequency of backups that suits your needs—this could be daily, weekly, monthly, or you can choose to back up manually. Next, choose the Google account you wish to associate with these backups. Make sure your device has a stable internet connection, as this is necessary for the backup process.
Step 4: Start Backup
Once you have configured all the necessary settings, click on 'Back Up' to initiate the process. Your messages and media files will begin uploading to Google Drive. This may take some time depending on the size of your chat history and media files, as well as your internet speed. After the backup is complete, your data will be securely stored on Google Drive, ensuring it is safe and can be restored to your device when needed.
Pros & Cons of backing up WhatsApp to Google Drive:
|
Pros |
Cons |
| Easy to use with Google Drive integration | May need extra Google Drive storage |
| Accessible data on any device | Requires stable internet for backup/restoration |
| Secure with encryption and strong measures | Potential data privacy concerns |
| Automatic, regular backups | High battery usage during large backups |
Method 2: Export Chat via Email
If you prefer an alternative to WhatsApp backup in iPhone to Google Drive, exporting chats via email is another viable option. This method allows you to save your conversation history and access it from your email account whenever needed. To do this:

Step 1: Open the Chat
First, unlock your device and navigate to the messaging app where your chat is located. Find and open the specific chat you want to back up. Once inside the chat, tap on the three dots located in the upper right corner to access more options.
Step 2: Export Chat
In the dropdown menu, select 'More' and then tap on 'Export chat'. You will be prompted to choose whether you want to include media files like images and videos or just export the text messages. Make your selection according to your needs.
Step 3: Send to Gmail
After making your selection, choose Gmail as your method for exporting the chat. The chat data will be compiled into a TXT file. Once the file is ready, it will automatically attach to a new email draft in your Gmail app. Enter the recipient's email address, add any additional information you deem necessary, and hit 'Send'. The chat backup will be sent to your email as a TXT file for safekeeping.
Pros & Cons of exporting chat via email:
|
Pros |
Cons |
| Easy process without needing extra storage | Requires manual process; no automatic backups |
| Selective chat backups, not the entire history | Managing multiple exports can get cumbersome |
| Access saved chats without the internet | Cumulative backups may consume email storage |
| Multiple backups were possible if the email service allows | Media might be excluded or disorganized |
Method 3: Using Local Backup
Local backups can be an additional layer of security. These backups are stored directly on your device, ensuring that you have immediate access to your data without relying on an internet connection. This can be particularly useful in situations where cloud services are unavailable or compromised, providing an extra safeguard for your important files.
In addition to the "WhatsApp chat backup to Google Drive" method we covered above, local backups offer another easy method to protect your important data.

Step 1. Automatic Daily Backups
WhatsApp automatically creates local backups every day at 2 AM. These backups are stored in your device's internal storage or on an SD card if available. This ensures that your chat history and media files are regularly saved without any effort on your part.
Step 2. Manual Backup
You can also create a manual backup at any time by navigating to Settings > Chats > Chat backup and selecting 'Back Up'. This option is particularly useful if you want to ensure you have the most recent conversations saved before making significant changes to your device, such as performing a factory reset or switching to a new phone.
Step 3. Transfer to Gmail
To transfer these local backups to Gmail for extra security, connect your device to a computer using a USB cable. Locate the WhatsApp backup file in your device's storage (usually found in the WhatsApp/Databases folder), and email it to yourself via Gmail. This provides an additional layer of protection by keeping your important data accessible in your email account.
Pros & Cons of using local backup:
|
Pros |
Cons |
| Immediate access without internet | Significant storage space usage |
| Automatic daily backups | Vulnerable to device damage/theft |
| Extra security via local storage | Extra steps for manual transfer |
| Manual transfer to Gmail for added security | Less straightforward recovery options |
Part 3:Bonus Tip: Back Up WhatsApp Messages in Few Minutes
Dr.Fone WhatsApp Transfer stands out as a top choice for backing up WhatsApp messages. It's user-friendly, and reliable, and offers comprehensive features that cater to both personal and professional needs. The software ensures that your important conversations, photos, and videos are securely stored and easily accessible when needed. Additionally, its intuitive interface makes the backup process simple, even for those who aren’t tech-savvy.
Whether you’re looking to protect personal memories or important business communications, Wondershare Dr.Fone provides a robust solution. Plus, it allows you to back up WhatsApp to Google Drive effortlessly, adding an extra layer of convenience and security.
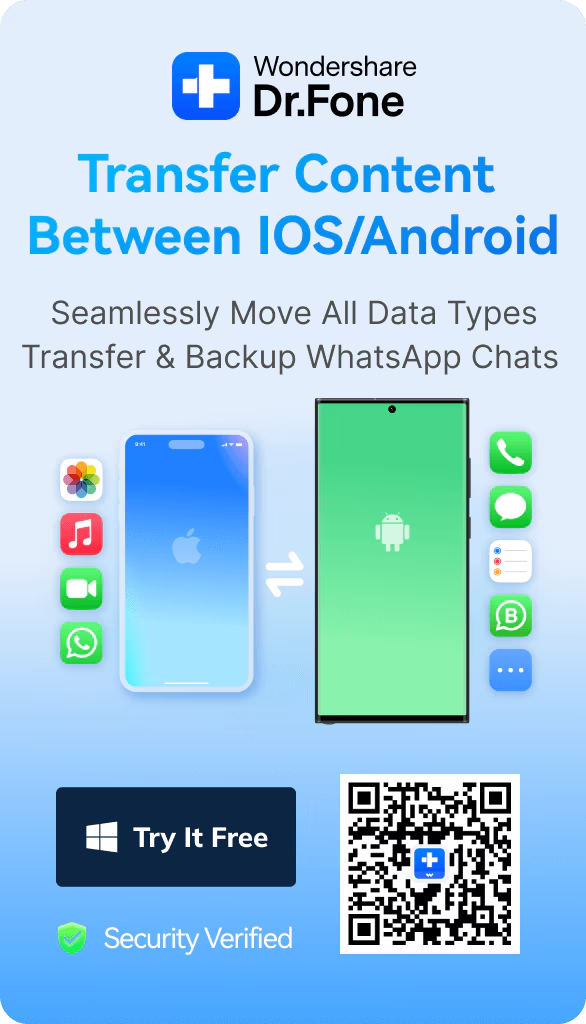
Dr.Fone - WhatsApp Transfer
Backup WhatsApp to Gmail with Dr.Fone - WhatsApp Transfer
- Transfer WhatsApp messages from Android to iOS, Android to Android, iOS to iOS, and iOS to Android.
- Backup WhatsApp messages from iPhone or Android on your PC.
- Allow restoring any item from the backup to iOS or Android.
- Completely or selectively preview and export WhatsApp messages from iOS backup to your computer.
- Support all iPhone and Android models.


How to Backup WhatsApp to Gmail with Dr.Fone - WhatsApp Transfer:
As we follow through the process, iOS devices can easily back up their important WhatsApp data with the help of the WhatsApp Transfer tool offered by Dr.Fone. This unique utility provides the simplest of operations while giving you complete control over the data that is to be backed up. Follow through the comprehensive steps to backup and restore WhatsApp on your iOS device:
Step 1: Launch the WhatsApp Transfer Tool on Your Computer
First, open Wondershare Dr.Fone on your computer. Then, go to the Toolbox > WhatsApp Transfer to get started with the transfer tool.

Step 2: Access Backup Function
Once you open the tool in another window, simply navigate to WhatsApp > Backup WhatsApp messages to start backing up your existing WhatsApp data on your iDevice.

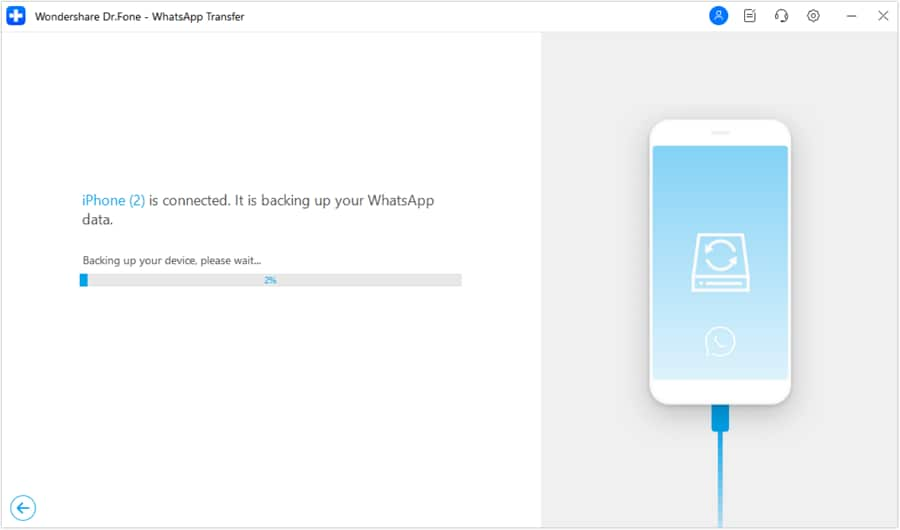
Step 3: Check Out Your Backup Progress
Once the process kicks off, you'll see the progress on the next screen, making it easy to keep an eye on things.
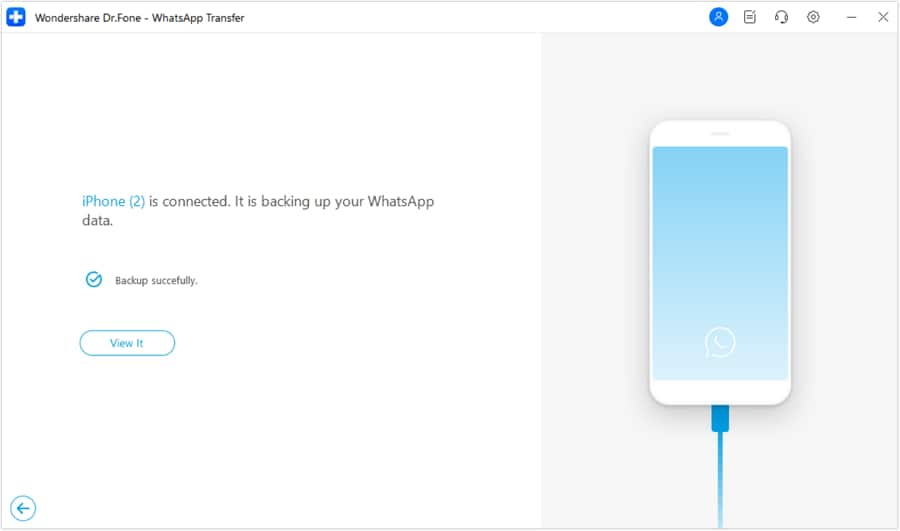
Step 4: Wrap Up Backup and Take a Look
Once your data is backed up, you'll see a clear message confirming the success of the process. To check out your backed-up data, click View It to open it in a new window.
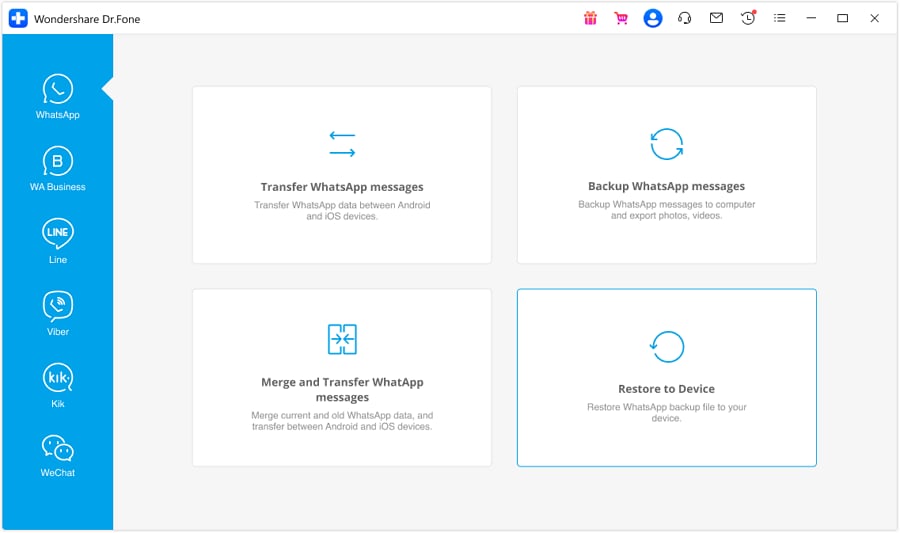
Step 5: Access Restore Function
If you ever want to restore your WhatsApp data back to your iOS device, simply follow this path: WhatsApp > Restore to Device. This will open a new window and kick off the restoration process.
Step 6: Choose a Backup File to Restore
You'll see the backup files on the next screen, giving you a glimpse of the data the platform holds. Find your iDevice's data and go ahead and click the View button next to the file details.

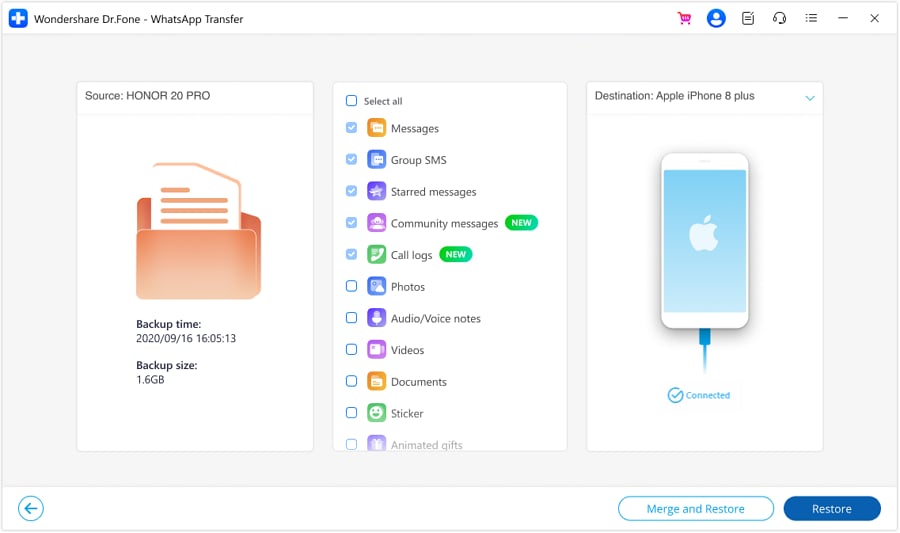
Step 7: Preview Your Backup Data and Restore to Your Device
On the next screen, you'll see a preview of your entire WhatsApp backup file, neatly organized into categories. Just pick any category to view specific chats, media, and related content in the preview window. When you're ready to restore the data to your iDevice, simply click the Restore to Device button at the bottom-right of the screen.
Step 8: Begin Device Restoration
On the next screen, you'll see a prompt to start the restoration process. Simply click the Restore button to get things going.

Step 9: Confirm Data Backup on Your Device
Before starting, be sure to back up your existing WhatsApp data on your iDevice, as this process will delete it. If you’d like to back up your data, click Backup. To continue with the process and start the restoration, just press Continue.

Step 10: Check Out the Data Restore Progress
In the next window, you'll see how the data restoration is coming along. If you need to stop the process, just click Cancel.

Step 11: Turn Off the Find My Feature
A prompt window will pop up on your screen, asking you to turn off the Find My iPhone feature on your iDevice. No worries, just follow the on-screen instructions: open the Settings on your iPhone and tap your name at the top of the screen.
Next, head over to the Find My section to access the settings. On the following screen, simply toggle off the Find My iPhone option. Once you’ve done that, click OK on your computer’s screen.

Step 12: Finish WhatsApp Restoration on iDevice
Once you’ve followed all the instructions, the restoration process will wrap up, and you’ll see a message confirming it’s done. Just click OK to finish everything up.

Conclusion
Backing up your WhatsApp messages is essential for preserving your important conversations and media. Whether you choose Google Drive, email exports, or local backups, maintaining regular backups ensures peace of mind. Explore the best options for your needs and consider using Wondershare Dr.Fone – WhatsApp Transfer for a seamless and secure experience.
Ready to safeguard your chats? Start your backup process today and ensure your WhatsApp memories are always within reach.


Daisy Raines
staff Editor