
How to Remove Apple ID without Password: Top 5 Ways in 2026
Dec 31, 2025 • Filed to: Screen Lock Removal • Proven solutions
Planning to sell or give away your iPhone? Before you do, the first and most important step is to erase the Apple ID without a password, especially if you’ve forgotten it. Without doing so, the next user won’t be able to set up the device.
So, how to remove Apple ID without a password? Don’t worry — there are several simple methods you can try. You can use Apple’s official tools or rely on third-party unlocker apps that accomplish the task quickly.
In this guide, we’ll walk you through the best ways to remove your Apple ID safely and easily. Whether you’re locked out or just preparing to switch devices, we’ve got you covered!
- Part 1. Things to Know Before Removing Apple ID
- Part 2. How to Remove Apple ID Without Password [6 Simple Ways]
- Method 1. Delete Apple ID Using iTunes
- Method 2. Remove Apple ID Through iTunes & App Stores
- Method 3. Using Account Recovery
- Method 4. Delete via the Apple Privacy Page
- Method 5. Contacting Apple Support
- Part 3. [Best] How to Erase Apple ID Without Password via an Apple ID Unlocker

Part 1. Things to Know Before Removing Apple ID
Before we get into the details of the methods to delete Apple ID, you should know the consequences of this action. Here are some things to be aware of when removing Apple ID from your device:
- Inactive Find My iPhone: You can no longer track your device using Find My if it gets lost or stolen.
- Issues with Activation Lock: Active Find My before removing Apple ID will trigger the Activation lock. You need the Apple ID password to reactivate your device.
- Loss of Purchased Content: You can no longer access music, apps, or movies tied to your Apple ID account.
- Failure to Sync Data: You will lose access to iCloud and its features. You cannot back up or access photos, contacts, and documents stored on iCloud Drive.
- Restrictions on App Updates: You cannot update apps, movies, or books purchased with the removed ID.
You May Also Like:
Apple ID Locked for Security Reasons
Part 2. How to Remove Apple ID Without Password [6 Simple Ways]
If you cannot access your Apple ID or do not remember the associated password, these proven solutions will help you remove the Apple ID from an iPhone without a password.
Method 1. Delete Apple ID Using iTunes
iTunes is a simple answer for how to remove an Apple account from an iPhone without a password, given that you have turned off Find My iPhone on your device and can access your screen passcode. Your device can be locked or unlocked. iTunes can help you erase your Apple account without credentials in both situations.
When Your Device is Unlocked:
Step 1. Link the device to a computer using a USB cable.
Step 2. Launch iTunes. Then click the Device icon and click “Summary” from the side panel.
Step 3. Click the “Restore iPhone” button. A popup will appear.
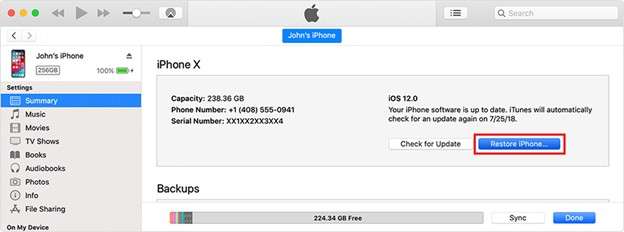
Step 4. Press “Restore” again to verify the action to erase your iPhone.
When Your Device is Locked:
Step 1. Put your device in recovery mode. To do this:
- iPhone 8 or later: Quickly press the Volume Up. Then, the Volume Down button. Afterward, long-press the Side button.
- iPhone 7/7 Plus: Long-press the Volume Down and Side buttons together.
- iPhone 6s or earlier: Hold the Home and Side or Top buttons.
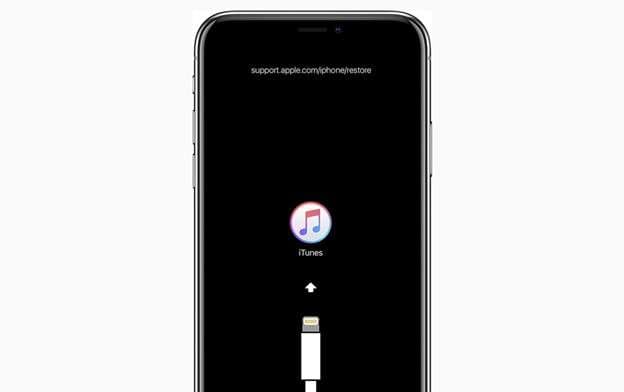
Step 2. Connect your device to your computer in recovery mode. Then, launch iTunes.
Step 3. You will see a message that your iPhone has a problem and needs to be restored.
Step 4. Click “Restore” to erase your device and reinstall its software.
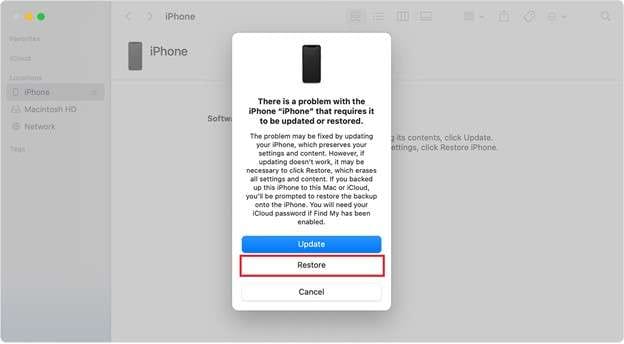
Step 5. Follow the instructions on your screen to conclude the restoration.
📱 iPhone Frozen? Fix It in 3 Steps – No Data Loss!
Struggling with a frozen iPhone screen? 🤔 Our guide covers 6 common causes, step-by-step fixes for all models (iPhone 6s to iPhone 17), and safe data recovery. 98.6% success rate! ✨
Method 2. Remove Apple ID Through iTunes & App Stores
For devices running iOS 10.2, you can directly remove the Apple ID from the settings via the iTunes and App Stores option, given the Find My feature is not active and you know your passcode.
Directions on how to delete Apple ID without the password:
Step 1. Open the Settings app. Select “iTunes & App Stores.” You need to click your Apple ID name for some devices to access this option.
Step 2. Tap the Apple ID displayed at the top. A popup will appear. Tap “Sign Out” from here.
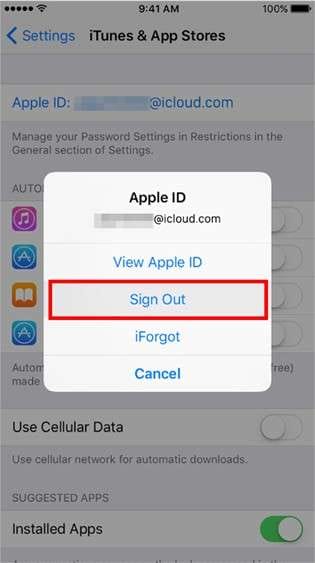
Step 3. You will see a prompt to back up your data before signing out. This will allow you to access it if you want to sign back in.
Let’s explore another way to remove an Apple account from iPhone without a password.
Method 3. Using Account Recovery
Do you have access to the registered email or the phone number linked to your Apple ID? You can reset your password using the Account Recovery and the iForgot website. Then, you can sign in to your Apple ID and remove it through the standard process.
Apply these steps to do it.
Remove Apple ID Without the Screen Passcode:
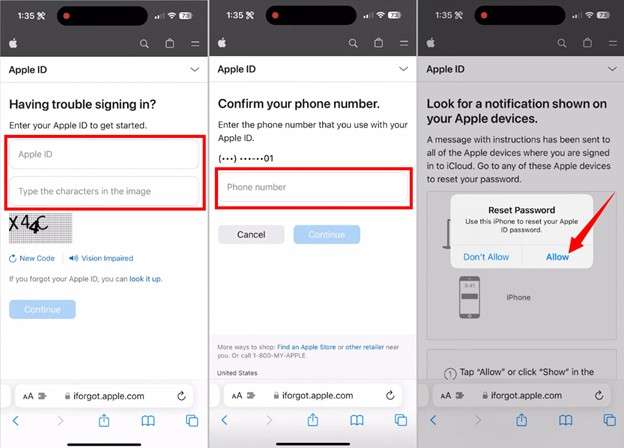
Step 1: Visit the iForgot website and click Reset Password. Enter your Apple ID and verification code, then click Continue.
Step 2: Verify your phone number when prompted and follow the on-screen instructions to reset your password.
Step 3: Once reset, open the Settings app on your device.
Step 4: Tap your name at the top, scroll down, and select Sign Out.
Step 5: Enter your new Apple ID password and tap Turn Off to remove the account.
Delete Apple ID with the Screen Passcode:
Step 1. Open Settings and tap the Apple account name at the top.
Step 2. Tap “Sign in and Security” and press “Change password.”
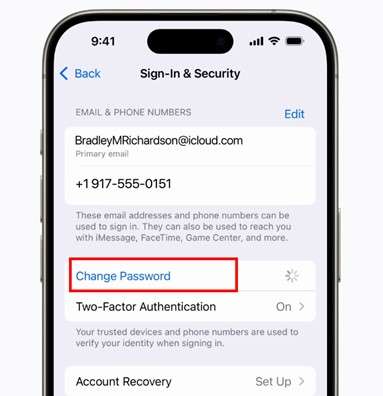
Note: You can also scroll down and tap Sign Out. Then, choose “Forgot password” to change it.
Step 3. Enter your iPhone passcode to confirm the action. Then, type your new password in both fields and tap “Change.”
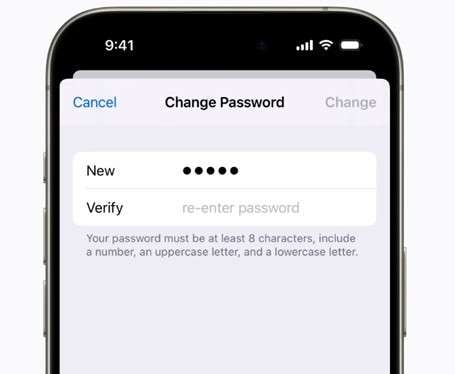
Step 4. Select whether to sign out of other devices using the same account.
Step 5. Your password will change. Use the new password to sign out of the Apple ID and remove it.
Method 4. Delete via the Apple Privacy Page
The Data and Privacy webpage has another solution for how to erase an Apple ID without a password. Need to remove your account entirely? It makes it possible. Want to deactivate temporarily? You got it!
Instructions to remove Apple account from an iPhone without the password:
Step 1. Go to Apple’s Data and Privacy website. Sign in to your Apple ID. Use Two-factor authentication instead of a password.
Step 2. Navigate to the Delete your Account section. Click “Request to delete your account.”

Note: Select the “Request to deactivate your account” on this page. This will remove your account temporarily if this is what you seek.
Step 3. Click the dropdown arrow and choose a reason to remove your account. Then, click “Continue.”
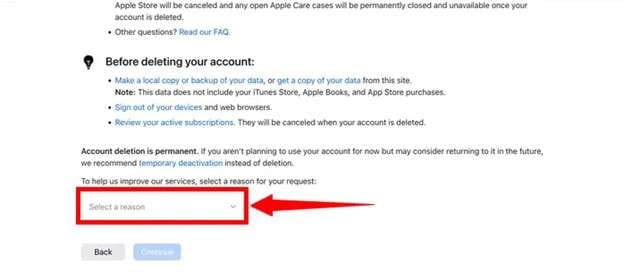
Step 4. Follow the instructions on your screen to conclude the account deletion request.
Method 5. Contacting Apple Support
You can get in touch with the Apple Support team and submit a request to remove your account. However, you will need to provide valid proof that you are the true owner of the device.
This can be an original receipt of the purchase from a certified seller. The team will confirm the serial number and your ownership before helping you.
Your device may still be linked to an Apple ID through the Activation Lock. In this case, the support team will show you how to recover the password instead of removing the Apple ID.
Part 3. [Best] How to Erase Apple ID Without Password via an Apple ID Unlocker
All the earlier methods for how to delete an Apple account without a password can work — but they often come with limits. You might need a specific iOS version or have to turn off Find My iPhone first. If you don’t, trying to remove the account can trigger Activation Lock, which still asks for your Apple ID password.
Looking for a better option? Dr.Fone - Screen Unlock (iOS) is your reliable solution. Dr.Fone - Screen Unlock lets you remove Apple ID without a password, even if Find My iPhone is still turned on. You won’t need to worry about extra steps or getting stuck midway.
Even better — if your device runs on iOS 11.4 or earlier, Dr.Fone helps preserve your data during the process. It supports all iPhones and iPads from iOS 7.0 to 18, so you won’t face any compatibility issues. Quick, safe, and user-friendly — it's the smart way to take back control of your device.
Dr.Fone - Screen Unlock (iOS)
One click to Erase Apple ID Without Password.
- Simple, click-through, process.
- Unlock screen passwords or Apple ID from all iPhones and iPads.
- No tech knowledge is required, everybody can handle it.
- Supports almost all iPhones and the latest iOS version fully!

Steps to Remove Apple ID from iPhone Without Password
Step 1. Download and launch Wondershare Dr.Fone on your computer. Connect your iPhone or iPad, then go to Toolbox > Screen Unlock > iOS and select Remove Apple ID.

Step 2. Confirm your device is connected, then click Unlock Now. If prompted, verify whether your device has a screen lock or two-factor authentication enabled.

Step 3. Follow the on-screen guide to enter Recovery Mode. If it fails, switch to DFU Mode using the provided instructions.

Step 4. Dr.Fone will auto-detect your device info. Confirm the model and iOS version, correct them if needed, and click Start to download the appropriate firmware.

Step 5. Once the firmware downloads, click Unlock Now. Enter the confirmation code, proceed, and wait for the process to complete. Click Done when finished.

That’s how to remove Apple ID without a password in just a few simple steps! Dr.Fone makes the process seamless. It requires no technical operation or manual steps on your part.
Conclusion
That wraps up how to remove Apple ID without a password. We have shared simple and proven methods to help you remove the Apple account without knowing the associated password. All of these methods are effective. However, they have prerequisites you must meet, including turning off Find My service and using a specific iOS version. Wondershare Dr.Fone Screen Unlock (iOS) can bypass these limitations. Try it for a simple and quick way to erase your Apple ID without a password.
4,624,541 people have downloaded it
FAQs
iPhone Unlock
- Access Locked iPhone
- 1. Reset Locked iPhone Without iTunes
- 2. Erase Locked iPhone
- 3. Get Into Locked iPhone
- 4. Factory Reset Locked iPhone
- 5. Reset Locked iPhone
- 6. iPhone Is Disabled
- 7. Fix iPhone Unavailable Issue
- 8. Forgot Locked Notes Password
- 9. Unlock Total Wireless Phone
- 10. Review of doctorSIM Unlock
- iPhone Lock Screen
- 1. Lock Apps on iPhone
- 2. Bypass iPhone Passcode
- 3. Unlock Disabled iPhone Without PC
- 4. Disable One More Minute Screen Time
- 5. Unlock iPhone Passcode Screen
- 6. Reset iPhone Password
- 7. Auto Lock Never on iPhone
- 8. Remove Carrier Lock/SIM Restrictions
- 9. Get iMei Number on Locked iPhone
- 10. Add a New Face ID
- 11. iPhone Passcode Expired Pop-Up
- 12. Control Display Rotation
- 13. Fix iPhone is Disabled Connect to iTunes
- 14. Fix Turn Passcode Off Greyed Out
- 15. Get iPhone out of Demo Mode
- 16. Unlock Unresponsive Screen
- 17. iPhone Ask for Passcode After Reset
- Remove iCloud Lock
- 1. Unlock an iPhone 7 Plus iCloud
- 2. iOS 18 iCloud Unlock
- 3. iOS 26 iCloud Unlock
- 4. Crack iCloud-Locked iPhones to Sell
- 5. Jailbreak iCloud Locked iPhone
- 6. What To Do If You Bought A Locked iPhone?
- 7. Fix iPhone Unavailable No Erase Option
- 8. Find iCloud Email Address on Apple Device
- 9. Broque Ramdisk iCloud Bypass
- Unlock Apple ID
- 1. Remove Payment Method on iPhone
- 2. Create a New Apple ID Account
- 3. Change Apple ID on iPad
- 4. Change Your Apple ID Password
- 5. Apple ID Not Active
- 6. Fix Wrong Apple ID Issue on iPhone
- 7. Fix This Person Is Not Active
- 8. New iCloud Terms and Conditions
- 9. Fix Apple ID Account Unavailable
- 10.Find Apple ID by IMEI
- 11. Unlink 2 iPhones with the Same Apple ID
- 12. Reset Password at appleid.apple.com
- 13. App Store Keep Asking for Password
- 14. Find Apple ID Password No Reset
- 15. Trusted Devices List Not Available
- Remove SIM Lock
- 1. Unlock iPhone Using Unlock Chip
- 2. Unlock iPhone for Free
- 3. Unlock iPhone Online
- 4. Factory Unlock iPhone
- 5. SIM Unlock iPhone
- 6. Unlock AT&T iPhone
- 7. Unlock iPhone with IMEI Code
- 8. Unlock iPhone without SIM Card
- 9. Unlock Cricket iPhone
- 10. Unlock iPhone with/without SIM Card
- 11. Unlock T-Mobile iPhone
- 12. Unlock Verizon iPhone
- 13. iPhone IMEI Checker
- 14. Unlock Xfinity iPhone
- 15. Unlock iPhone From The Carrier
- 16. Turbo SIM iPhone
- 17. Get the Sprint Unlock Codes
- 18. Unlock a Sprint Phone
- 19. Fix When iPhone Says No Sim
- Unlock iPhone MDM
- 1. Remove MDM from iPhone
- 2. Remote Management on iPhone
- 3. MDM VS MAM
- 4. Top MDM Bypass Tools
- 5. IoT Device Management
- 6. Unified Endpoint Management
- 7. Enterprise Mobility Management
- 8. Top 10 Proxy Websites
- 9. Hindilinks4u Alternatives
- Unlock Screen Time Passcode
- 1. Reset Screen Time Passcode
- 2. Turn Off Screen Time without Passcode
- 3. Screen Time Passcode Not Working
- 4. Disable Parental Controls
- 5. Bypass Screen Time on iPhone Without Password
- 6. Delete Screen Time History on iPhone
- 7. Turn Off Downtime on iPhone
- 8. Download Age Restricted Videos
- MDM Unblock Games/Websites
- 1. Basketball Stars Game Unblocked
- 2. Play Getaway Shootout Unblocked
- 3. Play Build Now GG Unblocked
- 4. BitLife Unblocked
- 5. 10 Best Unblocked Anime Websites
- 6. Best Unblocked Game Websites
- 7. 1v1 LOL Unblocked
- 8. Get Poly Track Unblocked
- 9. Music Websites Unblocked
- 10. Spotify Unblocked
- 11. Snow Rider 3D Unblocked
- Unlock Apple Watch
- Unlock iPod Touch
- ● Manage/transfer/recover data
- ● Unlock screen/activate/FRP lock
- ● Fix most iOS and Android issues
- Unlock Now Unlock Now Unlock Now




James Davis
staff Editor