

Old photos preserve cherished memories, but frequently suffer deterioration like fading, scratches, and discoloration over time. While skilled users can leverage Photoshop to address these issues, the Dr.Fone App - Old Photo Restoration tool is a convenient, AI-driven alternative that simplifies the restoration process for mobile users. We'll guide you through restoring old photos with photoshop, and how to fix old photos using Dr.Fone App, so you can find the method that's right for you.
In this article
Part 1: Preparing to Repair an Old Photo
Transforming old photographs to digital format is a process that requires careful restoration. This technique enables manipulation of the images without posing a threat to the actual copies. To ensure the ideal output is achieved, it is critical to have the appropriate tools and methods at hand.
Choosing the Right Scanner:

Because they are able to scan delicate prints and larger formats, flatbed scanners are highly preferred for converting aged photographs into digital format. Epson Perfection V600 and Canon ImageFormula RS40 are commonly chosen for their user-friendly nature and impressive resolution. Flatbed scanners can capture images at resolutions ranging from 300 DPI (dots per inch) for standard prints to up to 6400 DPI for negatives and slides. If you have hundreds or thousands of photos, consider investing in a high-speed scanner like the Epson FastFoto FF-680W, which can process multiple photos quickly.
Scanning Resolution:
The type and size of the photo will dictate which resolution you pick. When dealing with standard photos like 4x6, 5x7, or 8x10 inches, scanning anywhere from 300 to 600 DPI will be acceptable for most restoration purposes. Even lower resolution scanning around 300 DPI is reasonable for wallet sized prints, but for more detailed work, aim for 600 –900 DPI. Try to hit a range of 2400 to 4800 DPI when dealing with slides and negatives. Higher resolutions ensure that you retain all the details necessary for editing and printing later.
Preparing Photos for Scanning:
Before scanning, clean your photos gently with a soft brush or microfiber cloth to remove dust and debris. Ensure the edges of each image are scanned while placing the image on the scanner bed. Also, for high-speed scanners with an auto-feed mechanism, make sure the images are placed in stacks properly so that there are no overlapping images or jams in the feeder.
Scanning Process:
Connect your scanner to your computer via USB or wireless connection. For more control over the settings, either use the scanner's software or third-party ones like SilverFast. Change the resolution based on the size of the photo you are trying to scan, as well as the quality you want. For normal prints, 300 DPI is perfect for quick scans, but higher detail scans like 600 DPI are far better for detail preservation. Large format scanners can manage documents that are 11x17 inches or larger, which is excellent for large prints or certificates.
File Formats:

Instead of saving scanned images as JPEG files, it is best to save them in either PNG or TIFF formats. Due to their less aggressive compression methods, both PNG and TIFF formats maintain image quality during editing. This is especially important if you intend to perform extensive edits in Photoshop later.
Organizing Files:
Once you have completed the scan, change each file's name to include a detailed narrative that includes dates, places and or events captured in the photo. Doing so will help you find specific images much quicker during restoration work.
By following these steps, you ensure that your scanned images are optimized for editing while preserving their original quality. Proper digitization lays the foundation for effective restoration work in Photoshop.
Part 2: Restoring Old Photos with Photoshop (Step-by-Step)
Restoring old photos in Photoshop involves addressing common issues such as scratches, tears, faded colors, and noise. Each step requires specific tools and techniques to bring the photo back to life while preserving its original charm. Keep reading and learn how to restore old photos in photoshop.
Fixing Scratches and Tears

Repairing scratches and tears is crucial to restoring the photo's original appearance. Photoshop provides multiple tools for this task:
- Healing Brush Tool:
- Select the Healing Brush Tool from the toolbar (shortcut key: J).
- Hold down the Alt key (Option key on Mac) and click on a clean area of the image to sample it.
- Paint over the scratch or tear to blend it seamlessly with the surrounding pixels.
- Adjust the brush size and hardness for precision by using the brush settings in the top menu.
- Clone Stamp Tool:
- Choose the Clone Stamp Tool from the toolbar (shortcut key: S).
- Alt-click (Option-click on Mac) to sample an area of the image that matches the damaged region.
- Carefully paint over the tear or missing fragment to duplicate and restore it.
- Use small strokes and zoom in on the image to ensure accuracy.
- Lasso Tool + Duplicate Layer:
- Use the Lasso Tool to select a damaged area.
- Right-click and choose "Layer via Copy" to duplicate the selection onto a new layer.
- Use Free Transform (Ctrl+T or Command+T) to adjust and reposition the copied area, blending it into the photo seamlessly.
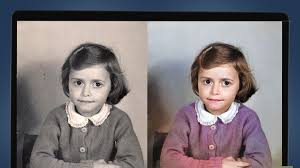
Correcting Faded Colors
Color correction dramatically improves an image's visual appeal, especially for faded photos:
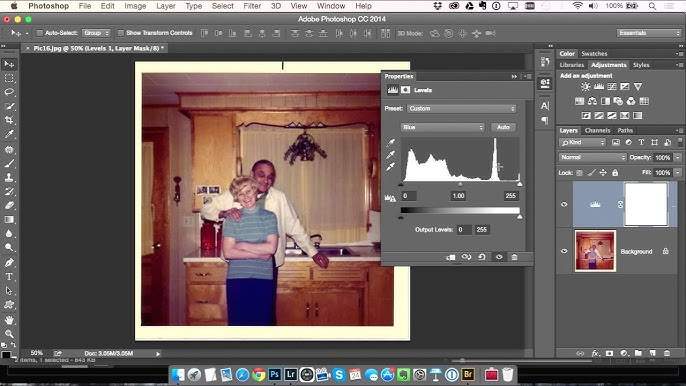
- Adjustment Layers:
- Create a new adjustment layer by navigating to "Layer" > "New Adjustment Layer" > "Hue/Saturation" or "Curves."
- For Hue/Saturation:
- Adjust sliders to restore vibrant colors.
- Increase saturation slightly while maintaining natural tones.
- For Curves:
- Drag points on the curve graph to brighten shadows or enhance highlights.
- Photo Filter Option:
- Go to "Image" > "Adjustments" > "Photo Filter."
- Apply warming or cooling filters to set an overall tone for your image.
- Alternatively, manually pick colors that match your photo's original hues.
- Selective Color Adjustments:
- Navigate to "Image" > "Adjustments" > "Selective Color."
- Focus on specific color ranges (e.g., reds, yellows) to enhance faded areas without affecting other parts of the image.
Enhancing Sharpness
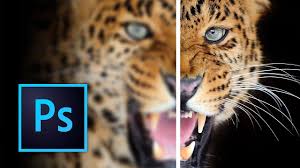
Improving sharpness restores clarity and detail, especially in blurry or low-resolution areas:
- Sharpen Tool:
- Select the Sharpen Tool from the toolbar (shortcut key: R).
- Adjust brush size and strength in the top menu.
- Apply sharpening selectively by painting over areas that need more definition.
- Unsharp Mask Filter:
- Go to "Filter" > "Sharpen" > "Unsharp Mask."
- Set parameters:
- Amount: Controls how much sharpening is applied.
- Radius: Determines how far pixels are affected.
- Threshold: Reduces sharpening in areas with minimal contrast.
- Preview changes before applying them.
- Neural Filters for Restoration:
- Open Photoshop's Neural Filters by navigating to "Filter" > "Neural Filters" > "Photo Restoration."
- Use sliders like Scratch Reduction and Facial Enhancement for automatic sharpening and restoration.
Final Touches & Exporting
After completing restoration steps, enhance vibrancy, brightness, contrast, and overall color balance:
- Navigate to "Image" > "Adjustments." Explore options like Exposure, Saturation, White Balance, Brightness/Contrast, etc., for final adjustments.
- Save your restored photo by going to "File" > "Export." Choose an appropriate format like PNG or TIFF for high-quality output.
By following these detailed steps, you can restore old photos effectively using Adobe Photoshop's powerful tools!
Part 3: Alternative Tools to Fix Old Photos in Photoshop
Bringing life back into old photos appears overwhelming; however, with the Dr.Fone App - Old Photo Restoration, it has become simple and more efficient than usual. No matter how badly scratched, faded, or discolored your photo is, Dr.Fone App's modernization of AI technology guarantees professional results with a click of a button. Now, let's take a look at how you can easily restore old photos using Dr.Fone app.
Dr.Fone App - Old Photo Restoration (iOS & Android)
1-Click Restoration: Bring Old Photos Back to Glory
- Intelligent defect identification and automatic optimization
- Targeted repairs for scratches, stains, fading, and more
- Professional-grade restoration quality
- Efficient & user-friendly


Step-by-Step Guide to Using Dr.Fone App - Old Photo Restoration
01of 04Launch and Select Photo
- Open the Dr.Fone app on your device.
- Navigate to the AI Tools section by tapping the blue toolbox icon at the bottom of the screen.
- Select the Old Photo Restoration option.

02of 04Initiate the Restoration Process
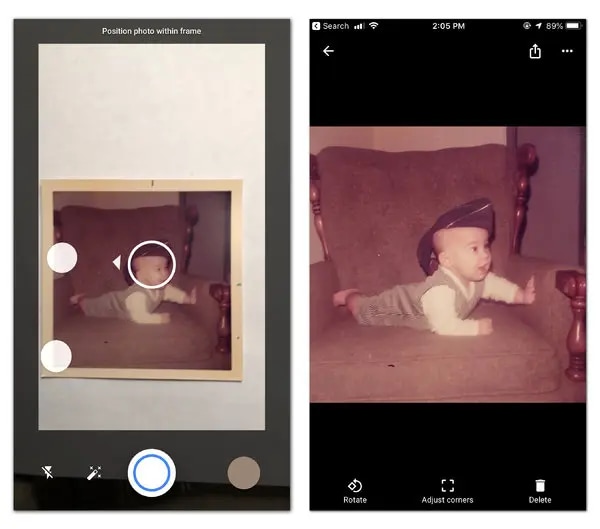
- Tap the "Select Photo" button to access your device's gallery and choose the old image you want to restore.
- Tap the "Restore" button at the bottom to start the restoration process. Dr.Fone will now process your image and apply necessary enhancements, including color correction, scratch removal, and noise reduction.

03of 04Preview Changes
- Once the restoration is complete, use the slider tool provided by Dr.Fone to compare the original photo with the enhanced version side by side.
- This feature allows you to see the dramatic improvements made by the app, giving you a clear view of how much better your photo looks after restoration.

04of 04Save the Restored Image
- If you're satisfied with the results, tap on the "Save" button.
Additional Note: Dr.Fone App - Old Photo Restoration is supported on both iOS and Android platforms with identical steps for restoration. You can download the app for iOS from App Store and for Android from Google Play.
Conclusion
Restoring photos seems to be time-consuming but it becomes much easier with Photoshop and Dr.Fone tools. Photos can have their cherished memories through restoration, which is facilitated through Dr.Fone app due to its mobile compatibility. Restoring old photos with photoshop offers great versatility for customization unlike Dr.Fone but is a much better alternative for desktop users. Whether you choose Photoshop for intricate edits or Dr.Fone App for a simple fix, both options make it easy to revive your treasured photographs.


Alice MJ
staff Editor
Generally rated4.5(105participated)