

 TL;DR:
You can restore faded photos manually for precise control using Photoshop 2024 or automatically with AI using the Dr.Fone App - Old Photo Restoration on iOS and Android.
● Photoshop requires a high-resolution scan as a prerequisite and relies on manual adjustments via Curves, Levels, Hue/Saturation, and Unsharp Mask, making it suitable for users with editing experience.
● The Dr.Fone App bypasses the manual learning curve by applying 1-click automated AI corrections to fix contrast, tone, and scratches directly from your mobile device gallery.
● To prevent physical degradation, handle original photos with gloves to avoid skin oil damage and store them in acid-free albums or UV-protective frames while maintaining high-resolution digital backups.
Ask AI for a summary
 ChatGPT
 Perplexity
 Gemini
 Claude
 Grok
Grok
Old photos often suffer from fading due to exposure to sunlight, moisture, or simply the passage of time. This can result in a loss of color and detail, diminishing the beauty of these cherished memories. Fortunately, with the help of advanced tools like Adobe Photoshop and the Dr.Fone App - Old Photo Restoration, restoring faded photos is now easier than ever. These powerful tools can revive the vibrancy of your old photos, ensuring they remain vivid and cherished for generations to come.
In this article
Part 1: How to Restore Faded Photos in Photoshop

Photoshop is a versatile tool for restoring faded photos, offering a range of features to enhance brightness, contrast, and color. Here's how to use the latest versions of Photoshop, such as Photoshop 2024, to revive your faded images:
1. Open Your Scanned Faded Photo:
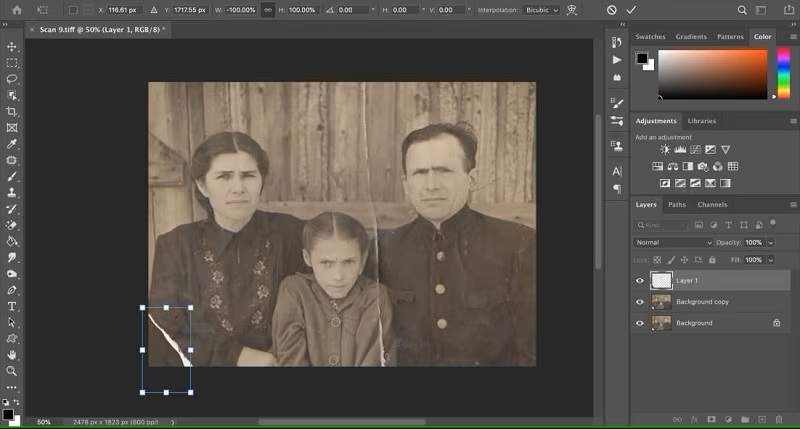
- Begin by scanning your faded photo to create a digital copy. Use a high-quality scanner to ensure the best possible image quality. This step is crucial as it sets the foundation for the restoration process. Ensure your scanner is set to capture the image at a high resolution to preserve as much detail as possible.
- Once scanned, open the image in Photoshop 2024. This will allow you to access the full range of Photoshop's editing tools.
2. Enhance Brightness and Contrast:
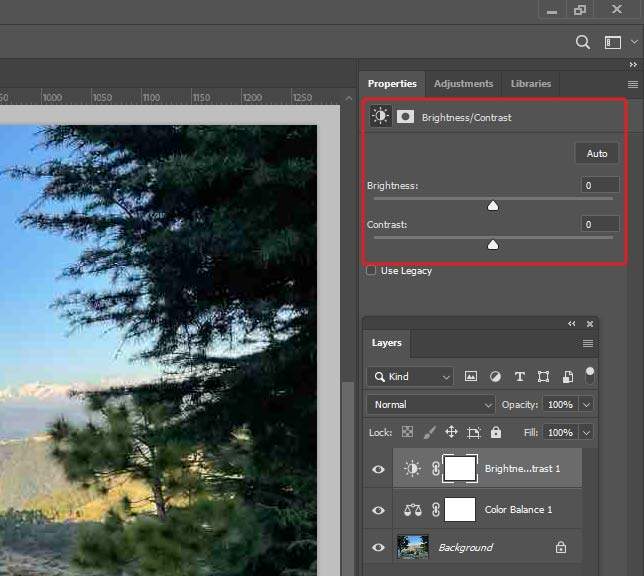
- Use adjustment layers like Curves or Levels to adjust the brightness and contrast of your photo. These tools allow you to fine-tune the shadows, midtones, and highlights, bringing back depth and vibrancy to your image. For instance, the Levels panel can be used to dial in the black point, enhancing the overall contrast of the image. This step helps restore the dynamic range of your photo, making it look more balanced and visually appealing.
3. Revive Faded Tones:
- Apply selective color adjustments using the Hue/Saturation adjustment layer. This allows you to target specific colors and enhance them, restoring the original tones of your photo. Additionally, tools like Auto Color can help create colors based on what's already present in the image, ensuring a natural look. By adjusting the saturation levels, you can bring back the vibrancy of your photo without overdoing it.
4. Add Sharpening Filters:
- Use sharpening filters like Unsharp Mask to improve the clarity of your image. This helps refine details and textures, making your photo look sharper and more defined. For heavily damaged photos, you might also consider using tools like the Spot Healing Brush or Clone Stamp for more complex repairs. These tools can help remove scratches or unwanted marks while preserving the original image quality.
Part 2: How to Restore Faded Photos Using the Dr.Fone App
The Dr.Fone App - Old Photo Restoration offers a quick and user-friendly way to restore faded photos without needing extensive editing skills. Here's how to use it:
Dr.Fone App - Old Photo Restoration (iOS & Android)
1-Click Restoration: Bring Old Photos Back to Glory
- Intelligent defect identification and automatic optimization
- Targeted repairs for scratches, stains, fading, and more
- Professional-grade restoration quality
- Efficient & user-friendly


01of 04Install the Dr.Fone App
- Download the Dr.Fone App from App Store or Google Play. The app is available for both iOS and Android devices, making it accessible to a wide range of users.

02of 04Upload Your Faded Photo

- Launch the Dr.Fone App and navigate to the AI Tools section by tapping the blue toolbox icon at the bottom of the screen. This section contains various AI-powered features, including the Old Photo Restoration tool.
- Select the Old Photo Restoration feature. This tool is specifically designed to fix issues like fading, scratches, and discoloration, making it perfect for restoring old photos.
- Tap the Select Photo button to access your device's gallery and choose the faded image you want to enhance.
03of 04Apply Automatic Enhancements

- Tap the Restore button to initiate the restoration process. Dr.Fone's AI algorithms will automatically apply enhancements such as contrast correction and tone recovery to revive your faded photo. This process is quick and efficient, requiring minimal input from the user.
04of 04Save Your Restored Image
- If you're satisfied with the results, tap on the Save button to store your restored photo directly on your device.
Part 3: Preventing Future Fading of Photos
To ensure your photos remain vibrant and protected from fading, consider these essential tips:
1. Store Physical Copies Safely:
Keep physical copies of your photos away from direct sunlight and moisture. Sunlight can cause colors to fade, while moisture can lead to mold or damage. Use acid-free albums or storage boxes to preserve them. These materials are designed to prevent chemical reactions that can harm your photos over time. Additionally, consider storing them in a cool, dry place, such as a closet or attic, to maintain a stable environment.
2. Digitize Important Images:
Use a high-quality scanner to digitize your important photos. This creates a digital backup that can be easily shared and preserved. Digital copies are less susceptible to physical damage and can be stored on multiple devices or cloud services, ensuring they remain safe even if the physical copy is lost or damaged. When scanning, ensure the resolution is set high enough to capture all the details in your photos. This way, you can enjoy your cherished memories for years to come without worrying about them fading away.
3. Use Protective Frames:

When displaying physical photos, use frames with UV protection to shield them from sunlight. This will help prevent fading and discoloration over time. Additionally, ensure the frame is made from materials that won't react with the photo, such as acid-free mats and frames.
4. Avoid Handling Photos Excessively:
Oils from your skin can damage photos, so handle them as little as possible. If you must touch them, wear gloves to prevent oils from transferring to the surface. This will help maintain their condition and prevent unwanted marks or smudges.
5. Create Multiple Backups:

Store digital copies of your photos in multiple locations, such as external hard drives, cloud storage services like Google Drive or iCloud, and USB drives. This ensures that even if one backup is lost or damaged, you have others to fall back on.
6. Regularly Check Stored Photos:
Periodically inspect your stored photos for signs of damage or deterioration. Early detection can help prevent further damage and ensure that any necessary preservation steps are taken promptly.
| Feature | Photoshop | Dr.Fone App |
| Ease of Use | Requires editing skills | User-friendly, automatic enhancements |
| AI-Automated Fixes | Manual adjustments required | AI-driven automatic enhancements |
| User-Friendliness for Beginners | Steep learning curve | Easy to use, no prior editing experience needed |
Conclusion
Restoring faded photos is no longer a daunting task thanks to tools like Photoshop and the Dr.Fone App - Old Photo Restoration feature. Photoshop offers a comprehensive set of editing tools that allow for precise adjustments to brightness, contrast, and color, making it ideal for those with some editing experience. On the other hand, the Dr.Fone App provides a quick and user-friendly solution, perfect for beginners who want to restore their cherished memories without needing extensive editing skills. With its AI-driven enhancements and user-friendly interface, it's the perfect tool for anyone wanting to restore their old photos quickly and easily. Whether you're reviving family heirlooms or cherished vacation memories, Dr.Fone's Old Photo Restoration feature brings life back to your faded photos, ensuring they remain vibrant and cherished for generations to come.


Alice MJ
staff Editor
Generally rated4.5(105participated)