Bypass iCloud Activation Lock and Android FRP without password.

 100% Security Verified | No Subscription Required | No Malware

 :
: 
 ChatGPT
 Perplexity
 Gemini
 Claude
 Grok
Grok
Being locked out of your Sony Xperia phone can be a frustrating experience, whether you've forgotten your pattern, PIN, or password. This situation can disrupt your daily communication, work, and access to important data. Fortunately, you don't have to be stuck with a locked device forever.
In this comprehensive guide, we'll explore six effective methods to unlock your Sony Xperia's lock screen. We'll cover everything from specialized software that makes the process effortless to free built-in Android features. Read on to find the solution that best fits your needs and get back into your device quickly.
In this article
- Part 1. The Easiest Way to Unlock Sony Xperia Without Data Loss
- Part 2. Using Google's Find My Device to Unlock
- Part 3. Unlock Sony Xperia via Factory Reset
- Part 4. Using Your Backup PIN (Older Android Versions)
- Part 5. Using ADB to Remove the Lock Screen
- Part 6. Contacting Sony Support for Assistance
- Part 7. Bonus: How to Bypass Google FRP Lock on Sony Xperia After Reset
Part 1. The Easiest Way to Unlock Sony Xperia Without Data Loss
When you need a quick, reliable, and user-friendly solution, Dr.Fone - Screen Unlock (Android) stands out as the best choice. This professional tool is designed to remove any type of lock screen—including PIN, password, pattern, and fingerprint—from your Sony Xperia with a high success rate. It simplifies a complex technical process into a few simple clicks, making it accessible even for non-technical users.
 Unlock Android phone in seconds.
- Remove PIN, pattern, password, fingerprint.
- Bypass Google FRP lock easily.
- Works on all Android brands & models.
- No tech skills required – user-friendly.
Follow these steps to unlock your Sony Xperia phone:
-
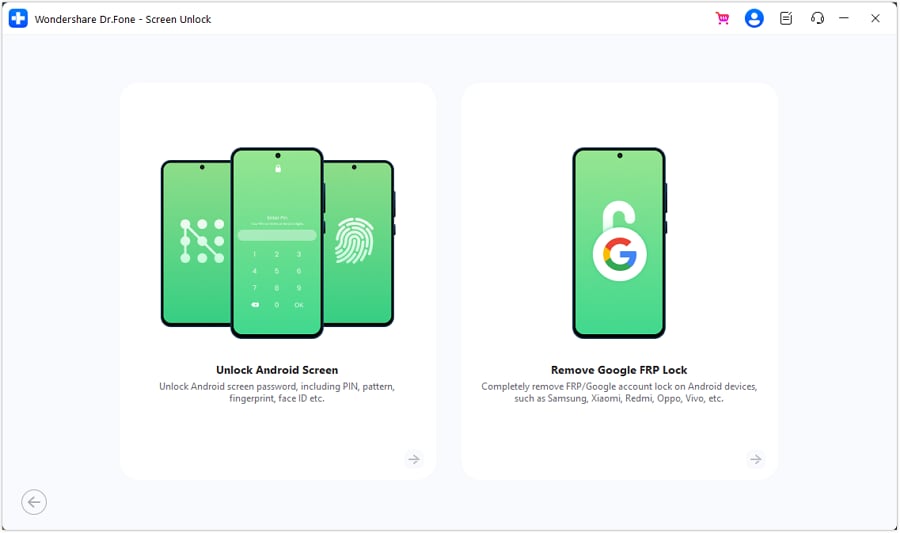
Step 1 Launch Dr. Fone and Select Screen Unlock
Download and install Dr.Fone on your computer. Open the program and click on "Screen Unlock" from the main toolkit. Connect your Sony Xperia to the computer using a USB cable and select "Unlock Android Screen."

-
Step 2 Choose Your Device Brand
The software supports a wide range of devices. From the list of brands, select "Sony" to ensure the correct unlocking procedure is used for your device.
-
Step 3 Enter Download Mode
The software will provide on-screen instructions to put your Sony Xperia into Download Mode. This typically involves turning off the phone and then holding a specific combination of buttons (like Volume Down + Power) while connecting it to the computer.
-
Step 4 Unlock Your Sony Xperia
Once the device is in Download Mode, Dr.Fone will download the necessary recovery package. After the download is complete, click "Remove Now." The program will begin removing the lock screen. Within minutes, your Sony Xperia will restart without any lock screen, and you can access it freely.
Part 2. Using Google's Find My Device to Unlock
Google's Find My Device is a security feature that helps you locate, lock, or erase your phone remotely. You can also use it to unlock your Sony Xperia, but this method will perform a factory reset, deleting all data on your device.
Prerequisites:
- Your Sony Xperia must be turned on and connected to the internet (Wi-Fi or mobile data).
- Location services must be enabled on the device.
- You must be logged into your Google account on the phone.
Here’s how to use it:
-
Step 1 Visit Find My Device
On a computer or another device, go to the Google Find My Device website and sign in with the same Google account used on your locked Sony phone.
-
Step 2 Select Your Device
The service will attempt to locate your phone. Select your Sony Xperia from the list of devices linked to your account.
-
Step 3 Erase the Device
You will see three options: Play Sound, Secure Device, and Erase Device. Click on "Erase Device" and confirm your choice. This action will remotely wipe your phone, removing the lock screen along with all your data. After the process is complete, your phone will restart as if it were new.

Part 3. Unlock Sony Xperia via Factory Reset
If you cannot access Google's Find My Device, you can perform a factory reset directly on the phone using its hardware buttons. This process, also known as a hard reset, will unlock your phone by erasing all data, settings, and apps.
-
Step 1 Power Off Your Phone
Press and hold the Power button until the power menu appears, then select "Power off." If the screen is unresponsive, hold the Power button for about 10-15 seconds until the device vibrates and shuts down.
-
Step 2 Boot into Recovery Mode
Press and hold the Volume Down button and the Power button simultaneously. Keep holding them until the Sony logo appears and the phone vibrates. Release the buttons to enter Recovery Mode.
 Note: The button combination to enter Recovery Mode might vary slightly depending on your Sony Xperia model. If the above combination doesn't work, try Power + Volume Up.
 -
Step 3 Wipe Data/Factory Reset
In the Recovery Mode menu, use the Volume buttons to navigate to "Wipe data/factory reset" and press the Power button to select it. Confirm your choice on the next screen by selecting "Yes" or "Factory data reset."
-
Step 4 Reboot Your Device
After the reset is complete, select "Reboot system now" from the main Recovery menu. Your Sony Xperia will restart without a lock screen.
Part 4. Using Your Backup PIN (Older Android Versions)
For older Sony Xperia models running Android 4.4 KitKat or earlier, you can unlock your device using a backup PIN or your Google account credentials if you fail to enter the correct pattern multiple times.
-
Step 1 Enter the Wrong Pattern
On the lock screen, deliberately enter the wrong pattern five times in a row.
-
Step 2 Choose Unlock Method
After the fifth incorrect attempt, a message will appear. Tap on the "Forgot Pattern?" option that shows up at the bottom of the screen.
-
Step 3 Unlock Your Phone
You will be prompted to either enter your backup PIN or sign in with the Google account associated with the device. Choose either option, provide the correct credentials, and you will regain access to your phone.
Part 5. Using ADB to Remove the Lock Screen
This is an advanced method for users who had previously enabled USB Debugging on their Sony Xperia before it was locked. It requires using Android Debug Bridge (ADB) commands to delete the lock screen file.
Prerequisites:
- USB Debugging must have been enabled on your phone.
- You need a computer with ADB set up.
-
Step 1 Connect Your Phone
Connect your locked Sony Xperia to your computer via a USB cable.
-
Step 2 Open Command Prompt
Open a Command Prompt or Terminal window in the ADB installation directory on your computer.
-
Step 3 Execute the ADB Command
Type the following command and press Enter:
adb shell rm /data/system/gesture.key(for patterns) oradb shell rm /data/system/password.key(for passwords). This command removes the file that stores your lock screen information. -
Step 4 Restart Your Phone
Reboot your Sony Xperia. The lock screen should be gone, but this is temporary. Make sure to set a new PIN, pattern, or password immediately in your phone's settings before you restart it again.
Part 6. Contacting Sony Support for Assistance
If none of the above methods work or you're uncomfortable performing them yourself, your final option is to contact Sony's official customer support. They can provide guidance specific to your device model. You may need to provide proof of ownership, such as the original purchase receipt, before they can assist you. They will likely guide you through a factory reset or advise you to take the device to an authorized service center.
Part 7. Bonus: How to Bypass Google FRP Lock on Sony Xperia After Reset
After performing a factory reset using methods like Find My Device or Recovery Mode, you might encounter the Factory Reset Protection (FRP) lock. This security feature requires you to enter the Google account credentials previously synced with the device to prove ownership.
If you've forgotten your Google account password or bought a second-hand device with the previous owner's account still linked, you'll be stuck. This is where Dr. Fone - Screen Unlock (Android) becomes essential again. In addition to removing screen locks, it includes a powerful feature to bypass the Google FRP lock on Sony and many other Android devices.
- Unlock Android phone in seconds.
- Remove PIN, pattern, password, fingerprint.
- Bypass Google FRP lock easily.
- Works on all Android brands & models.
- No tech skills required – user-friendly.
Conclusion
Getting locked out of your Sony Xperia is stressful, but there are multiple ways to regain access. For a quick, guaranteed solution without technical hurdles, Dr.Fone - Screen Unlock is the most recommended method, as it handles both screen locks and FRP issues effectively. Free methods like Google Find My Device and factory reset are viable alternatives, but they always result in complete data loss. Choose the method that aligns with your technical comfort level and urgency to unlock your Sony Xperia and use it normally again.
FAQ
-
1. Will unlocking my Sony Xperia delete my data?
Most methods for unlocking a Sony Xperia, including Google's Find My Device and performing a factory reset, will erase all data on the device. Tools like Dr.Fone - Screen Unlock are designed to remove the lock screen, but for most modern Android devices, data erasure is an unavoidable part of the security protocol. It is always best to back up your data regularly to prevent loss. -
2. Can I unlock my Sony Xperia for free?
Yes, you can unlock your Sony Xperia for free using methods like Google's Find My Device or a factory reset via Recovery Mode. However, both of these methods will wipe all your personal data from the phone. -
3. What is FRP lock on a Sony phone?
FRP (Factory Reset Protection) is a security feature on Android devices. If your phone is factory reset through an untrusted method (like Recovery Mode), FRP lock activates. It requires you to enter the last known Google account username and password that was synced with the device to prove you are the rightful owner before you can set it up again. -
4. What if I can't remember the Google account details for FRP bypass?
If you cannot remember the Google account credentials required to bypass the FRP lock after a reset, you will need a specialized tool. Dr.Fone - Screen Unlock (Android) has a specific function to bypass the Google FRP lock, allowing you to set up your device with a new account.
 Add Wondershare Dr.Fone as a preferred source on Google