iPhone Change Passcode Requirement: Easy Steps to Update Your Unlock Code
Oct 13, 2025 • Filed to: Screen Lock Removal • Proven solutions
Securing our devices is more important than ever in today's world. An iPhone's unlock passcode acts as the first line of defense against unauthorized access. However, many users may not realize the importance of changing this passcode regularly. In this article, we will explore the reasons behind the iPhone passcode requirement and the benefits of updating your iPhone unlock passcode, along with a simple guide on how to do it effectively.
- Part 1. Why iPhone Says "You must change your iphone unlock passcode within 60 minutes"?
- Part 2. 4 Common Methods to Stop iPhone Change Passcode Requirements
- Method 1. Change the Passcode to a Custom One
- Method 2. Disable Complex Passcode Requirements
- Method 3. Adjust Auto-Lock Settings
- Method 4. Update iOS Software

- Part 3. Most Recommended: Dr.Fone - Screen Unlock for iOS Your Solution for Locked Devices
Part 1. Why iPhone Says "You must change your iphone unlock passcode within 60 minutes"?
When your iPhone prompts you to change your unlock passcode, it indicates enhanced security measures are in place. Understanding the reasons behind this notification can help you navigate the process smoothly and keep your device secure.
- Enhanced Security: Regularly updating your passcode can help protect against unauthorized access, especially if you suspect that someone has gained knowledge of your existing passcode.
- Preventing Unwanted Access: If you've shared your iPhone with someone or have had it serviced, there's a risk that your passcode could be compromised. Changing it ensures that only you have access.
- Addressing Security Threats: As hacking techniques evolve, it's crucial to adapt. Changing your passcode regularly fortifies your device against new threats.
- Compliance with Policies: Some workplaces and institutions require frequent password changes as part of their security protocols. Following these guidelines helps maintain compliance.
- Establishing Good Habits: Regularly changing your passcode fosters a security-conscious mindset, encouraging you to think about the overall protection of your personal information.
Remember, your passcode is required when your iPhone restarts, so keeping it updated is vital for your security.
Part 2.Common Methods to Stop iPhone Change Passcode Requirements
If you're tired of receiving the prompt to change your iPhone unlock passcode, you must change your iPhone unlock passcode within 59 minutes. There are several methods you can employ to stop this notification. Below are four common methods explained in detail:
Method 1. Change the Passcode to a Custom One
One of the easiest methods to stop receiving prompts for your passcode is to update it to a new custom code that meets specific security requirements. Here’s how to do it in detail:

Step 1. Access Settings:
Begin by opening the Settings app on your device. This is usually represented by a gear icon.
Step 2. Navigate to Face ID & Passcode:
Scroll down and find the option labelled Face ID & Passcode (or Touch ID & Passcode, depending on your device). Tap on it to proceed.
Step 3. Select Change Passcode:
In this menu, you will see an option for Change Passcode. Click on this option to initiate the change process.
Step 4. Enter Current Passcode:
You will be prompted to enter your current passcode. This is a security measure to ensure that only the authorized user can make changes.
Step 5. Create a New Passcode:
After successfully entering your current passcode, you will be guided through the process of setting up a new one. Here, it’s crucial to choose a passcode that is not only compliant with the required security standards but also one that you can easily remember. A complex passcode typically includes a mix of numbers, letters, and possibly symbols.
Step 6. Confirm Your New Passcode:
Once you’ve created your new passcode, you will be asked to enter it again to confirm it. This step ensures that there are no errors in your new selection.
Step 7. Completion:
After confirming, you will receive a notification that your passcode has been successfully changed. From this point on, your device will use the new passcode, helping to enhance your security and reduce the frequency of prompts.
Method 2. Disable Complex Passcode Requirements
To make your device's passcode simpler, you can turn off the complex passcode requirement. Here’s how to do it step-by-step:

Step 1. Open Settings:
Locate and tap the “Settings” app on your device’s home screen.
Step 2. Access Face ID & Passcode (or Touch ID & Passcode):
Scroll down and select “Face ID & Passcode” if your device supports Face ID, or “Touch ID & Passcode” if it uses Touch ID. You may be prompted to enter your current passcode for security purposes.
Step 3. Disable Require Complex Passcode:
Within the passcode settings, look for the option labeled “Require Complex Passcode.” If this setting is enabled, you’ll need to disable it. This will allow you to use a simpler numeric code instead of a complex alphanumeric passcode.
Step 4. Security Considerations:
Keep in mind that opting for a simpler passcode can make your device less secure. While it may be easier to remember and input, a straightforward code is more susceptible to unauthorized access. Additionally, even if you disable the complex passcode requirement, your device may still request periodic changes to your passcode for security reasons.
Method 3. Adjust Auto-Lock Settings
Adjusting your auto-lock settings on your device can help minimize the number of times you're prompted to enter your passcode. Here's a detailed guide on how to do this:

Step 1. Navigate to Settings:
Start by locating the Settings app on your phone. This app typically features a gear icon and is usually found on your home screen or in your app drawer.
Step 2. Select Display & Brightness:
Once you're in the Settings menu, look for the option labeled Display & Brightness. This section contains all the settings related to your screen's brightness and auto-lock features.
Step 3. Adjust Auto-Lock Timing:
In the Display & Brightness settings, find the Auto-Lock option. Tap on it to view the available time durations for auto-locking your screen. You can choose from various options, such as 30 seconds, 1 minute, 2 minutes, and so on. Selecting a longer duration (for instance, 5 minutes or even longer) means your device will wait longer before it automatically dims the screen and requires a passcode to unlock.
Step 4. Understand the Impact:
While changing the auto-lock duration will not eliminate the need for a passcode, it will significantly reduce the frequency of prompts, especially if you frequently leave your phone idle for short periods. This adjustment can make your experience smoother and more convenient, particularly in scenarios where you check your phone often but don’t necessarily need to unlock it each time.
Method 4. Update iOS Software
Persistent requests to change your passcode can often be linked to software bugs or outdated versions of iOS. These issues can disrupt the normal functioning of your device and lead to unnecessary prompts that can be frustrating for users.

To address this, it's essential to ensure that your device is running the latest version of iOS. You can do this by navigating to Settings > General > Software Update. This section will check for any available updates. If there are updates, it's important to install them.
Installing the latest software updates can help resolve glitches caused by previous versions. Updates often contain bug fixes that enhance the overall performance of your device, which may also include corrections for issues like persistent passcode change prompts. Keeping your device updated not only improves its performance but also ensures that you have the latest security features and enhancements, contributing to a smoother user experience.
By utilizing these methods, you can effectively manage the frequency of iPhone passcode change requests while maintaining a level of security that suits your needs.
Part 3. Most Recommended: Dr.Fone - Screen Unlock for iOS Your Solution for Locked Devices
If you're searching for a reliable method to bypass the iPhone change passcode requirement, Dr.Fone - Screen Unlock (iOS) is an excellent option. This powerful tool is specifically designed to help users regain access to their devices without the stress of losing data.
Dr.Fone offers a user-friendly interface, making it accessible even for those who may not be tech-savvy. It effectively removes the passcode, allowing you to unlock your iPhone swiftly. This software is especially beneficial for individuals who have forgotten their passcode or are encountering repeated prompts to change their passcode.

Dr.Fone - Screen Unlock (iOS)
Bypass the iPhone Change Passcode Requirement.
- Simple, click-through, process.
- Unlock screen passwords from all iPhones and iPads.
- No tech knowledge is required, everybody can handle it.
- Supports the latest iOS version fully!

Steps to Use Dr.Fone - Screen Unlock (iOS) to Unlock iOS Device Without Passcode
The steps provided next show how to unlock the iPhone without a password with the help of this screen unlocking tool:
Step 1: Open the Screen Unlock Tool
Begin by downloading and installing Wondershare Dr.Fone on your computer. Once installed, navigate to Toolbox > Screen Unlock > iOS to launch the tool in a new window.

Step 2: Choose the Option to Unlock iOS
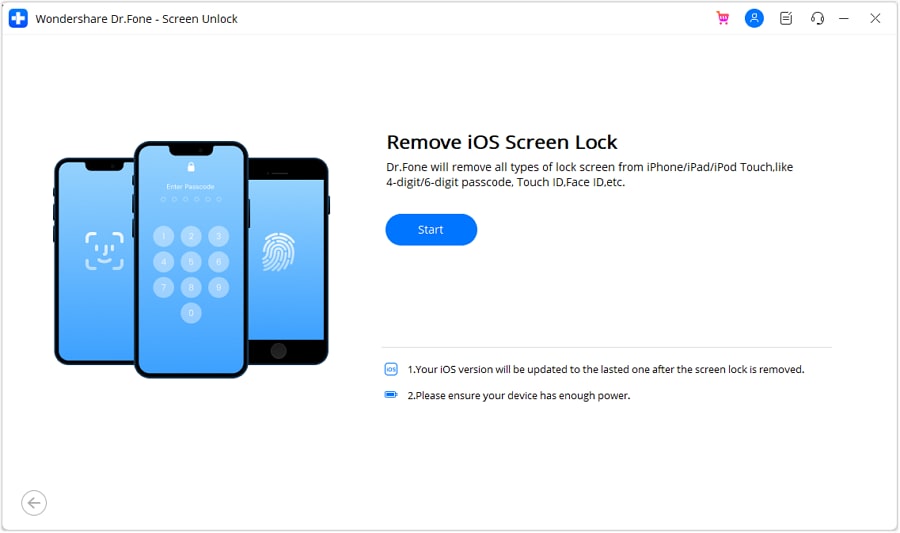
In the window that appears, click on the Unlock iOS Screen button to proceed with unlocking your iOS device's screen.

Step 3: Begin Unlocking Your iOS Device.
On the following screen, click Start to commence the unlocking process for your iOS device. Make sure that your device's battery level is sufficiently charged.
Step 4: Enter Recovery Mode on Your iDevice
Next, you'll need to put your iDevice into Recovery Mode. Follow the on-screen prompts that correspond to your specific model. If entering Recovery Mode proves ineffective, click the Try DFU Mode button at the bottom to access instructions for utilizing DFU Mode instead.

Step 5: Confirm Device Details
Once the user successfully places their iDevice into Recovery Mode, the platform automatically detects the Device Model and displays it in the appropriate section. If necessary, modify the model and choose the System Version that meets your requirements. When you're ready, click Start to unlock your device's screen.

Step 6: Download iOS Firmware
The screen will show the progress of the iOS firmware download. If you wish to cancel the process, simply click the Stop button. If the download is proceeding slowly, you can use the Copy button to copy the link and download the iOS firmware manually.

Step 7: Verify and Unlock the Device
Once the iOS firmware is successfully downloaded, it will be verified and shown on the following screen. Proceed by clicking the Unlock Now button to initiate the unlocking process.

Step 8: Confirm the Unlocking Process
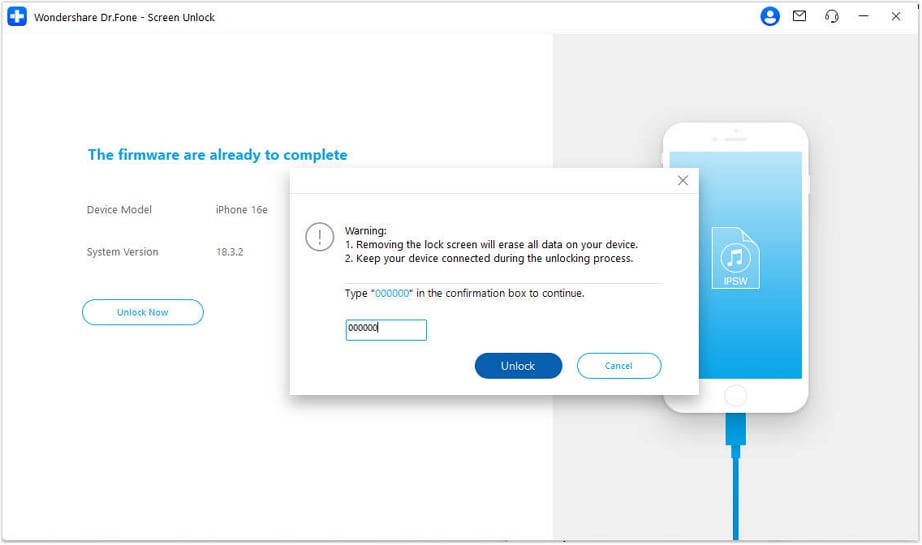
A prompt window will appear on your screen, requesting confirmation to proceed. Enter the required code and click Unlock to complete the process.
Step 9: Install iOS Firmware on Your Device
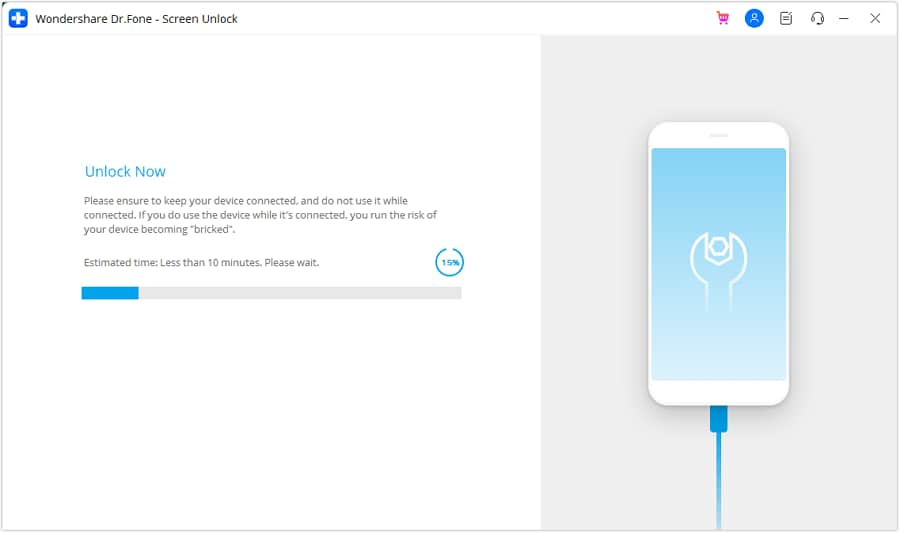
The following screen will display a progress bar indicating the unlocking process of your iOS device. It’s crucial to ensure that the device remains connected throughout this process; failing to do so could result in it becoming unusable.
Step 10: Successfully Unlock Your iOS Device
Once your iDevice is unlocked, click the Done button to complete the process. If your device remains locked, simply click Try Again to restart the unlocking procedure.

Conclusion
In conclusion, unlocking an iOS device can be a straightforward process when following the outlined steps carefully. By ensuring that the device is properly connected and that the correct firmware is downloaded, users can navigate potential challenges effectively. It's essential to remain attentive during each stage, especially when confirming the unlocking process. If complications arise, the option to retry offers peace of mind. Remember, you must change your iPhone unlock passcode for added security. For a hassle-free experience, consider trying Dr.Fone - Screen Unlock (iOS) to effortlessly regain access to your iDevice and enjoy its features once again.
FAQs
iPhone Unlock
- Access Locked iPhone
- 1. Reset Locked iPhone Without iTunes
- 2. Erase Locked iPhone
- 3. Get Into Locked iPhone
- 4. Factory Reset Locked iPhone
- 5. Reset Locked iPhone
- 6. iPhone Is Disabled
- 7. Fix iPhone Unavailable Issue
- 8. Forgot Locked Notes Password
- 9. Unlock Total Wireless Phone
- 10. Review of doctorSIM Unlock
- iPhone Lock Screen
- 1. Lock Apps on iPhone
- 2. Bypass iPhone Passcode
- 3. Unlock Disabled iPhone Without PC
- 4. Disable One More Minute Screen Time
- 5. Unlock iPhone Passcode Screen
- 6. Reset iPhone Password
- 7. Auto Lock Never on iPhone
- 8. Remove Carrier Lock/SIM Restrictions
- 9. Get iMei Number on Locked iPhone
- 10. Add a New Face ID
- 11. iPhone Passcode Expired Pop-Up
- 12. Control Display Rotation
- 13. Fix iPhone is Disabled Connect to iTunes
- 14. Fix Turn Passcode Off Greyed Out
- 15. Get iPhone out of Demo Mode
- 16. Unlock Unresponsive Screen
- 17. iPhone Ask for Passcode After Reset
- Remove iCloud Lock
- 1. Unlock an iPhone 7 Plus iCloud
- 2. iOS 18 iCloud Unlock
- 3. iOS 26 iCloud Unlock
- 4. Crack iCloud-Locked iPhones to Sell
- 5. Jailbreak iCloud Locked iPhone
- 6. What To Do If You Bought A Locked iPhone?
- 7. Fix iPhone Unavailable No Erase Option
- 8. Find iCloud Email Address on Apple Device
- 9. Broque Ramdisk iCloud Bypass
- Unlock Apple ID
- 1. Remove Payment Method on iPhone
- 2. Create a New Apple ID Account
- 3. Change Apple ID on iPad
- 4. Change Your Apple ID Password
- 5. Apple ID Not Active
- 6. Fix Wrong Apple ID Issue on iPhone
- 7. Fix This Person Is Not Active
- 8. New iCloud Terms and Conditions
- 9. Fix Apple ID Account Unavailable
- 10.Find Apple ID by IMEI
- 11. Unlink 2 iPhones with the Same Apple ID
- 12. Reset Password at appleid.apple.com
- 13. App Store Keep Asking for Password
- 14. Find Apple ID Password No Reset
- 15. Trusted Devices List Not Available
- Remove SIM Lock
- 1. Unlock iPhone Using Unlock Chip
- 2. Unlock iPhone for Free
- 3. Unlock iPhone Online
- 4. Factory Unlock iPhone
- 5. SIM Unlock iPhone
- 6. Unlock AT&T iPhone
- 7. Unlock iPhone with IMEI Code
- 8. Unlock iPhone without SIM Card
- 9. Unlock Cricket iPhone
- 10. Unlock iPhone with/without SIM Card
- 11. Unlock T-Mobile iPhone
- 12. Unlock Verizon iPhone
- 13. iPhone IMEI Checker
- 14. Unlock Xfinity iPhone
- 15. Unlock iPhone From The Carrier
- 16. Turbo SIM iPhone
- 17. Get the Sprint Unlock Codes
- 18. Unlock a Sprint Phone
- 19. Fix When iPhone Says No Sim
- Unlock iPhone MDM
- 1. Remove MDM from iPhone
- 2. Remote Management on iPhone
- 3. MDM VS MAM
- 4. Top MDM Bypass Tools
- 5. IoT Device Management
- 6. Unified Endpoint Management
- 7. Enterprise Mobility Management
- 8. Top 10 Proxy Websites
- 9. Hindilinks4u Alternatives
- Unlock Screen Time Passcode
- 1. Reset Screen Time Passcode
- 2. Turn Off Screen Time without Passcode
- 3. Screen Time Passcode Not Working
- 4. Disable Parental Controls
- 5. Bypass Screen Time on iPhone Without Password
- 6. Delete Screen Time History on iPhone
- 7. Turn Off Downtime on iPhone
- 8. Download Age Restricted Videos
- MDM Unblock Games/Websites
- 1. Basketball Stars Game Unblocked
- 2. Play Getaway Shootout Unblocked
- 3. Play Build Now GG Unblocked
- 4. BitLife Unblocked
- 5. 10 Best Unblocked Anime Websites
- 6. Best Unblocked Game Websites
- 7. 1v1 LOL Unblocked
- 8. Get Poly Track Unblocked
- 9. Music Websites Unblocked
- 10. Spotify Unblocked
- 11. Snow Rider 3D Unblocked
- Unlock Apple Watch
- Unlock iPod Touch
- ● Manage/transfer/recover data
- ● Unlock screen/activate/FRP lock
- ● Fix most iOS and Android issues
- Unlock Now Unlock Now Unlock Now



Daisy Raines
staff Editor