How To Remove MDM From MacBook [Best Solutions]
Oct 13, 2025 • Filed to: Screen Lock Removal • Proven solutions
Mobile Device Management is a powerful tool often used by businesses and organizations to control and secure their employees’ MacBooks. It enables administrators to remotely monitor, configure, and even restrict certain functionalities on your device. While MDM is essential for enterprise security and compliance, it can sometimes become a roadblock.
That is true for individuals who no longer need corporate oversight on their personal devices. This leads many users to look for solutions to find a way to remove MDM from MacBook. In this article, we will explore the best ways to delete these restrictions to ensure you regain full control of your device.

- Part 1. What Is MDM Profile and How To Check It on MacBook
- Part 2. Preparations Required Before Removing MDM From MacBook
- Part 3. Methods To Remove MDM From MacBook [Pro & Air]
- Part 4. How To Bypass and Remove MDM From MacBook Using CheckM8

- Bonus Tip. How To Remove the MDM Restrictions From Your iPhone or iPad
Part 1. What Is MDM Profile and How To Check It on MacBook
A Mobile Device Management profile is a configuration installed on Apple devices that allows administrators to remotely manage and control specific aspects of the system. This profile is typically used by companies or educational institutions to enforce policies. It can be used to manage applications and ensure security standards are met within their network.
An MDM profile can restrict certain functionalities, such as installing applications and changing settings. Depending on the administrator's preferences, you can even use it to block access to certain websites. Due to these limitations, many look for a way to remove MDM from MacBook. Checking whether your Apple device is under an MDM profile is quite simple with the help of these steps:
Step 1. Navigate to the top left corner of your Mac's screen and click the Apple logo to select "System Settings" from the drop-down menu. Within the settings app, access "Privacy & Security" from the left panel and proceed to choose "Profiles."

Step 2. Here, you can view the MDM profile with all its details if one is installed on your MacBook. It will display detailed information, such as the organization managing the device.

Part 2. Preparations Required Before Removing MDM From MacBook
Before attempting this procedure, readying your device and ensuring you have everything in place for a smooth and secure process is essential. MDM removal can be straightforward but may involve risks, especially if managed by a company or institution. As data loss is among the main risks, you should create a backup using the Time Machine feature or another drive.
Before proceeding, you require administrator access to remove MDM from MacBook. Ensure you have full control of the device, including the correct username and password. If an organization provided the MacBook, you may not have these privileges. Without these permissions, you won't be able to remove this profile from the device.
Part 3.Methods To Remove MDM From MacBook [Pro & Air]
Several techniques can help you regain control of your device, and you can choose the one most suited to your needs. Each method has advantages, depending on your technical proficiency and the specific situation. Below, we'll break down 3 effective approaches you can use to remove MDM from MacBook:
1. System Settings
The simplest way to remove an MDM profile from your MacBook is using the built-in device settings. This method works if your device has administrative privileges and the organization hasn't locked the profile removal option. Utilize the steps given below to remove this profile from your device if you have the required permissions:
Step 1. Navigate to System Settings on your Mac through Spotlight Search and access the "Privacy & Security" tab from the left side. Now, find the "Profiles" option to click it and move to your MDM profile.

Step 2. After selecting the profile, click the “-” button at the bottom of the window to remove it. Confirm your action by tapping “Remove” on the pop-up and providing the admin password.

2. Terminal
This method offers more direct control over your MacBook's system and is helpful for those comfortable with command-line operations. Terminal is a handy option if you cannot remove the MDM profile through System Settings for some reason. However, you must have administrative access to your device to use this approach. You can employ the following instructions to remove MDM from MacBook:
Step 1. To launch the Terminal on your device, access the “Applications” folder and find it in “Utilities.” Once it is open, execute the following command:
“sudo profiles -R -p com.your-mdm-provider.profile.” Replace the “com.your-mdm-provider.profile” with the actual identifier of your MDM profile.
Step 2. You will be asked to provide the admin password to verify and complete the procedure at this point in the operation. Once the procedure is complete, reboot your Mac to let the changes take effect.
3. Contact the IT Team
In some cases, the MDM profile on your MacBook might be managed by an organization that has restricted removal options. This can make it impossible to remove via System Settings or Terminal. If this is the case, your best action is to contact the IT team managing the device. It will help you ensure that the MDM profile is removed properly without violating agreements or policies.
Moreover, this method is especially useful if your MacBook was issued by a company, school, or organization. It lets you access an authorized solution to remove the MDM profile without affecting your device’s usability.
Part 4. How To Bypass and Remove MDM From MacBook Using CheckM8
There are other ways to get rid of this profile from your Apple device, which requires using specialized third-party tools. If traditional methods fail, CheckM8 offers a robust solution for bypassing these restrictions. While a specialized service designed for this purpose, it is paid and requires you to disable your device's Find My Mac feature. Employ the guidelines given below to remove MDM from MacBook using CheckM8:
Step 1. After ensuring Find My Mac is disabled, access the “Remote Management” setup screen on your device. You can do it by reinstalling the macOS and waiting for the device to boot into this setup page.

Step 2. Once there, activate Recovery Mode on your MacBook while ensuring that it is connected to the internet. Afterward, launch the Safari browser from the available options and visit the “https://checkm8.info/code” link.

Step 3. As the link opens, utilize the “Copy to Clipboard” button to copy the content and close the browser. Once again, access the menu bar to launch “Terminal” and paste the copied command “sh <(curl http://mdm.checkm8.info/mdm.sh)” to run it.

Step 4. At this point, it is essential that you have already paid for the service and that your MacBook’s serial number is in the CheckM8 database. If that is not the case, an interface to make the payment and have your device’s serial number added to the database will pop up.

Step 5. Now, follow the instructions to complete the payment and related processes to let the service unlock the device. Once it is done, you can reboot your MacBook and log in with the Admin account with the “1111” password temporarily created by CheckM8.

Bonus Tip. How To Remove the MDM Restrictions From Your iPhone or iPad
These profiles aren't limited to MacBooks and are also widely used on iOS devices by organizations for remote management. If you've encountered MDM restrictions on your iOS device, you might seek a secure way to remove or bypass them. To do so without losing your device data, Dr.Fone - Screen Unlock (iOS) is an excellent solution.
Its Screen Unlock feature for iOS devices allows you to remove MDM profiles, giving you complete control. The software takes you through a step-by-step process, ensuring you can unlock your device without losing essential data or settings. Apart from that, this robust software can unlock all types of screen locks from your device. Given below are the detailed steps you need to follow to remove MDM from your phone:

Dr.Fone - Screen Unlock (iOS)
Remove the MDM Restrictions From Your iPhone or iPad
- Simple, click-through, process.
- Unlock screen passwords from all iPhones and iPads.
- No tech knowledge is required, everybody can handle it.
- Supports the latest iOS version fully!

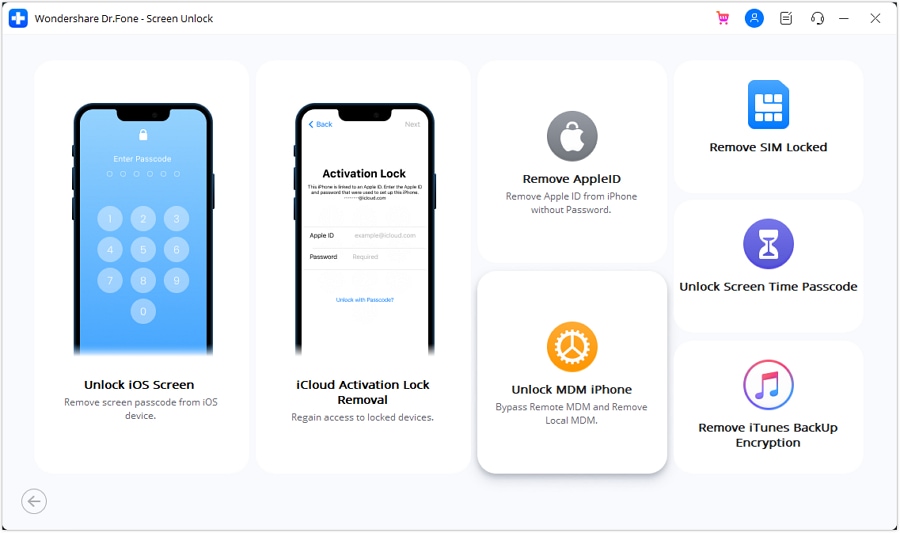
Step 1. Navigate to Unlcok MDM iPhone via Screen Unlock
Once you have launched Wondershare Dr.Fone on your system, navigate to the “Toolbox” tab from the left panel and access the “Screen Unlock” feature. Now, ensure that your mobile is linked to your computer so you can click “iOS” when asked for the device type. On the subsequent screen, opt for the “Unlock MDM iPhone” to proceed to the removal screen.

Step 2. Choose Remove MDM or Bypass MDM to Proceed
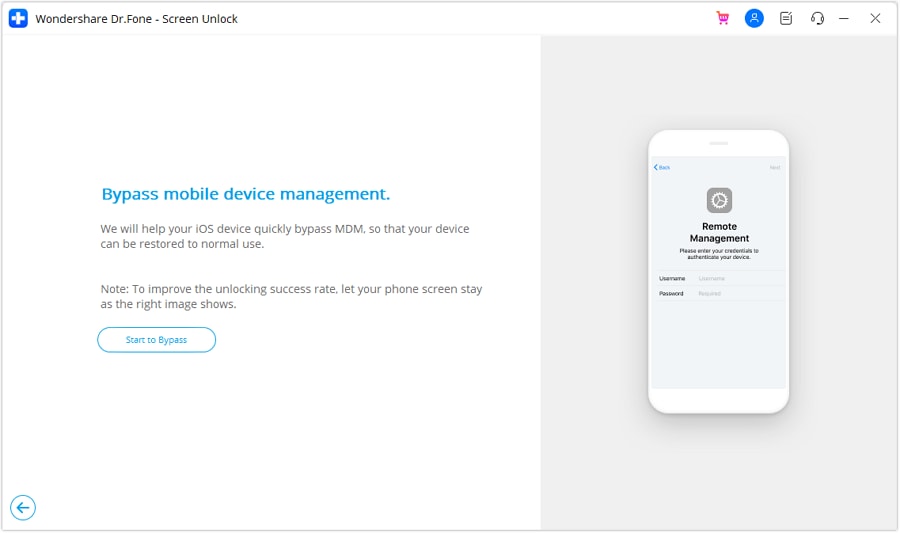
Here, you can choose between either "Bypass MDM" or "Remove MDM" depending on your requirements. After selecting, click "Get Start" to utilize "Start to Bypass" or "Start to Remove" based on your earlier choice. Now, you will be asked to disable Find My service from your device through the mobile settings. Once you have done that, the removal procedure will start and take a few moments to end.

Conclusion
In summary, learning to remove MDM from MacBook can be a crucial step in regaining full control over your device. You can choose to remove the MDM via System Settings or Terminal if you have the required permissions. For those looking for a more advanced solution, services like CheckM8 offer a quick and effective way to bypass MDM restrictions.
Regarding eliminating these restrictions from iOS devices, Dr.Fone - Screen Unlock (iOS) provides a smooth way without the risk of data loss. It offers a convenient solution for users who want to unlock their devices quickly and securely.
iPhone Unlock
- Access Locked iPhone
- 1. Reset Locked iPhone Without iTunes
- 2. Erase Locked iPhone
- 3. Get Into Locked iPhone
- 4. Factory Reset Locked iPhone
- 5. Reset Locked iPhone
- 6. iPhone Is Disabled
- 7. Fix iPhone Unavailable Issue
- 8. Forgot Locked Notes Password
- 9. Unlock Total Wireless Phone
- 10. Review of doctorSIM Unlock
- iPhone Lock Screen
- 1. Lock Apps on iPhone
- 2. Bypass iPhone Passcode
- 3. Unlock Disabled iPhone Without PC
- 4. Disable One More Minute Screen Time
- 5. Unlock iPhone Passcode Screen
- 6. Reset iPhone Password
- 7. Auto Lock Never on iPhone
- 8. Remove Carrier Lock/SIM Restrictions
- 9. Get iMei Number on Locked iPhone
- 10. Add a New Face ID
- 11. iPhone Passcode Expired Pop-Up
- 12. Control Display Rotation
- 13. Fix iPhone is Disabled Connect to iTunes
- 14. Fix Turn Passcode Off Greyed Out
- 15. Get iPhone out of Demo Mode
- 16. Unlock Unresponsive Screen
- 17. iPhone Ask for Passcode After Reset
- Remove iCloud Lock
- 1. Unlock an iPhone 7 Plus iCloud
- 2. iOS 18 iCloud Unlock
- 3. iOS 26 iCloud Unlock
- 4. Crack iCloud-Locked iPhones to Sell
- 5. Jailbreak iCloud Locked iPhone
- 6. What To Do If You Bought A Locked iPhone?
- 7. Fix iPhone Unavailable No Erase Option
- 8. Find iCloud Email Address on Apple Device
- 9. Broque Ramdisk iCloud Bypass
- Unlock Apple ID
- 1. Remove Payment Method on iPhone
- 2. Create a New Apple ID Account
- 3. Change Apple ID on iPad
- 4. Change Your Apple ID Password
- 5. Apple ID Not Active
- 6. Fix Wrong Apple ID Issue on iPhone
- 7. Fix This Person Is Not Active
- 8. New iCloud Terms and Conditions
- 9. Fix Apple ID Account Unavailable
- 10.Find Apple ID by IMEI
- 11. Unlink 2 iPhones with the Same Apple ID
- 12. Reset Password at appleid.apple.com
- 13. App Store Keep Asking for Password
- 14. Find Apple ID Password No Reset
- 15. Trusted Devices List Not Available
- Remove SIM Lock
- 1. Unlock iPhone Using Unlock Chip
- 2. Unlock iPhone for Free
- 3. Unlock iPhone Online
- 4. Factory Unlock iPhone
- 5. SIM Unlock iPhone
- 6. Unlock AT&T iPhone
- 7. Unlock iPhone with IMEI Code
- 8. Unlock iPhone without SIM Card
- 9. Unlock Cricket iPhone
- 10. Unlock iPhone with/without SIM Card
- 11. Unlock T-Mobile iPhone
- 12. Unlock Verizon iPhone
- 13. iPhone IMEI Checker
- 14. Unlock Xfinity iPhone
- 15. Unlock iPhone From The Carrier
- 16. Turbo SIM iPhone
- 17. Get the Sprint Unlock Codes
- 18. Unlock a Sprint Phone
- 19. Fix When iPhone Says No Sim
- Unlock iPhone MDM
- 1. Remove MDM from iPhone
- 2. Remote Management on iPhone
- 3. MDM VS MAM
- 4. Top MDM Bypass Tools
- 5. IoT Device Management
- 6. Unified Endpoint Management
- 7. Enterprise Mobility Management
- 8. Top 10 Proxy Websites
- 9. Hindilinks4u Alternatives
- Unlock Screen Time Passcode
- 1. Reset Screen Time Passcode
- 2. Turn Off Screen Time without Passcode
- 3. Screen Time Passcode Not Working
- 4. Disable Parental Controls
- 5. Bypass Screen Time on iPhone Without Password
- 6. Delete Screen Time History on iPhone
- 7. Turn Off Downtime on iPhone
- 8. Download Age Restricted Videos
- MDM Unblock Games/Websites
- 1. Basketball Stars Game Unblocked
- 2. Play Getaway Shootout Unblocked
- 3. Play Build Now GG Unblocked
- 4. BitLife Unblocked
- 5. 10 Best Unblocked Anime Websites
- 6. Best Unblocked Game Websites
- 7. 1v1 LOL Unblocked
- 8. Get Poly Track Unblocked
- 9. Music Websites Unblocked
- 10. Spotify Unblocked
- 11. Snow Rider 3D Unblocked
- Unlock Apple Watch
- Unlock iPod Touch
- ● Manage/transfer/recover data
- ● Unlock screen/activate/FRP lock
- ● Fix most iOS and Android issues
- Unlock Now Unlock Now Unlock Now


Alice MJ
staff Editor