How to Reset Restrictions Passcode Without Computer: A Comprehensive Guide

Jun 30, 2026 • Filed to: Screen Lock Removal • Proven solutions
 TL;DR:
To reset a forgotten iPhone Restrictions or Screen Time passcode without a computer, you must completely erase the device using iCloud or Settings, whereas bypassing the lock without data loss requires a desktop application.
● Entering the default passcode 1234 grants access to the feature if a personal restriction PIN was never manually configured on the device.
● Resetting the passcode natively through the iPhone Settings menu or remotely via iCloud's Find My feature will permanently delete all data and content from your device.
● Retaining your data requires connecting to a computer to either remove the lock using Dr.Fone - Screen Unlock (iOS) after disabling Find My iPhone, or extracting the PIN from an iTunes backup file named com.apple.springboard.plist using iBackupBot or iPhone Backup Extractor.
Ask AI for a summary
 ChatGPT
 Perplexity
 Gemini
 Claude
 Grok
Grok
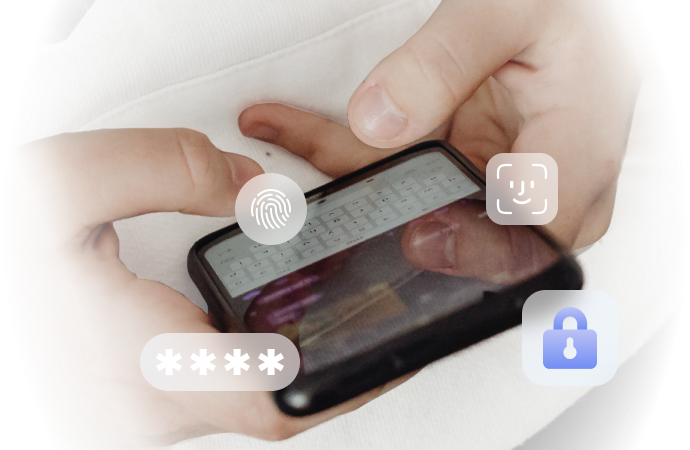
Has anyone found themselves in a situation where they can't remember the restriction passcode on an iPhone? You might have set up a Screen Time passcode to prevent your child from constantly using your device, but now you’ve forgotten it and can’t disable the restrictions. If this sounds familiar and you are wondering how to reset the restrictions passcode on an iPhone without a computer, you're not alone. Restrictions, now known as Screen Time in the latest iOS versions, are a common feature used to limit app and device usage. However, forgetting the passcode can be a real hassle. In this article, we’ll explore effective ways to reset restrictions on a passcode without a computer. Let's get started.
- Part 1: What Is a Restrictions Passcode?
- Part 2: How to Reset Your iPhone Restrictions Passcode Without Using a Computer
- Method 1: Reset Restrictions Passcode Using iCloud
- Method 2: Reset Your iPhone Restrictions Passcode Directly from Settings
- Method 3: Reset Your iPhone Restrictions Passcode Using iTunes
- Method 4: Reset Your Restrictions Passcode

- Part 3: Bonus: How to Reset Restrictions Passcode with Dr.Fone - Screen Unlock (iOS)
- Part 4: Is There a Default Restrictions/Screen Time Passcode?
- Part 5: Additional Tips: Avoiding Problems in the Future
Part 1: What Is a Restrictions Passcode?
Before we discuss how to reset the restriction passcode, you might wonder what it is. The Apple restriction passcode is a security feature designed to prevent anyone, including your children, from changing your restriction settings. The restricted passcode on the iPhone or iPad must be entered to access these settings.
However, because this passcode isn’t used often, it’s easy to forget. If you’ve found yourself thinking, "I forgot the restrictions passcode iPad or iPhone," you’re not alone. Resetting it can be a challenge. Below, we've outlined several methods to help you remove restrictions from your passcode. Keep reading to find out how.
1.1 Why do people forget their restrictions password?
It may seem unusual to forget a password, but it happens more often than you think. People usually forget their Restrictions passcode for the following reasons:
Use Less Often: The passcode is easy to forget if you don't change or check your limits settings often.
Complicated Codes: Many people pick passcodes that are hard to remember, which can be a problem if you don't use them often.
Multiple Devices: If you are in charge of more than one Apple device, it can be hard to remember the different passcodes for each one.
Passcode Confusion: Users can forget their passcodes if they mix up the Restrictions passcode with another passcode on their device, such as the screen unlock code.
Part 2: How to Reset Your iPhone Restrictions Passcode Without Using a Computer
Method 1: Reset Restrictions Passcode Using iCloud
If you know your Apple ID password, you can use the Find My feature to erase your iPhone and reset the Restrictions passcode. Remember that this method will delete all data and content from your iPhone. Before you go on, ensure you have a copy of any important items.

Here’s how you can use iCloud to reset the Restrictions passcode on your iPhone:
- Step 1: Get on your PC and go to icloud.com in a web window. If you're using a different iOS device, open the Find My app as well.
- Step 2: Log in with your Apple ID. Confirm that your Apple ID is the same for the iPhone you wish to restart. From the main screen of your Apple ID, choose "Find My."
- Step 3: Click on All Devices and choose the iPhone with the forgotten Restrictions passcode. Select Erase iPhone to delete all content and data from the device.
Method 2: Reset Your iPhone Restrictions Passcode Directly from Settings
If you want to reset the restrictions passcode on your iPhone without a computer, you can do it through your iPhone’s Settings. Remember, though, that this method will erase all content and settings on your device. You must know your current restriction passcode to move forward.

Steps to Follow:
- Open Settings on your iPhone.
- Tap on the Reset option.
- Choose Erase All Content and Settings.
Note: This process will remove all data from your device, so ensure you have a backup before proceeding.
Method 3: Reset Your iPhone Restrictions Passcode Using iTunes
If you have access to a computer, you can reset your restricted passcode on your iPhone using iTunes. Before starting, turn off the “Find My iPhone” feature from the iCloud settings, as the process won’t work if this feature is enabled. Follow these steps:
Step 1: Ensure your iOS device is backed up and disable "Find My iPhone."
Step 2: Access the iTunes application and link the iOS device and computer via a USB cable. Check to see if iTunes has the most recent version.
Step 3: Locate the "Restore iPhone" button ( on the left side of the Summary button) and press on it.

Step 4: When prompted, click "Restore" to confirm.

Step 5: In the window that appears, select "Next" and then press "Agree" to agree to the rules.

Step 6: Allow iTunes to download the latest iOS version and restore your device.

Method 4: Reset Your Restrictions Passcode
4.1 On a Windows PC:
Step 1: Install iBackupBot
- Begin by downloading and installing iBackupBot for iTunes on your Windows PC.
Step 2: Create a Backup with iTunes
- Connect your iPhone to your computer. Open iTunes, select your device icon, go to the Summary tab, and click Back Up Now to create a backup of your iPhone.
Step 3: Launch iBackupBot
- Open the iBackupBot application that you just installed.
Step 4: Navigate to the Preferences File
- Go to System Files, HomeDomain, Library, and Preferences. For assistance, use the onscreen guide.

Step 5: Locate the Configuration File
- Find the Image named “com.apple.springboard.plist” in the preferences folder.
Step 6: Open the File
- Right-click on “com.apple.springboard.plist” and choose to open it with Wordpad or Notepad.

Step 7: Identify the Passcode Section
Search for these lines in the file:

Step 8: Insert the New Passcode
Add these lines immediately after the section identified in Step 7:
Step 9: Save Your Changes
- Save and close the file to apply your changes.
Step 10: Restore Your iPhone
- Connect your iPhone and restore it using the backup you created earlier.

It's okay if you don't fully understand what you've done. For peace of mind, here's a brief explanation: You edited your backup file and changed the ''Restrictions Passcode' to ''1234'. After restoring that backup, your forgotten passcode issue is solved. The new passcode is now 1234!
4.2 On a Mac PC:
Step 1: Backup Your iPhone
- Establish a connection between your iPhone and Mac using a USB cord. Open iTunes and create a backup of your iPhone. Note where the backup files are stored.
Step 2: Download iPhone Backup Extractor
- Obtain the iPhone Backup Extractor application by downloading it from the provided hyperlink. Install and run the app, selecting Read Backups from your iPhone. Download iPhone Backup Extractor
Step 3: Extract iOS Files
- In the iPhone Backup Extractor, choose iOS Files and click Extract to access the backup contents.
Step 4: Find the Passcode
- Locate the file com.apple.springboard.list in the extracted data. Look for SBParentalControlsPin—the number next to it, such as 1234, is your restrictions Passcode. Note it down for future use.

Bonus Part 3: How to Reset Restrictions Passcode with Dr.Fone - Screen Unlock (iOS)
If you can connect your iPhone to a computer, resetting the restrictions passcode on your iPhone becomes straightforward. We suggest using Dr.Fone - Screen Unlock (iOS) for your needs. This tool offers various iOS unlocking features, including unlocking your iOS screen and Apple ID and removing MDM restrictions. It can also reset restrictions on passcodes.
Unlike other methods, Dr.Fone - Screen Unlock (iOS) ensures no data is lost during resetting. If you need help with issues such as a forgotten Screen Time passcode, a forgotten parental control passcode, or problems with your Screen Time passcode, you can rely on Dr.Fone - Screen Unlock for a solution.
Dr.Fone - Screen Unlock (iOS)
Reset Restrictions Passcode Without Hassle.
- Simple, click-through, process.
- Unlock screen passwords from all iPhones and iPads.
- No tech knowledge is required, everybody can handle it.
- Supports the latest iOS version fully!


We shall look at how to use Dr.Fone - Screen Unlock (iOS) to reset the Restrictions passcode on an iPhone.
Step 1: Launch the Dr.Fone Tool
Start by opening Wondershare Dr.Fone on your computer. Navigate to Toolbox, then choose Screen Unlock and select iOS to open the right tool.

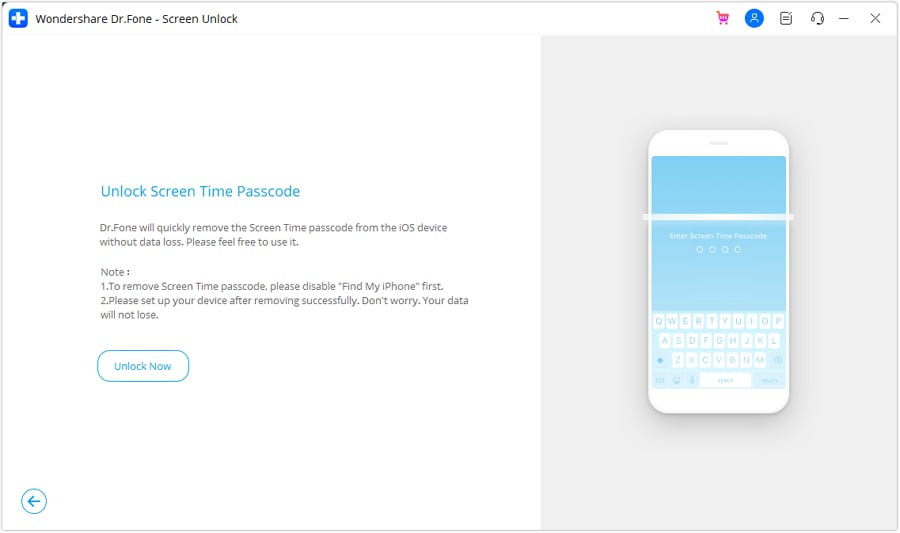
Step 2: Choose the Unlock Option
In the list of options, pick Unlock Screen Time Passcode. This will start the process of unlocking your Screen Time passcode.

Step 3: Connect Your iOS Device
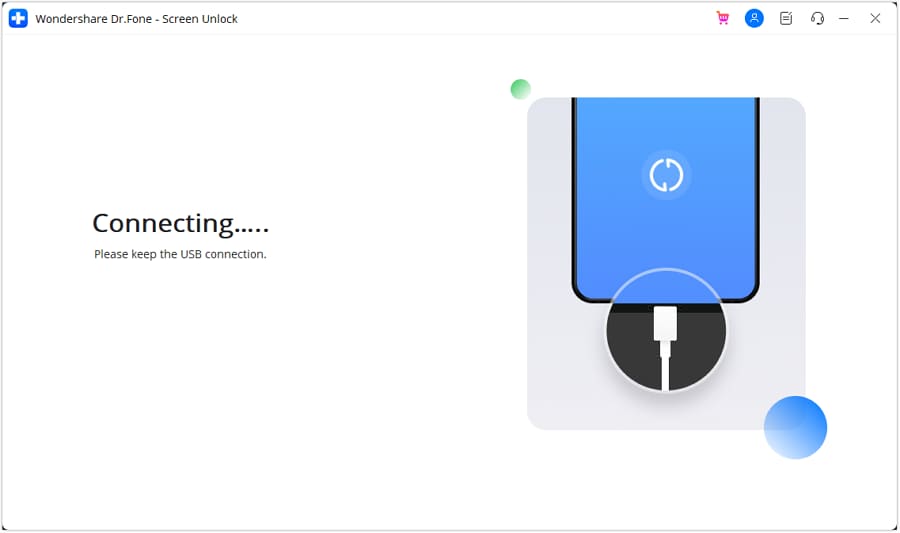
Use a USB cable to establish a connection between your iOS device and the computer.
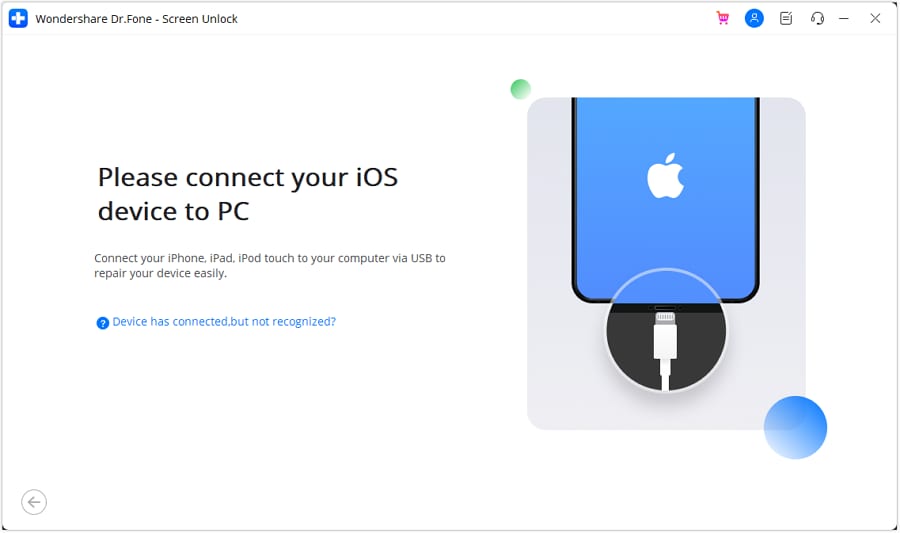
The platform will automatically identify your device and display its current status on the screen.
Step 4: Begin the Unlock Process
Once your device is connected, click the Unlock Now button to start unlocking.
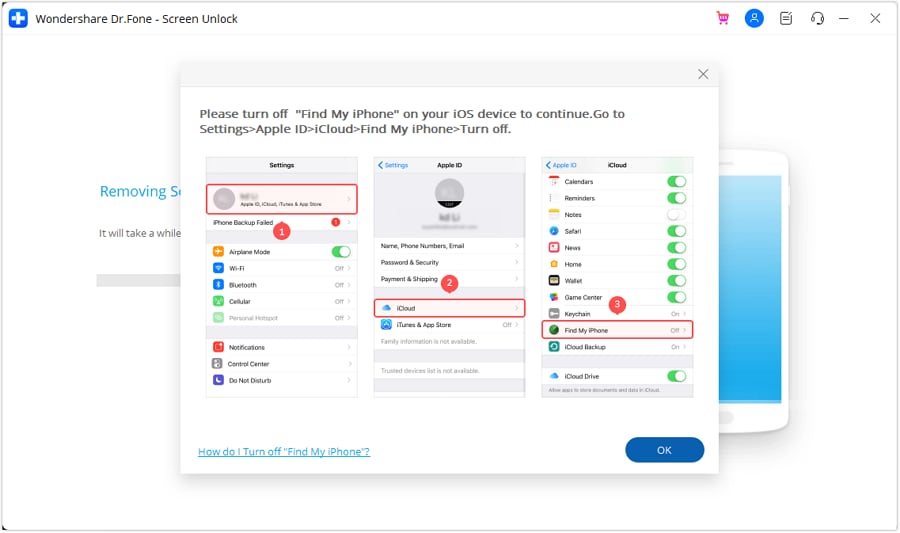
Step 5: Disable Find My iPhone
Turning off the Find My iPhone feature is an essential step to take. Go to Settings on your iPhone, tap your name at the top, then go to Find My, and toggle off Find My iPhone. Confirm by clicking OK on your computer screen.
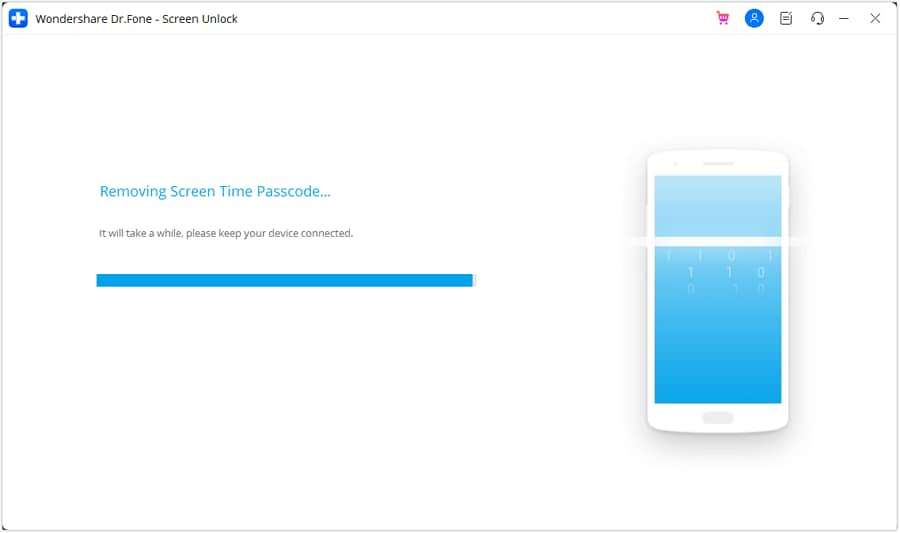
Step 6: Monitor the Unlocking Progress
You can track the unlocking procedure via the progress bar.
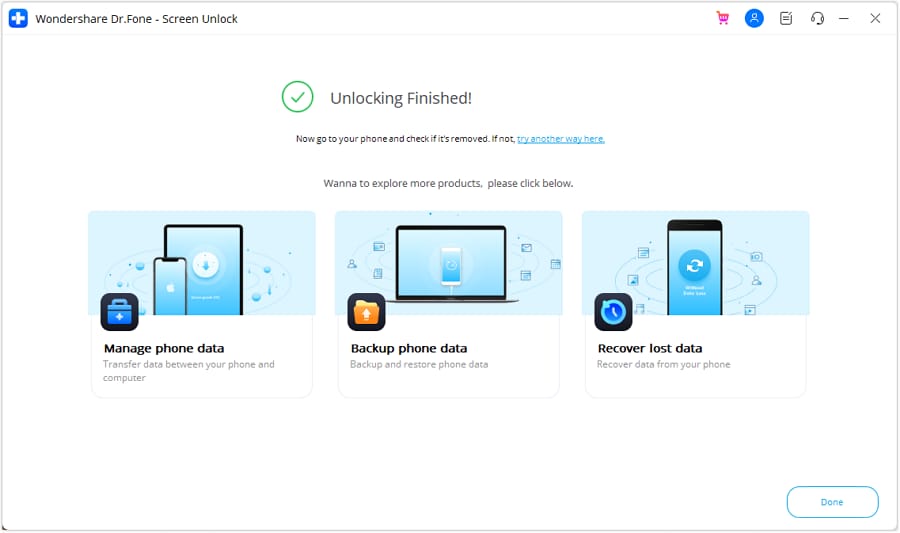
Step 7: Complete the Unlocking Process
A confirmation message will be displayed on the platform upon unlocking the device. Click Done to finish the process.
Part 4: Is There a Default Restrictions/Screen Time Passcode?
The screen time feature can usually be used with or without a passcode. However, some users are still asked to enter one even if they haven’t set a passcode. This happens because there is a default restrictions passcode for all devices. For those who haven’t set up a Screen Time passcode, simply entering 1234 can grant access to the feature.
Part 5: Additional Tips: Avoiding Problems in the Future
It's very important to take steps to avoid the problem again after you've changed your restrictions passcode. Here are some ideas:
1. Use an easy-to-remember password
Choose a strong but simple password. Do not use birthdays, popular numbers, or sequences that are easy for others to figure out.
2. Allow recovery of your Apple ID
Ensure your device is set up so you can use your Apple ID to recover the PIN. This function can save you if you forget your passcode again.
3. Backing up often
Back up your device to iCloud or iTunes often. If you have recent backups, you can restore your device and remove a lost passcode without losing any data.
4. Keep passcodes safe.
If you want to keep your passwords safe, you might want to use a password manager. So, you won't have to count on your memory alone.
Conclusion
It's unpleasant to forget your restrictions passcode, but you can quickly access your device with the right tools and techniques. You can use iCloud to reset the passcode, restore your device from a backup, or use a tool like Dr.Fone. Ensure you pick the right method for your needs, and always keep your passcodes safe.
If you have this problem, you might want to use Dr.Fone — Screen Unlock (iOS) for a quick and easy fix. With this tool, you can quickly get back in charge of your device.


iPhone Unlock
- Access Locked iPhone
- 1. Reset Locked iPhone Without iTunes
- 2. Erase Locked iPhone
- 3. Get Into Locked iPhone
- 4. Factory Reset Locked iPhone
- 5. Reset Locked iPhone
- 6. iPhone Is Disabled
- 7. Fix iPhone Unavailable Issue
- 8. Forgot Locked Notes Password
- 9. Unlock Total Wireless Phone
- 10. Review of doctorSIM Unlock
- iPhone Lock Screen
- 1. Lock Apps on iPhone
- 2. Bypass iPhone Passcode
- 3. Unlock Disabled iPhone Without PC
- 4. Disable One More Minute Screen Time
- 5. Unlock iPhone Passcode Screen
- 6. Reset iPhone Password
- 7. Disable iOS Call Recording Notification
- 8. Remove Carrier Lock/SIM Restrictions
- 9. Get iMei Number on Locked iPhone
- 10. Add a New Face ID
- 11. iPhone Passcode Expired Pop-Up
- 12. Control Display Rotation
- 13. Fix iPhone is Disabled Connect to iTunes
- 14. Fix Turn Passcode Off Greyed Out
- 15. Get iPhone out of Demo Mode
- 16. Unlock Unresponsive Screen
- 17. iPhone Ask for Passcode After Reset
- Remove iCloud Lock
- 1. Unlock an iPhone 7 Plus iCloud
- 2. iOS 18 iCloud Unlock
- 3. iOS 26 iCloud Unlock
- 4. Crack iCloud-Locked iPhones to Sell
- 5. Jailbreak iCloud Locked iPhone
- 6. What To Do If You Bought A Locked iPhone?
- 7. Fix iPhone Unavailable No Erase Option
- 8. Find iCloud Email Address on Apple Device
- 9. Broque Ramdisk iCloud Bypass
- Unlock Apple ID
- 1. Remove Payment Method on iPhone
- 2. Create a New Apple ID Account
- 3. Change Apple ID on iPad
- 4. Change Your Apple ID Password
- 5. Apple ID Not Active
- 6. Fix Wrong Apple ID Issue on iPhone
- 7. Fix This Person Is Not Active
- 8. New iCloud Terms and Conditions
- 9. Fix Apple ID Account Unavailable
- 10.Find Apple ID by IMEI
- 11. Unlink 2 iPhones with the Same Apple ID
- 12. Reset Password at appleid.apple.com
- 13. App Store Keep Asking for Password
- 14. Find Apple ID Password No Reset
- 15. Trusted Devices List Not Available
- Remove SIM Lock
- 1. Unlock iPhone Using Unlock Chip
- 2. Unlock iPhone for Free
- 3. Unlock iPhone Online
- 4. Factory Unlock iPhone
- 5. SIM Unlock iPhone
- 6. Unlock AT&T iPhone
- 7. Unlock iPhone with IMEI Code
- 8. Unlock iPhone without SIM Card
- 9. Unlock Cricket iPhone
- 10. Unlock iPhone with/without SIM Card
- 11. Unlock T-Mobile iPhone
- 12. Unlock Verizon iPhone
- 13. iPhone IMEI Checker
- 14. Unlock Xfinity iPhone
- 15. Unlock iPhone From The Carrier
- 16. Turbo SIM iPhone
- 17. Get the Sprint Unlock Codes
- 18. Unlock a Sprint Phone
- 19. Fix When iPhone Says No Sim
- Unlock iPhone MDM
- 1. Remove MDM from iPhone
- 2. Remote Management on iPhone
- 3. MDM VS MAM
- 4. Top MDM Bypass Tools
- 5. IoT Device Management
- 6. Unified Endpoint Management
- 7. Enterprise Mobility Management
- 8. Top 10 Proxy Websites
- 9. Hindilinks4u Alternatives
- Unlock Screen Time Passcode
- 1. Reset Screen Time Passcode
- 2. Turn Off Screen Time without Passcode
- 3. Screen Time Passcode Not Working
- 4. Disable Parental Controls
- 5. Bypass Screen Time on iPhone Without Password
- 6. Delete Screen Time History on iPhone
- 7. Turn Off Downtime on iPhone
- 8. Download Age Restricted Videos
- MDM Unblock Games/Websites
- 1. Basketball Stars Game Unblocked
- 2. Play Getaway Shootout Unblocked
- 3. Play Build Now GG Unblocked
- 4. BitLife Unblocked
- 5. 10 Best Unblocked Anime Websites
- 6. Best Unblocked Game Websites
- 7. 1v1 LOL Unblocked
- 8. Get Poly Track Unblocked
- 9. Music Websites Unblocked
- 10. Spotify Unblocked
- 11. Interstellar Proxy Review
- Unlock Apple Watch
- Unlock iPod Touch
- ● Manage/transfer/recover data
- ● Unlock screen/activate/FRP lock
- ● Fix most iOS and Android issues
- Free Download Free Download Free Download

James Davis
staff Editor