
Easy Steps to Remove Meraki Management iPad iPhone

Jun 30, 2026 • Filed to: Screen Lock Removal • Proven solutions
 TL;DR:
You can remove the Meraki Management profile from an iPad or iPhone directly through the device settings if you possess the administrator credentials, or use Dr.Fone - Screen Unlock (iOS) to bypass the restriction if you lack the passcode.
● Devices enrolled via Apple Automated Device Enrollment (ADE) restrict local removal and require an administrator to delete the configuration profile directly from the ADE Dashboard, Apple Business Manager, or Apple School Manager.
● Bypassing the management lock without credentials using Dr.Fone - Screen Unlock (iOS) requires the Find My feature to be manually disabled in the device's iCloud settings prior to initiating the process.
● Attempting to eliminate the Meraki profile through a standard factory reset will fail without administrator permissions, as MDM-enrolled devices restrict unauthorized content erasure.
Ask AI for a summary
 ChatGPT
 Perplexity
 Gemini
 Claude
 Grok
Grok
Find out how to easily remove meraki management from ipad by following this detailed instructions. Discover several approaches and master the devices with easy step-by-step instructions.
Managing your iOS devices with Meraki offers convenient remote configuration and app management. However, it can also impose restrictions that may affect device functionality and privacy. Whether you’re switching devices, managing privacy, or encountering functionality issues, removing Meraki management from iPad or iPhone can be beneficial.
Below is a complete guide on how to remove Meraki MDM from iPad or iPhone, along with a reliable solution for bypassing MDM restrictions.
- Part 1. Understanding Meraki Management
- Part 2. Guide For Users to Remove Meraki MDM from iPad
- Solution 1: Remove Meraki profile from iPad/iPhone via Settings
- Solution 2: Remove Meraki profile from the System Manager

- Part 3: How to Remove Meraki MDM from iPad/iPhone without Passcode
- Part 4. How to Remove Meraki Management from Devices
Part 1. Understanding Meraki Management
Before we discuss the steps to remove Meraki Management from the iPad, let’s briefly examine what it is and why it's used.
Meraki Management is a remote mobile device management (MDM) solution primarily used by schools and businesses. It allows these organizations to oversee and control devices provided to their users—such as iPads—by implementing restrictions to ensure they’re used strictly for intended purposes. For example, educational institutions that distribute iPads to students can use Meraki Management to restrict access, limiting usage to educational resources only.
One of the standout features of Meraki Management is its streamlined approach to configuration and data deployment across multiple devices from a single, centralized system. Companies utilize this system to share files or apps seamlessly across employee devices without requiring physical handling. Similarly, schools can distribute learning materials or applications to student devices effortlessly.
Part 2.Guide For Users to Remove Meraki MDM from iPad
As long as you know your password for Meraki MDM, the best way to remove Meraki management from an iPad or iPhone is to delete the profile in Settings. If the supervisor gives you the MDM password, you can delete Meraki MDM right away. They can also be taken off the Meraki homepage if they are the administrator. Now you can remove Meraki MDM from iPad with a password by following these steps.
Solution 1: Remove Meraki profile from iPad/iPhone via Settings
If you have the correct username and password, you can remove Meraki management from iPad or iPhone through the Settings menu. Follow these simplified steps:
Step 1: Open Settings
From the Home Screen, tap Settings.
Step 2: Navigate to General
Scroll down and select General.
Step 3: Access Device Management
Choose VPN & Device Management, then tap the Meraki Management profile.
Step 4: Remove Management
Select Remove Management and enter your credentials to confirm the removal. This will successfully remove Meraki MDM from iPad or iPhone.

Solution 2: Remove Meraki profile from the System Manager
If the device was enrolled through Apple Automated Device Enrollment (ADE), the Meraki MDM unenroll device option may be restricted. To permanently remove Meraki Management from iPad or iPhone in this case, adjustments should be made using the ADE Dashboard, Apple Business Manager, or Apple School Manager. Follow the instructions given below:
Step 1: Access System Manager
In System Manager, go to Manage and then Settings.
Step 2: Locate the Profile Configuration
Find the relevant profile in the list and click to enter Profile Configuration.
Step 3: Delete Profile
Scroll to the bottom, select Delete this profile, confirm by clicking OK, and then choose Save to complete the removal.

Part 3: How to Remove Meraki MDM from iPad/iPhone without Passcode
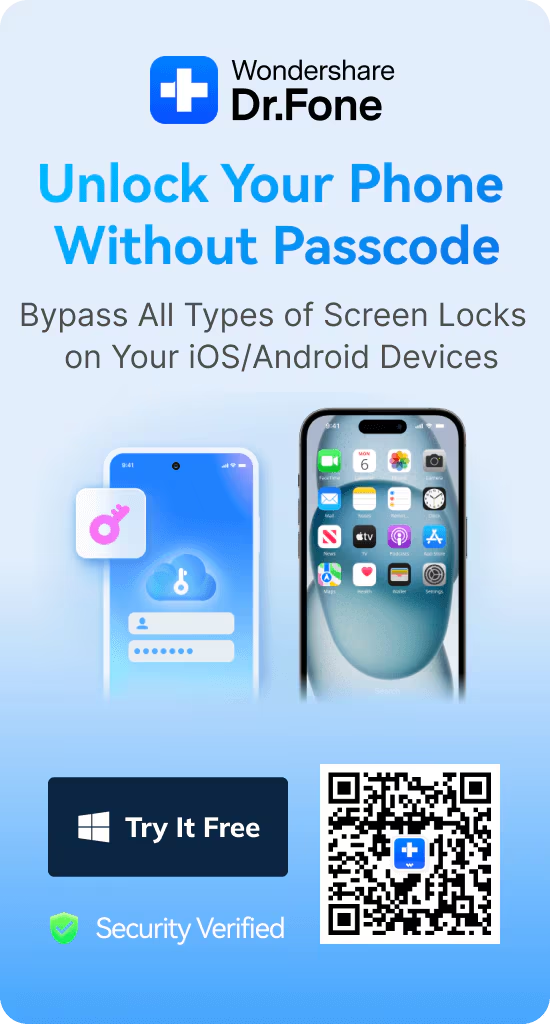
If an administrator supervises your iPad or iPhone, removing Meraki management by yourself can be challenging. Even if you manage to take it off, there's a high chance the Meraki MDM profile may return after updates or restores. Want a straightforward, complete solution to eliminate Meraki control? Dr.Fone – Screen Unlock (iOS) is the best recommended solution. This powerful tool removes any mobile device management profile, regardless of the type, from any iOS device. Best of all, none of your data is lost in the process.
Additionally, you gain full control over your device's security settings. You can independently unlock a disabled iPad or iPhone, disable Screen Time without a passcode, and remove your Apple ID without needing a password. All of this can be done on your own, from the comfort of your home.
Dr.Fone - Screen Unlock (iOS)
Remove Meraki MDM from iPad/iPhone without Passcode.
- Simple, click-through, process.
- Unlock screen passwords from all iPhones and iPads.
- No tech knowledge is required, everybody can handle it.
- Supports the latest iOS version fully!


With the following simple steps, you can remove Meraki Mobile Device Manager (MDM) from your iPad/iPhone in about five minutes and get full control back.
Step 1: Launch the Screen Unlock Tool
Begin by opening Wondershare Dr.Fone on your computer. In the main menu, navigate to Toolbox and select Screen Unlock, then choose iOS to access the tool for removing Meraki Management.

Step 2: Access the Unlock MDM Function
Once the tool is open, go to the Unlock MDM iPhone option. This step is essential for unlocking the MDM restriction on your iPad or iPhone.

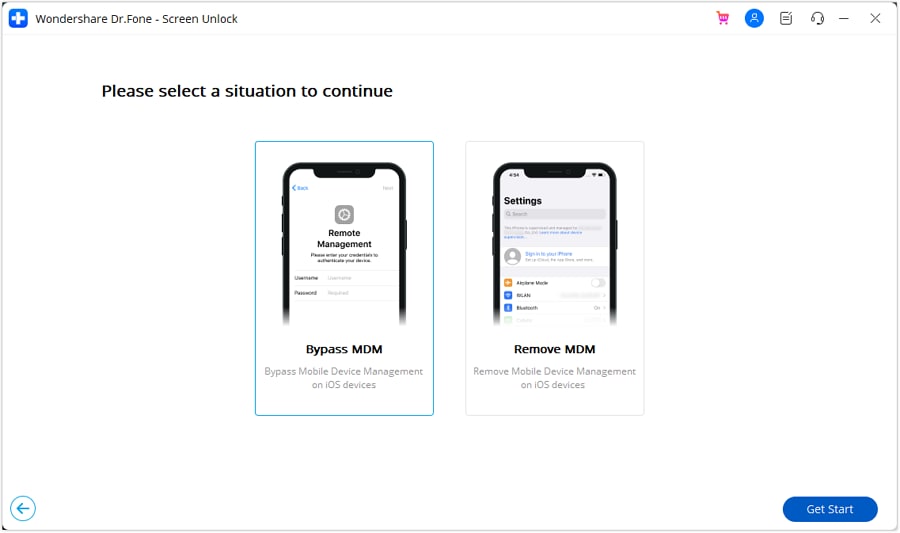
Step 3: Choose the Bypass MDM Option
On the next screen, you’ll see two options. Select Bypass MDM and then click Get Started at the bottom-right corner to proceed.
Step 4: Start the MDM Bypass Process
A new screen will appear. Click on Start to Bypass to initiate the MDM lock removal from your device.

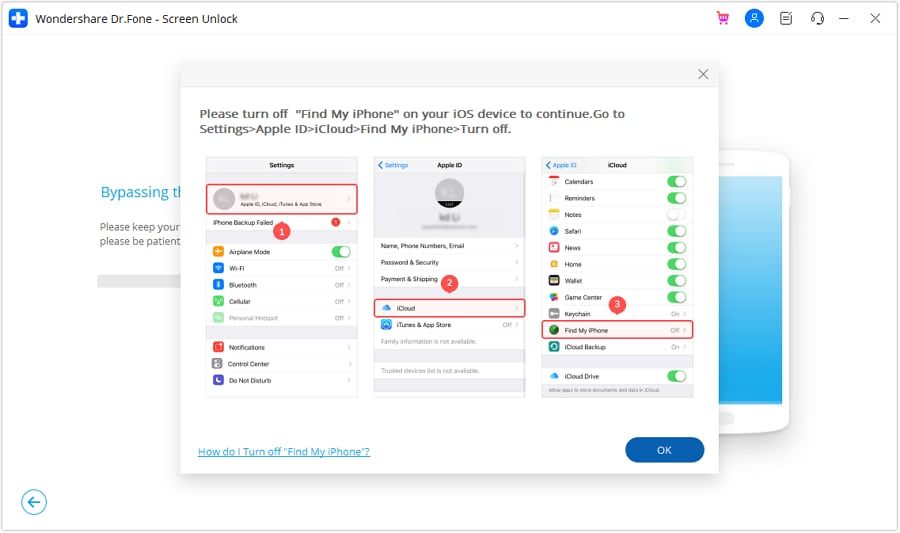
Step 5: Disable the Find My Feature
You’ll be prompted to turn off the Find My feature on your iPad or iPhone. Open Settings, tap your name at the top, go to iCloud, and toggle off Find My. Once this is done, confirm by clicking OK on your computer screen.
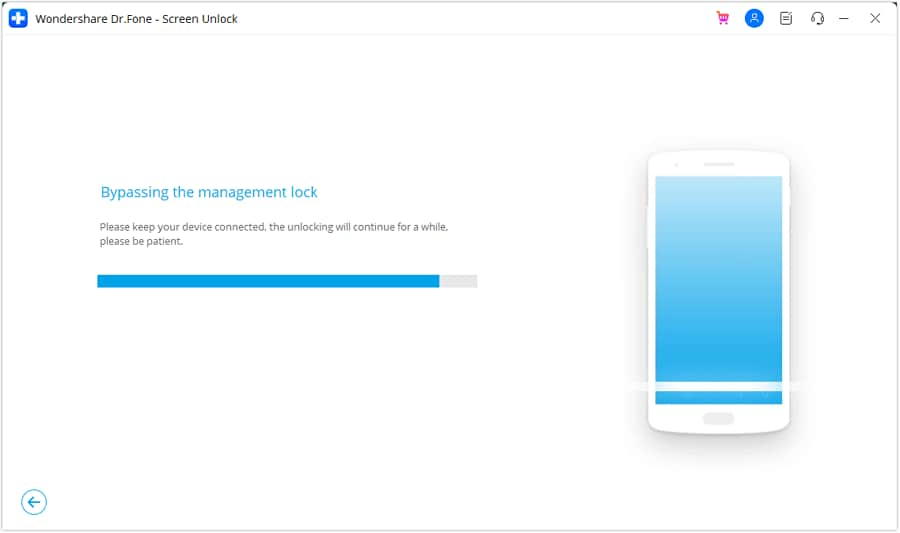
Step 6: Monitor the Bypass Progress
Dr.Fone will now start bypassing the remote MDM lock. The tool displays progress on the screen, so you can track the operation.
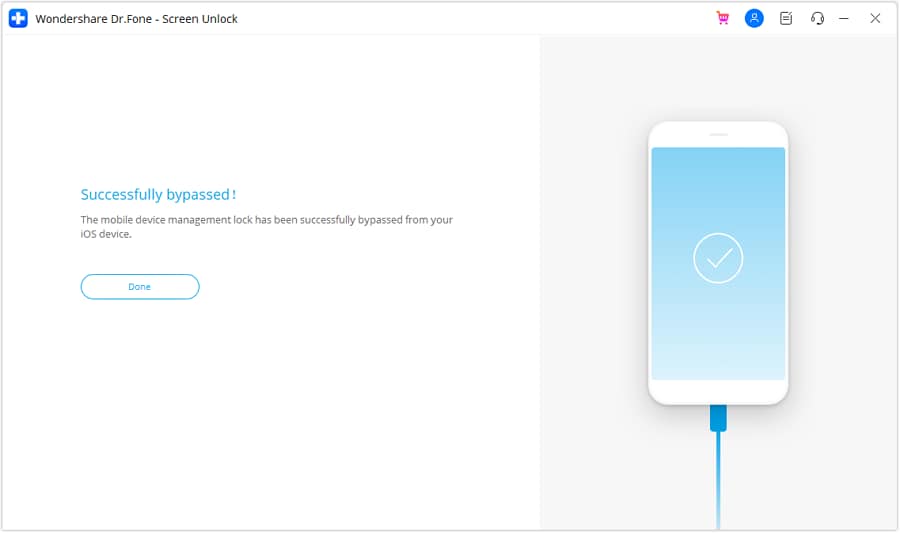
Step 7: Completion of MDM Bypass
When the process finishes, a message will confirm the successful bypass of the MDM lock. Click Done to close the window.
Part 4. How to Remove Meraki Management from Devices
Meraki MDM-managed devices can be monitored and controlled from a single, cloud-based dashboard. The administrator is granted centralized control once the Meraki MDM profile is installed on the device. The following steps show how to remove Meraki Management from various devices, including iPad, Android, Windows, and macOS systems.
4-1. Remove Meraki MDM from iPad
If you're looking to remove Meraki MDM from iPad models, follow these streamlined steps.
Step 1. Access Profiles
Go to Settings, then select General and tap Profiles & Device Management.
Step 2. Find Meraki Profile
Locate the Meraki Management profile in the list.
Step 3. Delete the Profile
Tap on the profile and select Remove. You may need to enter the device passcode if prompted.
4-2. Remove Meraki Management from Android
For Android devices with a work profile, follow these steps to remove Meraki Management:
Step 1. Deactivate Device Administrator
Go to Settings, tap Security, and then select Device Administrators. Find Meraki System Manager and choose Deactivate.
Step 2. Uninstall Meraki MDM
Next, go to Settings, tap Applications, select Manage Applications, locate System Manager, and choose Uninstall to fully remove the profile.
4-3. Remove Meraki Management from Windows
To delete Meraki Management on a Windows PC, either use the Windows Installer from the Meraki Dashboard or follow the steps below:
Step 1. Open Control Panel
Go to Control Panel and click on Programs and Features.
Step 2. Uninstall Meraki Agent
Locate Meraki Systems Manager Agent in the list of programs, right-click on it, and select Uninstall.
4-4. Remove Meraki Management from macOS
For macOS devices, you can remove Meraki Management by either deleting the agent or the profile. Follow these steps to remove the profile:
Step 1. Open System Settings
Click on System Settings, then go to Privacy & Security, and choose Profiles.
Step 2. Select the Meraki Profile
Find the Meraki Management profile and click on it.
Step 3. Delete the Profile
Click the Subtract button to remove the MDM profile from your system.
Conclusion:
Removing Meraki management from an iPad or iPhone is simple and can be done manually or with a tool like Dr.Fone - Screen Unlock (iOS). Whether you need to remove Meraki MDM from iPad or any other MDM, Dr.Fone provides a reliable, recommended solution to reclaim full control over your device. By following the given instructions in this article, you can effectively eliminate restrictions and enjoy unrestricted access to your iOS device.
FAQs


iPhone Unlock
- Access Locked iPhone
- 1. Reset Locked iPhone Without iTunes
- 2. Erase Locked iPhone
- 3. Get Into Locked iPhone
- 4. Factory Reset Locked iPhone
- 5. Reset Locked iPhone
- 6. iPhone Is Disabled
- 7. Fix iPhone Unavailable Issue
- 8. Forgot Locked Notes Password
- 9. Unlock Total Wireless Phone
- 10. Review of doctorSIM Unlock
- iPhone Lock Screen
- 1. Lock Apps on iPhone
- 2. Bypass iPhone Passcode
- 3. Unlock Disabled iPhone Without PC
- 4. Disable One More Minute Screen Time
- 5. Unlock iPhone Passcode Screen
- 6. Reset iPhone Password
- 7. Disable iOS Call Recording Notification
- 8. Remove Carrier Lock/SIM Restrictions
- 9. Get iMei Number on Locked iPhone
- 10. Add a New Face ID
- 11. iPhone Passcode Expired Pop-Up
- 12. Control Display Rotation
- 13. Fix iPhone is Disabled Connect to iTunes
- 14. Fix Turn Passcode Off Greyed Out
- 15. Get iPhone out of Demo Mode
- 16. Unlock Unresponsive Screen
- 17. iPhone Ask for Passcode After Reset
- Remove iCloud Lock
- 1. Unlock an iPhone 7 Plus iCloud
- 2. iOS 18 iCloud Unlock
- 3. iOS 26 iCloud Unlock
- 4. Crack iCloud-Locked iPhones to Sell
- 5. Jailbreak iCloud Locked iPhone
- 6. What To Do If You Bought A Locked iPhone?
- 7. Fix iPhone Unavailable No Erase Option
- 8. Find iCloud Email Address on Apple Device
- 9. Broque Ramdisk iCloud Bypass
- Unlock Apple ID
- 1. Remove Payment Method on iPhone
- 2. Create a New Apple ID Account
- 3. Change Apple ID on iPad
- 4. Change Your Apple ID Password
- 5. Apple ID Not Active
- 6. Fix Wrong Apple ID Issue on iPhone
- 7. Fix This Person Is Not Active
- 8. New iCloud Terms and Conditions
- 9. Fix Apple ID Account Unavailable
- 10.Find Apple ID by IMEI
- 11. Unlink 2 iPhones with the Same Apple ID
- 12. Reset Password at appleid.apple.com
- 13. App Store Keep Asking for Password
- 14. Find Apple ID Password No Reset
- 15. Trusted Devices List Not Available
- Remove SIM Lock
- 1. Unlock iPhone Using Unlock Chip
- 2. Unlock iPhone for Free
- 3. Unlock iPhone Online
- 4. Factory Unlock iPhone
- 5. SIM Unlock iPhone
- 6. Unlock AT&T iPhone
- 7. Unlock iPhone with IMEI Code
- 8. Unlock iPhone without SIM Card
- 9. Unlock Cricket iPhone
- 10. Unlock iPhone with/without SIM Card
- 11. Unlock T-Mobile iPhone
- 12. Unlock Verizon iPhone
- 13. iPhone IMEI Checker
- 14. Unlock Xfinity iPhone
- 15. Unlock iPhone From The Carrier
- 16. Turbo SIM iPhone
- 17. Get the Sprint Unlock Codes
- 18. Unlock a Sprint Phone
- 19. Fix When iPhone Says No Sim
- Unlock iPhone MDM
- 1. Remove MDM from iPhone
- 2. Remote Management on iPhone
- 3. MDM VS MAM
- 4. Top MDM Bypass Tools
- 5. IoT Device Management
- 6. Unified Endpoint Management
- 7. Enterprise Mobility Management
- 8. Top 10 Proxy Websites
- 9. Hindilinks4u Alternatives
- Unlock Screen Time Passcode
- 1. Reset Screen Time Passcode
- 2. Turn Off Screen Time without Passcode
- 3. Screen Time Passcode Not Working
- 4. Disable Parental Controls
- 5. Bypass Screen Time on iPhone Without Password
- 6. Delete Screen Time History on iPhone
- 7. Turn Off Downtime on iPhone
- 8. Download Age Restricted Videos
- MDM Unblock Games/Websites
- 1. Basketball Stars Game Unblocked
- 2. Play Getaway Shootout Unblocked
- 3. Play Build Now GG Unblocked
- 4. BitLife Unblocked
- 5. 10 Best Unblocked Anime Websites
- 6. Best Unblocked Game Websites
- 7. 1v1 LOL Unblocked
- 8. Get Poly Track Unblocked
- 9. Music Websites Unblocked
- 10. Spotify Unblocked
- 11. Interstellar Proxy Review
- Unlock Apple Watch
- Unlock iPod Touch
- ● Manage/transfer/recover data
- ● Unlock screen/activate/FRP lock
- ● Fix most iOS and Android issues
- Free Download Free Download Free Download

Julia Becker
staff Editor