Why No None Option for Apple ID Payment Appears and How to Fix It
Oct 13, 2025 • Filed to: Screen Lock Removal • Proven solutions
It is not possible to create an Apple ID without a credit card. When creating or upgrading an Apple ID, the no none option will never appear. The inability to select "None" when creating or upgrading an Apple ID is an increasingly frequent problem. You may encounter these circumstances.
Many other users encounter a scenario in which they are unable to proceed without adding a credit card because there is no none Apple ID payment option. You don't need to worry because we'll explain the causes of the issue and the easiest ways to fix the Apple ID credit card no none option so that you can a complete control of your device.
Part 1: The 6 Best Ways to Fix the "No None" Option for Apple ID Payment
A lot of people choose "None" as the method of payment when creating their Apple ID. Apple requires you to choose a payment method, however, you can choose "None" or a credit card. On the flip side, sometimes it is possible to use the "none" option for the payment of Apple ID. The problem can be from various causes. The "none" option for Apple ID when choosing a payment method is annoying; therefore, let's look at some good ways to remedy that.
You May Also Like:
Change or Add a Credit Card on Your Apple ID Account
Get Apple ID Verification Code Without Phone
Steps to Take When Your Apple ID is Not Verifying
Solution 1: Turn Off Family Sharing
If you're part of Family Sharing, your payment options are managed by the organizer, which can limit your ability to select None as a payment method. To fix this:
For members:
Step 1: Launch Settings and find your Apple ID.
Step 2: Select Family Sharing, then tap Leave Family Sharing.
For organizers:
Step 1: Open Family Sharing from Settings.
Step 2: Choose a member and tap Stop Family Sharing.

Solution 2: Clear Unpaid Balances
To select the None option for your payment method, make sure your account is free of any unpaid balances. Here's how you can do it:
Step 1: Go to Settings and tap on your Apple ID.Choose iTunes & App Store, then select your Apple ID.
Step 2: Tap View Apple ID, and enter your passcode if prompted.
Step 3: Select Purchase History to check for unpaid bills. The None option will be accessible after it has been cleared.

Solution 3: Update Your Country or Region
If your Apple ID is linked to a country or region that doesn't match your actual location, it can cause problems with the payment method. For example, if you choose the United Kingdom option when in the United States, the no none option for Apple ID may show up.when creating your account. To switch your region, take these actions:
Step 1: Head over to iTunes & App Store in the Settings menu.
Step 2: Go to the Apple ID that was used to update the device and tap on it. Then, choose View Apple ID.
Step 3: Choose Country/Region and select Change Country or Region. Please read the terms and conditions thoroughly before agreeing to them.

Solution 4: Cancel Auto-Renewable Subscriptions
Auto-renewing subscriptions may block the None option. To resolve this:
Step 1: Select your Apple ID profile from the drop-down menu in the Settings app.
Step 2: Select Subscriptions to view all active ones. Choose the subscription to cancel and tap Cancel.

Solution 5: Incorporate a Payment Option
If you're downloading from the App Store or iTunes for the first time and haven't added a payment method, follow these steps:
- Step 1: Open the Settings app, then tap on your Apple ID to access it.
- Step 2: Once chosen Payment & Shipping, now enter details by selecting the Add Payment Method button.
On the other hand:
- The account sign, which is located on the upper right of the App Store, will notify you.
- Simply pick Manage Payments from the menu that appears under Account Settings in order to add a payment method. The None option needs to appear once an authentic technique has been set.

Solution 6: Fix the "No None" Error by Disabling an Incorrect Apple ID
Bypassing the Apple ID on your iPhone will help you fix the issue of not being able to pick "None" as a payment option while setting up your Apple ID. This method is particularly useful if you're struggling with the "none" option for payment during Apple ID registration.
Use Dr.Fone - Screen Unlock (iOS) to Bypass Your Apple ID
Dr.Fone - Screen Unlock (iOS) is an ideal tool for situations where you've forgotten your Apple ID PIN and need to delete the account. This powerful iOS unlocking software allows you to:
- If you've lost your PIN, you can bypass your Apple ID.
- Unlock your screen and bypass both Screen Time and MDM (Mobile Device Management) restrictions without needing a passcode.
Dr.Fone - Screen Unlock (iOS)
Fix the "No None" Error by Disabling an Incorrect Apple ID.
- Simple, click-through, process.
- Unlock screen passwords or Apple ID from all iPhones and iPads.
- No tech knowledge is required, everybody can handle it.
- Supports almost all iPhones and the latest iOS version fully!

Ideal for Apple ID-Related Problems
For situations like forgetting your Apple ID, persistent Apple ID verification requests, or being unable to sign out, Dr.Fone - Screen Unlock (iOS) is highly recommended. Most people can deactivate their Apple ID across all of their devices with a couple of clicks.
Step 1: Launch Wondershare Dr.Fone on your computer, go to Toolbox > Screen Unlock > iOS, and select Remove Apple ID. Connect your iPhone or iPad to start.

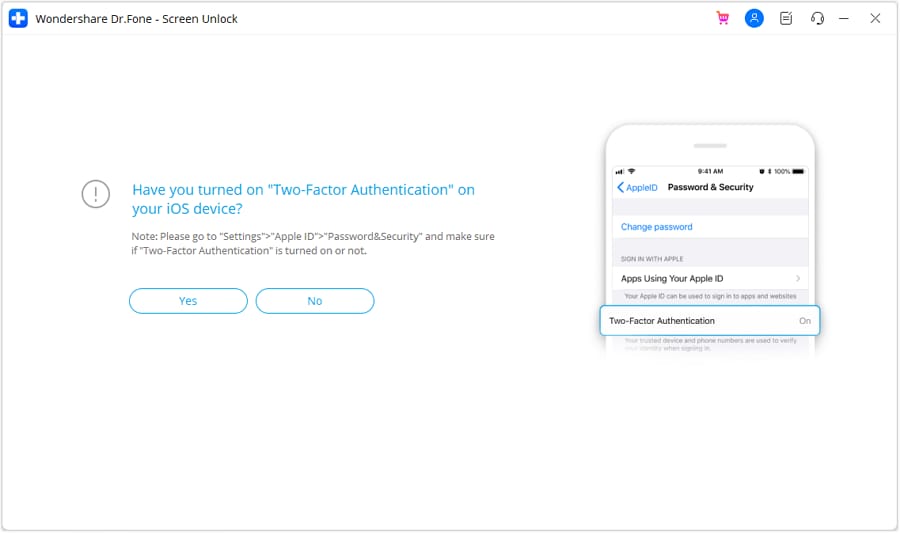
Step 2: Verify if your device has Screen Lock and Two-Factor Authentication enabled. Enable both if needed, then click Yes to proceed.

Step 3: Put your device in Recovery Mode by following the on-screen instructions. If needed, switch to DFU Mode for alternative steps.

Step 4: Confirm the device model and iOS version shown. Manually input details if necessary, then click Start.

Step 5: The software will start downloading the iOS firmware. Once downloaded, verify the firmware and click Unlock Now.

Step 6: Enter the confirmation code when prompted and click Unlock. Stay connected until the process completes. Once successful, click Done to finish.

Conclusion:
When there's a problem with an Apple ID payment, no one likes having the '''no none option for the credit card information'' issue. But there is an easy way to fix it if the right steps are taken. You can manage your Apple ID with a credit card no none option every time by clearing the amount that hasn't been paid, updating the payment information, and getting rid of any wrong Apple IDs with software like Dr.Fone - Screen Unlock (iOS). These kinds of options make it easy to use your Apple ID without having to enter your credit card information. These tips will help you get your Apple ID to work again.
FAQs
- Open the Settings app on your iPhone to get rid of a payment method from your Apple ID.
- In the upper right corner, tap your Apple ID.
- Select Payment & Shipping from that point on.
- Next, tap on the payment method that is currently linked to your account.
- Click on Switch to None at the very bottom.
iPhone Unlock
- Access Locked iPhone
- 1. Reset Locked iPhone Without iTunes
- 2. Erase Locked iPhone
- 3. Get Into Locked iPhone
- 4. Factory Reset Locked iPhone
- 5. Reset Locked iPhone
- 6. iPhone Is Disabled
- 7. Fix iPhone Unavailable Issue
- 8. Forgot Locked Notes Password
- 9. Unlock Total Wireless Phone
- 10. Review of doctorSIM Unlock
- iPhone Lock Screen
- 1. Lock Apps on iPhone
- 2. Bypass iPhone Passcode
- 3. Unlock Disabled iPhone Without PC
- 4. Disable One More Minute Screen Time
- 5. Unlock iPhone Passcode Screen
- 6. Reset iPhone Password
- 7. Auto Lock Never on iPhone
- 8. Remove Carrier Lock/SIM Restrictions
- 9. Get iMei Number on Locked iPhone
- 10. Add a New Face ID
- 11. iPhone Passcode Expired Pop-Up
- 12. Control Display Rotation
- 13. Fix iPhone is Disabled Connect to iTunes
- 14. Fix Turn Passcode Off Greyed Out
- 15. Get iPhone out of Demo Mode
- 16. Unlock Unresponsive Screen
- 17. iPhone Ask for Passcode After Reset
- Remove iCloud Lock
- 1. Unlock an iPhone 7 Plus iCloud
- 2. iOS 18 iCloud Unlock
- 3. iOS 26 iCloud Unlock
- 4. Crack iCloud-Locked iPhones to Sell
- 5. Jailbreak iCloud Locked iPhone
- 6. What To Do If You Bought A Locked iPhone?
- 7. Fix iPhone Unavailable No Erase Option
- 8. Find iCloud Email Address on Apple Device
- 9. Broque Ramdisk iCloud Bypass
- Unlock Apple ID
- 1. Remove Payment Method on iPhone
- 2. Create a New Apple ID Account
- 3. Change Apple ID on iPad
- 4. Change Your Apple ID Password
- 5. Apple ID Not Active
- 6. Fix Wrong Apple ID Issue on iPhone
- 7. Fix This Person Is Not Active
- 8. New iCloud Terms and Conditions
- 9. Fix Apple ID Account Unavailable
- 10.Find Apple ID by IMEI
- 11. Unlink 2 iPhones with the Same Apple ID
- 12. Reset Password at appleid.apple.com
- 13. App Store Keep Asking for Password
- 14. Find Apple ID Password No Reset
- 15. Trusted Devices List Not Available
- Remove SIM Lock
- 1. Unlock iPhone Using Unlock Chip
- 2. Unlock iPhone for Free
- 3. Unlock iPhone Online
- 4. Factory Unlock iPhone
- 5. SIM Unlock iPhone
- 6. Unlock AT&T iPhone
- 7. Unlock iPhone with IMEI Code
- 8. Unlock iPhone without SIM Card
- 9. Unlock Cricket iPhone
- 10. Unlock iPhone with/without SIM Card
- 11. Unlock T-Mobile iPhone
- 12. Unlock Verizon iPhone
- 13. iPhone IMEI Checker
- 14. Unlock Xfinity iPhone
- 15. Unlock iPhone From The Carrier
- 16. Turbo SIM iPhone
- 17. Get the Sprint Unlock Codes
- 18. Unlock a Sprint Phone
- 19. Fix When iPhone Says No Sim
- Unlock iPhone MDM
- 1. Remove MDM from iPhone
- 2. Remote Management on iPhone
- 3. MDM VS MAM
- 4. Top MDM Bypass Tools
- 5. IoT Device Management
- 6. Unified Endpoint Management
- 7. Enterprise Mobility Management
- 8. Top 10 Proxy Websites
- 9. Hindilinks4u Alternatives
- Unlock Screen Time Passcode
- 1. Reset Screen Time Passcode
- 2. Turn Off Screen Time without Passcode
- 3. Screen Time Passcode Not Working
- 4. Disable Parental Controls
- 5. Bypass Screen Time on iPhone Without Password
- 6. Delete Screen Time History on iPhone
- 7. Turn Off Downtime on iPhone
- 8. Download Age Restricted Videos
- MDM Unblock Games/Websites
- 1. Basketball Stars Game Unblocked
- 2. Play Getaway Shootout Unblocked
- 3. Play Build Now GG Unblocked
- 4. BitLife Unblocked
- 5. 10 Best Unblocked Anime Websites
- 6. Best Unblocked Game Websites
- 7. 1v1 LOL Unblocked
- 8. Get Poly Track Unblocked
- 9. Music Websites Unblocked
- 10. Spotify Unblocked
- 11. Snow Rider 3D Unblocked
- Unlock Apple Watch
- Unlock iPod Touch
- ● Manage/transfer/recover data
- ● Unlock screen/activate/FRP lock
- ● Fix most iOS and Android issues
- Unlock Now Unlock Now Unlock Now


Daisy Raines
staff Editor