How to Fix Apple ID Verification Keeps Popping Up? A Fresh Update
Dec 31, 2025 • Filed to: Screen Lock Removal • Proven solutions
Are you frustrated because your Apple ID verification keeps popping up and interrupting whatever you're doing? You're not alone—this is a common issue that can quickly get annoying.
Whether you're using an iPhone or Apple Watch, these repeated pop-ups can be a real hassle. But the good news is, there are simple ways to fix it.
In this guide, you'll find seven easy steps to stop those constant interruptions. Each solution is straightforward and doesn’t require any technical skills.
Follow along and you’ll soon enjoy your Apple device without the nagging messages. Let’s fix it for good!
Part 1. Why Apple ID Verification Keeps Popping Up?
Apple ID verification keeps popping up on your iDevice for multiple reasons. Some of them are as follows but are not limited to the following:
- Security Breach on Apple ID
Apple ID verification keeps popping up to inform you about a breach in security on your Apple ID. Your profile is automatically placed under some privacy protection conditions or is restricted, which could require you to provide your Apple ID password for verification purposes.
- Updated Apple ID Info
Suppose you have changed your Apple ID password or updated the security questions using another trusted device but haven't done that on your iPad or iPhone. In that case, the verification notification may pop up.
- iOS Issues
System glitches or outdated iOS can negatively affect the functioning of an iPad or iPhone. They often cause a device to malfunction, and a common problem you may face is Apple ID verification keeps popping up.
- Inactive Apple ID
You haven't used an iPhone or iPad with an Apple ID signed in for some time.
Now that you know why iPhone Apple ID verification keeps popping up. Are you thinking about the possible solutions to fix the issue? Let's look at them in detail.
You May Also Like:
IPhone Keeps Asking for Apple ID Password
Unlock Apple ID Without Phone Number
Part 2. Fixes to Stop Apple ID Verification Pop-Up Constantly
Generally, there are seven fixes to stop Apple ID verification from popping up constantly.
Method 1. Force Restart Your iPhone
Force restarting your iPhone is the first solution if you are looking for an easy and cost-effective solution. This automatically clears junk and eliminates bugs that may cause the Apple ID verification issue.
Below is how you can force restart different iPhone models.
iPhone 8/X or Later Models:
- Press and quickly release the Volume Up button.
- Then, hold and quickly release the Volume Down button.
- Hold down the Side button until the Apple logo appears on the screen.
iPhone 7 Series:
- Hold the Volume Down button and the Power button simultaneously.
- Release both buttons when the Apple logo appears on your screen.
iPhone 6 Series and Older Models:
- Press down the Home and Power buttons simultaneously.
- Hold the buttons until your iDevice shows the Apple logo, then release them.

Once you've rebooted your iPhone, it’s time to explore another effective fix to prevent that pop-up from occurring again.
Method 2. Sign Out and Back into Your iCloud
Still, the Apple ID verification keeps popping up. Then, you need to check the iCloud account settings: sign out of iCloud and log in again using the steps below.
If you are an iOS 10.3 or later user, go to Settings > [Your Name] > Scroll down and tap Sign Out. Follow the steps to enter your Apple account to sign out of iCloud.
Do you use iOS 10.2 or earlier? If yes, scroll down to Settings > iCloud > and tap Sign Out.
After you sign out of iCloud, restart your iPhone and log in to iCloud again.

Still, seeing the pop-up after signing out and back in? Don’t worry; we’ve got another fix up our sleeve!
Method 3. Remove Your Apple ID from Your iPhone [Best Method]
Have you tried all the above methods, but Apple ID verification keeps popping up? Worry not! Dr.Fone - Screen Unlock (iOS) is here to help you. It offers a great way to remove your Apple ID. This tool is perfect for unlocking iPhones or iPads without needing a passcode. You can also remove your Apple ID without knowing the password.
Additionally, Dr.Fone bypasses iCloud activation and MDM locks. It works on the latest iOS 18 and iPhone 16 series. The process is simple, with just three steps, and requires no technical expertise. This makes it the best solution for users struggling with constant Apple ID pop-ups.
If you’ve tried everything and your Apple ID verification keeps popping up, don’t worry—there’s still a way out. Dr.Fone - Screen Unlock (iOS) is a reliable tool designed just for situations like this. It lets you remove your Apple ID without knowing the password or even a passcode.
With Dr.Fone, you can also bypasses iCloud activation locks and MDM restrictions. It supports the latest iOS 18 and iPhone 16 series, so you’re covered even with the newest devices.
The best part? It only takes three simple steps and no technical skills are needed. If you're tired of constant pop-ups, this could be the quick and easy solution you're looking for.
Dr.Fone - Screen Unlock (iOS)
Remove Your Apple ID from Your iPhone [Best Method]
- Simple, click-through, process.
- Unlock screen passwords or Apple ID from all iPhones and iPads.
- No tech knowledge is required, everybody can handle it.
- Supports almost all iPhones and the latest iOS version fully!

Steps to Remove Apple ID from iDevice Using Dr.Fone - Screen Unlock (iOS):
Step 1: Open Dr.Fone on your computer, go to Toolbox > Screen Unlock > iOS, and select Remove Apple ID to begin.

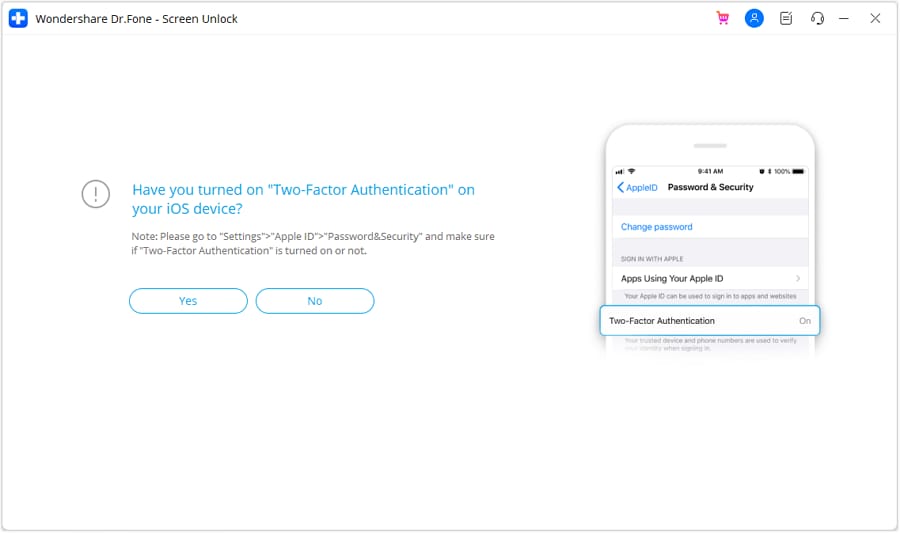
Step 2: Ensure your device has a screen lock and Two-Factor Authentication enabled. Click Yes to proceed.

Step 3: Follow the on-screen steps to put your device into Recovery Mode. If that doesn’t work, try DFU Mode.

Step 4: Confirm your device model and system version, then download the iOS firmware. Dr.Fone will verify it automatically.

Step 5: Click Unlock Now, enter the confirmation code, and complete the removal. Once done, click Done to finish.

That’s all about this process. You have seen how simple it is to remove the Apple ID with Dr.Fone - Screen Unlock (iOS). Next, let’s tackle some of the frequently asked queries.
Method 4. Update iOS
If the update failure is causing your iPhone to keep asking for your Apple ID, check that everything is updated. Make sure iOS, the App Store, purchased apps, and iTunes aren’t stuck in an update. Open the App Store and check for any ongoing downloads. Update all apps and ensure no sessions are hanging.

Next, go to Settings > iTunes > App Store from your iPhone. Sign out and sign in to see if the issue is solved. If not, you can try other practical solutions to fix the Apple ID verification keeps popping up the problem.
Method 5. Reset Apple ID Password
You can reset your Apple ID password on your iPhone and computer. Follow these steps:
On iPhone/iPad:
- Go to Settings > Your Name > Password & Security > Change Password.
- You might be asked for your current screen passcode. After that, create a new Apple ID password.
On a computer:
- Visit https://appleid.apple.com/ and log in. Once on the account page, find the Security section and click Change Password.
- Enter your current password. Then, create and confirm your new password. Click Change Password to complete.
If resetting your password didn’t solve the issue, don’t worry—there’s another step you can try!
Method 6. Turn FaceTime & iMessage Off and Back On
Check your iMessage and FaceTime activation. Log out and log back in with the correct Apple ID and password. iMessage and FaceTime use your Apple ID even in the background.
Below are the steps to turn off FaceTime:
Open Settings, tap FaceTime, and toggle the button off. Then, wait a couple of seconds and tap the button again to switch it on. When you turn on FaceTime, you need to enter your Apple ID and password.

Below are the steps to turn off iMessage.
Open Settings and tap Messages. Toggle the button off in iMessage. Wait a few seconds and click the button to switch it on again. When you turn on iMessage again, you must enter your Apple ID and password.

If toggling FaceTime and iMessage didn’t do the trick, no worries. There’s another fix to try!
Method 7. Reset All Settings
You can reset some or all of your iPhone’s preferences to fix bugs or issues. If the Apple ID verification keeps popping up due to incorrect settings, resetting all settings can be a quick solution. It’s like a triumph card trick!
Note: Back up your iPhone with iTunes or iCloud, as the Reset All Settings feature erases all data and settings on your iPhone.
- Go to Settings > General > Reset > Reset All Settings.
- Enter your passcode and confirm that Reset All Settings is complete.
If resetting your settings didn’t solve the issue, don’t worry! We’ve got one more fix that might just do the trick!"
Conclusion
In conclusion, if the Apple ID verification keeps popping up, it’s likely due to security issues, outdated information, or iOS glitches. Each of the seven fixes can help resolve the issue and restore smooth operation to your iPhone or Apple Watch.
If you’ve tried everything and the pop-ups persist, consider using Dr.Fone - Screen Unlock (iOS). It’s a reliable tool that lets you easily remove your Apple ID without a password.
With Dr.Fone, you can bypass iCloud locks and get rid of those annoying verification pop-ups for good. It’s a simple, three-step solution to keep your devices running smoothly.
FAQs
- Sign out of the wrong Apple ID using the correct credentials and log in again.
- If you cannot remember your credentials or the profile displayed is disabled, delete the Apple ID linked to your device using Dr.Fone - Screen Unlock (iOS). Then, sign in to another Apple account.
- Restart your iOS device.
iPhone Unlock
- Access Locked iPhone
- 1. Reset Locked iPhone Without iTunes
- 2. Erase Locked iPhone
- 3. Get Into Locked iPhone
- 4. Factory Reset Locked iPhone
- 5. Reset Locked iPhone
- 6. iPhone Is Disabled
- 7. Fix iPhone Unavailable Issue
- 8. Forgot Locked Notes Password
- 9. Unlock Total Wireless Phone
- 10. Review of doctorSIM Unlock
- iPhone Lock Screen
- 1. Lock Apps on iPhone
- 2. Bypass iPhone Passcode
- 3. Unlock Disabled iPhone Without PC
- 4. Disable One More Minute Screen Time
- 5. Unlock iPhone Passcode Screen
- 6. Reset iPhone Password
- 7. Auto Lock Never on iPhone
- 8. Remove Carrier Lock/SIM Restrictions
- 9. Get iMei Number on Locked iPhone
- 10. Add a New Face ID
- 11. iPhone Passcode Expired Pop-Up
- 12. Control Display Rotation
- 13. Fix iPhone is Disabled Connect to iTunes
- 14. Fix Turn Passcode Off Greyed Out
- 15. Get iPhone out of Demo Mode
- 16. Unlock Unresponsive Screen
- 17. iPhone Ask for Passcode After Reset
- Remove iCloud Lock
- 1. Unlock an iPhone 7 Plus iCloud
- 2. iOS 18 iCloud Unlock
- 3. iOS 26 iCloud Unlock
- 4. Crack iCloud-Locked iPhones to Sell
- 5. Jailbreak iCloud Locked iPhone
- 6. What To Do If You Bought A Locked iPhone?
- 7. Fix iPhone Unavailable No Erase Option
- 8. Find iCloud Email Address on Apple Device
- 9. Broque Ramdisk iCloud Bypass
- Unlock Apple ID
- 1. Remove Payment Method on iPhone
- 2. Create a New Apple ID Account
- 3. Change Apple ID on iPad
- 4. Change Your Apple ID Password
- 5. Apple ID Not Active
- 6. Fix Wrong Apple ID Issue on iPhone
- 7. Fix This Person Is Not Active
- 8. New iCloud Terms and Conditions
- 9. Fix Apple ID Account Unavailable
- 10.Find Apple ID by IMEI
- 11. Unlink 2 iPhones with the Same Apple ID
- 12. Reset Password at appleid.apple.com
- 13. App Store Keep Asking for Password
- 14. Find Apple ID Password No Reset
- 15. Trusted Devices List Not Available
- Remove SIM Lock
- 1. Unlock iPhone Using Unlock Chip
- 2. Unlock iPhone for Free
- 3. Unlock iPhone Online
- 4. Factory Unlock iPhone
- 5. SIM Unlock iPhone
- 6. Unlock AT&T iPhone
- 7. Unlock iPhone with IMEI Code
- 8. Unlock iPhone without SIM Card
- 9. Unlock Cricket iPhone
- 10. Unlock iPhone with/without SIM Card
- 11. Unlock T-Mobile iPhone
- 12. Unlock Verizon iPhone
- 13. iPhone IMEI Checker
- 14. Unlock Xfinity iPhone
- 15. Unlock iPhone From The Carrier
- 16. Turbo SIM iPhone
- 17. Get the Sprint Unlock Codes
- 18. Unlock a Sprint Phone
- 19. Fix When iPhone Says No Sim
- Unlock iPhone MDM
- 1. Remove MDM from iPhone
- 2. Remote Management on iPhone
- 3. MDM VS MAM
- 4. Top MDM Bypass Tools
- 5. IoT Device Management
- 6. Unified Endpoint Management
- 7. Enterprise Mobility Management
- 8. Top 10 Proxy Websites
- 9. Hindilinks4u Alternatives
- Unlock Screen Time Passcode
- 1. Reset Screen Time Passcode
- 2. Turn Off Screen Time without Passcode
- 3. Screen Time Passcode Not Working
- 4. Disable Parental Controls
- 5. Bypass Screen Time on iPhone Without Password
- 6. Delete Screen Time History on iPhone
- 7. Turn Off Downtime on iPhone
- 8. Download Age Restricted Videos
- MDM Unblock Games/Websites
- 1. Basketball Stars Game Unblocked
- 2. Play Getaway Shootout Unblocked
- 3. Play Build Now GG Unblocked
- 4. BitLife Unblocked
- 5. 10 Best Unblocked Anime Websites
- 6. Best Unblocked Game Websites
- 7. 1v1 LOL Unblocked
- 8. Get Poly Track Unblocked
- 9. Music Websites Unblocked
- 10. Spotify Unblocked
- 11. Snow Rider 3D Unblocked
- Unlock Apple Watch
- Unlock iPod Touch
- ● Manage/transfer/recover data
- ● Unlock screen/activate/FRP lock
- ● Fix most iOS and Android issues
- Unlock Now Unlock Now Unlock Now


James Davis
staff Editor