How to Fix iCloud Authentication Failed Problem Fast and Easy
Oct 13, 2025 • Filed to: Screen Lock Removal • Proven solutions
Have you ever gotten this message "iCloud authentication failed" before? A lot of users have been concerned about problems with the problem of iCloud authentication.
When iPhones get an authentication problem, they can't get to the App Store or iCloud. This is all due to the most recent iOS update and an issue with an Apple ID that isn't allowed.
Before you can use the iCloud services, you have to verify your identity, which can go wrong occasionally.
This article discusses methods that can guide you in fixing problems with iCloud authentication on your iOS device. There are well-explained pictures to go along with the ways it suggests. Each solution is fully explained, along with the mistakes that could have happened and what you can do to fix them.

Part 1: Why does the iCloud Authentication problem show up?
If iCloud authentication fails, iCloud can’t be accessible after getting an authentication because they were unable to sign in to iCloud. There are two main reasons for this: the network and the iCloud Server.
- An authentication issue can happen if the connection on your network is too poor or unstable to connect.
- On top of that, there may have been an issue with the iCloud server that prevented users from signing in normally.
When users get an iCloud authentication error, they can either figure it out on their own or with help from iCloud.
The following are possible measures you can take to fix the issue on your own. Pick the one that works best for you.
Part 2: How to fix iCloud authentication failed problems
How do I fix the problem where I could not sign in after authentication failed? Here are the following easy and quick solutions to help you. Let's explore them!
Solution 1: Restart Your Device
Restarting your device is one of the easiest and most effective ways to resolve iCloud authentication errors. A simple restart can clear bugs that might be interfering with your device's functionality and causing iCloud authentication difficulties.
Here’s how to restart your device:
Step 1: Hold down the side button and either volume button for a while until the power-off dial shows up.
Step 2: Drag the slider and wait for your device to shut down, which may take about 30 seconds.
Step 3: If your phone is unresponsive, force restart it.
Step 4: Hold down the side button until you see the Apple sign. This will turn it back on.

Solution 2: Check for Software Updates
Another way to address iCloud authentication problems is by ensuring your device has the latest software. Installing updates can fix bugs that may be triggering iCloud authentication failures. Here are some reasons why this solution helps:
First Reason: Updates often include security patches and bug fixes that can resolve iCloud authentication issues.

Second Reason: New software releases might update iCloud servers and features, giving you access to more reliable services.

Third Reason: Updating to the latest version ensures your device meets current iCloud security features, reducing the risk of authentication errors.
To check for updates, follow these steps:
Check for updates as follows:
Step 1: Go to your iPhone's Settings.
Step 2: Scroll down and select General.
Step 3: Tap Software Update to check for updates.

Step 4: In case an update is available, click on Download and Install.
Step 5: If prompted to provide a security code, do so and then tap the button that says ""Accept the terms and conditions"".
Step 6: Wait for the update to download. The speed will depend on your network and the update size.
Step 7: Tap Install Now.

Step 8: Your phone might automatically restart to update—do not turn it off or disconnect it.
Solution 3: Sign out and sign in to iCloud
The issue can occur when your iCloud session has timed out, your password is incorrect, or your account has been deregistered. Signing out and signing back into your iCloud account usually clears most authentication issues. Here's how:
Step 1: Tap Settings and tap your Apple account from the top.
Step 2: Scroll down and tap the Sign Out button.
Step 3: After signing out, tap Sign in to your iPhone on the main Settings screen.
Step 4: Enter the correct Apple ID and password + verify code.

Solution 4: Reset Network Settings
Sometimes, the problem is associated with the network itself. But if you're sure that your network is steady, yet every attempt to authenticate from iCloud fails, you might try resetting the network. Don't worry; this will only reset the network settings on your device without deleting any data.
Here’s how:
Step 1: Open Settings.
Step 2: Choose General and scroll down until you see Transfer or Reset iPhone.
Step 3: Now click on the Reset button; after that, you have the option to Reset Network Settings.

Solution 5: Use Dr.Fone - Screen Unlock (iOS) to Fix It (Recommended)
Removing your iCloud account from your iPhone or iPad is a good way to resolve the iCloud Authentication Failed issue. A professional tool called Dr.Fone - Screen Unlock (iOS) can help you do this without losing any kind of data. There are no limits on how quickly and easily the iCloud account can be deleted. The process works well with a high rate of success. You can restart your device without an Apple ID if yours is locked for security reasons or not available. Dr.Fone - Screen Unlock (iOS) can help you do this. Besides that, this program can get past all kinds of screen locks, screen time passcodes, and device management. To get started, take the steps listed below:
Step 1: Open Dr.Fone Screen Unlock Tool
Begin by installing Wondershare Dr.Fone on your computer. Once it's set up, go to the Toolbox, select Screen Unlock, and choose iOS to get started.

Step 2: Choose the Remove Apple ID Option
In the next screen, find the Remove Apple ID option and click it to begin the removal process for your Apple ID.

Step 3: Begin Unlocking Apple ID
Connect your iPhone or iPad to your computer. Once the device is recognized, click Unlock Now. For devices running iOS/iPadOS 11.4 or later, this will erase all data, while earlier versions will keep your data safe.

Step 4: Confirm Screen Lock Activation
A prompt will ask you to confirm whether your device’s screen lock is active. Ensure the lock is turned on and click Yes to proceed.

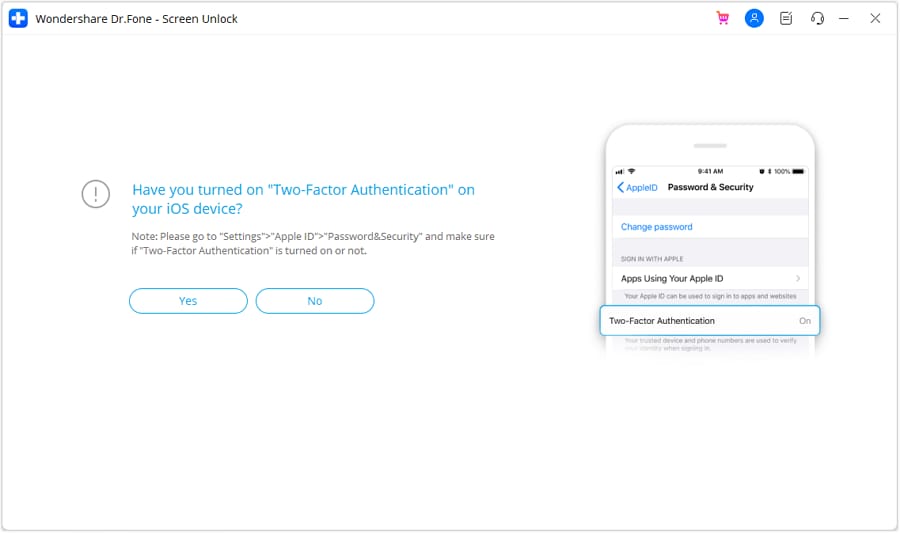
Step 5: Verify Two-Factor Authentication
Make sure Two-Factor Authentication is enabled on your device. If it’s off, turn it on and then click Yes to continue.

Step 6: Enter Recovery Mode
Follow the on-screen directions to put your device in Recovery Mode. If you encounter any issues, click Try DFU Mode to switch to DFU Mode for further instructions.

Step 7: Check the Device Model and Version
Once in Recovery Mode, check your device’s details. Confirm the correct System Version or manually enter it if needed, and click Start.

Step 8: Download iOS Firmware
The tool will now begin downloading the iOS firmware. If the download is slow, click Copy to download it directly.

Step 9: Verify Firmware and Unlock Apple ID
After the firmware is downloaded, the system will verify it. Once done, click Unlock Now to address any issues with your Apple ID.

Step 10: Confirm the Unlock Process
A pop-up will ask for a confirmation code. Enter the code and click Unlock to start unlocking the Apple ID.

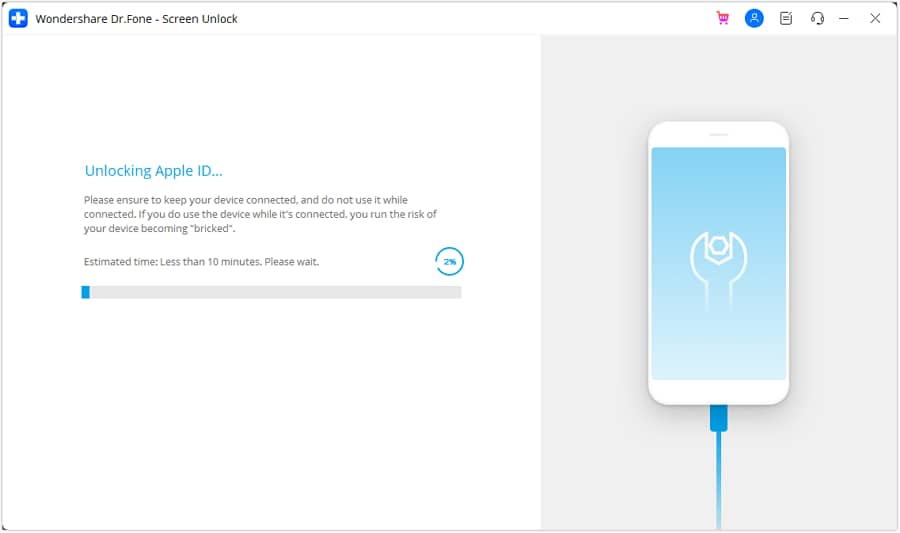
Step 11: Track Unlock Progress
Keep your device connected while the Apple ID is being removed. Avoid disconnecting the device during this phase.

Step 12: Complete Apple ID Removal
Once the process finishes, a message will confirm the successful removal. Click Done to complete, or if the process fails, click Try Again to repeat.


Dr.Fone - Screen Unlock (iOS)
Fix iCloud Authentication Failed Problem.
- Simple, click-through, process.
- Unlock screen passwords from all iPhones and iPads.
- No tech knowledge is required, everybody can handle it.
- Supports the latest iOS version fully!

Conclusion:
Although frustrating, iCloud authentication errors are relatively easy to resolve with just a few simple steps. Sometimes, it simply requires resetting your Apple ID password, or you may need to update the iOS software. Such solutions will handle all your iCloud authentication difficulties. With more persistent challenges, it is recommended to use Dr.Fone - Screen Unlock (iOS) for a more permanent solution. It will help you bypass any activation-related problems and regain access to your device. Make sure you understand how to do this in the right way.
FAQs
iPhone Unlock
- Access Locked iPhone
- 1. Reset Locked iPhone Without iTunes
- 2. Erase Locked iPhone
- 3. Get Into Locked iPhone
- 4. Factory Reset Locked iPhone
- 5. Reset Locked iPhone
- 6. iPhone Is Disabled
- 7. Fix iPhone Unavailable Issue
- 8. Forgot Locked Notes Password
- 9. Unlock Total Wireless Phone
- 10. Review of doctorSIM Unlock
- iPhone Lock Screen
- 1. Lock Apps on iPhone
- 2. Bypass iPhone Passcode
- 3. Unlock Disabled iPhone Without PC
- 4. Disable One More Minute Screen Time
- 5. Unlock iPhone Passcode Screen
- 6. Reset iPhone Password
- 7. Auto Lock Never on iPhone
- 8. Remove Carrier Lock/SIM Restrictions
- 9. Get iMei Number on Locked iPhone
- 10. Add a New Face ID
- 11. iPhone Passcode Expired Pop-Up
- 12. Control Display Rotation
- 13. Fix iPhone is Disabled Connect to iTunes
- 14. Fix Turn Passcode Off Greyed Out
- 15. Get iPhone out of Demo Mode
- 16. Unlock Unresponsive Screen
- 17. iPhone Ask for Passcode After Reset
- Remove iCloud Lock
- 1. Unlock an iPhone 7 Plus iCloud
- 2. iOS 18 iCloud Unlock
- 3. iOS 26 iCloud Unlock
- 4. Crack iCloud-Locked iPhones to Sell
- 5. Jailbreak iCloud Locked iPhone
- 6. What To Do If You Bought A Locked iPhone?
- 7. Fix iPhone Unavailable No Erase Option
- 8. Find iCloud Email Address on Apple Device
- 9. Broque Ramdisk iCloud Bypass
- Unlock Apple ID
- 1. Remove Payment Method on iPhone
- 2. Create a New Apple ID Account
- 3. Change Apple ID on iPad
- 4. Change Your Apple ID Password
- 5. Apple ID Not Active
- 6. Fix Wrong Apple ID Issue on iPhone
- 7. Fix This Person Is Not Active
- 8. New iCloud Terms and Conditions
- 9. Fix Apple ID Account Unavailable
- 10.Find Apple ID by IMEI
- 11. Unlink 2 iPhones with the Same Apple ID
- 12. Reset Password at appleid.apple.com
- 13. App Store Keep Asking for Password
- 14. Find Apple ID Password No Reset
- 15. Trusted Devices List Not Available
- Remove SIM Lock
- 1. Unlock iPhone Using Unlock Chip
- 2. Unlock iPhone for Free
- 3. Unlock iPhone Online
- 4. Factory Unlock iPhone
- 5. SIM Unlock iPhone
- 6. Unlock AT&T iPhone
- 7. Unlock iPhone with IMEI Code
- 8. Unlock iPhone without SIM Card
- 9. Unlock Cricket iPhone
- 10. Unlock iPhone with/without SIM Card
- 11. Unlock T-Mobile iPhone
- 12. Unlock Verizon iPhone
- 13. iPhone IMEI Checker
- 14. Unlock Xfinity iPhone
- 15. Unlock iPhone From The Carrier
- 16. Turbo SIM iPhone
- 17. Get the Sprint Unlock Codes
- 18. Unlock a Sprint Phone
- 19. Fix When iPhone Says No Sim
- Unlock iPhone MDM
- 1. Remove MDM from iPhone
- 2. Remote Management on iPhone
- 3. MDM VS MAM
- 4. Top MDM Bypass Tools
- 5. IoT Device Management
- 6. Unified Endpoint Management
- 7. Enterprise Mobility Management
- 8. Top 10 Proxy Websites
- 9. Hindilinks4u Alternatives
- Unlock Screen Time Passcode
- 1. Reset Screen Time Passcode
- 2. Turn Off Screen Time without Passcode
- 3. Screen Time Passcode Not Working
- 4. Disable Parental Controls
- 5. Bypass Screen Time on iPhone Without Password
- 6. Delete Screen Time History on iPhone
- 7. Turn Off Downtime on iPhone
- 8. Download Age Restricted Videos
- MDM Unblock Games/Websites
- 1. Basketball Stars Game Unblocked
- 2. Play Getaway Shootout Unblocked
- 3. Play Build Now GG Unblocked
- 4. BitLife Unblocked
- 5. 10 Best Unblocked Anime Websites
- 6. Best Unblocked Game Websites
- 7. 1v1 LOL Unblocked
- 8. Get Poly Track Unblocked
- 9. Music Websites Unblocked
- 10. Spotify Unblocked
- 11. Snow Rider 3D Unblocked
- Unlock Apple Watch
- Unlock iPod Touch
- ● Manage/transfer/recover data
- ● Unlock screen/activate/FRP lock
- ● Fix most iOS and Android issues
- Unlock Now Unlock Now Unlock Now


James Davis
staff Editor