How to Fix Cannot Verify Server Identity Error on iPhone with Easy Steps
Oct 13, 2025 • Filed to: Screen Lock Removal • Proven solutions
You’re in the middle of an important task on your iPhone, ready to send an email or access a favorite app, when a message suddenly appears: “Cannot Verify Server Identity”. This alert can be confusing and disruptive, blocking access to key apps and Apple services. The cause?
It is primarily a server-side problem with the SSL certificate - the security component that can assist in identifying safe connections. An expired, untrusted, or simply not up to Apple's extremely high standards, a certificate prevents an iPhone or iPad from authenticating the server's identity and results in this error message.
Don’t worry, though; resolving it is easier than you might think. This guide will show you clear, simple steps to fix the "cannot verify server identity iPhone" problem and restore seamless access.
- Part 1: Understanding the "Cannot Verify Server Identity" Alert
- Part 2: Why the “Cannot Verify Server Identity” Error Occurs
- Part 3: Troubleshooting "Cannot Verify Server Identity" on iPhone
- Solution 1: Exit and Restart the Mail App
- Solution 2: Turn your iPhone or iPad off and on Again
- Solution 3: Remove and Re-add Your Email Account
- Solution 4: Update Your iOS Version
- Solution 5: Update Carrier Settings
- Solution 6: Reset Network Settings
- Solution 7: Factory Reset Your iPhone or iPad

- Solution 8: Recommended solution: Using Dr.Fone - Screen Unlock (iOS) with Zero Data Loss
Part 1: Understanding the "Cannot Verify Server Identity" Alert
The "Cannot Verify Server Identity" message you see when you try to open the mail application usually means there is some form of misalignment between the SSL Certificate on the mail server and the server settings on your device, especially when this is an iPhone or iPad.
Therefore, when your device tries to validate the certificate with the corresponding domain name, it is unable to verify the authenticity of the certificate. This causes the server to be marked as untrusted and gives the "Cannot Verify Server Identity" warning.
This notification may seem like an interruption if you want to access or send an urgent email, but there are quite a few simple solutions available for this purpose.
Part 2: Why the “Cannot Verify Server Identity” Error Occurs
One of the most common issues with iOS and iPhones, particularly when accessing email, is referred to as the "Cannot Verify Server Identity" message. The error occurs when your device is unable to authenticate the security certificate of the mail server, which often identifies it as invalid or untrusted. This issue can arise due to an expired or incorrectly signed certificate, causing cannot to verify server identity on iPhone or iPad.

Several factors may trigger this error on iOS devices. Let's see in more detail the most common:
- Incorrect Date and Time Settings: This may include misconfigured dates and times that trigger communication problems with servers, which can cause an instance of a ''cannot verify identity'' error.
- Poorly secured network connection: When you connect your device via a weakly or unsecured network, it may be hard for the device to make a secure connection, which makes your device not pass through your identity verification.
- Domain and Server Mismatch: If the domain or server names do not align correctly, the “cannot verify server identity’’ issue keeps popping on your device.
- Software Bugs on iOS: Internal software bugs can interfere with verification processes, leading to errors like “cannot verify server identity’’ on iPhone.
- Issues in the Mail App: Problems in the Mail application may make your iPhone send errors related to server identity verification, which then causes "cannot identify server identity iPhone."
- Incorrect Network Settings: Some may get misconfigured network settings that do not let your gadget reach out to the server in an appropriate way and at times produce the error messages "cannot verify server identity".
- Outdated iOS or Carrier Settings: The server's identity certificate can't be compatible with the device's cellular provider's carrier settings or outdated iOS.
Part 3: Troubleshooting "Cannot Verify Server Identity" on iPhone
The "Cannot Verify Server Identity" error message on your iPhone or iPad may be pesky, but there are remedies that might help you get past the problem. Sometimes, you have misconfigured network settings that do not let your gadget reach out to the server appropriately and, at times, produce the error message "cannot verify server identity." This error message depends on server-side issues, and so you have to rely on the developers to address that problem.
But you can run a few self-troubleshooting checks on your device to get Mail app or other services working normally again. Below, we list several ways to troubleshoot this issue on your device.
Solution 1: Exit and Restart the Mail App

The "Cannot Verify Server Identity" error often can be solved by simply restarting the Mail app. This is a step which has rescued many users experiencing this problem, so give it a try:
Step 1: Swipe up from the bottom of the screen, or double-click the Home button on older devices to fully exit the Mail app and swipe away the Mail app.
Step 2: Reopen your Mail application and resume your test for the presence of that error.
Solution 2: Turn your iPhone or iPad off and on again.

If the Mail app won't start up again, try restarting your device. Depending on the model, different gadgets have different steps to follow to restart:
If your iPhone X, 11, 12, or iPad doesn't have a Home button, do the following:
Step 1: Hold down the Side (or Top) button and either volume button until the power-off scale appears.
Step 2: move the button to turn off your tool.
Step 3: Hold down the Side button again after a short time until the Apple logo shows up.
For iPads or iPhones with a Home button that are older than 8:
Step 1: Hold down the Side button up to the power-off scale shows up.
Step 2: move the button to shut your tool.
Step 3: Keep pressing and holding the Side (or Top) button once more until you see the Apple logo.
Solution 3: Remove and Re-add Your Email Account

Removing and re-adding your email account can also help fix the ""Cannot Verify Server Identity"" error. Here’s how to do it:
Step 1: Open Settings and go to Mail.
Step 2: Select Accounts and tap on the account that’s causing the issue.
Step 3: Choose Delete Account and confirm by selecting Delete from My iPhone.
Step 4: Go back to Settings, tap on Mail, and select Accounts again.
Step 5: Tap Add Account and re-enter your account details to set it up again.
Solution 4: Update Your iOS Version

Running an outdated iOS version can sometimes cause the ""Cannot Verify Server Identity"" error. Updating your device’s software may resolve the problem:
Step 1: Open Settings and tap General.
Step 2: Select Software Update and follow the prompts to download and install any available updates.
Step 3: Once the update is complete, open the Mail app and check if the issue has been resolved.
Solution 5: Update Carrier Settings
Your device’s carrier settings can also affect your email’s ability to connect to the server. Updating these settings may help fix the ""Cannot Verify Server Identity"" error:
Step 1: Open Settings and go to General.
Step 2: Tap on About. If a carrier update is available, you’ll see an option to install it on the screen.
Step 3: Follow the on-screen prompts to complete the update.
Solution 6: Reset Network Settings

Misconfigured network settings may also lead to ""Cannot Verify Server Identity"" errors. Resetting these settings can often resolve the issue. Here’s how:
Step 1: Open Settings on your iPhone or iPad.
Step 2: Navigate to General, then scroll down to Reset.
Step 3: Choose Reset Network Settings and confirm your selection.
Step 4: Once reset, reconnect to your Wi-Fi network and check if the error persists.
Solution 7: Factory Reset Your iPhone or iPad

As a last resort, you may need to perform a factory reset on your device. This will erase all data on your iPhone or iPad, so make sure to back up any important information beforehand. To proceed with a factory reset:
Step 1: Open Settings and select General.
Step 2: Scroll down and tap Reset.
Step 3: Choose Erase All Content and Settings.
Step 4: If prompted, enter your device passcode to confirm.
Step 5: You’ll see a warning prompt. Confirm by selecting Erase.
Step 6: After the reset completes, set up your device again.
Solution 8: Recommended solution: Using Dr.Fone - Screen Unlock (iOS) with Zero Data Loss
Therefore, if the methods above are not effective and an apple cannot verify the identity of the server, then it will indeed work to remove the unverifiable Apple ID with the help of Dr.Fone - Screen Unlock (iOS).
Besides, for any freezing situation or a black screen stuck condition on your iPhone, the problem of failed up update during iOS, you can resolve them with the help of Dr.Fone - Screen Unlock (iOS), an all-in-one solution to fix system issues and data loss as well as an imposed or locked screen.

Dr.Fone - Screen Unlock (iOS)
Fix Cannot Verify Server Identity Error on iPhone.
- Simple, click-through, process.
- Unlock screen passwords from all iPhones and iPads.
- No tech knowledge is required, everybody can handle it.
- Supports the latest iOS version fully!

Here are the steps:
Step 1. Start by installing Wondershare Dr.Fone on your computer. After opening the program, go to Toolbox, select Screen Unlock, and choose iOS from the drop-down menu.

Step 2. On the next screen, locate the option labeled "Remove Apple ID" and click on it to initiate the process.

Step 3. Link up your iOS device with the desktop or laptop. Once the device is detected, click on Unlock Now. For devices with iOS/iPadOS 11.4 or later, this action will erase all data, while earlier versions will retain your data.

Step 4. You will need to verify whether the screen lock is enabled on your device. Ensure it is activated and then press the Yes button to continue.

Step 5. Confirm that Two-Factor Authentication is turned on. If it is not enabled, do so and click Yes to proceed.
Step 6. To enter Recovery Mode, follow the on-screen prompts. If you encounter issues, select Try DFU Mode for further guidance.

Step 7. While in Recovery Mode, check the details of your device. Ensure the system version is correct, and click Start, or enter the information manually if needed.
Step 8. The tool will begin downloading the iOS firmware. If the download speed is slow, click Copy for a direct download.

Step 9. Once the firmware has downloaded, the system will validate it. After verification, click Unlock Now to resolve any issues related to your Apple ID.

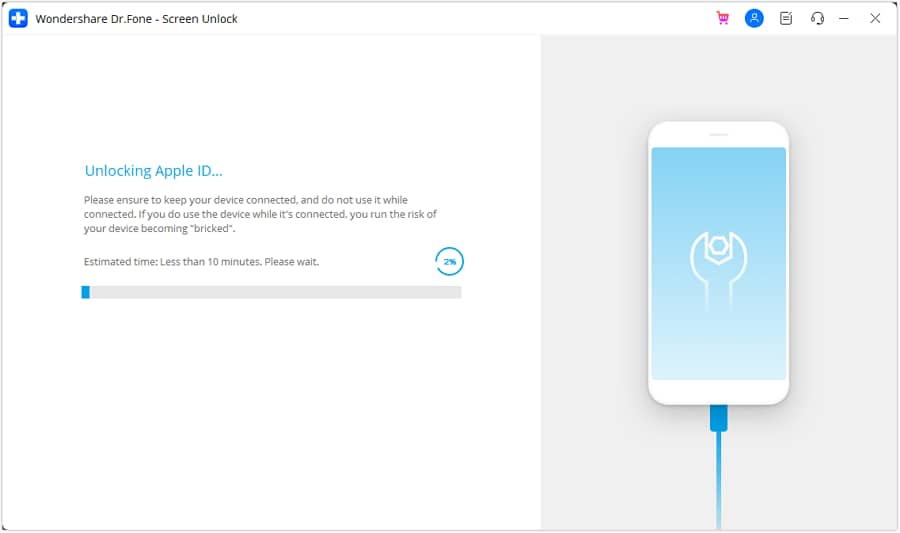
Step 10. A prompt will appear asking for a confirmation code. After entering the code, tap Unlock to start the Apple ID unlocking process.
Step 11. Keep your device connected while the Apple ID is being removed. Do not disconnect it during this phase.

Step 12. Once the process finishes, a notification will confirm successful removal. Click Done to finalize; if the attempt fails, press Try Again.

Conclusion:
dealing with the "Cannot Verify Server Identity" issue on your iPhone or iPad doesn’t have to be overwhelming. From simple fixes like restarting your device to more involved solutions like resetting network settings, each method offers a way to resolve the error and restore secure access to your apps. If these steps don’t work, a comprehensive tool like Dr.Fone - Screen Unlock (iOS) can provide additional support. Without risking data loss, Dr.Fone offers solutions for bypassing Apple ID issues and fixing other iOS-related problems, helping you get back to uninterrupted usage with ease.
4,624,541 people have downloaded it
iPhone Unlock
- Access Locked iPhone
- 1. Reset Locked iPhone Without iTunes
- 2. Erase Locked iPhone
- 3. Get Into Locked iPhone
- 4. Factory Reset Locked iPhone
- 5. Reset Locked iPhone
- 6. iPhone Is Disabled
- 7. Fix iPhone Unavailable Issue
- 8. Forgot Locked Notes Password
- 9. Unlock Total Wireless Phone
- 10. Review of doctorSIM Unlock
- iPhone Lock Screen
- 1. Lock Apps on iPhone
- 2. Bypass iPhone Passcode
- 3. Unlock Disabled iPhone Without PC
- 4. Disable One More Minute Screen Time
- 5. Unlock iPhone Passcode Screen
- 6. Reset iPhone Password
- 7. Auto Lock Never on iPhone
- 8. Remove Carrier Lock/SIM Restrictions
- 9. Get iMei Number on Locked iPhone
- 10. Add a New Face ID
- 11. iPhone Passcode Expired Pop-Up
- 12. Control Display Rotation
- 13. Fix iPhone is Disabled Connect to iTunes
- 14. Fix Turn Passcode Off Greyed Out
- 15. Get iPhone out of Demo Mode
- 16. Unlock Unresponsive Screen
- 17. iPhone Ask for Passcode After Reset
- Remove iCloud Lock
- 1. Unlock an iPhone 7 Plus iCloud
- 2. iOS 18 iCloud Unlock
- 3. iOS 26 iCloud Unlock
- 4. Crack iCloud-Locked iPhones to Sell
- 5. Jailbreak iCloud Locked iPhone
- 6. What To Do If You Bought A Locked iPhone?
- 7. Fix iPhone Unavailable No Erase Option
- 8. Find iCloud Email Address on Apple Device
- 9. Broque Ramdisk iCloud Bypass
- Unlock Apple ID
- 1. Remove Payment Method on iPhone
- 2. Create a New Apple ID Account
- 3. Change Apple ID on iPad
- 4. Change Your Apple ID Password
- 5. Apple ID Not Active
- 6. Fix Wrong Apple ID Issue on iPhone
- 7. Fix This Person Is Not Active
- 8. New iCloud Terms and Conditions
- 9. Fix Apple ID Account Unavailable
- 10.Find Apple ID by IMEI
- 11. Unlink 2 iPhones with the Same Apple ID
- 12. Reset Password at appleid.apple.com
- 13. App Store Keep Asking for Password
- 14. Find Apple ID Password No Reset
- 15. Trusted Devices List Not Available
- Remove SIM Lock
- 1. Unlock iPhone Using Unlock Chip
- 2. Unlock iPhone for Free
- 3. Unlock iPhone Online
- 4. Factory Unlock iPhone
- 5. SIM Unlock iPhone
- 6. Unlock AT&T iPhone
- 7. Unlock iPhone with IMEI Code
- 8. Unlock iPhone without SIM Card
- 9. Unlock Cricket iPhone
- 10. Unlock iPhone with/without SIM Card
- 11. Unlock T-Mobile iPhone
- 12. Unlock Verizon iPhone
- 13. iPhone IMEI Checker
- 14. Unlock Xfinity iPhone
- 15. Unlock iPhone From The Carrier
- 16. Turbo SIM iPhone
- 17. Get the Sprint Unlock Codes
- 18. Unlock a Sprint Phone
- 19. Fix When iPhone Says No Sim
- Unlock iPhone MDM
- 1. Remove MDM from iPhone
- 2. Remote Management on iPhone
- 3. MDM VS MAM
- 4. Top MDM Bypass Tools
- 5. IoT Device Management
- 6. Unified Endpoint Management
- 7. Enterprise Mobility Management
- 8. Top 10 Proxy Websites
- 9. Hindilinks4u Alternatives
- Unlock Screen Time Passcode
- 1. Reset Screen Time Passcode
- 2. Turn Off Screen Time without Passcode
- 3. Screen Time Passcode Not Working
- 4. Disable Parental Controls
- 5. Bypass Screen Time on iPhone Without Password
- 6. Delete Screen Time History on iPhone
- 7. Turn Off Downtime on iPhone
- 8. Download Age Restricted Videos
- MDM Unblock Games/Websites
- 1. Basketball Stars Game Unblocked
- 2. Play Getaway Shootout Unblocked
- 3. Play Build Now GG Unblocked
- 4. BitLife Unblocked
- 5. 10 Best Unblocked Anime Websites
- 6. Best Unblocked Game Websites
- 7. 1v1 LOL Unblocked
- 8. Get Poly Track Unblocked
- 9. Music Websites Unblocked
- 10. Spotify Unblocked
- 11. Snow Rider 3D Unblocked
- Unlock Apple Watch
- Unlock iPod Touch
- ● Manage/transfer/recover data
- ● Unlock screen/activate/FRP lock
- ● Fix most iOS and Android issues
- Unlock Now Unlock Now Unlock Now


James Davis
staff Editor