Itel A16 FRP Bypass: Complete Step Guide For Unlocking Google Lock On Itel Phones

Jun 11, 2026 • Filed to: Screen Lock Removal • Proven solutions
 TL;DR:
To bypass the Google FRP lock on an Itel A16 or Itel A16 Plus, you must either exploit system application vulnerabilities to manually add a new account or use a dedicated desktop unlocking software.
● Preliminary requirements include a stable WiFi connection, over 50 percent battery life, and an alternative Google account, though the bypass procedure will not recover any user data previously erased by the factory reset.
● Manual workarounds—such as the SIM contact MMS trick, keyboard Switch Access, or VNROM application disabling—operate directly on the phone but frequently fail on heavily patched firmware like the Android 10 updates.
● Dr.Fone - Screen Unlock serves as the primary fallback for updated devices, replacing risky third-party APK downloads with an automated USB unlocking process handled through a computer.
Ask AI for a summary
 ChatGPT
 Perplexity
 Gemini
 Claude
 Grok
Grok
A reset phone should start fresh. Yet many users see a Google account screen when they turn on their device. This happens because of FRP protection. It keeps the phone safe but can also stop the real owner from using the device again. This issue appears often on budget Android phones like the Itel A16 Plus FRP model.
Many people search for ways to safely remove the lock. The good news is that several simple options exist. Some methods work with a computer while others work directly on the phone. In this guide, you will see practical steps for the Itel A16 FRP bypass and FRP bypass for the Itel A16 Plus using safe techniques and trusted tools.
- Part 1: What Is FRP Lock on Itel Phones and Why It Appears
- Part 2: Preparation Before Starting Itel A16 FRP Bypass
- Method 1: Best Professional Solution for Itel FRP Bypass Using Dr.Fone

- Method 2: Itel A16 Plus FRP Bypass Using Sim Card Contact Trick
- Method 3: Itel A16 Plus FRP Bypass Using Language and Keyboard Settings
- Method 4: Itel A16 Plus FRP Bypass Using Temporary Pin or Pattern Trick
- Method 5: Itel A16 Plus FRP Bypass Using Vnrom Settings Method
Part 1. What Is FRP Lock on Itel Phones and Why Does It Appear?
FRP means Factory Reset Protection. Google added this feature to Android to protect user data. When a device resets without removing the Google account first, the system asks for the previous login details.
This security stops strangers from using a stolen phone. But problems happen in many normal cases, such as:
- forgetting the Gmail password
- buying a second-hand phone
- resetting the device without removing the account
- system errors after a factory reset
When this happens, the phone stays on the verification screen.
Part 2. Preparation Before Starting Itel A16 FRP Bypass
Before you try any unlocking method, make sure the device is ready. This reduces errors during the process.
Checklist before starting
- Charge the phone above 50 percent: Prevents shutdown during the bypass process.
- Connect the device to a stable WiFi network: Most methods require internet access.
- Use a reliable computer if the method requires one: Essential for PC-based tools like Dr.Fone.
- Keep a new Google account ready if needed: Required to complete setup after bypass.
- Download tools only from trusted sources: Avoids malware and corrupted files.
Dr.Fone - Screen Unlock (Android)
A Powerful Tool for Removing FRP on Android Devices
- Remove FRP lock on Samsung, Xiaomi, Redmi, Huawei, and mainstream Android phones without a password or Google account.
- Bypass Google FRP account on all Samsung Phones and Tablets.
- 100% success rate for FRP bypass on Samsung Snapdragon devices.

- Bypass Google account verification after factory reset.
- No tech knowledge required, Simple, click-through, process.


Preparation helps avoid failure during the ITEL A16 Plus Android 10 FRP bypass procedures.
Method 1. Best Professional Solution for Itel FRP Bypass Using Dr. Fone Screen Unlock
One reliable way to remove the Google verification lock is Dr.Fone - Screen Unlock (Android). This desktop tool is designed to bypass Factory Reset Protection and restore access to Android devices after a reset. It works in situations where users forget their Google account or purchase a second-hand phone that still shows the Itel A16 Plus FRP verification.
How it works:
This tool connects the phone to a computer and unlocks it step by step. Rather than using hidden settings or workarounds used in FRP bypass Itel A16 Plus methods, the software figures out all the correct flash procedure for FRP unlock.
Another advantage is functionality. The software can remove various Android locks, including PIN, password, pattern, fingerprint, and FRP verification, from many Android devices.
Steps For Itel A16 FRP Bypass Using Dr. Fone
- Run Dr. Fone on your PC and select the right feature. Once in the main dashboard, go to Toolbox section and click on Screen Unlock. Choose device type ‘‘Android’’.

- Then, select the feature which is named as Remove Google FRP Lock. It will then ask around the phone brand, so that it can continue with the correct unlocking process.
Select the device model if prompted.

- Power off and connect the phone to your PC using a USB cable. If connecting, press the volume buttons so the software can recognize your device correctly.
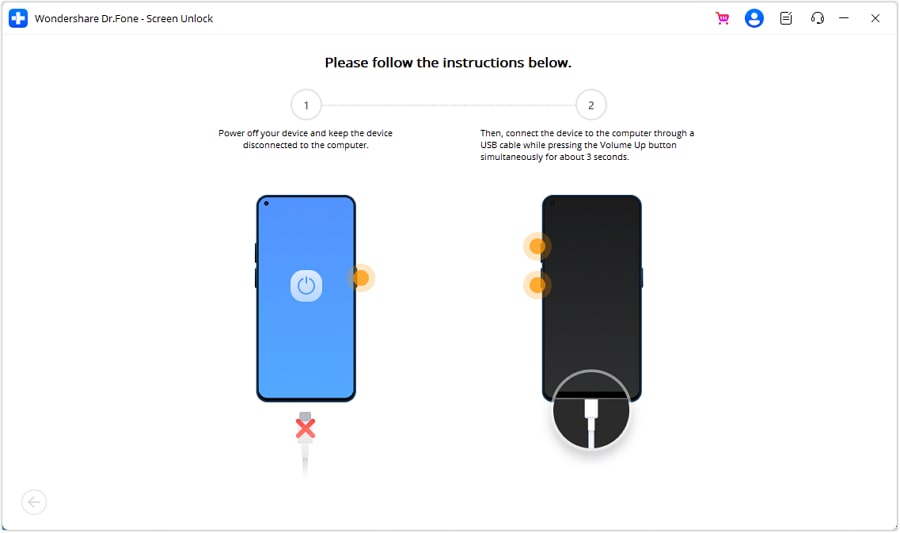
- Follow the instructions in your program for entering recovery mode. Just follow the on-screen instructions.
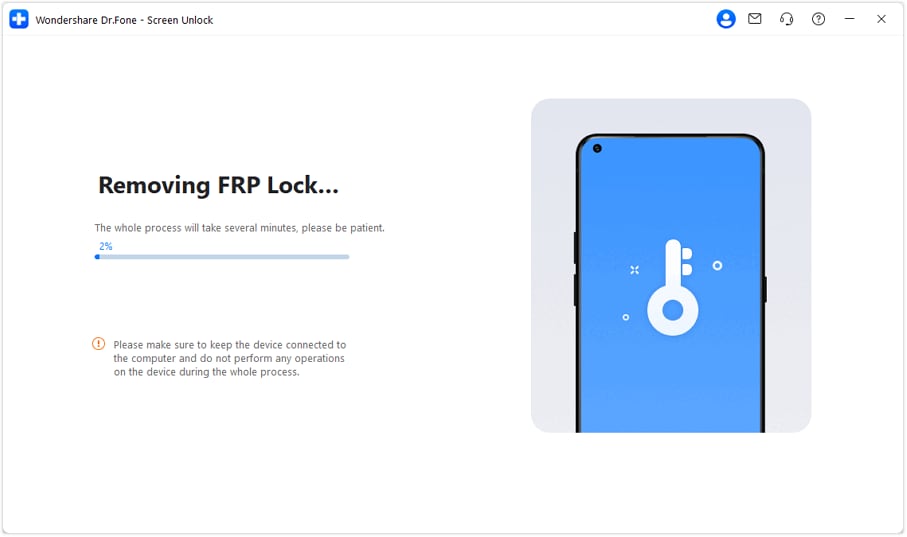
- Now, the software begins to remove the Google verification lock once the device is prepared. After the process is done, reboot the phone and set it up again, voiding your previous account.
4,624,541 people have downloaded it
Method 2. Itel A16 Plus FRP Bypass Using Sim Card Contact Trick
This method uses the SIM card and emergency contact options to access browser settings and install required APKs for FRP bypass.
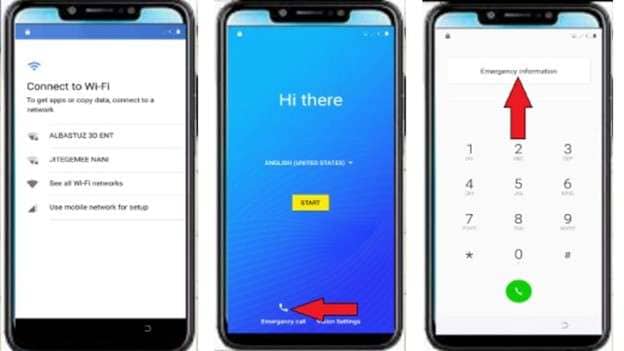
- Link up a SIM card in the phone and switch it on. Connect the phone to a WiFi network. Once that link is established, return to step one of the welcome screen of this setup.
- Tap the emergency call button on-screen. Then, tap twice on the option named emergency information. This will provide access to contact information stored on the SIM card.
- Select a contact, tap the edit icon on the screen. Go to add contact, select any phone number of the list.
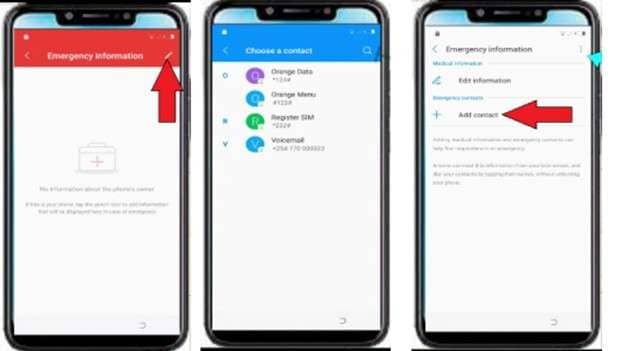
- Tap on the number to access contact options. Now press the three dots at the top and select share.
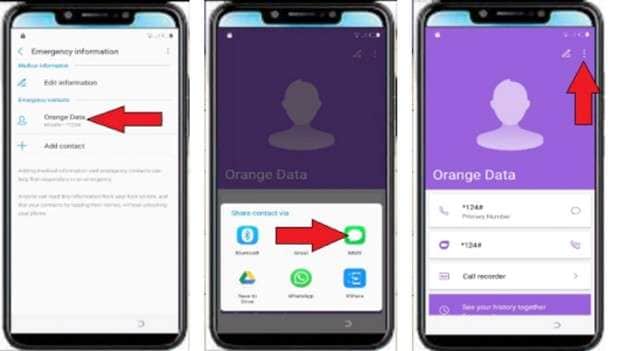
- A list of sharing apps will appear. Long-press the MMS option. This opens the app information page.
- From the app information screen, open the SMS application settings. Find the option labelled "Open links" and select YouTube from the list.
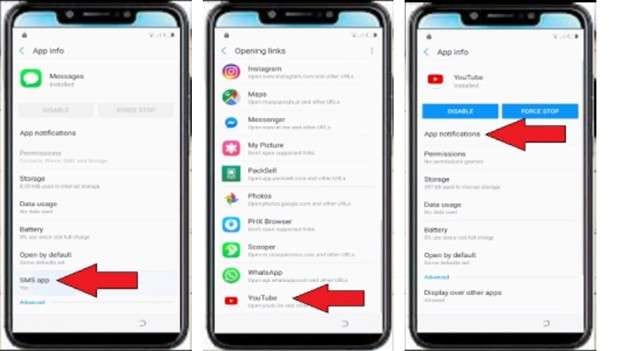
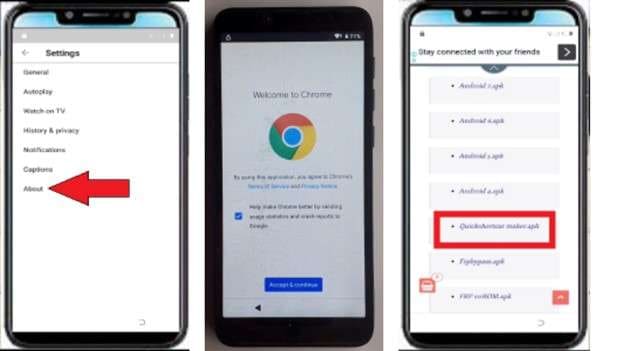
- Open YouTube and go to the notification settings. Tap additional settings, then choose about. Select the YouTube terms of service to open the Chrome browser.
- When Chrome opens, accept the basic setup options. In the search bar, type the website albastuz3d.net.
- Download two files from the website. The first is the Google Account Manager APK that matches the Android version. The second file is QuickShortcutMaker APK. These files are often used in FRP bypass Itel A16 Plus procedures.
- After both files have been downloaded, open the Chrome menu and go to the Downloads section. Tap the Google Account Manager file to start installation. Allow installation from this source if the phone asks for permission.
- Finish installing Google Account Manager and return to the downloads list. Now install the QuickShortcutMaker application, then open it.

- In QuickShortcutMaker, use the search bar and type Google Account Manager. From the results, open the option related to Google account sign-in.
- Tap to see if the activity would open. On the following screen, press the three dots and select Use browser to sign in. A sign in page for signing into Google will show.
- Enter any valid Gmail account and complete the login. After signing in, restart the phone.
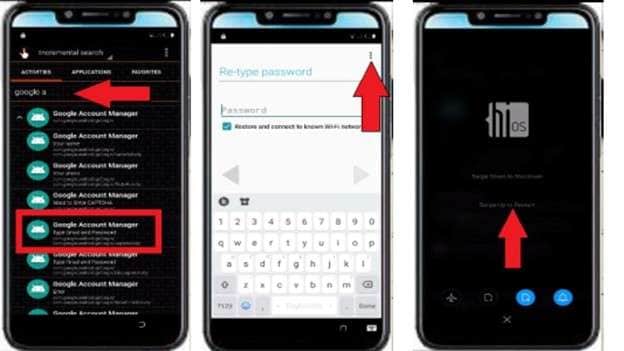
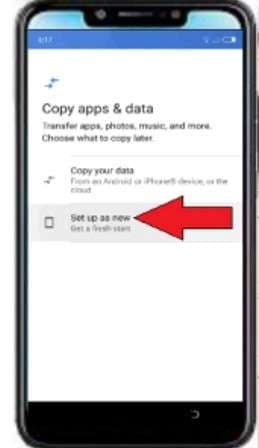
- Once the phone powers back up, initiate the setup. Select set up as new and proceed with the setup process.
Method 3. Itel A16 Plus FRP Bypass Using Language and Keyboard Settings
This method uses language and keyboard settings to access system functions and install APKs needed for FRP removal.
- Turn on the phone and connect it to a WiFi network. After connecting, return to the setup process's start screen.
- Change the device language. Select the third language from the bottom of the list. This step activates more keyboard options and allows access to keyboard language settings.
- Go back to the WiFi connection page and tap the option called "See all Wi-Fi networks". Then choose add network and long-press the space key or the globe icon on the keyboard.
- Open the keyboard settings menu. Select the last option under the keyboard choices and then tap the blue option below the QWERTY keyboard layout.
- Scroll down this settings page and select the first option itself with an arrow icon. When the next screen pops up, click the three dots in the upper right corner, then select the second option.
- Find the option named Switch Access. On that page, tap the share icon and select Google from the sharing options.
- This will take you to the Google search page. Tap the globe icon on the keyboard to switch its language back to English.
- In the Google search bar, type albastuz3d dot net and open the website.
- Download two files from the website. The first file is the Google Account Manager APK based on the Android version of the phone. The second file is FRP Bypass APK. These files are commonly used during FRP Bypass Itel A16 Plus procedures.
- After the files finish downloading, open the browser downloads section. Tap the Google Account Manager file and allow installation from this source if the phone asks for permission.
- Complete the installation of Google Account Manager and return to the downloads page. Then install the FRP Bypass application and open it.
- Inside the FRP Bypass app, open the menu from the three dots at the top corner. This will take you to the Google sign-in page.
- Enter any valid Google account and sign in with the correct email and password. Confirm the login and restart the phone.
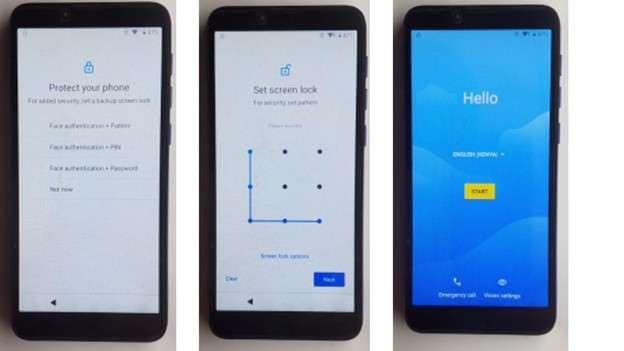
- When the device turns on again, continue the setup process. Skip the screen lock page and proceed through the remaining steps.
- The device will now open normally without the previous Itel A16 Plus FRP verification screen.
Method 4. Itel A16 Plus FRP Bypass Using Temporary Pin or Pattern Trick
This method uses a temporary screen lock to access system settings and bypass FRP.
- Power the phone on, and join it to a WiFi network. Keep going through the setup until you see the page that says “copy apps and data.” Go to that page and select the do not copy option.
- The next screen will request a pattern or PIN. If prompted for a PIN, enter four zeros. When it requests a pattern, draw an L shape. Go back to the starting page after that.
- From the start screen, switch the device language to the last option in the list. Then click on the second option in language settings.
- Return to the list of WiFi connections and select Show All WiFi Networks. Tap on the add network and long-press the space or globe icon on your keyboard to access keyboard settings.
- Select the last option under the keyboard menu and tap the blue option below the QWERTY keyboard layout. Scroll down and choose the option that shows an arrow icon.
- On the next screen, tap the three dots in the top corner and choose the second option. Open the first option shown and tap the share icon. From the sharing options, select Google.
- Google search will open on the screen. Change the keyboard language back to English using the globe icon. In the search bar, type albastuz3d dot net and open the website.
- From the website, download the file called development settings APK. After the download finishes, open the browser downloads page and tap the file to install it. Allow installation from other sources if the phone asks for permission.
- After installation, open the application. Scroll down and open the system options. Then open the language settings and add English as a new language.
- Drag the English language to the top of the list to make it the default language. Then return to the main settings screen.
- Open the security settings and enable screen pinning. When the device asks for a lock method, use the same one from earlier. Enter four zeros if it is a PIN or draw the L pattern if it is a pattern lock.
- Go back until you reach the start screen again. Begin the setup process once more and skip the options when possible. When the phone asks for verification, enter the same pattern or PIN that was created earlier.
- Continue the setup and skip the remaining steps. The phone will open normally without the previous Itel A16 Plus FRP verification screen.
Method 5. Itel A16 Plus FRP Bypass Using Vnrom Settings Method
This method uses VNROM files and system settings to disable Google services and add a new account.
- Next, power on the phone and connect it to a WiFi. Proceed with the setup until you're on the copy apps and data screen. Select do not copy, and return to the start.
- Change the device language and select the third language from the bottom of the list. After changing the language, go back to the WiFi connection page.
- Tap All Wi-Fi Networks, then tap Add network. Long-press the space bar or the globe icon to open keyboard settings.
- Select the last option under the keyboard settings and then tap the blue option under the QWERTY keyboard layout. Scroll down and choose the option shown with an arrow.
- On that page, open the highlighted option to access application settings. Scroll down and open the YouTube application.
- Open the first option in YouTube settings, then follow the arrow that appears. Scroll down and select the option that redirects to the Chrome browser. Accept the browser setup, so Chrome opens.
- In Chrome, change the keyboard language back to English using the globe icon. In the search bar, type albastuz3d dot net and open the website.
- From the website, download two files called FRP vnROM APK and Development Settings APK. After the download finishes, open the browser downloads section.
- Install the vnROM file first, but do not open it. Then install Development Settings and open the application after installation.
- Inside the application, scroll down and open the system settings. Tap the language option with the globe icon and add English as a new language.
- Move the English language to the top so it becomes the default language. Then return to the main settings page.
- Open apps and notifications and select See all apps. Find Google Play services and disable the application. Then open the Google Play Store and disable it as well.
- Return to the main settings screen and open the accounts option. Tap "Add account" and choose Google. Continue and sign in using any valid Gmail account and password.
- After adding the account return to apps and notifications again, and enabling Google Play services and Google Play Store.
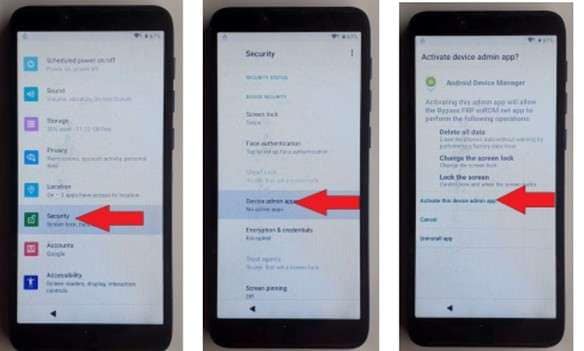
- Go back to the main settings page and open the security section. Select device admin apps and activate Android Device Manager.
- Restart the phone and continue the setup process. Skip the options when possible.
- The device will now open normally without the previous Itel A16 Plus FRP verification screen.
Conclusion
Each method in this guide solves the lock in a different way. The SIM contact trick works when you can access emergency options. The language and keyboard method helps when the browser can open through settings. The PIN or pattern method is useful when temporary lock prompts appear during setup. The VNROM approach works best for users comfortable installing APK files, like the FRP bypass APK for Itel A16.
Still, these manual paths rely on system gaps and may fail on newer updates, such as Itel A16 Plus Android 10 FRP bypass cases. Dr.Fone offers a more stable route. They automate the process and remove the verification screen with fewer risks during the Itel A16 FRP bypass.
4,624,541 people have downloaded it
FAQs


Android Unlock
- Android Password Lock
- 1. Reset Lock Screen Password
- 2. Ways to Unlock Android Phone
- 3. Unlock Wi-Fi Networks
- 4. Reset Gmail Password on Android
- 5. Unlock Android Phone Password
- 6. Unlock Android Without Password
- 7. Emergency Call Bypass
- 8. Enable USB Debugging
- 9. Unlock Asus Phone
- 10. Unlock Asus Bootloader
- Android Pattern Lock
- Android Pin/Fingerprint Lock
- 1. Unlock Android Fingerprint Lock
- 2. Recover a Locked Device
- 3. Remove Screen Lock PIN
- 4. Enable or Disable Screen Lock PIN
- 5. Pixel 7 Fingerprint Not Working
- Android Screen Lock
- 1. Android Lock Screen Wallpapers
- 2. Lock Screen Settings
- 3. Customize Lock Screen Widgets
- 4. Apps to Reinvent Your Android
- 5. Lock Screen Wallpaper on Android
- 6. Unlock Android with Broken Screen
- 7. Unlock Google Find My Device Without Problems
- 8. Forgot Voicemail Password on Android
- 9. Unlock SafeSearch on Google
- Android Screen Unlock
- 1. Android Device Manager Unlock
- 2. Unlocking Android Phone Screen
- 3. Bypass Android Face Lock
- 4. Bypass Android Lock Screen
- 5. Bypass Lock Screen By Emergency Call
- 6. Remove Synced Google Account
- 7. Unlock Android without Data Loss
- 8. Unlock Phone without Google Account
- 9. Unlock Android phone
- 10. Reset a Locked Android Phone
- 11. Unlock Doogee Phones
- 12. Best 10 Unlock Apps For Android
- 13. Remove Gmail Account
- 14. Unlock 30/30 Attempts Remaining
- 15. OEM Unlock Missing
- 16. Change Lock Screen Clock
- 17. OEM Unlocking on Android
- 18.Bypass Knox Enrollment Service
- 19. Unlock Google Pixel 6a, 6 or 7
- 20. Best Alternative to MCT Bypass Tool
- 21. Best Way to Unlock Your ZTE Phone
- Android SIM Unlock
- 1. Easily Unlock Android SIM
- 2. 5 Android Unlock Software
- 3. Carrier Unlock Phone to Use SIM
- 4. Change Android Imei without Root
- 5. How to Change SIM PIN on Android
- 6. Best Unlocked Android Phones
- Android Unlock Code
- 1. Lock Apps to Protect Information
- 2. Unlock Secret Features on Phone
- 3. Android SIM Unlock Code Generator
- 4. Ways to Sim Unlock Phone
- 5. Remove Sim Lock without Code
- 6. Updated Android Factory Reset Code
- Google FRP Bypass
- 1. Bypass Google Account Verification
- 2. Bypass Google FRP Lock On Phones
- 3. Bypass Google Pixel FRP
- 4. Huawei Bypass FRP Tools for PC
- 5. Direct Open FRP MobileTech
- 6. Bypass Samsung S24 FRP Lock
- 7. EDL Cable Unlock FRP
- 8. Unlock OnePlus Nord FRP
- 9. Tecno FRP Bypass
- 10. Remove Infinix FRP Lock
- 11. FRP Itel Lock Removal
- 12. Itel A23 FRP Bypass Easy Guide
- 13. Itel A16 FRP Bypass
- 14. Remove Google FRP Using Online Tools
- Unlock Bricked Phone
- 1. Restore Bricked Mobile Phone
- 2. Fix Motorola Bricked Phone
- 3. Fix Bricked Redmi Note
- 4. Unbrick Oneplus Easily
- 5. Unbrick Xiaomi Phone
- 6. Unbrick Huawei Phone
- 7. Unbrick Poco X3
- 8. Software to Unbrick Samsung
- 9. Unbrick 3DS
- 10. Unbrick PSP
- Android Unlock Tools
- 1. Griffin Unlocker Tool Review
- 2. BMB Unlock Tool Review
- 3. Android Multi Tools Review
- 4. Best Bootloader Unlock APKs
- 5. Top 5 Micromax FRP Tools
- 6. Pangu FRP Bypass
- 7. Google Account Manager APK FRP Review
- 8. D&G Password Unlocker Review
- 9. Android Multi Tools Review
- 10. Easy Samsung FRP Tool Review
- 11.Samfw FRP Tool
- Android MDM
- ● Manage/transfer/recover data
- ● Unlock screen/activate/FRP lock
- ● Fix most iOS and Android issues
- Free Download Free Download Free Download

Daisy Raines
staff Editor