3 Solutions for Moto G Pure FRP Bypass With/Without PC [Updated]

Jun 11, 2026 • Filed to: Screen Lock Removal • Proven solutions
 TL;DR:
Bypassing the Factory Reset Protection (FRP) on a Moto G Pure requires either using a PC with Dr.Fone - Screen Unlock (Android) for an automated removal or manually exploiting the device's TalkBack or Emergency Call features to bypass Google account checks.
● The PC method utilizing Dr.Fone - Screen Unlock (Android) on Windows or Mac offers a fast two-minute resolution and high success rate for users wanting to avoid complex manual configurations.
● The non-PC methods require a Wi-Fi connection and strict navigation through the native TalkBack or Emergency Call menus to manually force stop the "Android Setup" application and disable "Google Play Services" before completing a final setup.
● To prevent triggering the FRP lock in the future, you must manually delete the active Google profile from the device's "Accounts" settings menu prior to performing a factory reset.
Ask AI for a summary
 ChatGPT
 Perplexity
 Gemini
 Claude
 Grok
Grok
Getting locked out of your mobile because of the Factory Reset Protection can be tough. That is especially the case if you don't remember the previously synced Google account. While FRP is designed to protect your phone and prevent unwanted access after a reset, it often causes problems. Most of the time, it is the people who’ve bought a used phone that are affected.
This guide will walk you through three simple, updated solutions that help with Moto G Pure FRP bypass. Each method is explained in a way that's easy to follow, even if it’s your first time dealing with this issue. So, keep reading to get back into your phone in no time without stress or confusion.
Part 1. How To FRP Bypass Moto G Pure With PC [2 Minutes & 100% Success]
Before jumping into more complicated methods, starting with a fully effective solution often saves time. It also avoids repeated failed attempts, giving you unnecessary stress. Especially when you have access to a PC, using Dr.Fone – Screen Unlock (Android) can make the Motorola G Pure FRP bypass process smooth. It offers a straightforward process designed specifically to help users remove this lock from Android devices.
What sets this software apart is its ease of use, as no advanced knowledge is needed to employ it. Nor are there any multiple steps that might confuse beginners. Its dynamic approach guides you through the unlocking process with clear instructions. That reduces the time it usually takes to complete such a task. Most importantly, the tool ensures a high success rate, even for the latest Android versions.
In addition to its efficiency, Dr.Fone is widely trusted by users who often face phone lock issues. It provides a dedicated service for all Samsung devices on any Android OS version. Apart from that, all major brands are supported by this program to get rid of FRP. Plus, this great prowess also extends to getting rid of all sorts of screen locks.
Dr.Fone - Screen Unlock (Android)
The Best Tool to Bypass Moto G Pure FRP and Solve Your Screen Locks
- Completely unlinked from the previous Google account, it won’t be traced or blocked by it anymore.
- Remove all Android screen locks (PIN/pattern/fingerprints/face ID) in minutes.
- Compatible with various Android models.
- Provide specific removal solutions to promise good success rate.


Quick Manual on How To FRP Bypass Moto G Pure With PC in a Matter of Minutes
To regain access to your mobile, this method is likely to be your fastest and most reliable bet. Adhere to these elaborate instructions for the FRP bypass Moto G Pure operation:
Step 1. Open The Program and Head to The FRP Lock Removal Menu
Start by launching Dr.Fone – Screen Unlock (Android) and entering the "Toolbox" section to view all available features. Once there, proceed with the "Screen Unlock" option and choose "Android" as your device type. Following that, continue by selecting "Remove Google FRP Lock" when prompted.

Step 2. Choose the Brand and Follow the Prompts
After that, browse through the list of supported brands to select "Moto" and tap “Start” so the tool can recognize your device. At this point, you need to follow the steps provided on the screen and hit the "Send Notifications" button when you are done.

Step 3. Allow the Tool to Remove the Moto FRP Lock
Once you have done that, click the “OK” button to proceed with the operation. Now, you will be asked to perform a series of actions on the mobile to aid the process. A short while later, the process will wrap up on its own, and you'll just need to tap "Done" to finish everything up.
4,624,541 people have downloaded it
Part 2. How To Perform Moto G Pure FRP Bypass Without PC
There is no need to worry, even if you lack access to a computer for this operation. You can still remove the FRP lock on your Moto G Pure using methods that rely only on the device itself. While these approaches may take a few extra steps, they remain highly effective when done carefully. Detailed below are 2 ways you can execute the FRP bypass Motorola G Pure task:
Way 1. Use the TalkBack Feature To Bypass Moto G Pure FRP
One clever way to get around this restriction without using a PC is by taking advantage of the native “TalkBack” function. This accessibility option can help trigger a series of steps that lead you to the phone’s settings. Here, you can eventually take steps for the FRP bypass Moto G Play process. Although it may feel a bit tricky at first, this guide can lead you to a successful operation:
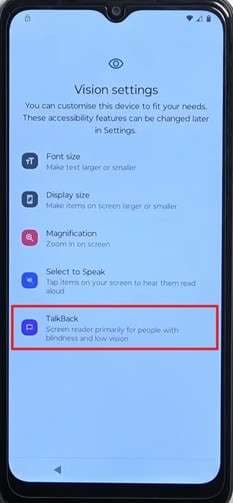
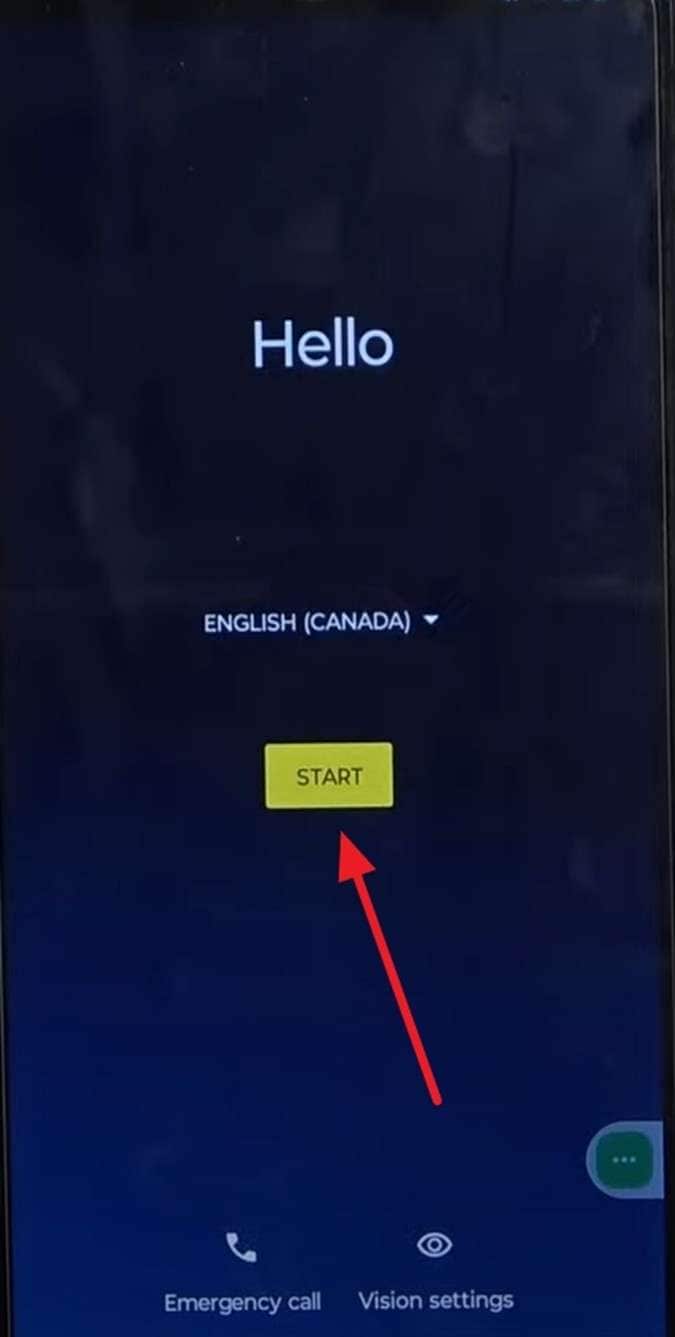
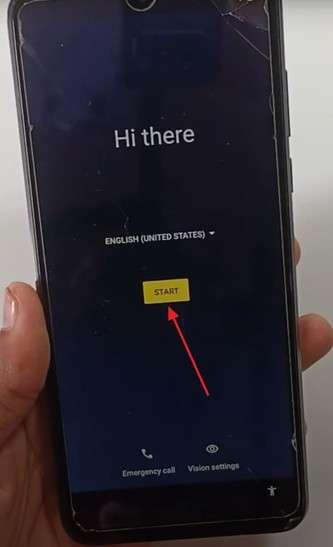
Step 1. Power on the device to check that the FRP lock is active on it and connect it to a Wi-Fi network to proceed. After that, return to the initial “Hello” screen and tap the “Vision Settings” button.

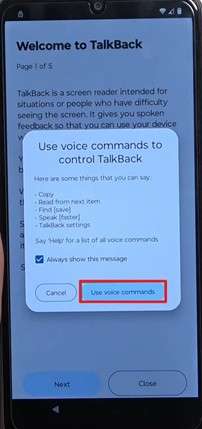
Step 2. Now, continue by selecting “TalkBack” on the next screen and enabling the “Use TalkBack” option. Afterward, wait for the “Welcome to TalkBack” screen to appear and draw a mirrored “L” gesture.
Step 3. Then, choose "While using this app" from the permissions pop-up and pick the "Use voice commands" option. When doing that, say, "Open Google Assistant," and follow it by saying, "Open YouTube."
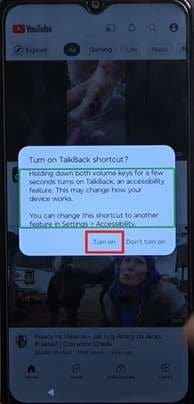
Step 4. Once YouTube launches, press both volume keys simultaneously in an attempt to turn off TalkBack. When the confirmation window shows up, select “Turn On.” Repeat the same volume key action once more to finally disable the TalkBack feature.
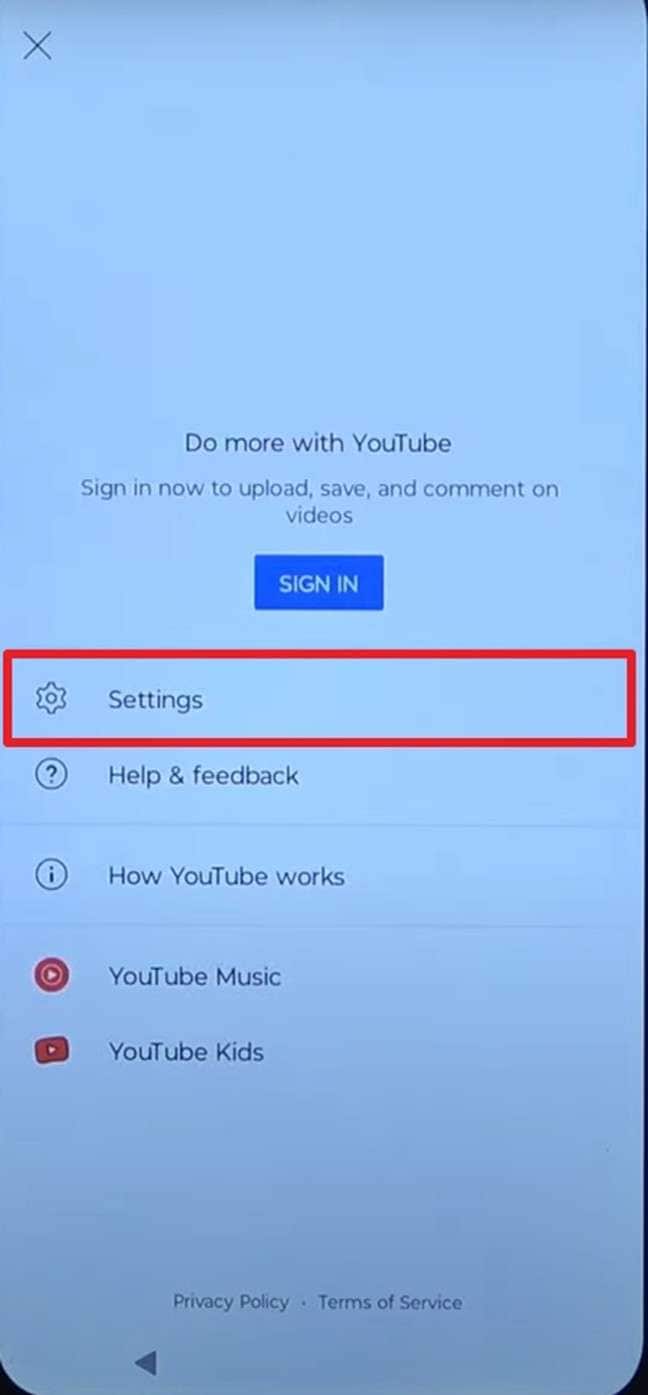
Step 5. Next, locate and tap the profile icon in the top right corner of the app to continue. Then, head into the “Settings” section and proceed to select “About.”
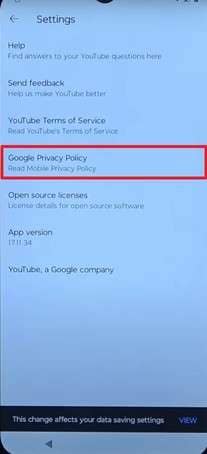
Step 6. Following that, tap “Google Privacy Policy” to open Chrome and prompt you to accept its terms. After Chrome opens, tap the address bar and go to “hardreset.info/bypass.”
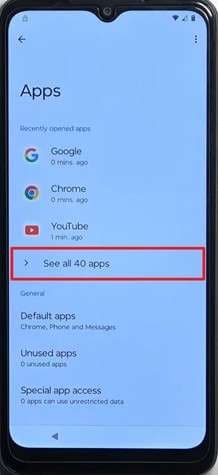
Step 7. Once the page loads, scroll to find and tap the shortcut to open the “Settings” app. Then, navigate to the “Apps” section within the mobile configurations and choose the “See all apps” option.
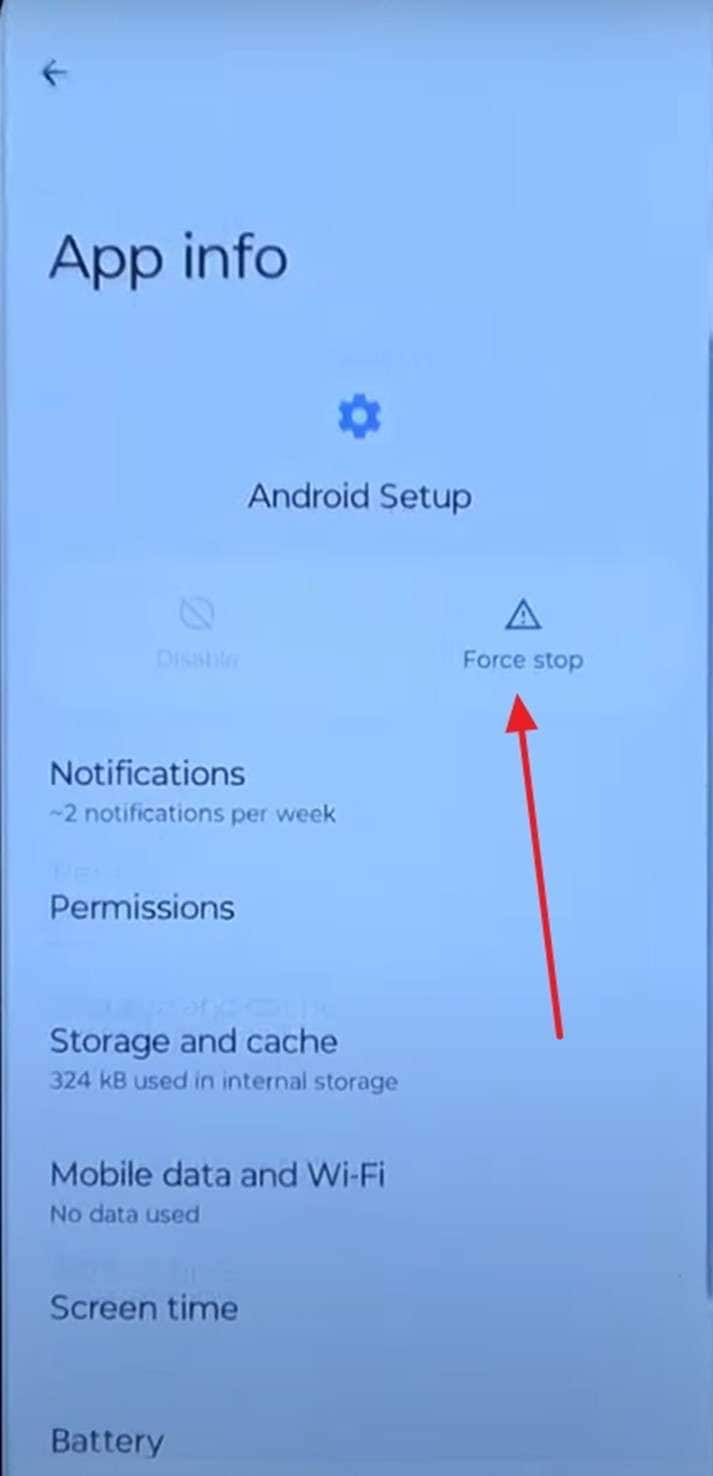
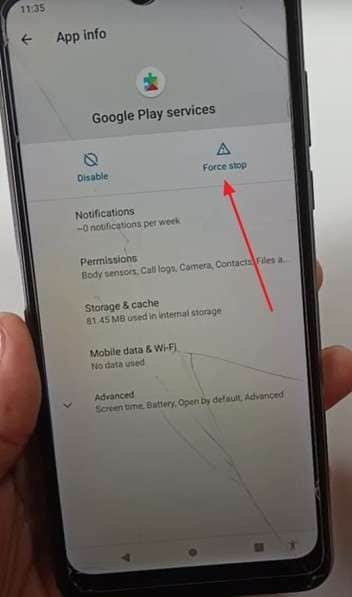
Step 8. At this point, locate the “Android Setup” app and press “Force Stop” to end its activity. Right after that, find “Google Play Services” and choose both “Disable” and “Force Stop” one after the other.
Step 9. Moving ahead, return to the main “Settings” menu and enter the “Accessibility” section. There, open the “Accessibility Menu” and enable the “Accessibility Menu Shortcut.”

Step 10. When it's turned on, return to the original "Hello" screen and tap "Start" to continue to the screen where the device checks for updates. At that stage, press the Accessibility Menu shortcut and select "Assistant" from the menu that appears.
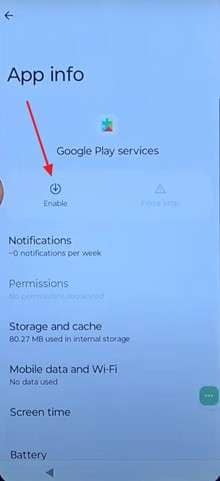
Step 11. Keep trying until you get the chance to choose “Settings” on the screen. Eventually, you’ll reach the app information screen for Google Play Services, where you must tap “Enable.”
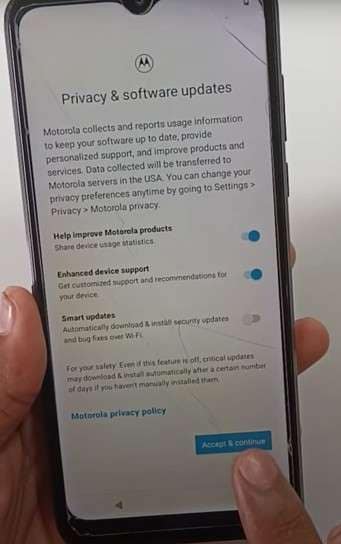
Step 12. Then, return to the previous screen and wait for the Google page to appear before selecting “Agree.” Finally, the setup wizard will prompt you to create a PIN code for the device.
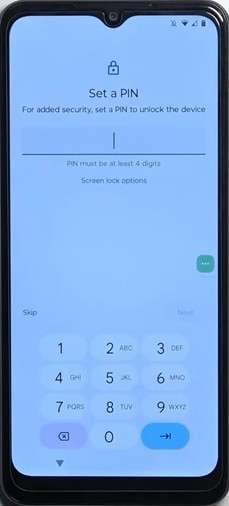
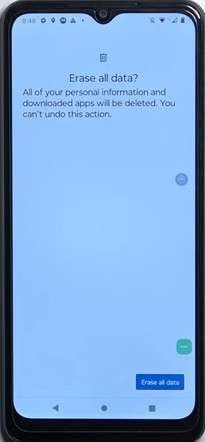
Step 13. Complete that step to finalize the initial setup. Once done, open the “Settings” again and perform a factory reset to fully complete the FRP bypass process.
Way 2. Try the Emergency Call Option To Bypass FRP Moto G Pure
The TalkBack feature is not the only workaround, as another approach is also possible. Some users have claimed to perform the Moto G Play FRP bypass via the emergency call option. This technique might be a bit unconventional, but it can be the cure. Triggering a few actions can let you utilize the phone’s settings to delete the Google lock. Utilize the following steps to learn how to employ this technique:
Step 1. Confirm the FRP lock by turning on your Moto phone and linking it to a stable network. Then return to the “Hello” screen to tap “Emergency Call” > “Emergency Information” > “Emergency Information” again and hit the pencil icon.
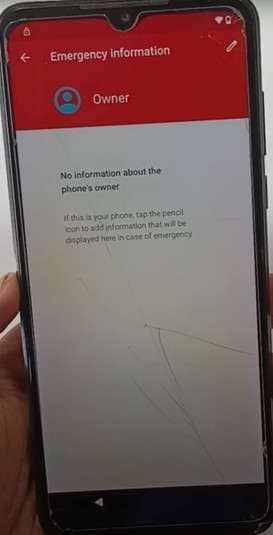
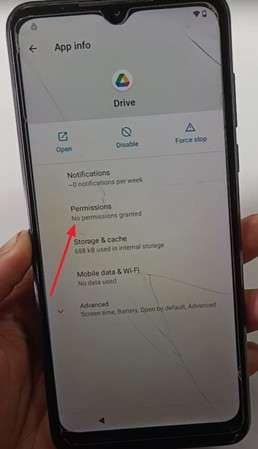
Step 2. Now, tap the “Name” field to select the profile picture icon and press “Open an Image.” Once in the File Manager, go to “Recent” to long-press “Drive.” When the Drive info screen opens, tap “Permissions” to continue.
Step 3. Next, use the search icon to look for “Settings” and opt for the Settings app from the results. Following that, tap “Open” on the next page to launch it and go to “Accessibility” > “Accessibility Menu.”
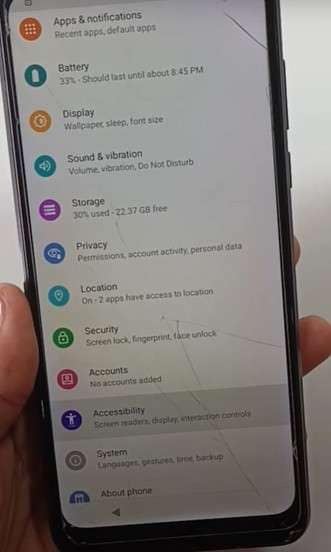
Step 4. Here, enable the “Accessibility Menu Shortcut” toggle and return to the main settings screen to access “Apps & Notifications” > “App Info.” Now, find “Android Setup” to tap “Force Stop” and scroll to “Google Play Services” to hit “Disable” and “Force Stop.”
Step 5. Following that, return to the “Hello” screen to press “Start” and use the accessibility shortcut to select “Assistant.” Then, hit “Settings” from the screen to visit the “Google Play Services” info page and “Enable” the app.
Step 6. Go back to access the “Google Services” page and tap “Accept” to continue. Finally, skip the PIN setup screen and disable the accessibility menu shortcut to conclude the operation.
Pro Tip. How To Avoid Moto Pure FRP Bypass
To save yourself from going through this hassle in the future, there’s one simple step that can make a big difference. Whenever you plan to factory reset your Moto G Pure mobile, get rid of your Google account beforehand. Do that when you're selling it, giving it away, or just starting fresh. Using these steps will save you from dealing with the Moto G Pure FRP scenario:
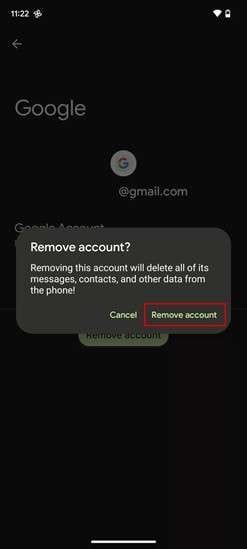
Step 1. Make your way into the mobile configurations via the app and access the “Accounts” tab. Here, opt for the Google profile and hit the “Remove Account” button on the next screen.
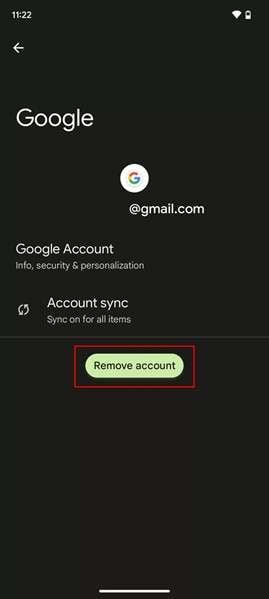
Step 2. Following that, confirm your intent one more time by pressing "Remove Account" again. Finally, tap "OK" to affirm the decision for the last time to delete the profile from the mobile.
You may also like: download frp tools for additional bypass methods.
Conclusion
In summary, dealing with the FRP Moto G Pure scenario can be a mess if you do not have the right tools. Yet, there are a few effective solutions that can help you regain access. There are direct approaches that involve using various mobile functions like TalkBack and Emergency Call. The problem is that they may not always be consistent or easy to follow for every person.
For the most reliable and quick experience, using Dr.Fone – Screen Unlock (Android) remains the top recommendation. Its fast operation and high success rate make it a smart choice, especially if you want a smooth Moto G Pure FRP bypass.
4,624,541 people have downloaded it
FAQs


Android Screen Unlock
- Unlock Android Screen
- Best Unlock Apps For Android
- Unlock Android Pattern Lock
- Bypass Android lock
- Unlock Android with Broken Screen
- Unlock Android Forgot PIN
- Unlock Without Google Account
- Unlock without Factory Reset
- Unlock Android Tablets
- Reset Locked Android Phone
- SafeUnlocks Review
- Unlock Huawei Phones
- Unlock Google Pixel Phones
- Unlock OnePlus Phones
- Unlock Vivo Phones
- Unlock Sony Xperia
- Unlock LG Phones
- Unlock Mi Pattern Lock
- Unlock OPPO Phones
- Unlock Realme Phones
- Unlock LG Phones
- Unlock Honor Phone
- Unlock Kyocera Phone
- Unlock Samsung Screen
- Bypass Samsung Lock
- Unlock Samsung Password/Pin
- Top Samsung Unlock Softwares
- Samsung Unlock Code Generator
- Get Free Samsung Unlock Codes
- Samsung Galaxy Secret Code List
- Samsung Knox Disable
- Reset Samsung Galaxy A12
- Unlock Samsung S22 Ultra
- Bypass Android FRP
- Top FRP Bypass Tools
- Disable FRP
- Bypass Android FRP
- Bypass FRP with PC
- Bypass FRP with ADB
- Bypass Google Account Verification
- Custom Binary Blocked by FRP Lock
- Bypass Google Pixel FRP
- Bypass Huawei FRP
- Huawei FRP Code
- Bypass Xiaomi/Redmi/Poco FRP
- Bypass OPPO FRP
- Bypass LG FRP
- Bypass Motorola FRP
- Bypass Lenovo FRP
- Bypass Realme FRP
- Bypass ZTE FRP
- Vivo Y15a FRP Bypass
- Moto G Pure FRP Bypass
- Bypass Samsung FRP
- Galaxy Z Fold 7 FRP Bypass
- Bypass Galaxy M01 FRP
- Bypass Samsung M11 FRP
- Bypass Samsung J5 Prime FRP
- Bypass amsung A02/A02 FRP
- Bypass Samsung A10/A10s FRP
- Bypass Samsung A12 FRP
- Bypass SamsungA20/A20S FRP
- Bypass Samsung A21/A21s FRP
- Bypass Samsung Galaxy 50 FRP
- Bypass Samsung Galaxy 51 FRP
- Bypass Samsung S7 FRP
- Bypass Samsung Galaxy S22 FRP
- FRP Bypass Tools
- Test DPC APK
- FRP File Bypass
- ES File Explorer
- Maxroms FRP Bypass
- GSM Aladdin
- Android Novo Tools FRP
- GSMNeo FRP
- Phoenix Service Tool
- MRT Key Review
- XSoft FRP Unlock
- FRPFile FirmwareBD
- ZeroKnox Removal Tool
- Samflash Tool
- Techeligible FRP Unlock
- Riserom FRP Bypass
- Romstage FRP Bypass
- GSM Prime FRP
- ● Manage/transfer/recover data
- ● Unlock screen/activate/FRP lock
- ● Fix most iOS and Android issues
- Free Download Free Download

Daisy Raines
staff Editor