100% Security Verified | No Subscription Required | No Malware

 :
: 
 ChatGPT
 Perplexity
 Gemini
 Claude
 Grok
Grok
I performed a factory reset on my POCO X3 Pro, but now I'm stuck on the Google verification screen. I've forgotten my password. What is the most effective POCO FRP unlock tool for 2026?
Verified POCO User Forum

Facing a Factory Reset Protection (FRP) lock on your POCO smartphone is a common yet frustrating experience. This security feature, designed to protect your data after a forced reset, can become a barrier if you lose your Google account credentials. Whether you are using the POCO C40, X3 Pro, or the M3 series, being locked out means your device is essentially a brick.
This comprehensive 2026 guide provides the most current solutions for POCO FRP bypass. We will explore both professional software solutions that act as a dedicated poco c40 frp unlock tool and manual workarounds for users who do not have immediate access to a computer. By following these verified steps, you can safely navigate MIUI security and restore your phone's functionality.
In this article
Part 1. Best POCO FRP Unlock Tool: Dr.Fone - Screen Unlock (Android)
For most users, the most efficient way to handle a locked device is by using a specialized poco x3 pro frp unlock tool. Manual exploits often involve dozens of steps that can be patched by Xiaomi at any time. In contrast, Dr.Fone - Screen Unlock (Android) offers a streamlined, professional-grade solution that stays updated with the latest 2026 security patches.
As a robust poco x3 frp unlock tool, Dr.Fone automates the technical heavy lifting. It bypasses Google account verification regardless of the MIUI version or the specific chipset (Snapdragon or MediaTek). This ensures that users with poco c31 frp bypass needs or those looking to bypass poco m3 frp can achieve results in minutes without risking a system boot loop or permanent data corruption.
 Unlock Android phone in seconds.
- Remove PIN, pattern, password, fingerprint.
- Bypass Google FRP lock easily.
- Works on all Android brands & models.
- No tech skills required – user-friendly.
Step 1 Launch Dr.Fone and Access Toolbox
Open Dr.Fone on your PC or Mac. From the main dashboard, navigate to the Toolbox tab and select the Screen Unlock utility to start the poco x3 pro frp removal process.

Step 2 Define Device Type
Select Android as the operating system for your POCO device to reveal the specific unlocking tools available for the platform.

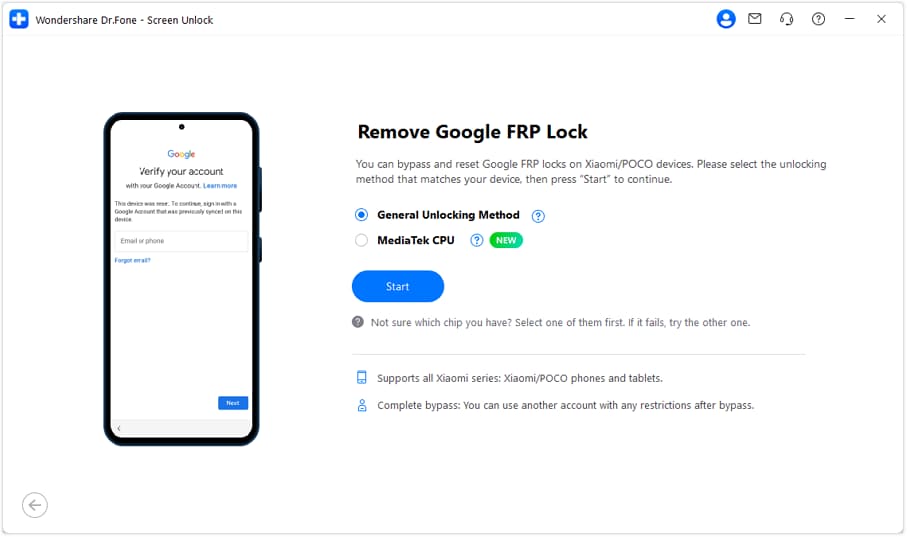
Step 3 Target the Google FRP Lock
Within the Android unlock suite, choose the option labeled Remove Google FRP Lock. This is the primary function for bypassing the frp poco x3 pro verification screen.

Step 4 Select Brand and CPU Mode
Pick your mobile brand (Xiaomi/POCO) and click Start. If your device uses a MediaTek chipset, select the MediaTek CPU option for a more direct unlock path.

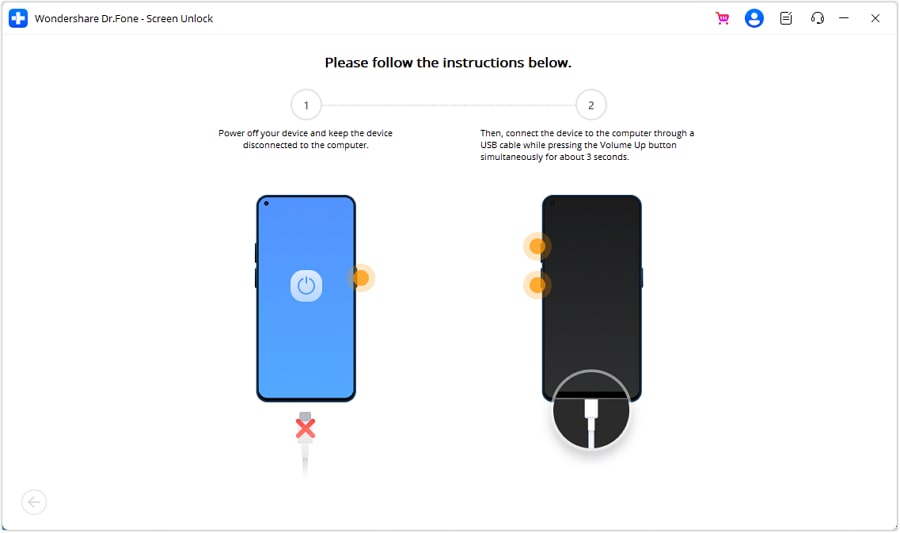
Step 5 Connect and Initiate Bypass
Follow the prompts to connect your POCO phone to the computer. You may need to hold the volume buttons for several seconds to allow the software to detect the device and begin removing the Google lock.
Step 6 Secondary Unlocking Path
If the CPU-specific method doesn't trigger, click on the General Unlocking Method. This serves as a universal poco c40 frp unlock tool logic for various MIUI configurations.
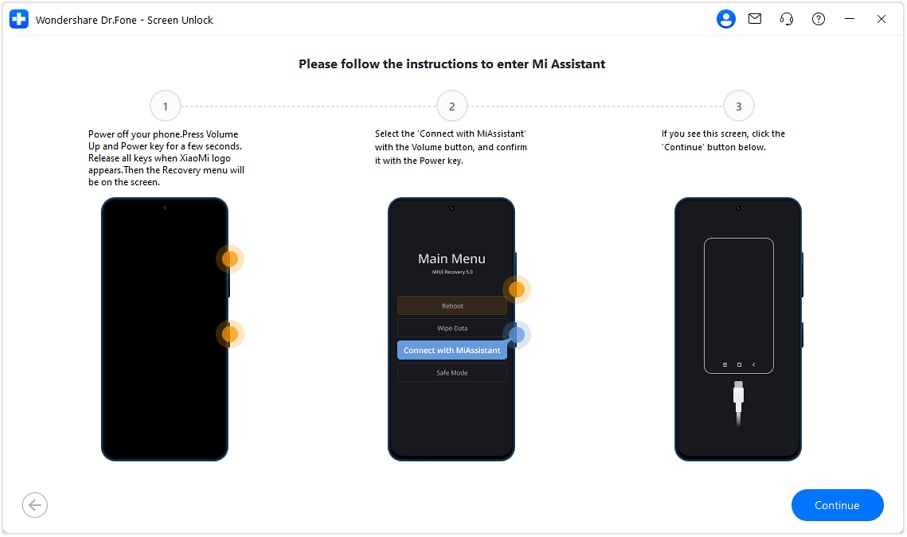
Step 7 Utilize Recovery Mode with MiAssistant
Enter the Recovery Menu on your POCO device. Use the volume keys to navigate to Connect with MiAssistant and confirm to bridge the connection with Dr.Fone.
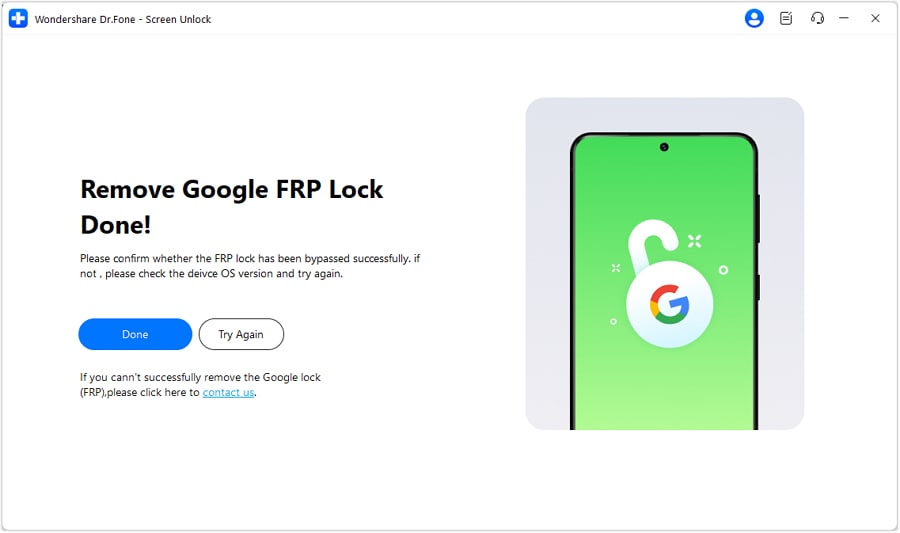
Step 8 Completion
The software will finalize the removal. Once the progress bar reaches 100%, click Done and reboot your phone to access the home screen without any account prompts.


Part 2. How to Bypass POCO FRP Without a Computer (Manual Method)
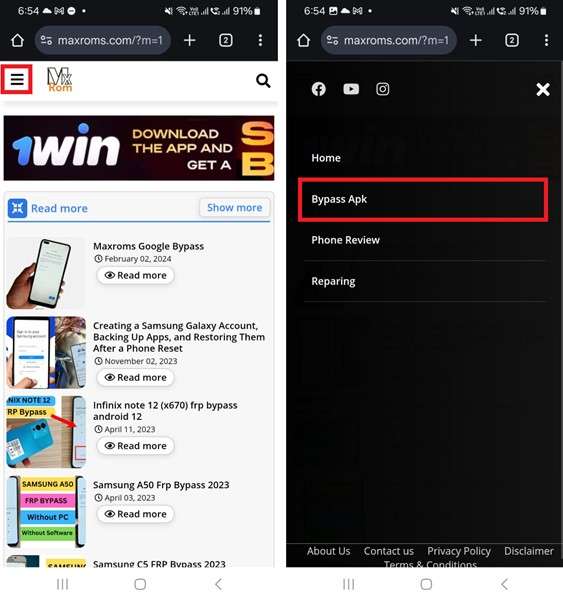
If you don't have access to a PC, you can attempt to bypass poco x3 frp using an APK-based exploit. This method utilizes system vulnerabilities to trick the device into accepting a new Google account. While effective, it is more complex and requires another working Android phone to assist in the transfer.
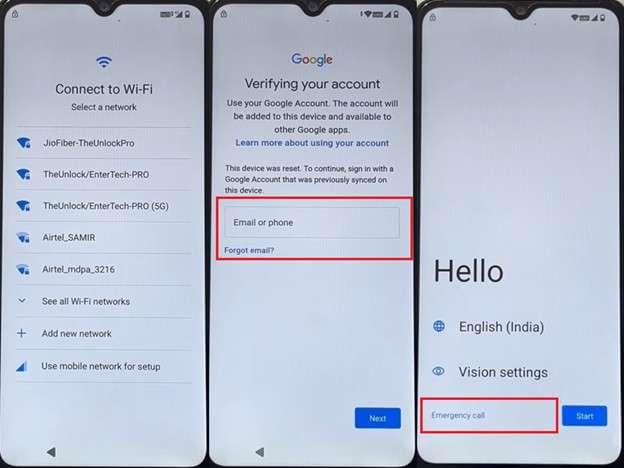
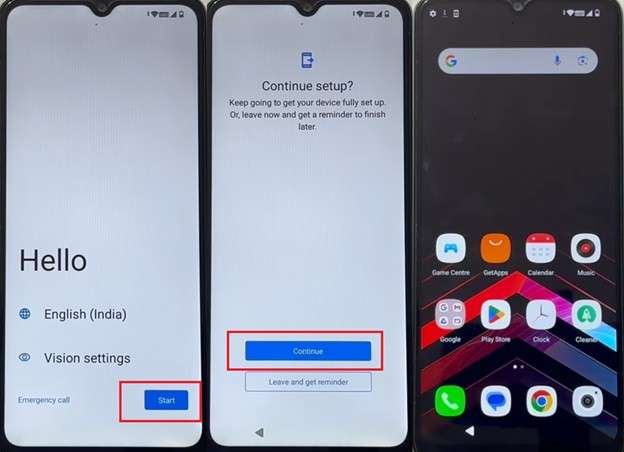
Step 1 Network and Emergency Setup
Connect to Wi-Fi and reach the FRP verification screen. Return to the Start screen, insert a SIM card, and tap Emergency Call.
Step 2 Trigger the Recorder
Dial an emergency number and tap the Record icon. Grant all requested system permissions to proceed.
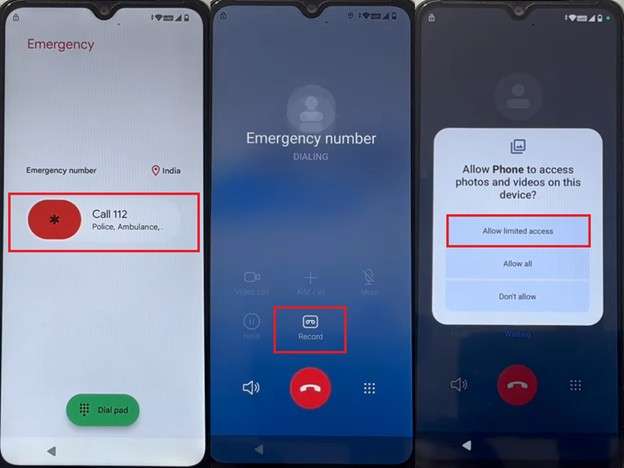
Step 3 Permission Loop Exploit
Deny photo permissions via "Allow None," redial, and tap Record again. This time, click Next on the permission prompt to force the system to open the File Manager.

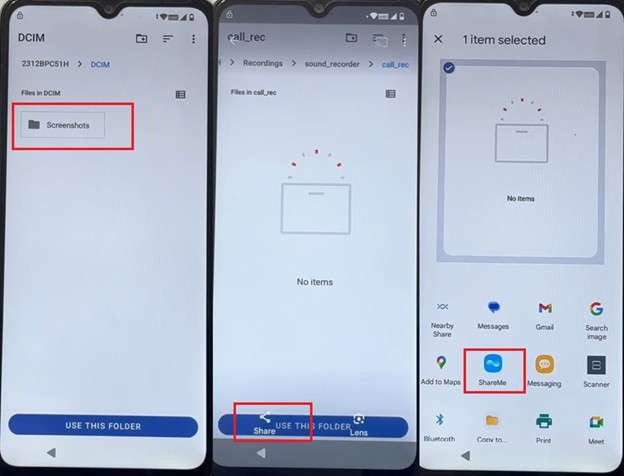
Step 4 Screenshot and ShareMe
Once in the File Manager, take a screenshot. Open that screenshot and use the Share icon to launch the ShareMe app.
Step 5 App Preparation on Second Phone
On another Android phone, use Chrome to download the Activity Launcher APK. Ensure both phones have ShareMe installed.
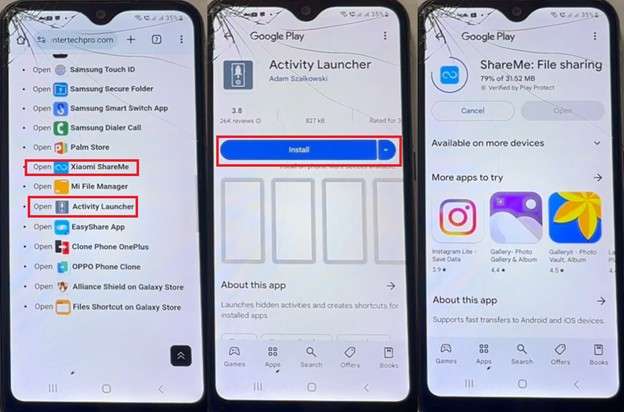
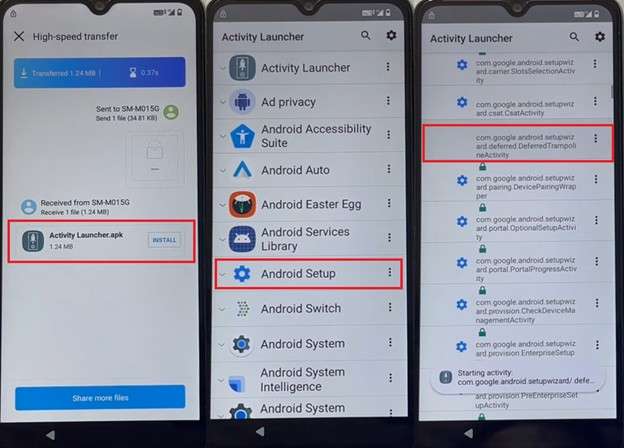
Step 6 Transfer and Launch
Send the Activity Launcher APK to the locked POCO. Open it and find the Android Setup activity to initiate the deferred setup wizard.
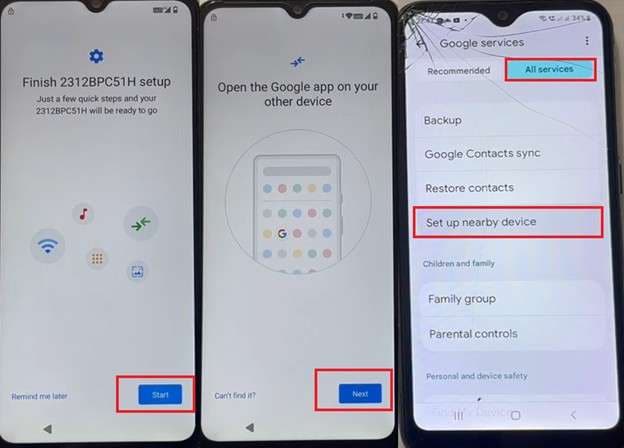
Step 7 Account Transfer
On the working phone, go to Settings > Google > Set up & restore > Set up nearby device. This will link the two devices for account synchronization.
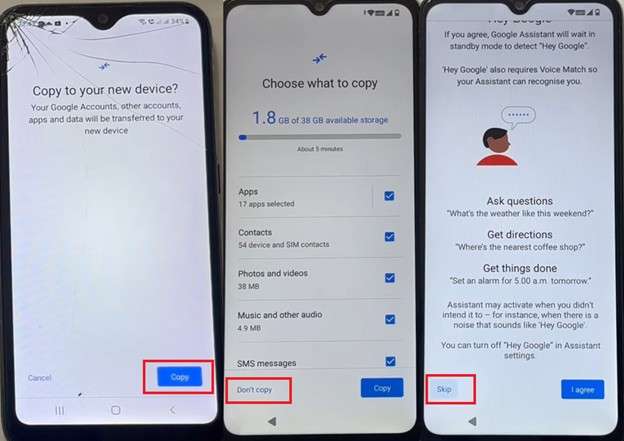
Step 8 Copy Credentials
Choose Copy to move your Google ID to the locked POCO. When prompted to restore data, select Don't Copy to keep the process clean.
Step 9 Final Setup
Follow the setup prompts until you reach the home screen. Your device is now temporarily unlocked using the new Google account.
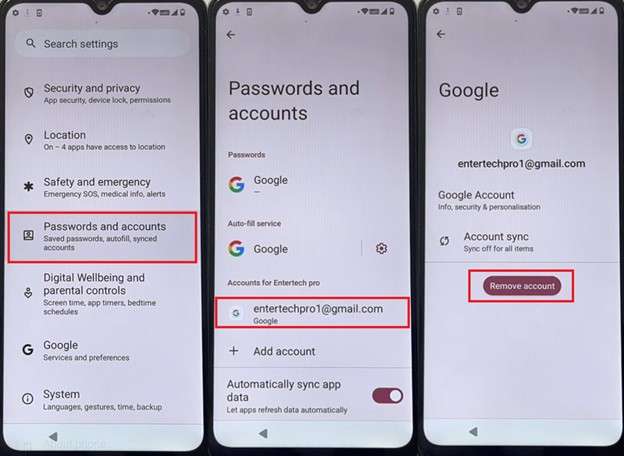
Step 10 Remove Accounts
Navigate to Settings > Passwords & Accounts and Remove the Google account you just transferred to prevent it from locking again.
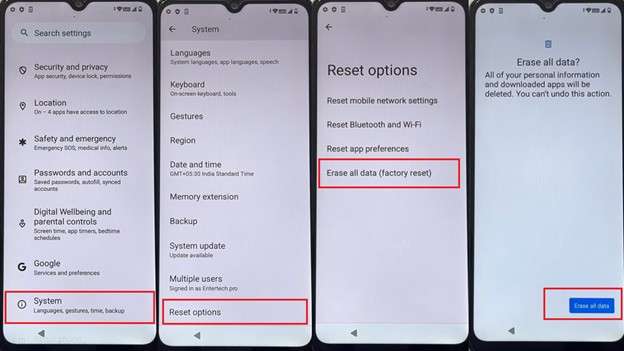
Step 11 Factory Reset
Go to System > Reset options and perform a final Erase All Data (Factory Reset). The FRP lock is now completely gone.
- Effortlessly manage data through preview, delete, export, etc.
- Transfer all data between devices.
- Robust backup solutions for reliable data protection.
- Mirror screens to PC for meetings, teaching, and control.

Part 3. Pro Tip: How to Disable FRP Lock on POCO Devices Permanently
Prevention is always better than cure. To avoid needing a poco c40 frp unlock tool in the future, you should disable the Factory Reset Protection before performing any system reset. FRP only activates when a Google account is active on the device during a reset.
- Ensure all Google accounts are manually removed from the "Accounts & Sync" menu.
- Enable "Developer Options" and toggle on "OEM Unlocking" to prevent FRP from triggering.
- Always back up your account credentials in a secure password manager.
Conclusion
Whether you choose a high-success professional utility like Dr.Fone or a manual poco m3 frp bypass workaround, unlocking your device in 2026 is entirely possible. Professional software remains the safest route to protect your hardware integrity. For consistent results across the POCO lineup, including the C40 and X3 series, utilizing a dedicated poco x3 pro frp unlock tool is the recommended standard for both experts and novices alike.
FAQ
1. How long does the POCO FRP bypass take?
Using a professional tool like Dr.Fone typically takes less than 10 minutes. Manual exploits can take 30 minutes or longer depending on your familiarity with MIUI settings.2. Will a factory reset remove the FRP lock?
No, a standard factory reset from recovery is what triggers the FRP lock. You must use a specialized bypass method to clear the Google account verification.3. What is the best POCO X3 Pro FRP unlock tool for 2026?
Dr.Fone - Screen Unlock (Android) is widely considered the best choice due to its compatibility with the latest MIUI 14/15/16 security patches and user-friendly interface.4. Is manual POCO FRP bypass safe?
Manual methods carry risks of "soft-bricking" or getting stuck in a menu loop. Professional tools are much safer as they are tested against specific hardware configurations.
 Add Wondershare Dr.Fone as a preferred source on Google