


 TL;DR:
Use Dr.Fone Photo Cleaner, an iPhone Shortcut, Mail, or a browser compressor to make existing photos smaller; use High Efficiency only for future captures.
- Check the original MB or KB size first, then verify the compressed copy because not every method reaches an exact target.
- TinyPNG converts uploaded HEIC photos to JPG, while iLoveIMG supports up to 30 images per task on its current Basic plan.
- Keep the original until you confirm the new photo meets the required file-size limit and still has acceptable quality.
Ask AI for a summary
 ChatGPT
 Perplexity
 Gemini
 Claude
 Grok
Grok
An iPhone photo can seem beautiful but fail a website upload because it's 6 MB instead of 1 MB. Email attachments, application forms, cloud uploads, and phone storage all have issues. Cropping or screenshotting aren't your only options.
If you need to reduce photo file size iPhone files, you can compress them, lower their dimensions, or save them in a more efficient format. This guide covers a dedicated Dr.Fone APP workflow, Shortcuts, browser compressors, and a setting that keeps future photos smaller. The right choice depends on your target size because smaller files can involve a trade-off between file size, dimensions, format, and image quality.
- Part 1: Photo File Size vs. Image Dimensions — Know What You Are Reducing
- Part 2: Method 1 — Compress a Photo with Dr.Fone APP on iPhone
- Part 3: Reduce Photo Size Using Built-In iPhone Methods
- Part 4: Compress an iPhone Photo Online
- Part 5: Which iPhone Photo-Compression Method Should You Choose?
- FAQ
- Conclusion
Part 1: Photo File Size vs. Image Dimensions — Know What You Are Reducing
Before you reduce image size iPhone files, separate two measurements that are often confused.
1.1 File Size Is Not the Same as Photo Dimensions
File size: Storage utilised by the image is file size, normally in KB or MB.
Dimensions: The size of the image is in width × height in pixels, such as 4032 × 3024 px.
Compression: Compression minimises the data storage size for an image.
Resizing: Adjusts the dimensions of the image.
Cropping: Cropping an image means to remove part of the visible image.
Image file size is based on at least three factors. Making dimensions smaller may mean a smaller file size but resizing is not compression.
Key point: Essentially, you can reduce photo file size on iPhone without cropping part of the photo.
1.2 Check the Current Photo Size First
Use the built-in Photos app:
Photos → open the photo → swipe up or tap Info → check the file size
The Info view can show the photo’s file size along with other image metadata. (support.apple.com)
Why Check First?
Choose the method based on the actual goal:
- Upload limit: Reduce the file until it meets the required MB or KB limit.
- iPhone storage: Use compression or broader storage management.
- Oversized dimensions: Resizing may be appropriate.
- One-time sharing: A temporary smaller copy may be enough.
If you want a precise size like 100 KB, 500 KB, or 1 MB, use a tool that supports target-size control. Otherwise, check the final size after compression.
Part 2: Method 1 — Compress a Photo with Dr.Fone APP on iPhone
If you would rather avoid indirect workarounds, Dr.Fone offers a dedicated iPhone photo-compression path. It is useful when you want to reduce photo file size iPhone images without first building a Shortcut.
The Dr.Fone iOS app is mainly designed around iPhone cleaning and storage management. Its current feature set includes duplicate media cleanup, screenshot cleanup, duplicate contact management, app locking, AI Photo Enhancer, and Old Photo Restoration. For this guide, however, the relevant tool is Compress Photos.
Dr.Fone App - Photo & Video Compressor for iPhone
Compress Photos & Videos to Free Up iPhone Storage
- Compress Large Photos to Reduce File Size
- Compress Large Videos Instead of Deleting Them
- Free Up More Storage Space for New Photos, Videos, and Apps
- Manage Space-Consuming Photos and Videos More Efficiently



2.1 Why Use Dr.Fone for Photo Compression?
The main advantage is a more direct workflow. The compression tool is built around making large photos smaller, so it requires fewer manual steps than creating and configuring an iOS Shortcut.
It makes the most sense when you:
- need to compress Camera Roll photos regularly;
- want smaller files before an upload;
- prefer a mobile app over a custom Shortcut;
- want to keep a smaller copy on the iPhone.
Dr.Fone’s current guide does not document exact KB targeting or lossless compression, so check the finished file rather than assuming a fixed result.
2.2 How to Compress Image iPhone Files with Dr.Fone
You can reduce the size of an existing photo directly in Dr.Fone App. Follow the steps below to select an image, check the expected reduction, and save the compressed copy.
-
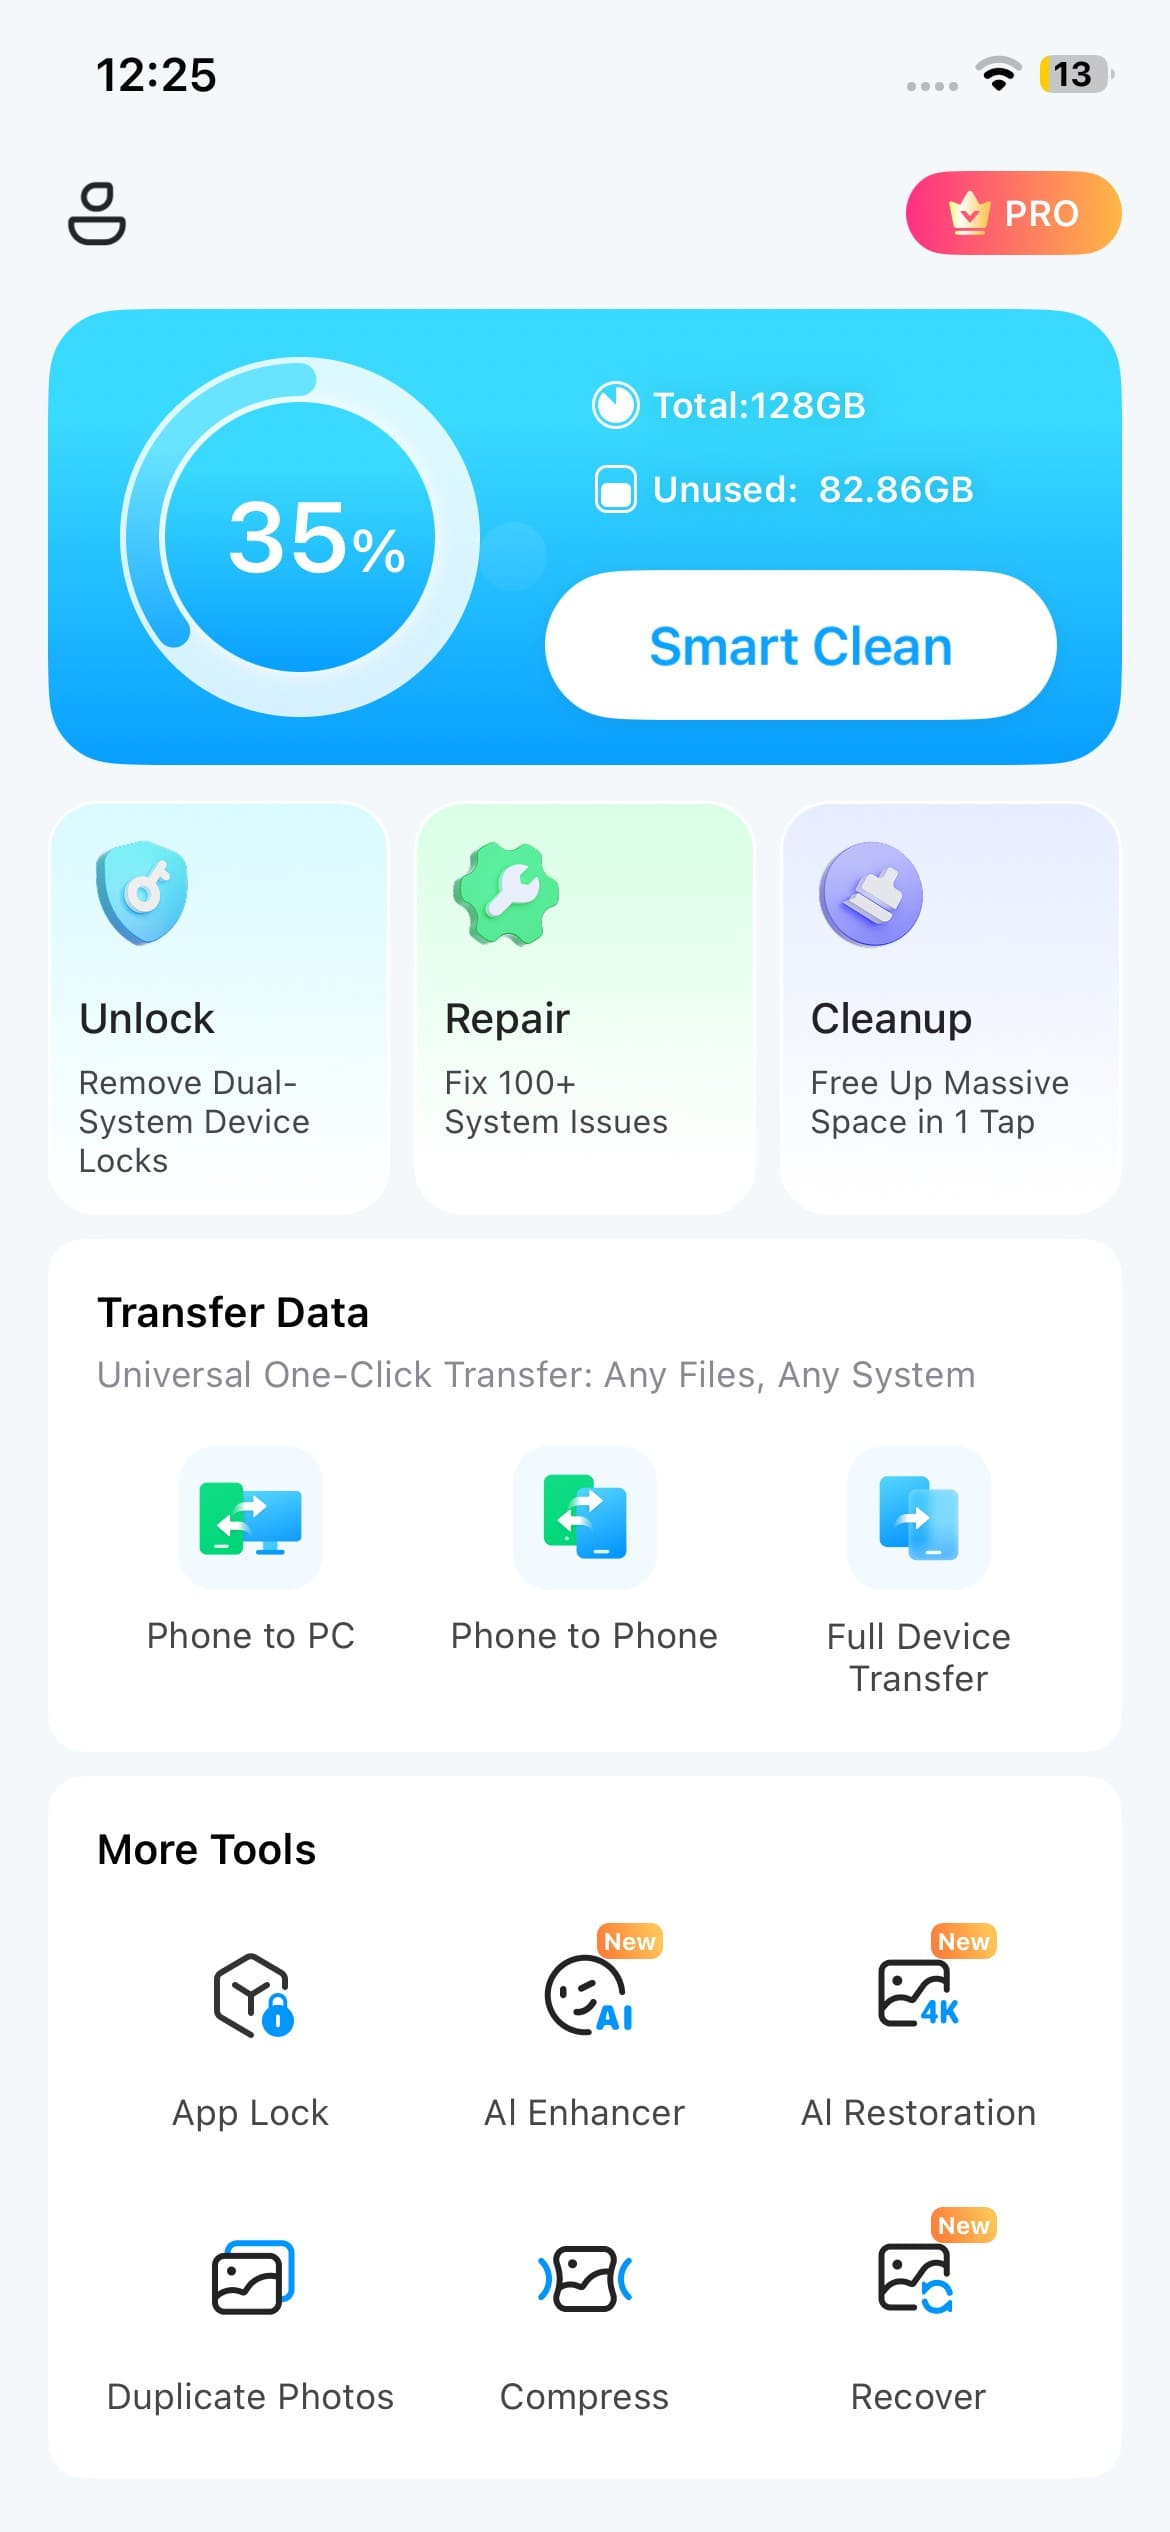
Step 1 Open the Compressor
Launch Dr.Fone App and go to the “More Tools” area. Tap “Compressor” to enter the photo and video compression workspace.
-
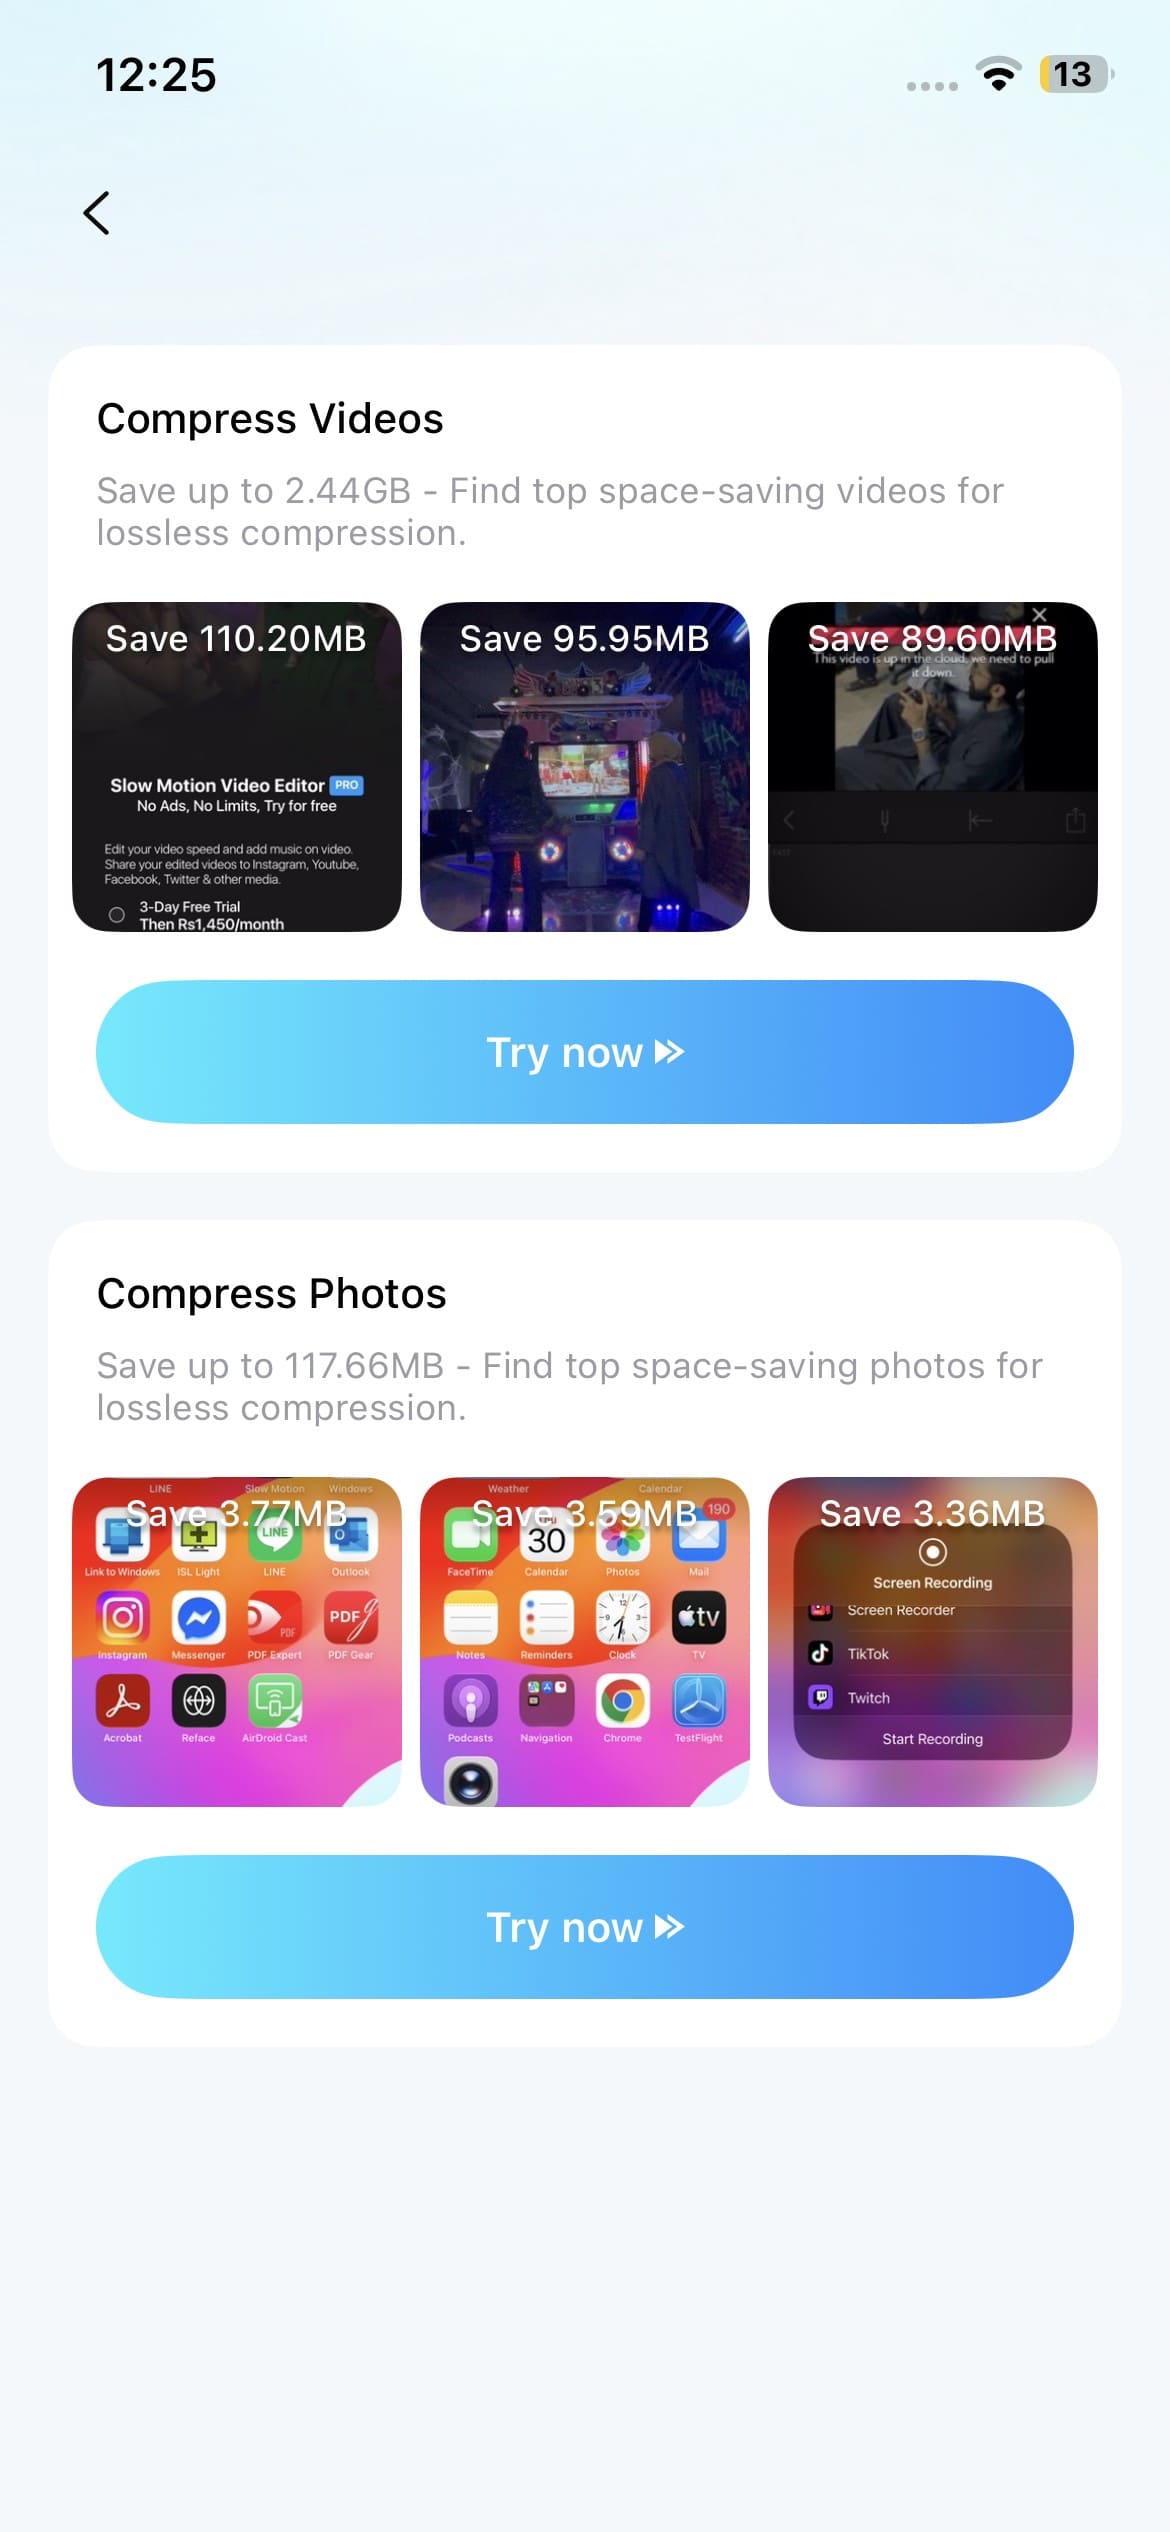
Step 2 Select a Photo to Compress
Under “Compress Photos,” tap “Try Now.” Choose the image you want to make smaller from your photo library and continue to the compression screen.
-
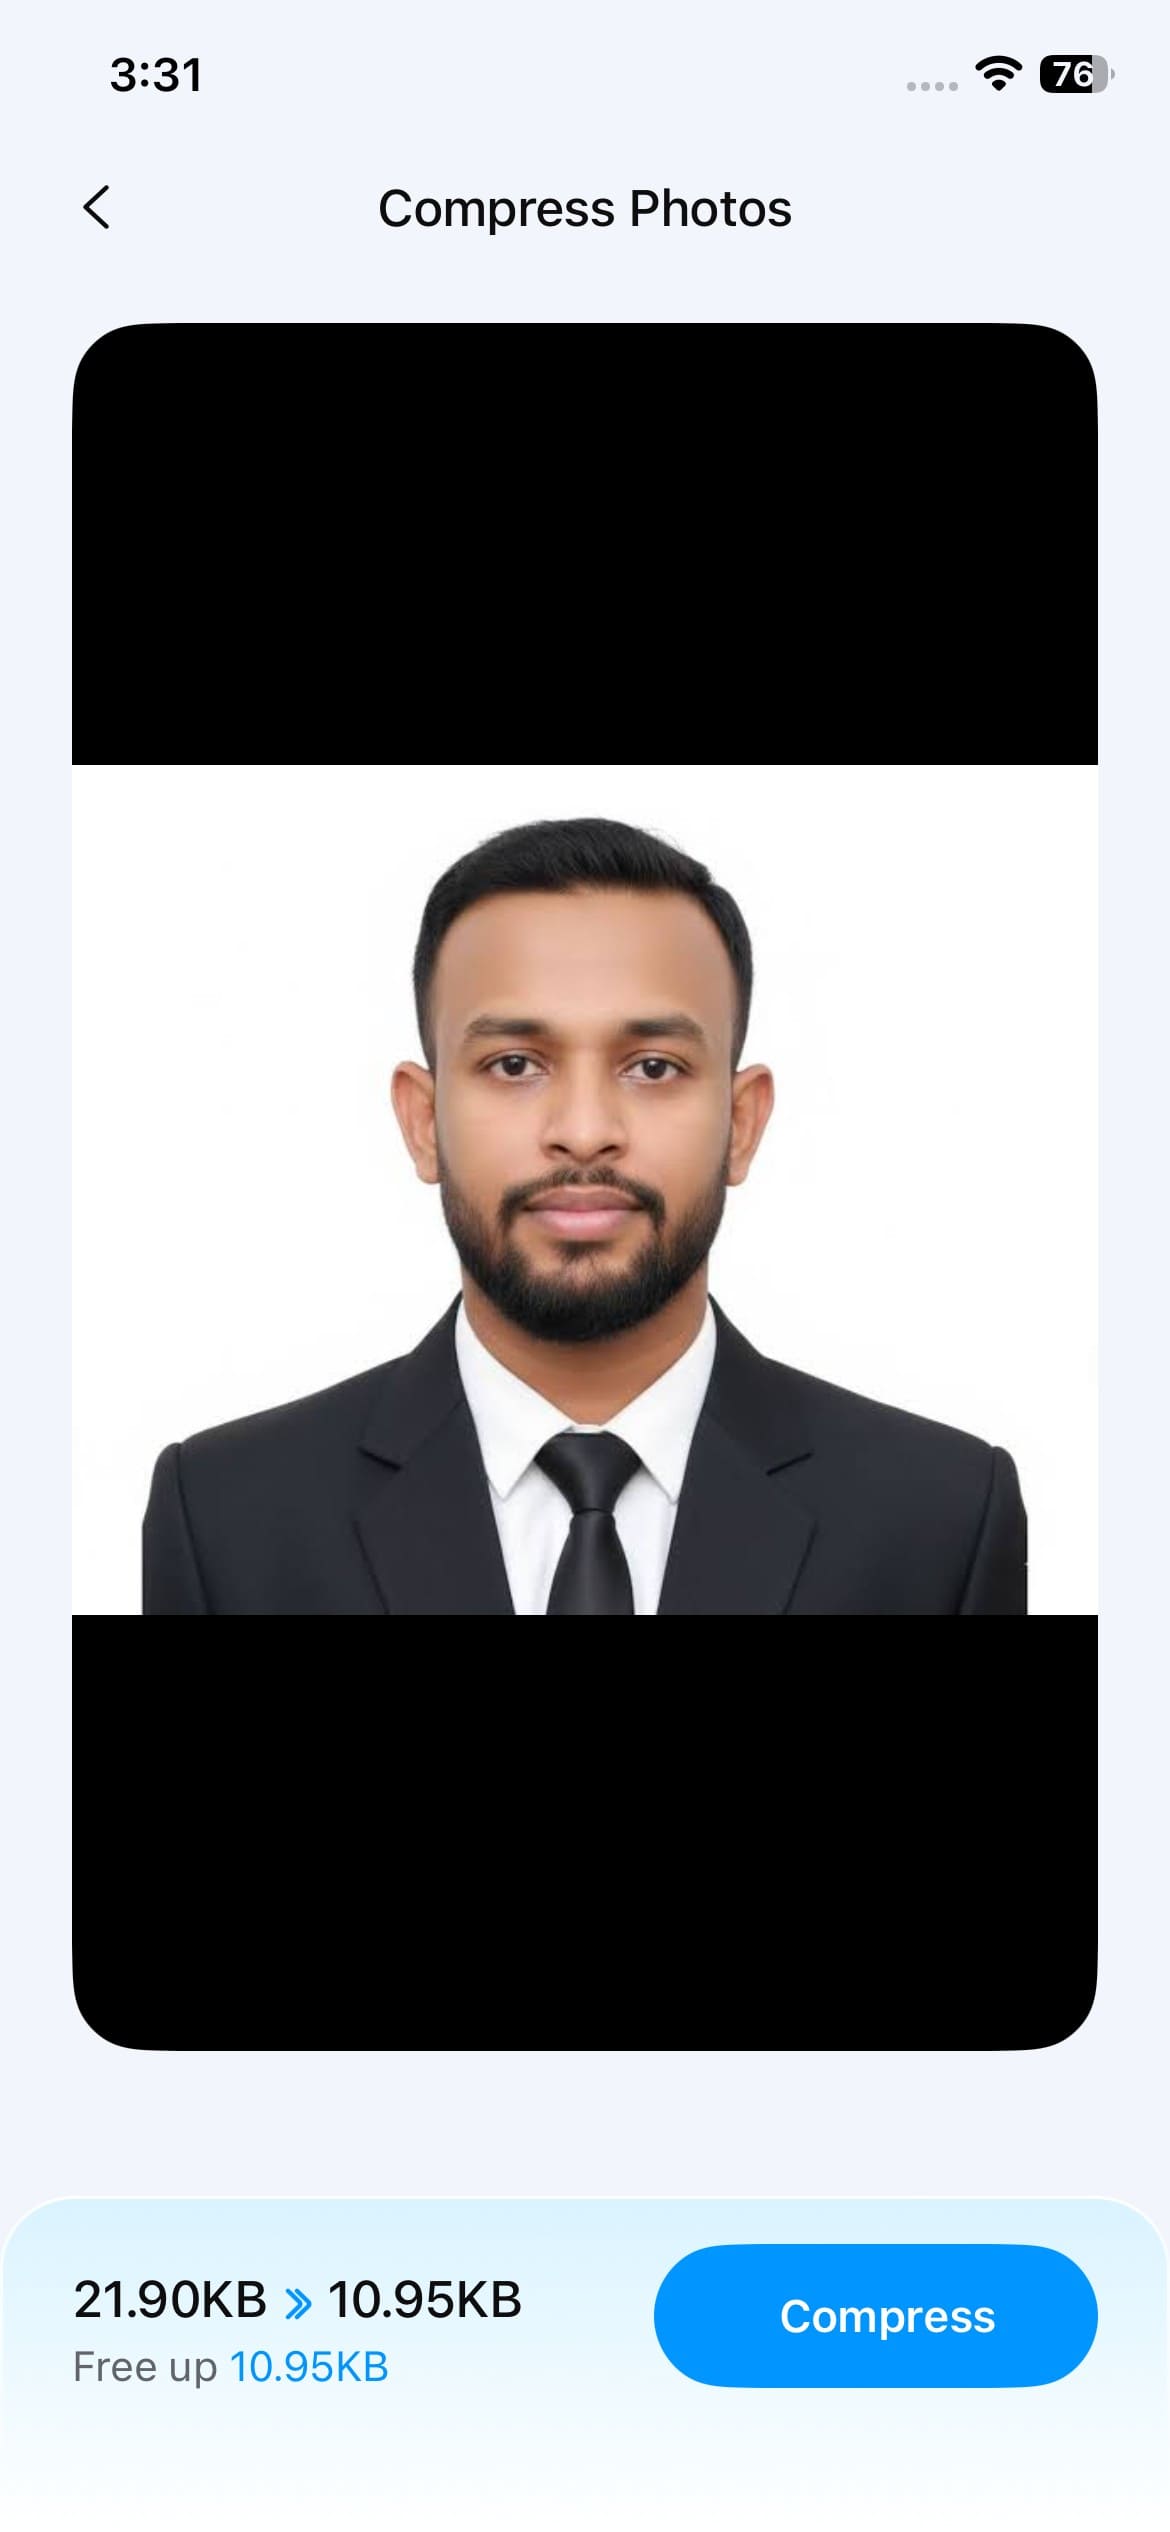
Step 3 Check the Result and Save It
Review the estimated reduction shown by the app, then tap “Compress.” After processing, preview the smaller photo and check its file size and image quality. Tap “Save” when you are satisfied with the result.
2.3 When Is This Method Most Useful?
Dr.Fone fits well when photo compression is more than a one-time task. It can help when preparing large photos for forms or websites, reducing Camera Roll storage, or handling compression entirely on the iPhone.
A dedicated app keeps the process simple, but it is not your only choice. Current iOS versions also provide native ways to make an image file smaller without installing another compression tool.
Part 3: Reduce Photo Size Using Built-In iPhone Methods
If you don’t want to install another compressor, the iPhone has several native ways to reduce photo size. Whether you are shrinking an image you already have, creating a repeatable workflow, or keeping future photos smaller, the best choice depends on your needs.
3.1 Create a Shortcut for Repeat Compression
Shortcuts can make photo compression quicker when you need the same process more than once.
One approach is to add a shortcut such as Change Image Quality & Share and use it whenever you need a smaller copy.
-
Step 1 Add the Shortcut
Add Change Image Quality & Share to the Shortcuts app.
-
Step 2 Open It
Go to All Shortcuts and run the shortcut.
-
Step 3 Choose the Photo and Quality
Select the required image, tap Add, and choose an available quality level such as:
- Low
- Medium
- High
-
Step 4 Save the Result
Allow the shortcut to add the processed image to Photos, then tap Save Image.
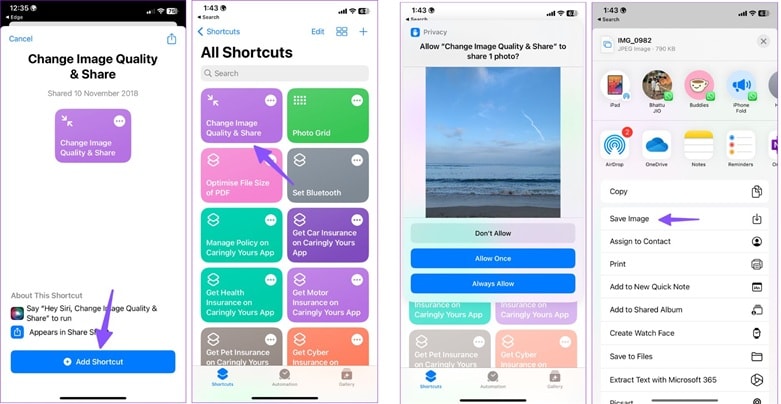
You can also build a custom Shortcut if you need specific width or height settings. For most routine compression tasks, however, a ready-made workflow is simpler.
Best for: repeated compression and users who want a reusable native workflow.
Limitation: it takes some setup and is less direct than a dedicated compression tool.
3.2 Use High Efficiency to Keep Future Photos Smaller
If Camera photos regularly take up too much space, changing the capture format can help prevent unnecessarily large files.
Go to:
Settings → Camera → Formats → High Efficiency
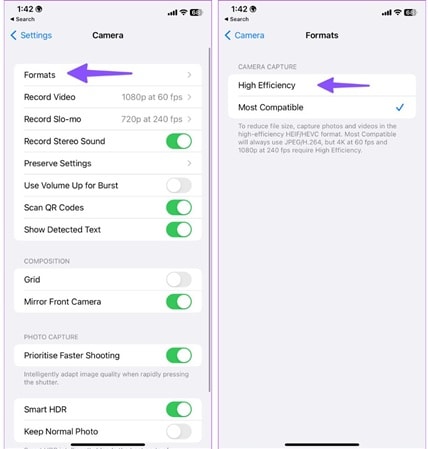
When High Efficiency is selected, the iPhone can save supported photos in the HEIC/HEIF format instead of more traditional formats such as JPEG.
HEIC is designed to store high-quality images more efficiently, which can help reduce the space used by future Camera photos. The key point is that this setting affects new captures. It does not automatically compress image iPhone files that are already stored in Photos.
Compatibility also matters. Some websites or services may still prefer JPEG, so you may need to convert before uploading.
3.3 Can Mail Reduce a Photo Too?
Mail can sometimes act as a quick sharing workaround.
The usual process is:
Photos → Share → Mail → enter recipient → Send
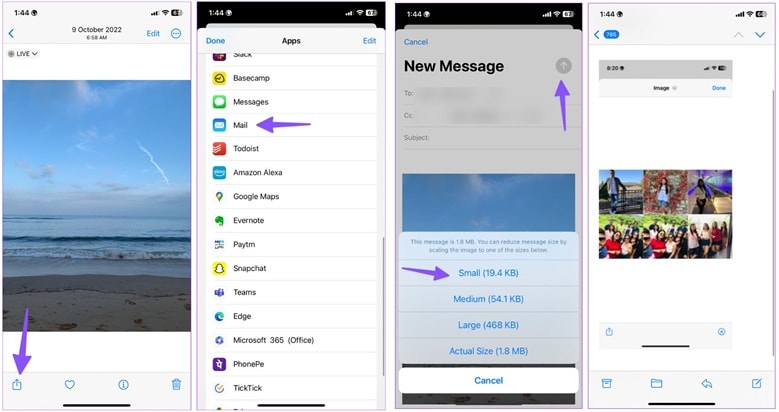
In mail flows where Mail displays options for image sizes, both small and medium and large options can reduce attachment sending.
Though it may be handy for sending one photo, it shouldn’t be your go-to compression method if you need a smaller file you can save, check, and reuse later.
If you want a quick way out without downloading anything, you can compress a photo online through Safari.
Part 4: Compress an iPhone Photo Online
Compressing an iPhone photo online can be the fastest option if you don’t do it often. To use the webpage, open it in Safari, upload the picture, let the service modify it, and check the new size in MB or KB before saving it.
4.1 TinyPNG / Tinify — Quick Automatic Compression
TinyPNG conveniently chooses the optimisation level automatically for each image by using smart lossy compression. The web tool presently supports JPG, PNG, WebP, AVIF, JXL, and APNG. If you’re using an iPhone, there’s one handy detail. When you upload a HEIC photo, we convert it to JPG.

Quick steps:
Safari → TinyPNG → upload/drop photo → wait for compression → download the smaller image
Free users can currently process up to 20 images at once, with a 5 MB maximum per image. Tinify also states that it retains uploaded files for no more than 48 hours before deletion.
Best for: quick automatic compression and web-ready images.
Watch for: a HEIC upload may come back as JPG.
4.2 iLoveIMG — Simple Compression with Clear Before/After Results
iLoveIMG offers a JPG, PNG, SVG, and GIF direct compressor. Users don't get a manual quality slider; instead, they choose a compression rate. After processing, it shows the reduction and lets you download the compressed image.

Quick steps:
Safari → iLoveIMG Compress IMAGE → Select images → Compress images → Download the result
Its current Basic plan lists up to 30 images per Compress IMAGE task and a 200 MB file-size allowance per task, so the older 25 MB figure should not be used.
Best for: straightforward browser compression when you want to see the resulting size before saving.
Quick check: Whichever service you use, confirm the downloaded photo actually meets your required MB or KB limit. Do not assume every compressed result will hit an exact target.
Part 5: Which iPhone Photo Compression Method Should You Choose?
No one method is best for all cases. Depending on your needs, you may want to shrink a current picture to save storage on your iPhone, meet an upload limit, or prevent large files in the future.
5.1 Method Comparison
| Method | Best For | Existing Photos? | Pick This When… |
|---|---|---|---|
| Dr.Fone APP – Photo Cleaner | Direct, repeated mobile compression | Yes | You want a dedicated iPhone workflow for compressing Camera Roll photos without building a Shortcut. |
| Change Image Quality & Share Shortcut | Repeat compression with Apple tools | Yes | You want a reusable native workflow and do not mind setting it up once. |
| High Efficiency | Smaller future Camera photos | No — future captures | You want new iPhone photos to use storage more efficiently from the moment they are taken. |
| Apple Mail | One-time photo sharing | Yes | You only need to send a smaller attachment and do not need a predictable compressed file to save and reuse. |
| TinyPNG / Tinify | Fast browser-based compression | Yes | You need quick automatic compression in Safari and your files fit the current free web limits. |
| iLoveIMG | Browser compression with larger task limits | Yes | You want a simple online workflow and need more room for larger or multiple files. |
FAQ
-
1. Can I make an iPhone photo exactly 500 KB or 1 MB?
Apple’s file size documentation has a slider, but not KB and mb designation. To use a strict limit, modify and save the file, then check the result size or use a tool that explicitly supports target-size control. -
2. Why are some iPhone photos much larger than others?
The difference comes from the format and resolution. According to Apple, ProRAW files are roughly 10-12× larger than HEIF or JPEG, meaning that a 12 MP ProRAW image is about 25 MB and a 48 MP image can be around 75 MB. -
3. Does Optimise iPhone Storage actually compress my original photos?
No. When storage is low, Optimise iPhone Storage saves a space-efficient version on the iPhone. While it helps to save device storage, it wont create a smaller upload file for future use. -
4. Why does an HEIC photo sometimes become JPEG when I share it?
If the device or service receiving it doesn't support HEIF, Apple may automatically send HEIF/HEIC media in a more compatible format, such as JPEG. When fully sharing via iCloud Photos, the original quality will remain. -
5. Can I restore the original quality after compressing a photo?
Not just one lossy compressed copy. Lossy compression will lose some image data. Never delete the original photo until you check the compressed version and know you don’t need it anymore.
Conclusion
A smaller photo is useful only if it still looks good and meets your size limit. How to compress a photo on iPhone? The right method depends on the task. Shortcuts suit repeat jobs, High Efficiency keeps future captures lighter, and TinyPNG or iLoveIMG work well for quick browser compression.
For a more direct iPhone workflow, Dr.Fone APP’s Photo Cleaner gives existing photos a dedicated compression path without building a custom Shortcut. Whichever way you reduce photo file size iPhone images, check the final MB or KB size and image quality before deleting the original.


Selena Lee
staff Editor
Generally rated4.5(105participated)