
![How to Use AI to Enlarge an Image Without Losing Quality [Tested]](https://images.wondershare.com/drfone/article/2026/09/enlarge-image-1.jpg)

 TL;DR:
AI upscaling is generally better than basic resizing for enlarging low-resolution photos, but it cannot recover detail that was never captured.
- Use the final print or display size and required PPI to determine the target pixel dimensions.
- Dr.Fone App supports Auto, Ultra HD, and Portrait enhancement modes, with Ultra HD offering up to 8x upscaling.
- Use a better original instead when the source is badly blurred, heavily compressed, archival, evidentiary, or contains unreadable text.
Ask AI for a summary
 ChatGPT
 Perplexity
 Gemini
 Claude
 Grok
Grok
An 1800 × 1200 image can print at very different physical sizes without changing its original pixel count. At 72 PPI, it prints about 25 inches wide. At 150 PPI, it prints 12 inches wide, while at 300 PPI, it prints only 6 inches wide. The image still contains the same 1800 × 1200 pixels. Only the print size and pixel density change.
This difference matters when you want to enlarge image files without making them blurry or pixelated. Instead of increasing dimensions randomly, consider the final use, required resolution, and quality of the original photo. This guide compares resizing and AI upscaling, explains how Dr.Fone App supports image enlargement, and helps you choose the right pixel dimensions for different projects.
- Part 1. Why Does an Image Lose Quality When You Make It Bigger?
- Part 2. Resize vs AI Upscale: Which Is Better for Enlarging an Image?
- Part 3. How to Enlarge an Image with Dr.Fone App
- Part 4. How Large Should You Make the Image?
- Part 5. What Else Changes When You Make a Photo Larger?
- Part 6. Common Problems After Enlarging a Picture
- Part 7. How to Enlarge a Photograph for Printing
- Part 8. When Should You Find a Better Original Instead of Enlarging?
- Frequently Asked Questions
Part 1. Why Does an Image Lose Quality When You Make It Bigger?
When you enlarge a photograph, image quality can drop for several reasons. The following points explain what causes the loss of sharpness and detail:
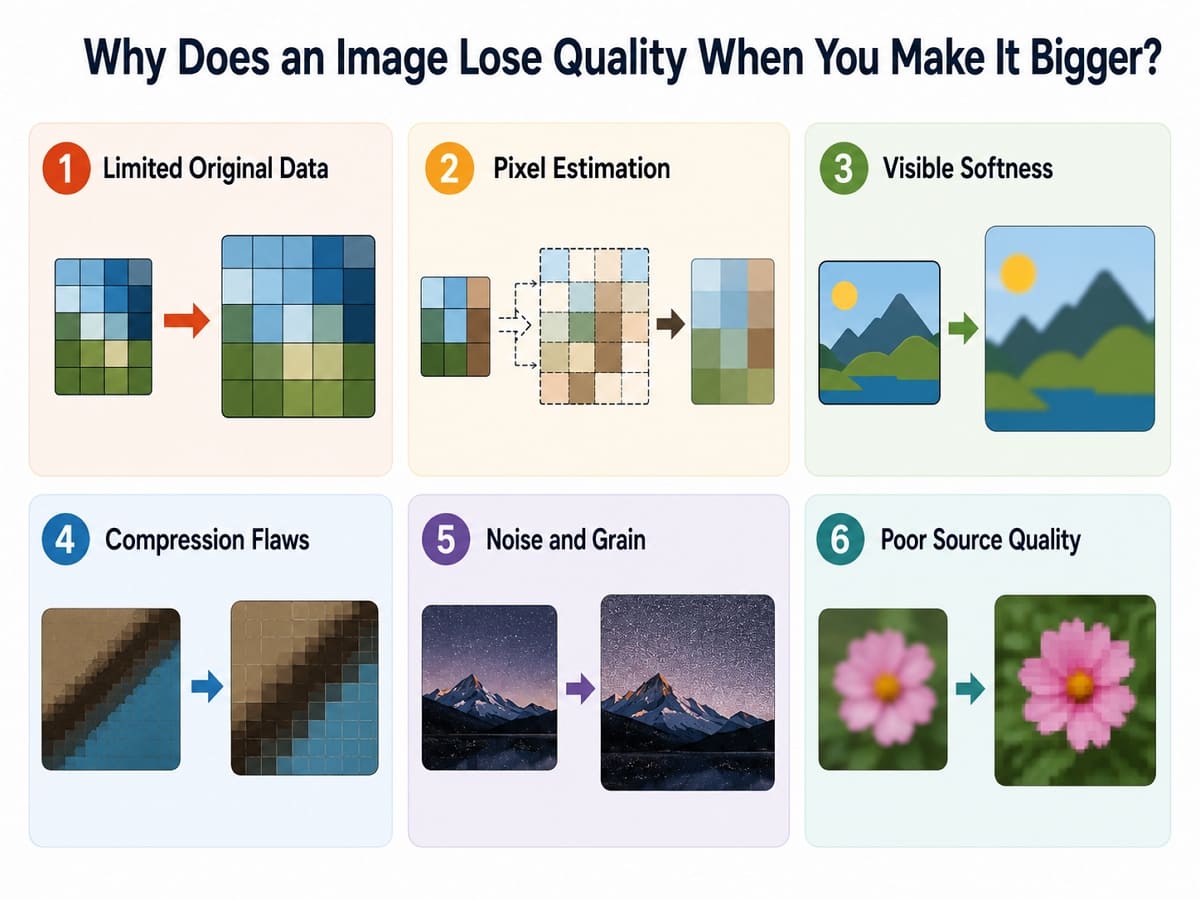
- Limited Original Data: A small 640 by 480 image contains only about 0.31 megapixels. Making it larger adds pixels, but it cannot recover detail that was never captured.
- Pixel Estimation: Basic resizing tools create new pixels by looking at nearby ones. Adobe explains that these estimated pixels can make an enlarged image look softer.
- Visible Softness: Enlargement makes existing blur and weak details easier to notice. Edges may also appear jagged, blocky, or less sharp at bigger sizes.
- Compression Flaws: JPEG compression removes some image data. When you enlarge the picture, blocky areas, fuzzy edges, and other compression flaws become more visible.
- Noise and Grain: Enlarging a photo also enlarges existing noise and grain. These unwanted details can become more noticeable and reduce the overall clarity of the image.
- Poor Source Quality: A blurry, heavily compressed, or low-resolution original gives resizing tools less useful detail to work with. Better source images usually produce cleaner enlargements.
Part 2. Resize vs AI Upscale: Which Is Better for Enlarging an Image?
When choosing the right photo image enlarger, it helps to understand the difference between basic resizing and AI upscaling. Standard resizing works well for small size changes, while AI upscaling can better preserve sharpness when enlarging low-resolution photos. The table below compares both methods:
| Factor | Basic Resizing | AI Upscaling |
|---|---|---|
| How Enlargement Works | Estimates new pixels from nearby pixels | Creates new pixels using learned image patterns |
| Added Detail | Adds no real detail | Adds estimated detail based on the image |
| Sharpness | Can look softer at larger sizes | Usually keeps edges and details sharper |
| Noise Handling | Enlarges existing noise and grain | Can reduce noise during processing |
| Large-Size Increases | Quality drops faster with heavy enlargement | Handles larger enlargements more effectively |
| Processing Time | Usually almost instant | Usually takes seconds or minutes |
| Best Use Case | Small-size changes and exact dimensions | Low-resolution images needing larger output |
Part 3. How to Enlarge an Image with Dr.Fone App
Large image enlargements usually benefit from AI tools, especially when the original photo lacks sharpness or detail. With basic tools, you may need to clean up the image first and resize it separately, which makes the process longer and less convenient. Dr.Fone App brings both steps into one automatic workflow on iOS and Android. Its AI Photo Enhancer can sharpen images, reduce noise, and improve overall clarity while enlarging them through 3 dedicated modes.
Auto and Portrait modes handle most of the enhancement automatically, with scans taking less than 2 minutes to make the image bigger. Ultra HD mode supports up to 8x upscaling and lets you compare the enhanced result before saving it. This AI-powered app also offers nearly four free uses for each mode, exports images without a watermark, and processes them locally to help protect your data.
Dr.Fone App - AI Photo Restorer & Enhancer (iOS & Android)
Restore, Colorize, Enhance, and Upscale Photos with AI
- Restore Old Photos by Fixing Creases, Tears, and Scratches
- Colorize Black-and-White Photos with AI
- Auto-Enhance Photos and Improve Portrait Details to HD Quality
- Upscale Images to 2x, 4x, or 8x for Clearer Results



Guide to Make an Image Bigger Using Dr.Fone App
If other pic enlargers do not deliver the quality you need, follow these simple steps to enlarge your image with AI upscaling in Dr.Fone App:
-
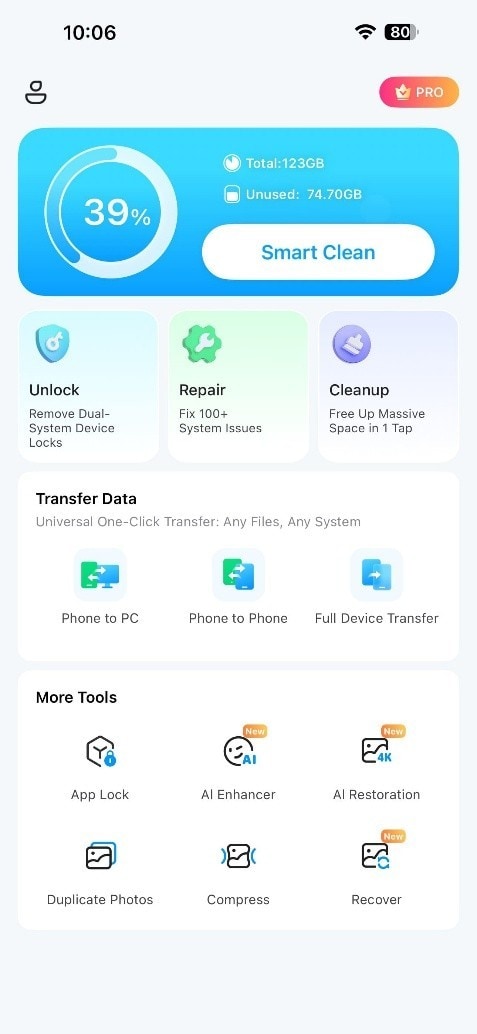
Step 1 Launch the AI Enhancer Tool
Go to the “More Tools” section and tap “AI Enhancer” to access the available enhancement modes.
-
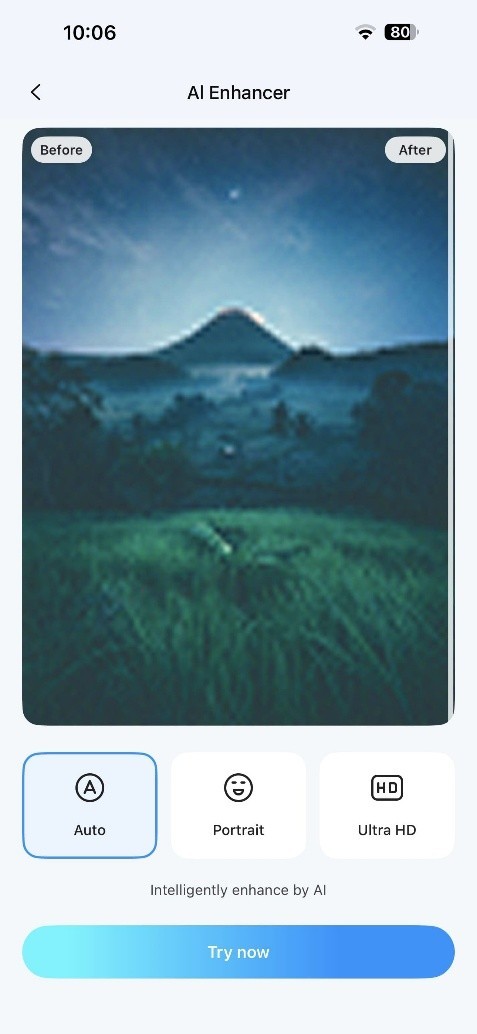
Step 2 Choose a Mode and Add Your Photo
Select “Auto,” “Ultra HD,” or “Portrait” based on the photo, then tap “Try Now.” Choose the image you want to enhance and begin processing.
-
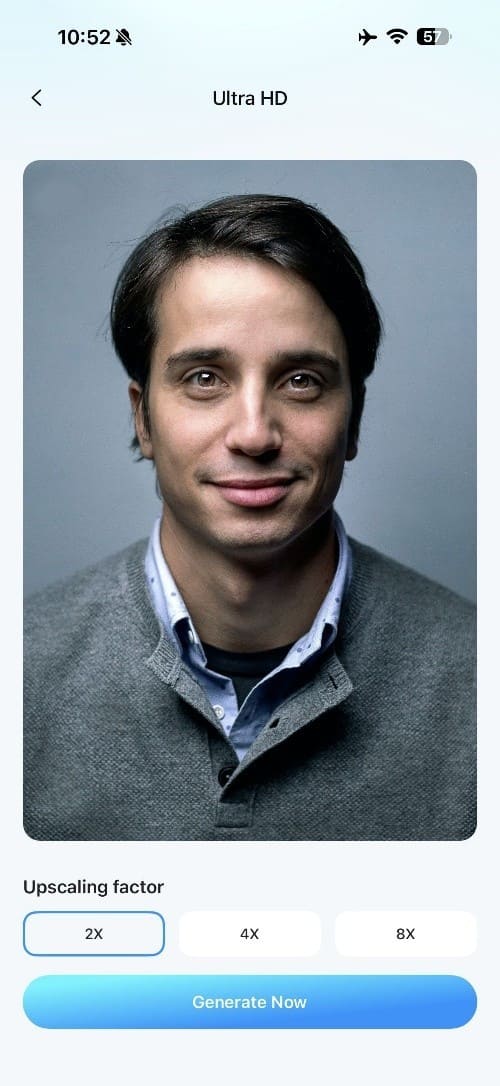
Step 3 Upscale and Review the Result
If you choose “Ultra HD,” select the upscale level you need and tap “Generate Now.” Compare the enhanced result, then press “Save” to export the image.
Part 4. How Large Should You Make the Image?
Before upscaling, use the table below to decide how much you need to make the image larger based on its final use, target dimensions, and required image quality.
| Final Use | Enlargement Goal | What Matters Most | What to Check |
|---|---|---|---|
| Social Media Sharing | Usually little or no enlargement | Platform image requirements | Whether the image already meets the recommended size |
| Website or Blog | Enlarge only when needed | Balance between clarity and file size | Image quality and page loading speed |
| Presentation | Match the required slide dimensions | Display size and viewing distance | Whether text and details remain clear on screen |
| Large-Screen Display | Match the screen resolution when possible | Viewing distance and display resolution | Sharpness at normal viewing distance |
| Small Photo Print | Around 1200 × 1800 pixels for 4 × 6 at 300 PPI | Pixel dimensions and print quality | Faces, edges, and fine details |
| Large Photo Print | Match print dimensions with the required PPI | Required print resolution | Overall sharpness and a test print |
| Cropped Image | Enlarge enough for the intended output | Remaining detail after cropping | Whether important details stay clear |
Part 5. What Else Changes When You Make a Photo Larger?
Making a photo larger can affect more than its dimensions. The following points explain what else may change when you make a photo larger and why each factor matters.
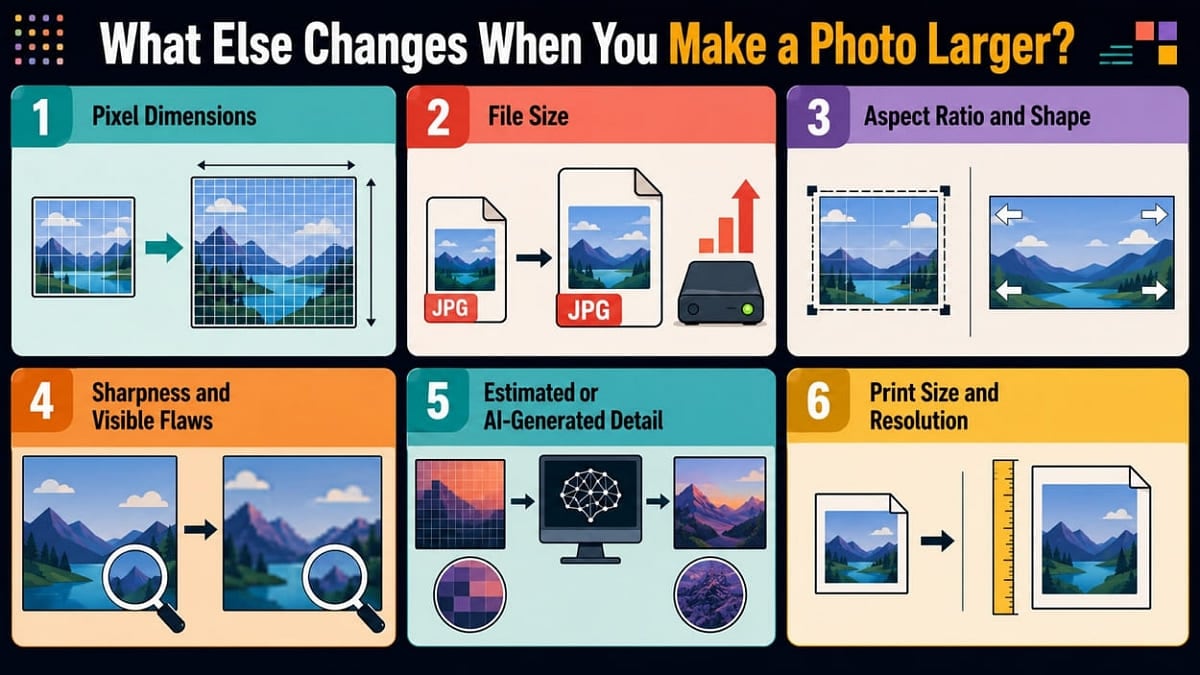
- Pixel Dimensions: Upscaling increases the number of pixels across the image when you make a photo larger. More pixels increase its digital dimensions, but they cannot restore detail that was never captured.
- File Size: A higher pixel count usually makes the file larger and increases storage needs. The final size also depends on format, compression, color depth, and layers.
- Aspect Ratio and Shape: Changing width and height unevenly can stretch faces, objects, and other elements. Keep the original aspect ratio or crop the image to fit a different shape.
- Sharpness and Visible Flaws: Enlargement can make blur, noise, jagged edges, and compression artifacts easier to notice. The larger the image becomes, the more visible these weaknesses may appear.
- Estimated or AI-Generated Detail: Basic resizing estimates new pixel values, while AI upscaling can create realistic-looking details from learned patterns. These additions improve appearance but are not original captured detail.
- Print Size and Resolution: A larger image can support a bigger print, but print sharpness still depends on pixel count and PPI. Enlarging too far can make the printed result look soft.
Part 6. Common Problems After Enlarging a Picture
When you try to make a picture bigger, several quality issues can appear. The table below explains the most common problems, their likely causes, and the best ways to fix them.
| Problem After Enlargement | Likely Cause | What to Do |
|---|---|---|
| Blurry Result | The original image was already blurry or low in detail | Use a clearer, higher-quality source image |
| Visible Pixelation | The image was enlarged beyond the detail available in the original | Reduce the enlargement size or use AI upscaling |
| Jagged Edges | Basic resizing made lines and edges look rough | Use a better resizing method or AI upscaling |
| Excessive Noise | Existing noise became more visible after enlargement | Reduce noise before enlarging the image |
| Artificial AI Detail | AI added details that were not present in the original | Lower the upscale level and compare with the original |
| Distorted Aspect Ratio | Width and height were changed without keeping the same proportions | Resize again with the aspect ratio locked |
| Very Large File Size | More pixels increased the amount of image data | Export only at the size and quality you need |
Part 7. How to Enlarge a Photograph for Printing?
If you want to know how to make a photo bigger for printing, start by checking the target print size and required resolution. The following 6 points explain what to consider before you enlarge an image for print:
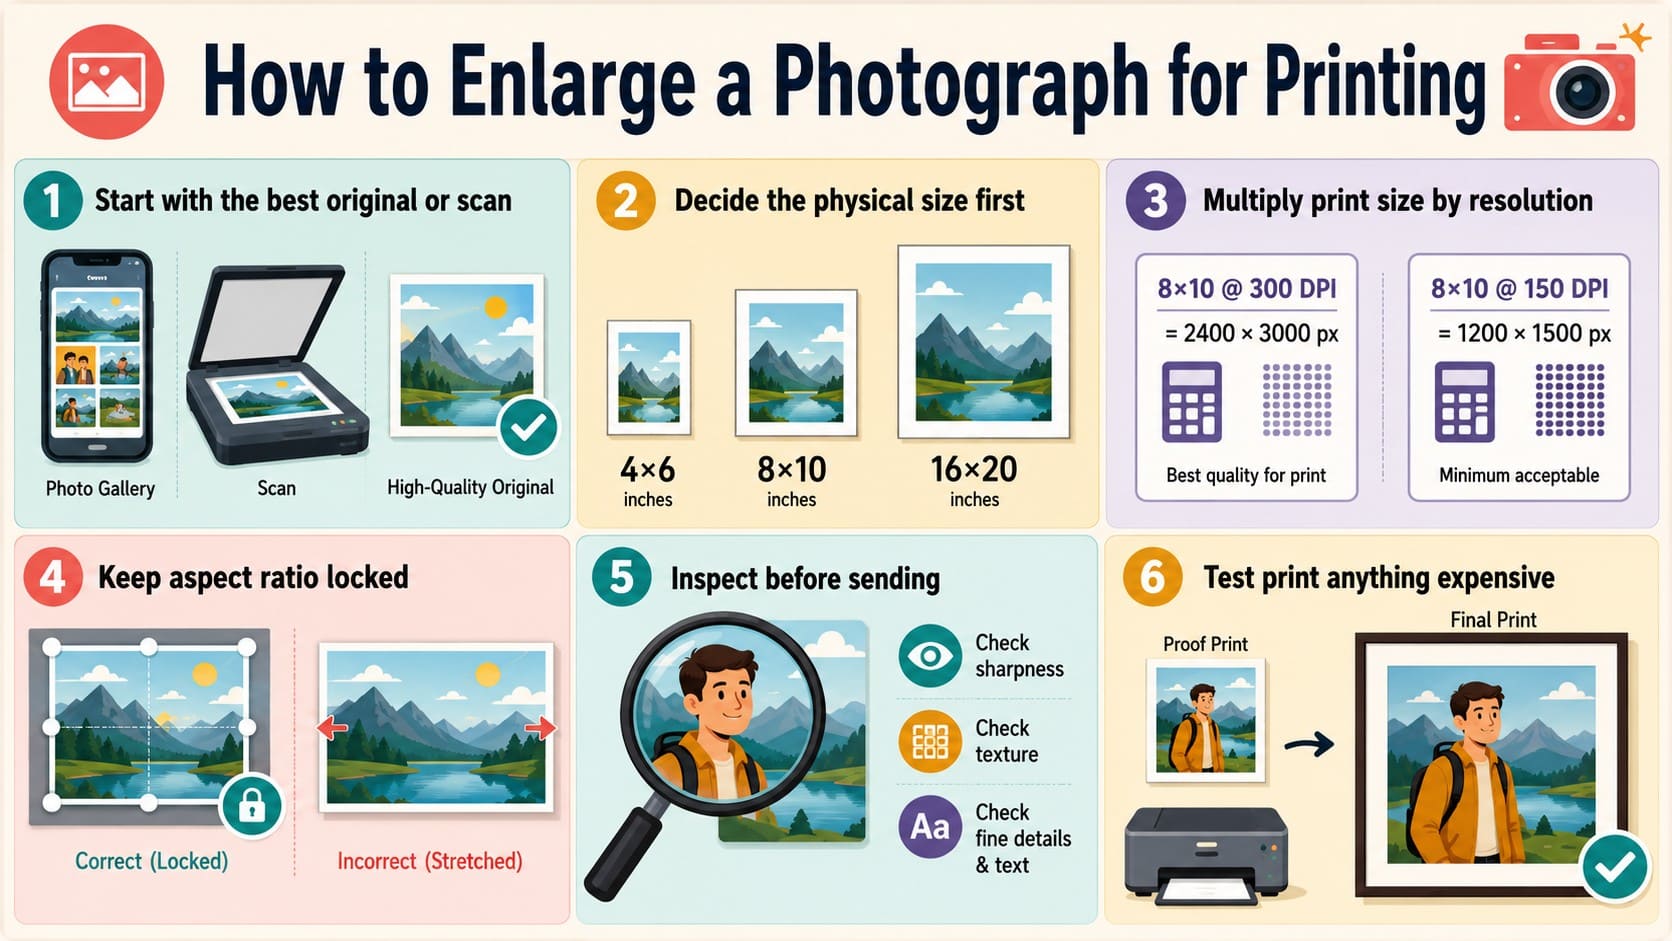
- Start With the Best Original or Scan: Always begin with the highest-quality version of the photo. Avoid compressed copies from messaging apps and use the original camera file, scan, or full-resolution image whenever possible.
- Choose the Final Print Size First: Decide the required print dimensions before enlarging the image. A 4 × 6 print needs far fewer pixels than a 16 × 20 print, so the target size determines the enlargement needed.
- Calculate the Required Pixel Size: Multiply the print dimensions by the target PPI. For example, an 8 × 10 print at 300 PPI needs 2400 × 3000 pixels for good print detail.
- Keep the Aspect Ratio Consistent: Do not stretch the photo to force it into a different print shape. Keep the original proportions while resizing or crop carefully to match the required print ratio.
- Inspect the Enlarged Image Carefully: Check faces, text, edges, and fine textures before printing. Look for blur, noise, pixelation, or unnatural AI-generated details that may become more visible on paper.
- Make a Test Print Before Ordering: Print a small section at the intended final scale before paying for a large print. This helps reveal softness, missing detail, and color differences that may be hard to notice on screen.
Part 8. When Should You Find a Better Original Instead of Enlarging?
AI tools can help enlarge an image without losing quality, but they cannot truly recover detail that was never captured. If the original is very small, blurry, heavily compressed, or requires exact detail, using a better source is usually the safer option.
Adobe explains that upsampling adds estimated pixels, while AI tools may create new details based on learned image patterns. Use the table below to decide when enlargement is suitable and when finding a better original makes more sense.
| Source Problem | Why Enlarging May Not Work | Better Option |
|---|---|---|
| Very Small Thumbnail | Too few original pixels are available for a large enlargement. A 500 × 500 image is only about 1.7 × 1.7 inches at 300 PPI before upscaling. | Find the full-resolution original before you enlarge image files for larger output. |
| Badly Blurred Faces | Upscaling may improve the appearance of sharpness, but it can create facial details instead of recovering the exact original features. | Use a clearer photo when facial accuracy or identity matters. |
| Unreadable Text or Numbers | AI-generated detail may look convincing even when it does not match the exact text or numbers in the source image. | Use a higher-resolution scan or original when text accuracy is important. |
| Heavy JPEG Compression | JPEG compression removes image data and can leave blockiness, blur, and edge artifacts that become more noticeable after enlargement. | Use the original camera file, PNG, TIFF, or a less-compressed copy when available. |
| Archival or Evidence Use | AI enlargement can add estimated or generated details that were not present in the original image. | Preserve and use the highest-quality original or scan for accurate records. |
| Better Original Still Exists | Upsampling adds estimated pixels and may reduce quality when the source resolution is too low. | Check the camera roll, scanner files, cloud storage, or original design files first. |
Conclusion
Determine the final size you need before enlarging the photo. For printing, multiply the print dimensions by the target PPI, check whether the original photo has enough detail, and enlarge the image only as much as necessary.
Dr.Fone App can simplify the process with AI upscaling on mobile, but the added details are still estimates rather than recovered information. For the best result, preserve as much original quality as possible and avoid enlarging beyond what the source image can support.
FAQ
-
1. Can I make an image bigger without making it blurry?
AI upscaling can preserve sharpness better than basic resizing by creating new pixels from image patterns. Dr.Fone App’s AI Photo Enhancer can sharpen and reduce noise, while Ultra HD supports up to 8x upscaling. Still, missing original details cannot be recovered. -
2. Does increasing image dimensions increase file size?
Usually, yes. Increasing pixel dimensions adds more image data, which often increases file size. However, format and compression also matter, so a larger compressed image can sometimes be smaller than a lower-resolution file saved with less compression. -
3. Can I enlarge a photograph for printing with AI?
AI upscaling can enlarge a photograph when it lacks enough pixels for printing. Calculate the required dimensions from print size and PPI, then upscale only as needed and inspect important details before printing. -
4. Is changing DPI the same as enlarging an image?
No. Changing DPI is not the same as enlarging an image. DPI controls printer dot density, while image enlargement increases pixel dimensions. If the pixel count stays unchanged, changing DPI only affects the physical print size.








Selena Lee
staff Editor
Generally rated4.5(105participated)