


 TL;DR:
Use direct compression, a lower-resolution iMovie export, or Photos trimming to make an iPhone video smaller, depending on whether you need to preserve the full clip, reduce resolution, or remove footage.
- Dr.Fone App compresses existing videos directly and lets you review the estimated output size.
- iMovie exports at 720p, 540p, or 360p can reduce file size substantially, while Photos trimming preserves the resolution of the remaining footage.
- Keep the original file, avoid repeated compression, and adjust Camera resolution, frame rate, HDR, and format settings for future recordings.
Ask AI for a summary
 ChatGPT
 Perplexity
 Gemini
 Claude
 Grok
Grok
Large iPhone videos can take longer to upload, use significant storage, or exceed attachment limits, especially when recorded in 4K. The right solution depends on whether you need a smaller file, lower resolution, or shorter clip.
This guide explains how to compress video iPhone files directly on your device. You can use Dr.Fone App for direct compression, iMovie for lower-resolution exports, or Photos to trim unwanted footage. You’ll also learn which method fits different situations and how to adjust Camera settings to record smaller videos in the future.
- Part 1. Check the Video Size Before You Compress It
- Part 2. Which Way Should You Reduce Video Size on iPhone?
- Part 3. How to Reduce Video Size on iPhone?
- Part 4. How Much Smaller Can a Video Get at a Lower Resolution?
- Part 5. What Makes an iPhone Video File So Large?
- Part 6. What to Do If the iPhone Video Is Still Too Large
- Part 7. How to Record Smaller Videos on iPhone in the Future
- Part 8. How to Compress an iPhone Video Without Making It Look Bad
Dr.Fone App - Photo & Video Compressor for iPhone
Compress Photos & Videos to Free Up iPhone Storage
- Compress Large Photos to Reduce File Size
- Compress Large Videos Instead of Deleting Them
- Free Up More Storage Space for New Photos, Videos, and Apps
- Manage Space-Consuming Photos and Videos More Efficiently



Part 1. Check the Video Size Before You Compress It
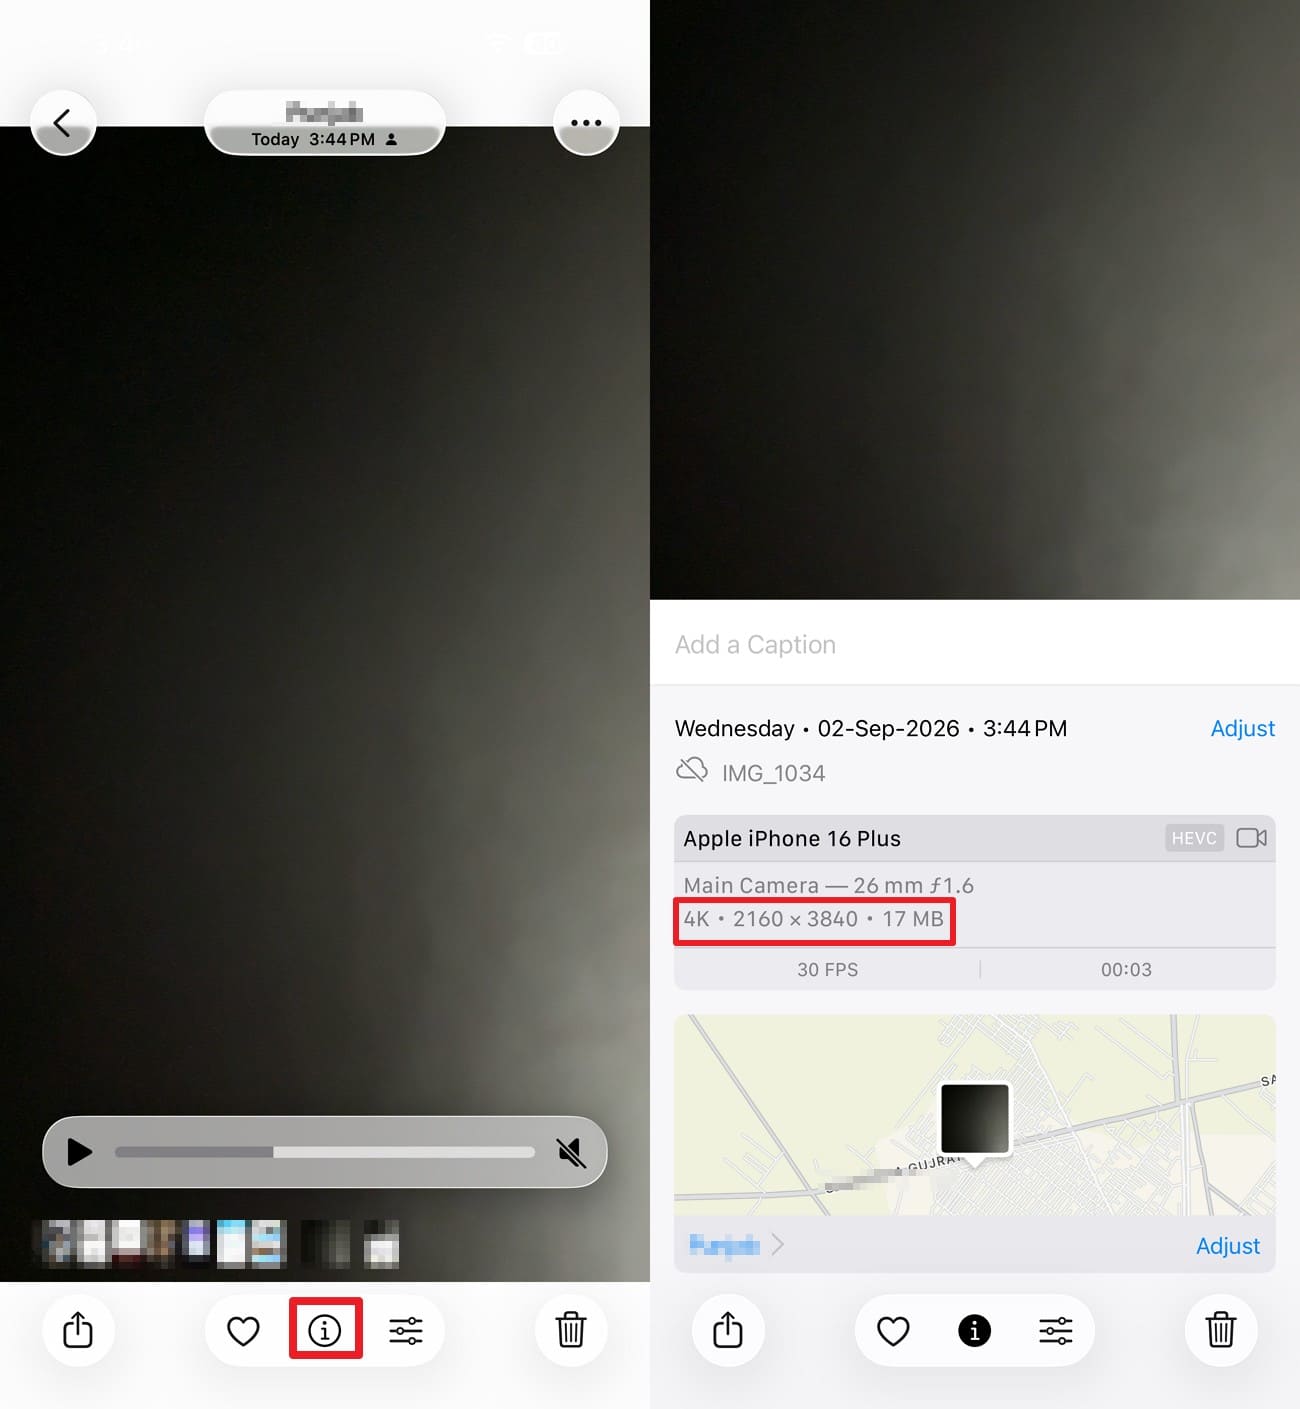
You can't tell whether a video needs compressing, trimming, or nothing at all until you know its size. Apple lets you view the current file size and technical details directly from the Photos app. Follow these steps to check your video before learning how to compress a video on iPhone:
Instructions. Open the video in the Photos App and tap the “Information” button or “Swipe Up.” Look for the file size (shown in megabytes or MB) listed near the recording details and resolution.
-
Step 1 Check Upload Limits
Compare your video size against the maximum limit accepted by the target platform or portal. This shows the exact reduction needed and prevents unnecessary compression.
-
Step 2 Review Settings and Length
Higher resolutions, higher frame rates, and longer runtimes naturally generate much larger files. Apple notes that adjusting these core recording parameters directly controls your baseline video storage size.
-
Step 3 Decide Whether to Compress or Trim
Lower the export resolution if you need the full clip or cut out unwanted sections if partial footage works. Apple recommends trimming the clip when standard compression still leaves the file too large to send.
-
Step 4 Preserve the Original File
Save your compressed video as a separate copy and verify its quality before deleting your source material. If the new export fails size requirements, return to the original and try a lower resolution.
Part 2. Which Way Should You Reduce Video Size on iPhone?
Once you know the current video size and your requirements, the next step is choosing the right reduction method. The 3 ways to reduce video size iPhone users can try are not interchangeable because each reduces file size differently.
| Situation | Best Method | What It Changes | Main Trade-Off |
|---|---|---|---|
| Large Video with Good Quality | Direct compression | File size through re-encoding | Some quality loss may occur |
| 4K Needed Only for Normal Sharing | Lower-resolution export | Resolution and file size | Less detail on larger screens |
| Video With Unnecessary Footage | Trimming | Duration and file size | Removes footage from the video |
| Video That Needs Direct Compression | Dr.Fone App | Compresses the video file on iPhone | Quality depends on compression level |
| Still Too Large After One Attempt | Combine trimming with lower-resolution export | Duration, resolution, and file size | Greater reduction can lower quality |
Part 3. How to Reduce Video Size on iPhone?
With the basics covered, you can now choose the method that best fits your video and sharing needs. Here are 3 practical ways to learn how to reduce video file size on iPhone:
Method 1. Compress an iPhone Video with Dr.Fone App
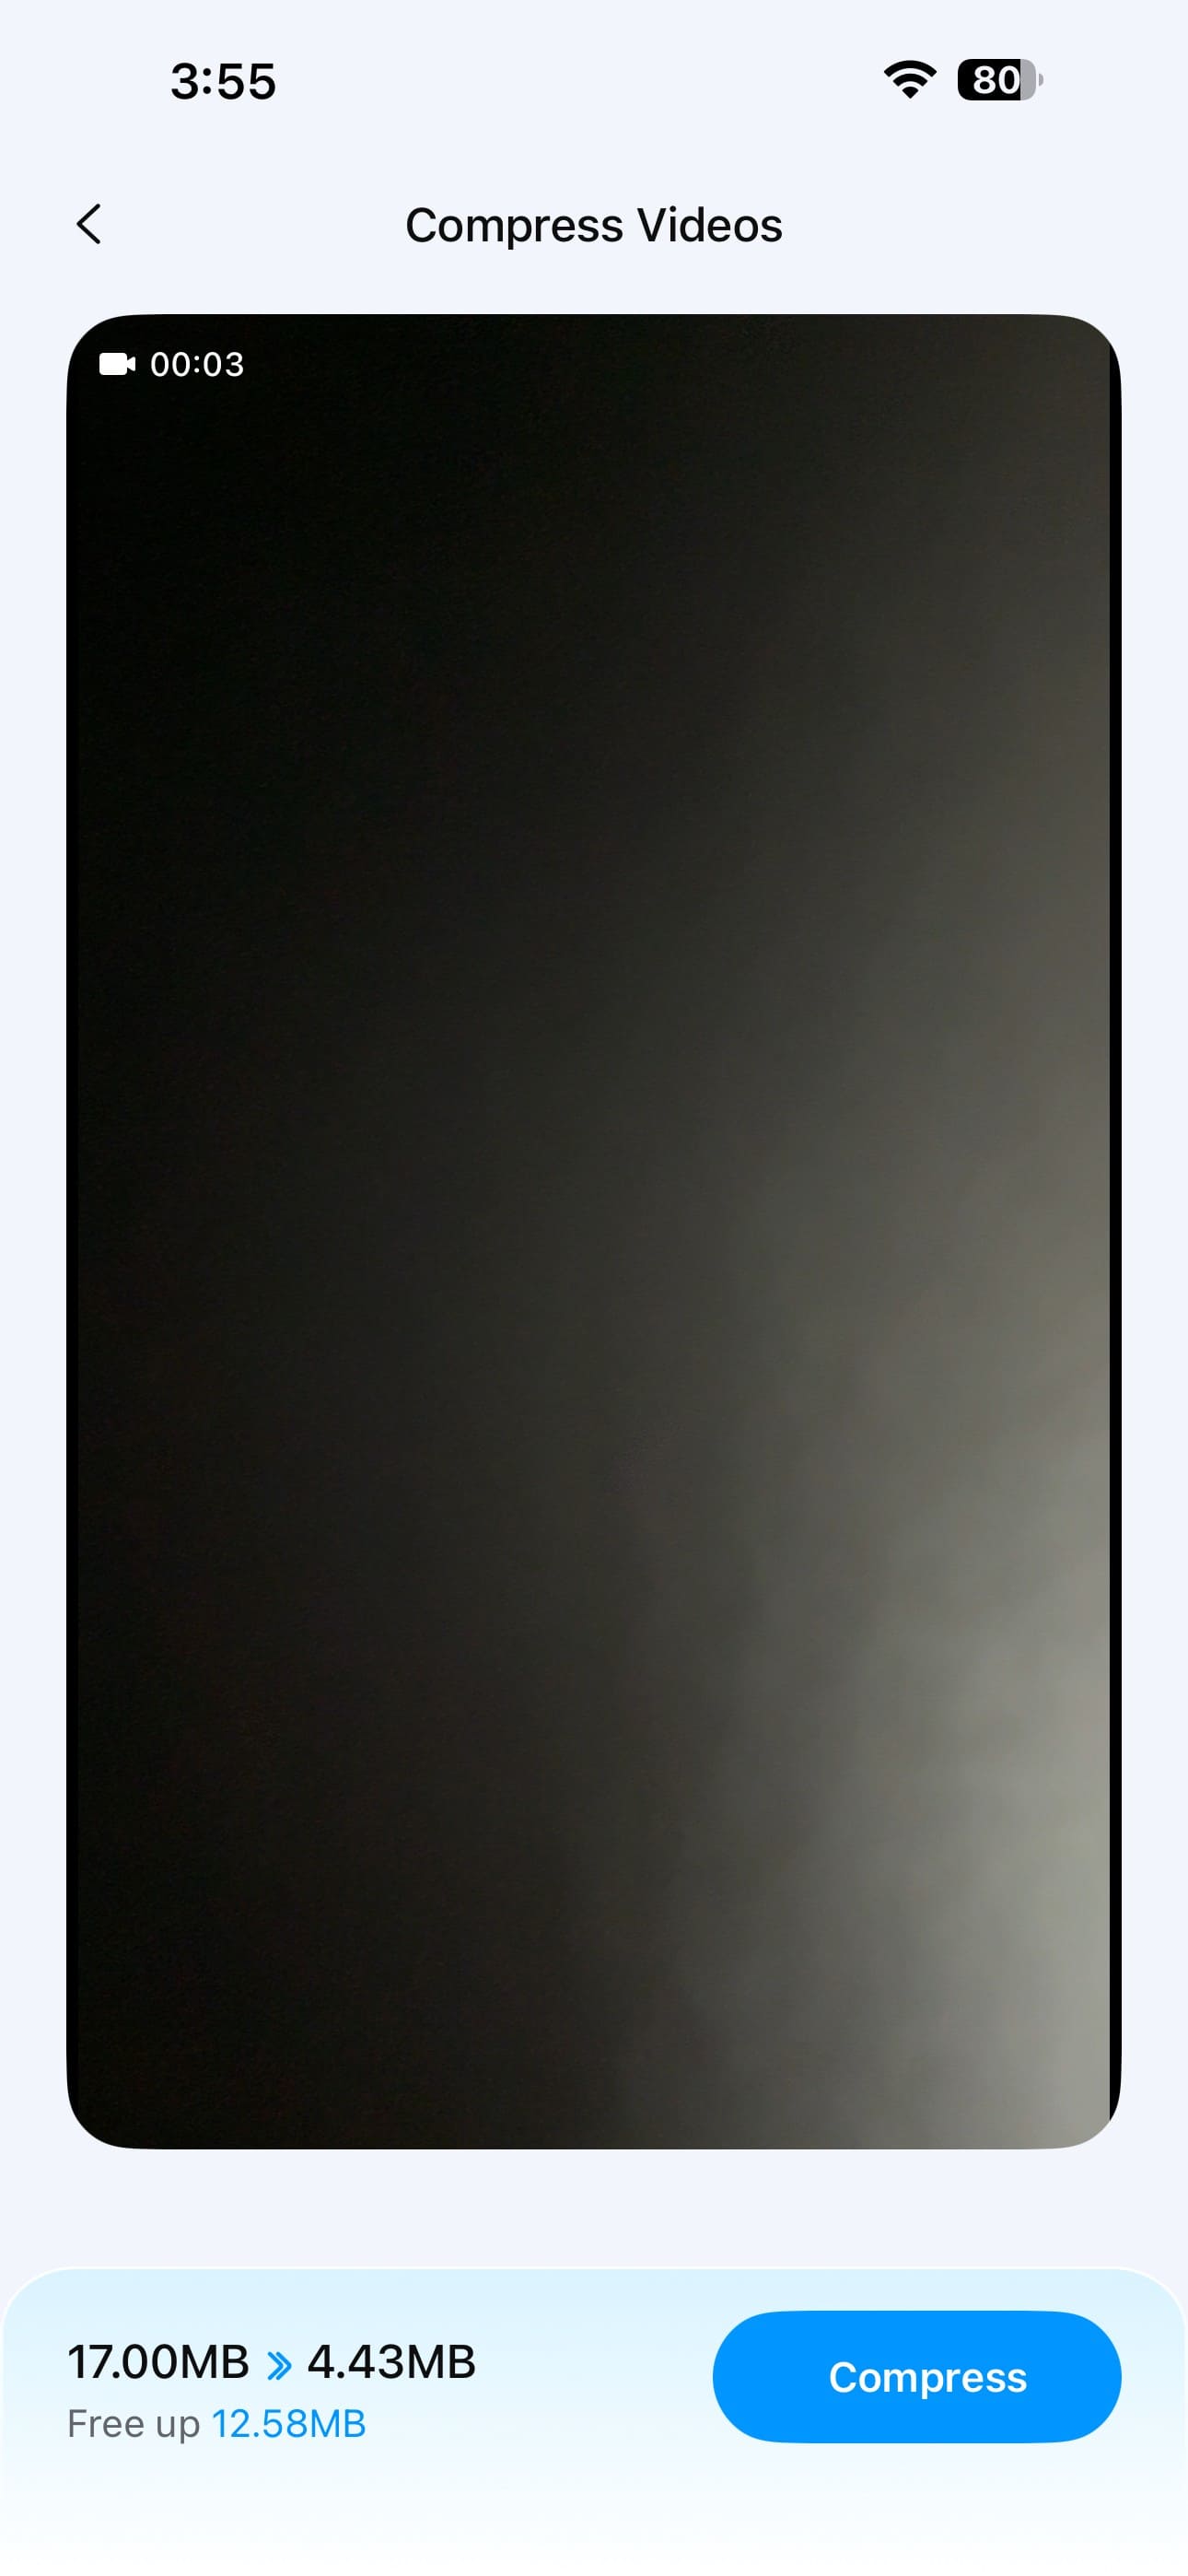
iMovie reduces file size by exporting at a lower resolution, while Photos reduces it by trimming unwanted footage. Dr.Fone App offers a dedicated Video Compressor for users who want to make an existing video smaller directly on their phone. Its Compressor tool lets you sort videos from Largest to Latest and select the files you want to process.
Dr.Fone App also supports batch video compression and HD-quality exports without a watermark. Before compression, you can check the estimated output size to understand how much storage the processed video should use. This makes the Video Compressor a practical option when your main goal is reducing file size without manually trimming footage or choosing a lower-resolution iMovie export.
Guide to Compress Videos on Dr.Fone App for iPhone
If you’re wondering how to reduce video size on iPhone using Dr.Fone App, follow these steps to compress your video directly on the device:
-
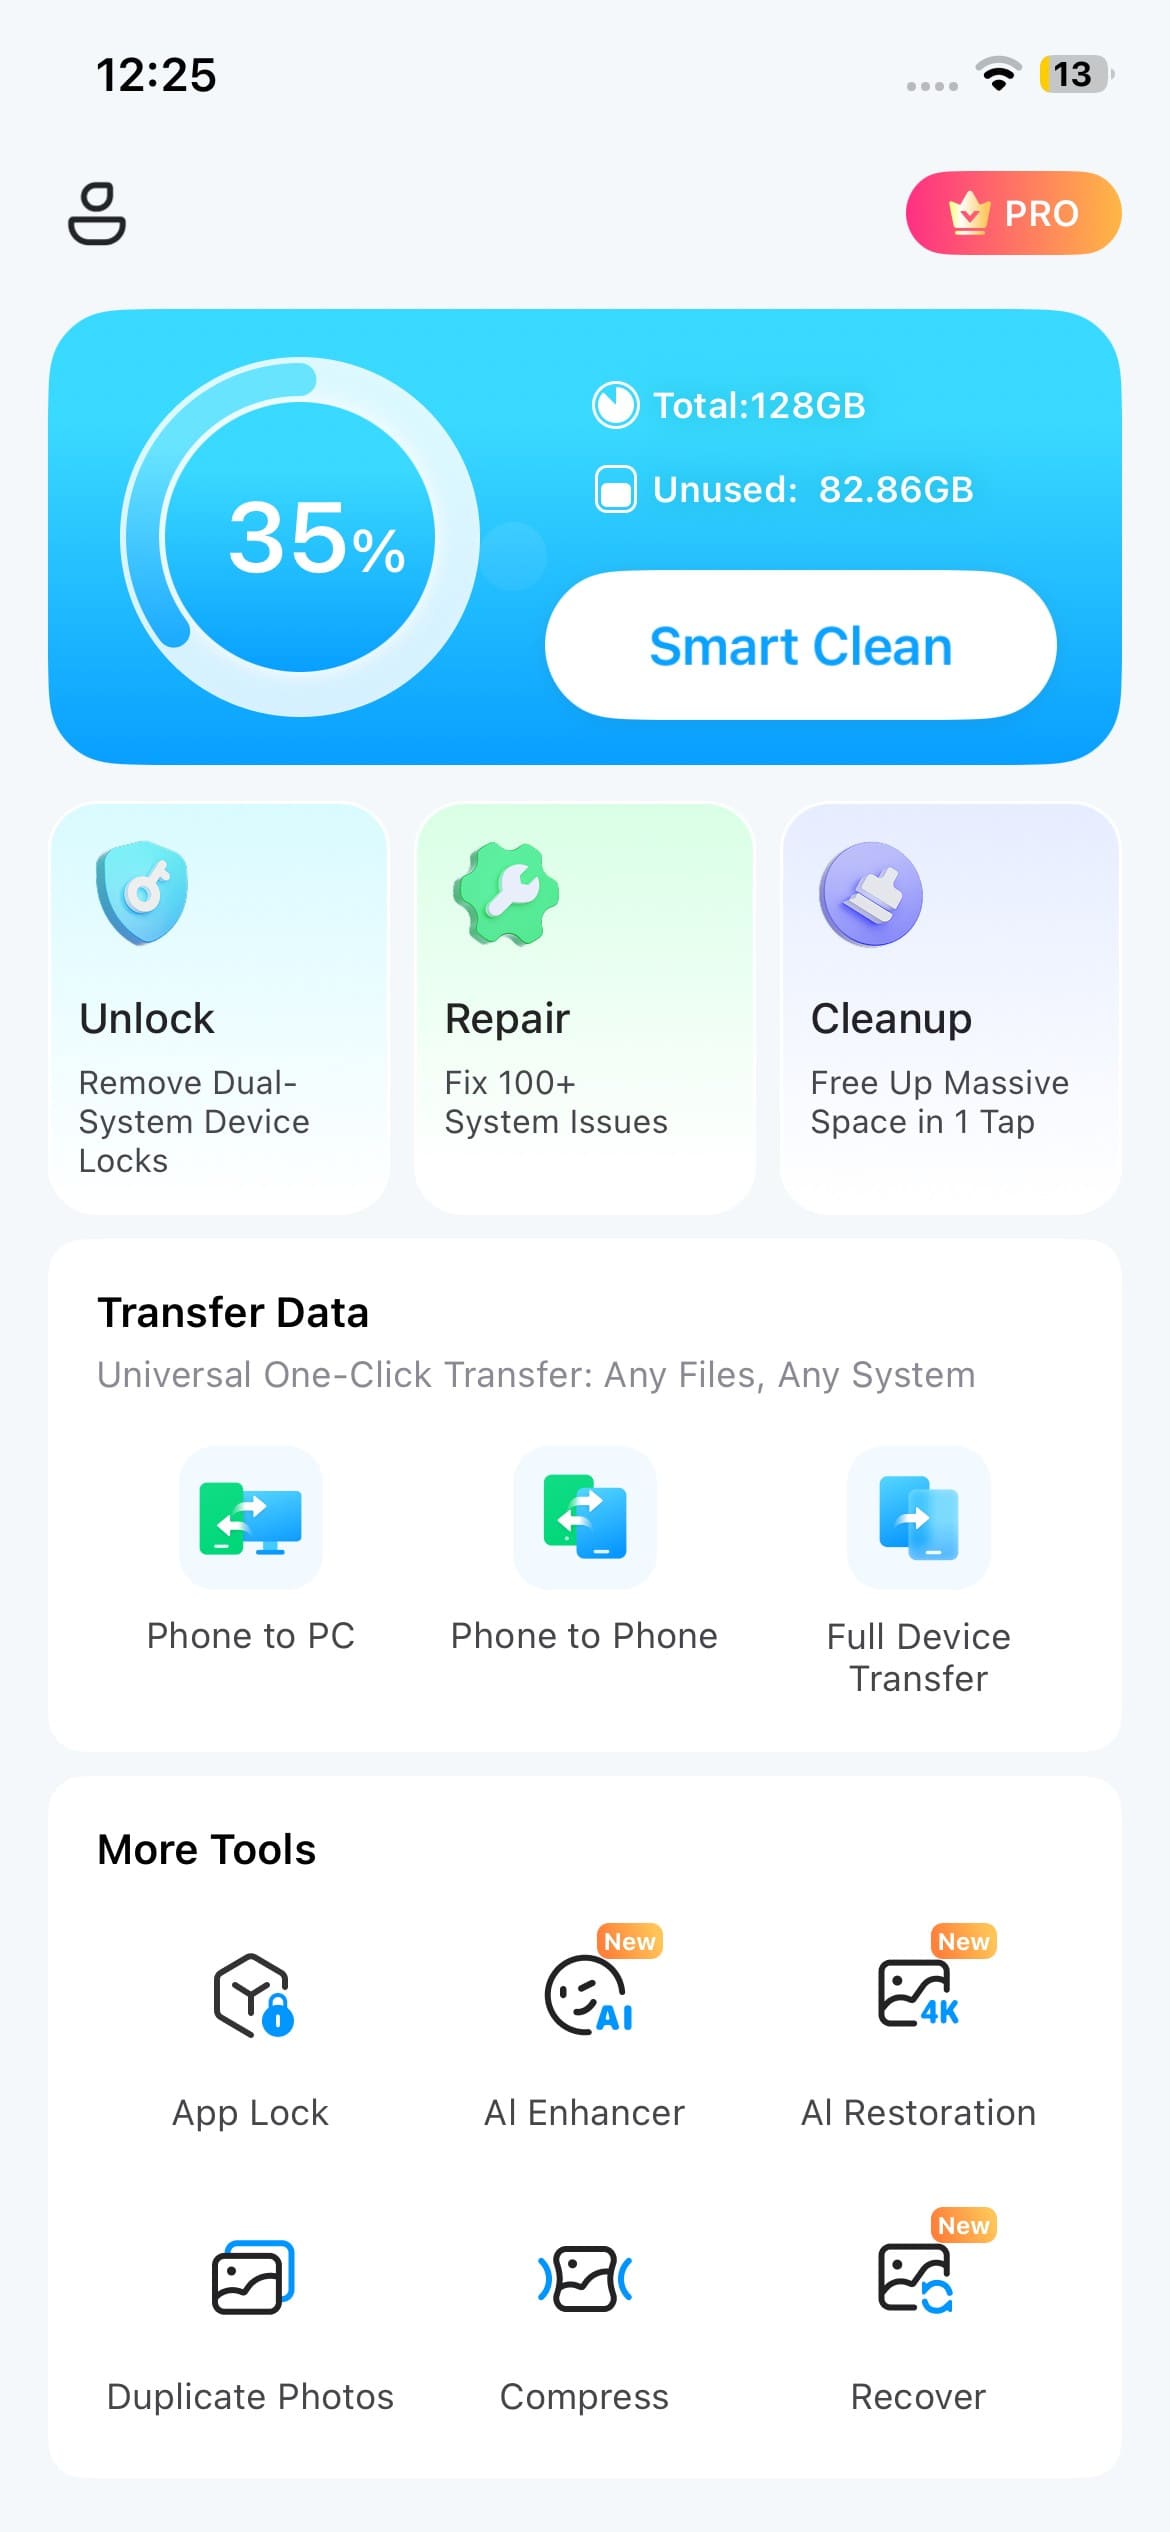
Step 1 Choose the Compress Tool
Open the Dr.Fone App and navigate to the “More Tools” section. Find and select the “Compressor” tool to access the available compression options.
-
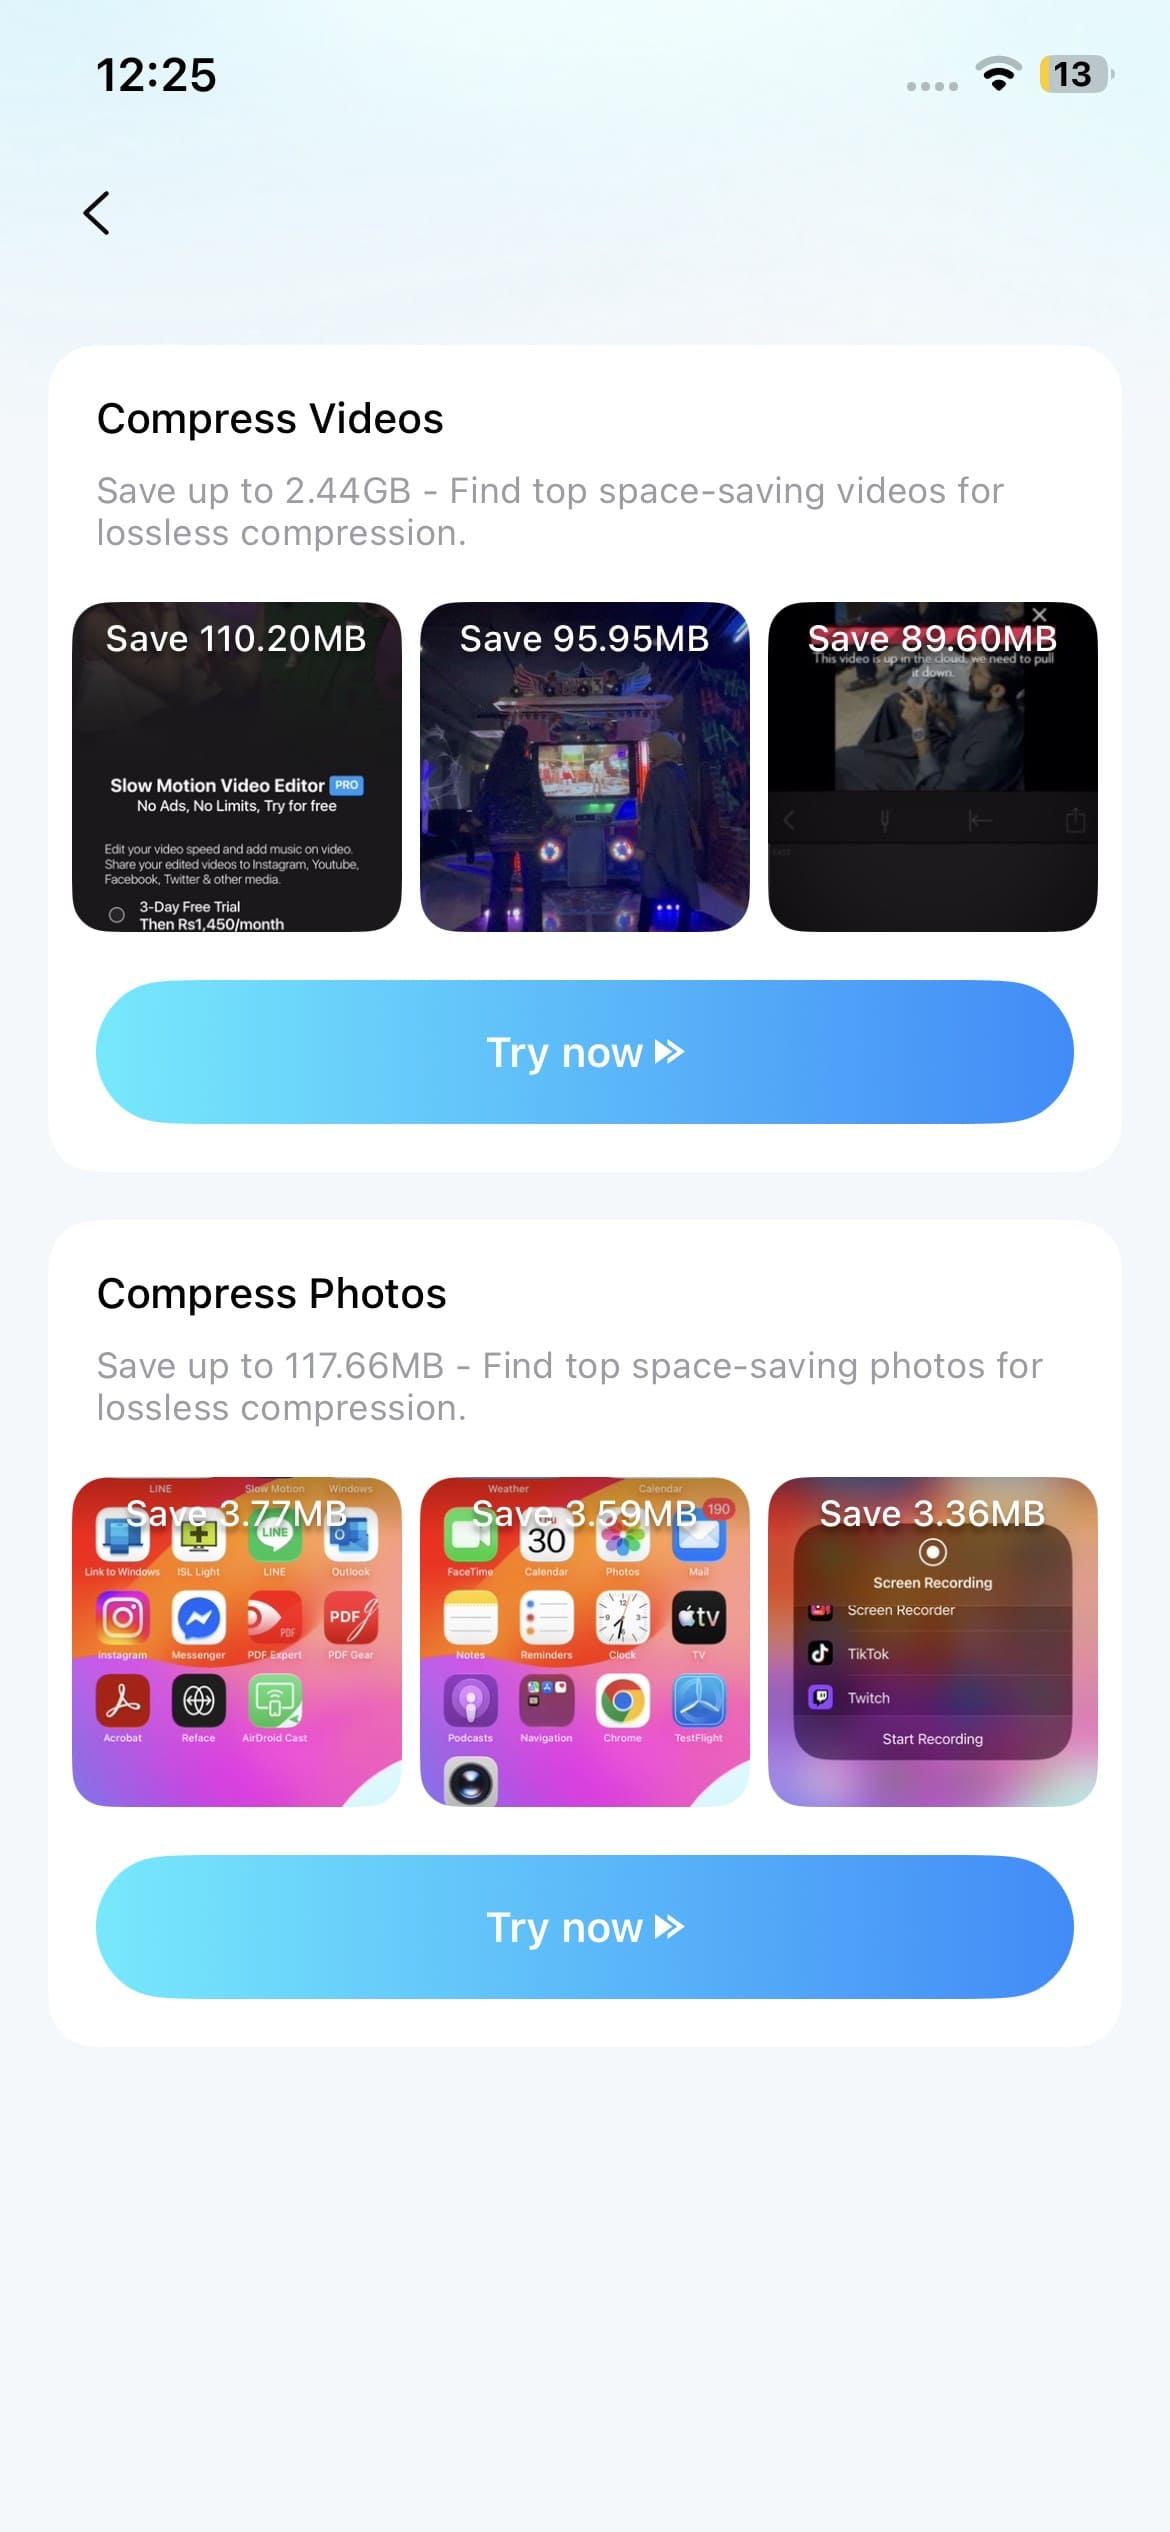
Step 2 Select the Video Compression Option
On the Compressor screen, locate the “Compress Videos” section and tap “Try Now” to proceed with video compression.
-
Step 3 Compress and Review the Estimated Result
Check the estimated file-size reduction, then tap “Compress” to begin. Once processing is complete, preview the compressed video, review its final size and quality, and save the result.
Method 2. Compress a Video with iMovie
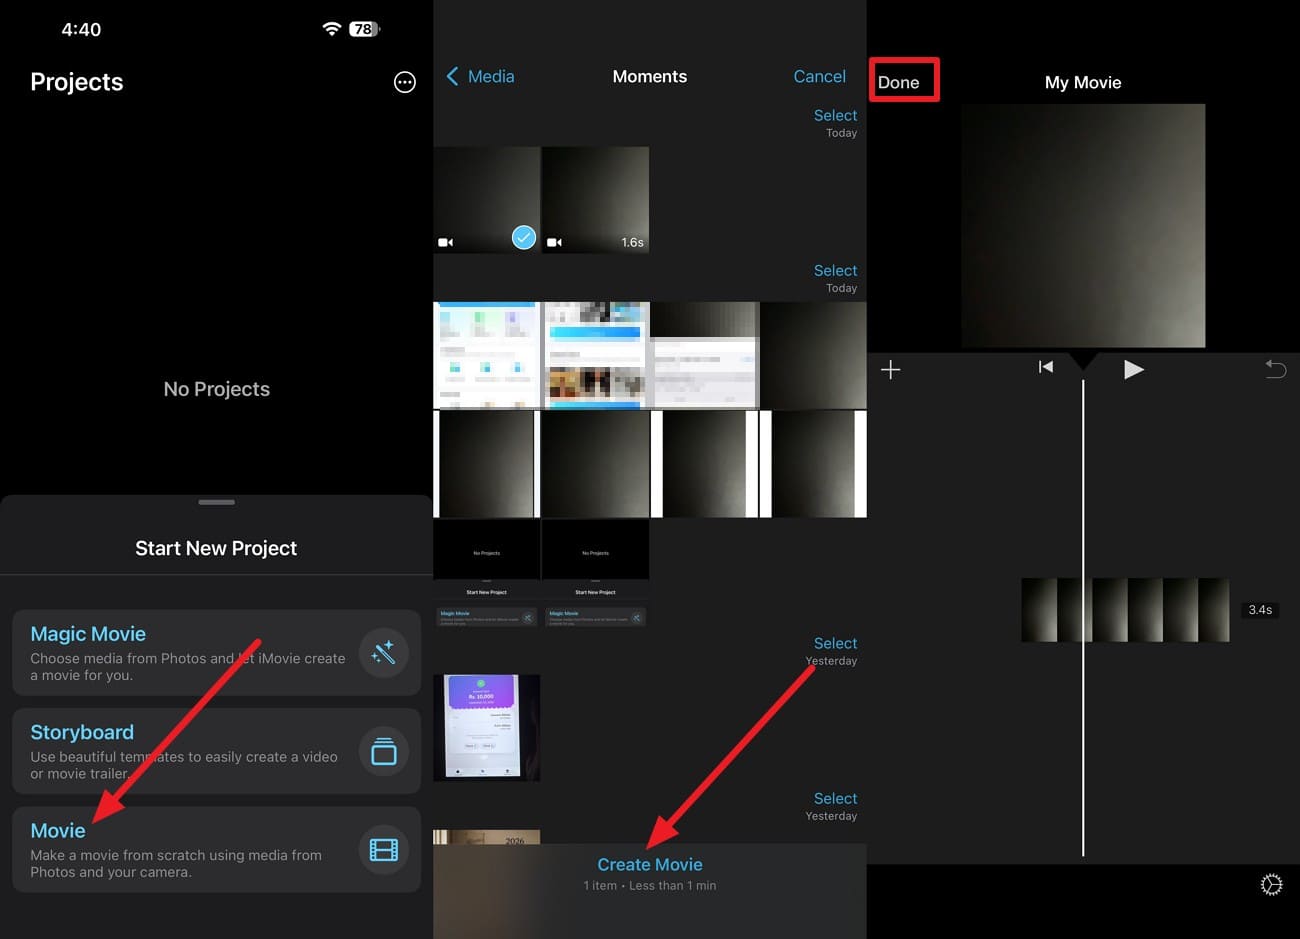
iMovie offers a simple way to make an already-recorded iPhone video smaller without trimming the footage. By exporting at a lower resolution, you can reduce the file size while choosing a quality level that suits your sharing needs. Lower resolutions generally create smaller files but may reduce visible detail. Follow these steps to learn how to compress an iPhone video using iMovie:
Step 1. On iMovie, tap on the “Movie” option, select the video you want to compress, and choose “Create Movie > Done.”
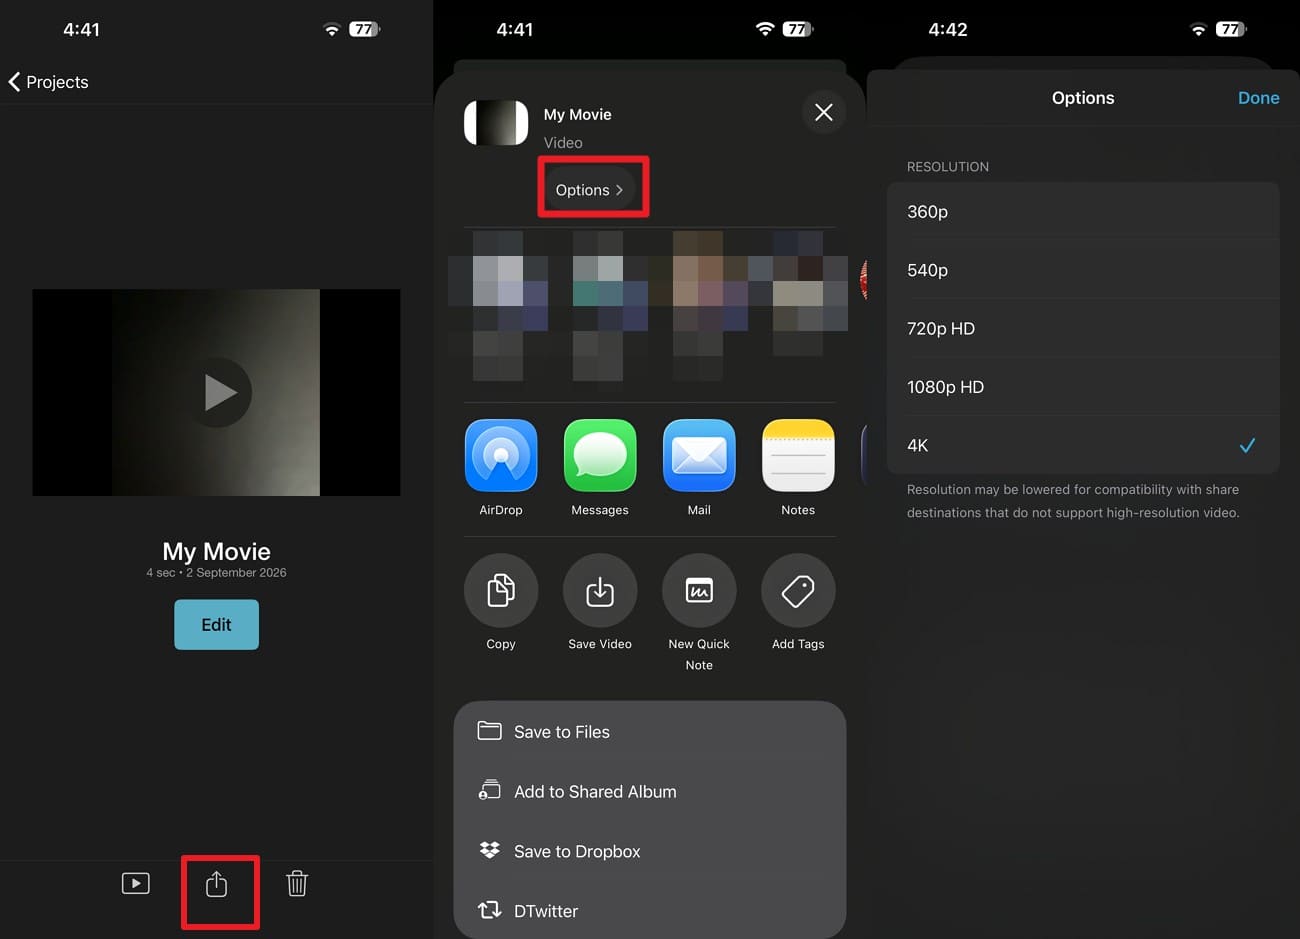
Step 2. Press the “Share” icon, select “Options,” and choose a lower resolution such as 720p, 540p, or 360p > Select “Done > Save Video.”
Method 3. Trim the Video in the Photos App
If unnecessary footage at the beginning or end is increasing the file size, the Photos app lets you trim it without intentionally lowering the resolution. This works well when you only need part of the recording. Longer or high-resolution clips may still need further compression. Follow these steps if you’re wondering how do you compress a video on iPhone by trimming:
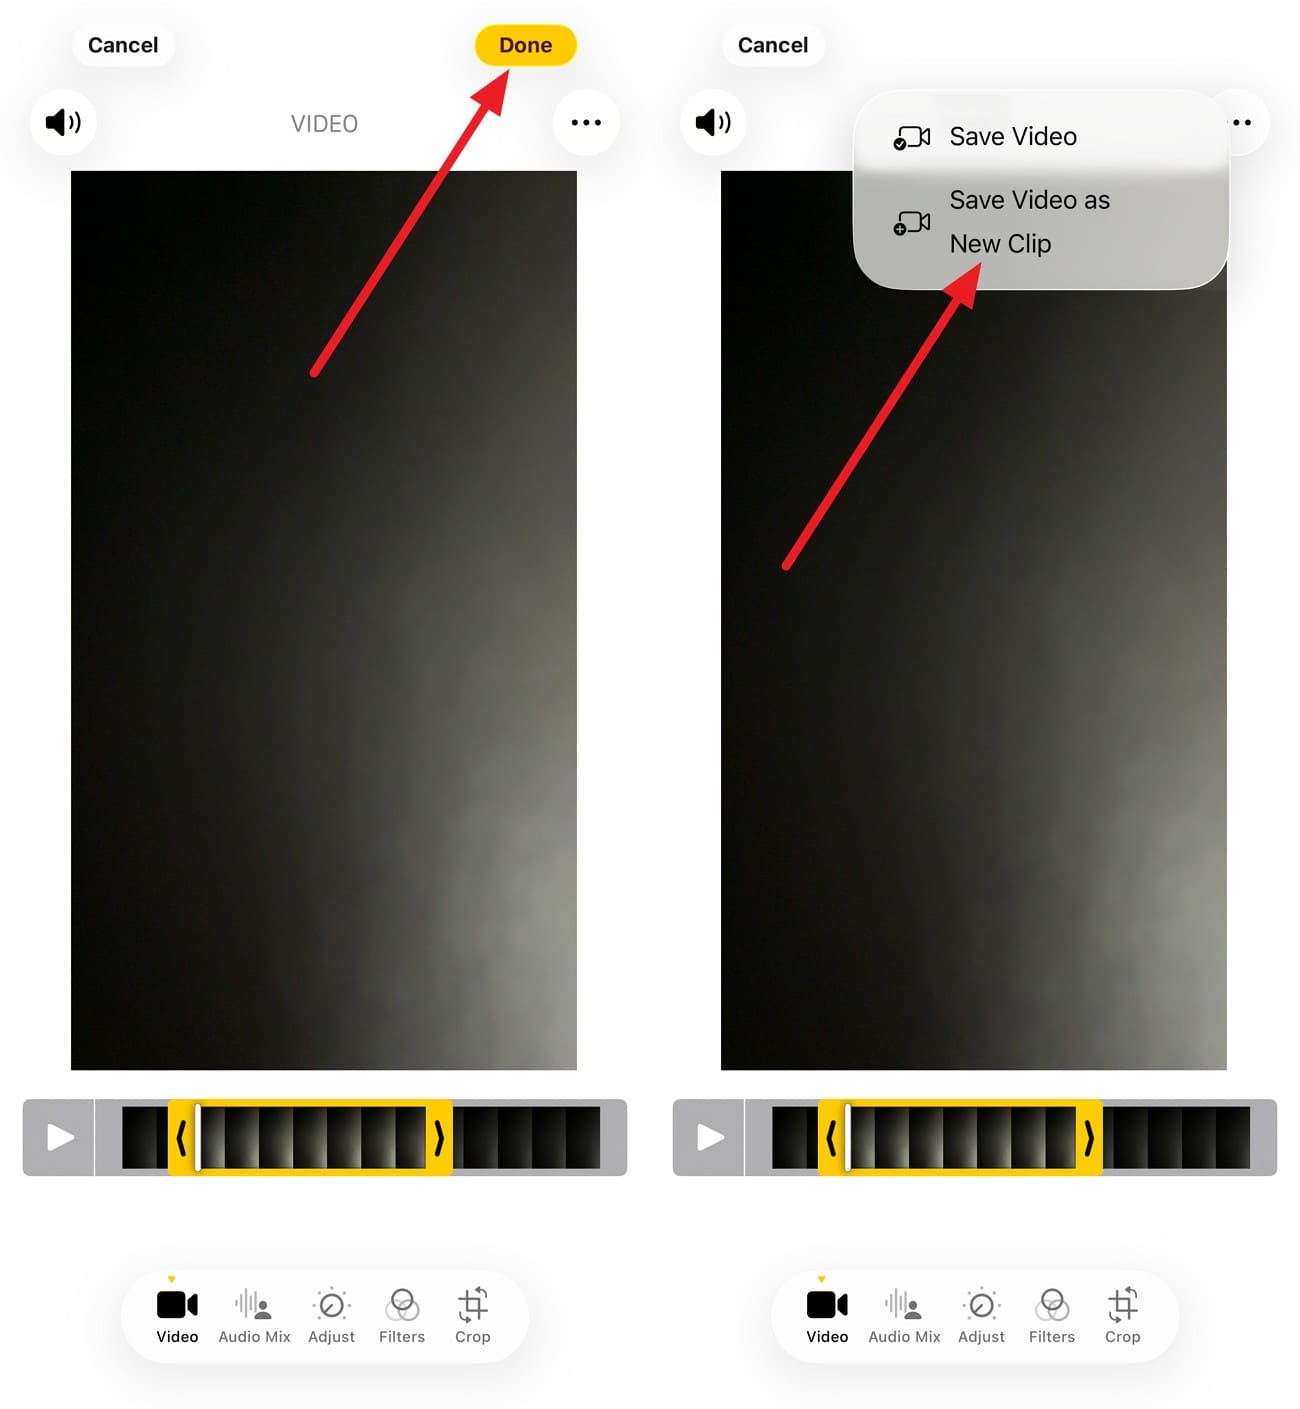
Step 1. Open the video in Photos, tap the “Edit” icon, and drag the sliders on both sides of the timeline to set the new start and end points.
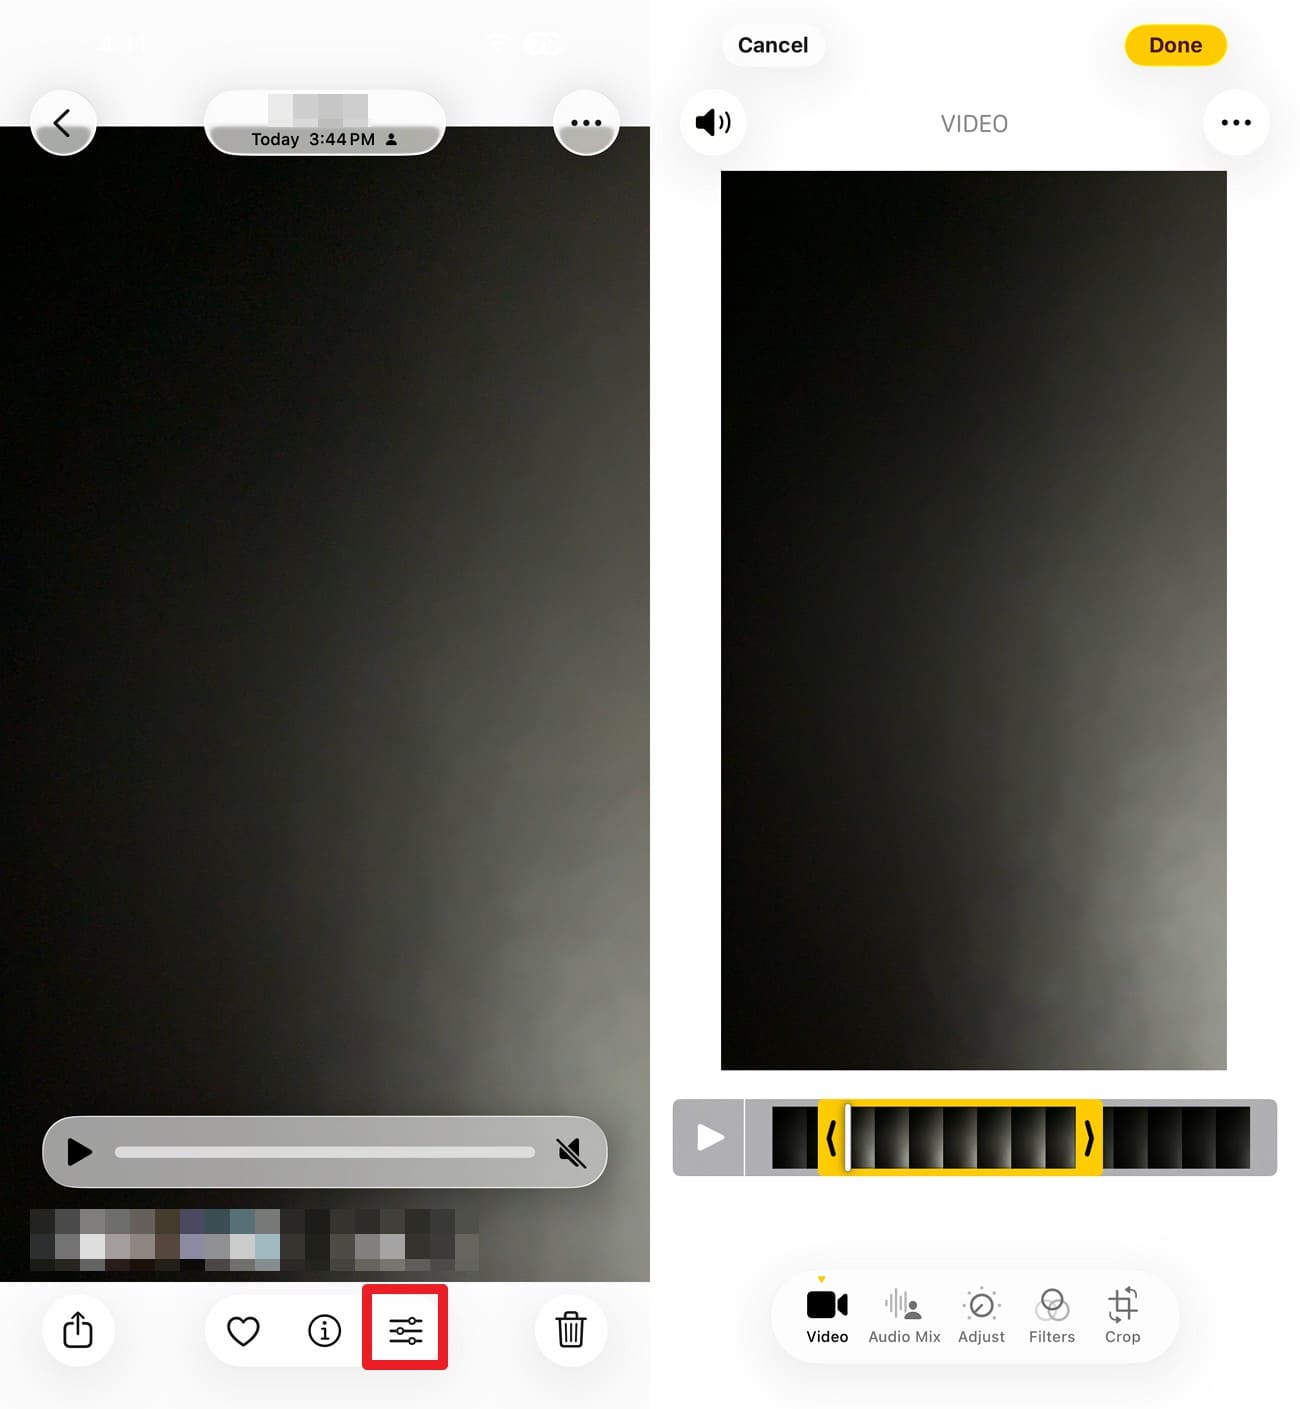
Step 2. Tap “Done,” then select “Save Video as New Clip” if you want to keep the full recording. Apple confirms that this option saves an additional trimmed version while preserving the original.
Part 4. How Much Smaller Can a Video Get at a Lower Resolution?
To compress video iPhone files effectively, choosing the right export resolution is important because lower resolutions can significantly reduce file size. Apple’s per-minute iMovie estimates help show how file size changes at each resolution:
| Export Resolution | Approximate Size Per Minute | Reduction vs 1080p | Suitable Use |
|---|---|---|---|
| 1080p | 70–105 MB | Baseline | Higher-quality sharing and archiving |
| 720p | 19–27 MB | Roughly 74% smaller | General sharing and uploads |
| 540p | 12–16 MB | Roughly 84% smaller | Social media, per Apple’s guidance |
| 360p | 6–9 MB | Roughly 91% smaller | Text messaging, per Apple’s guidance |
Part 5. What Makes an iPhone Video File So Large?
An iPhone video’s file size mainly depends on its resolution, frame rate, duration, HDR, codec, and recording mode. Higher recording settings generally require more storage. Understanding these factors can help you choose the right approach when learning how to compress a video on iPhone:
| Factor | Why It Increases File Size | What to Know |
|---|---|---|
| Resolution | Higher resolutions store more image detail | 4K generally creates much larger files than 1080p or 720p. Apple recommends using a lower resolution when you need a smaller video file. |
| Frame Rate | More frames are recorded every second | 60 fps generally requires more video data than 30 fps at the same resolution. iPhone lets you adjust the resolution and frame rate in Camera settings. |
| Duration | Longer recordings contain more video data | A 10-minute clip generally requires substantially more storage than a one-minute clip recorded using the same video settings. |
| HDR Video | Stores additional brightness and color information | Apple suggests turning off HDR Video when you want to make recorded videos smaller. |
| Video Format | Different codecs compress video differently | High Efficiency (HEVC) provides better compression than H.264, allowing smaller files while maintaining similar visual quality. |
| Recording Mode | Professional formats prioritize editing quality over smaller files | Apple ProRes creates much larger files. Apple states that ProRes files can be up to 30× larger than HEVC files. |
Part 6. What to Do If the iPhone Video Is Still Too Large
A first attempt may not reduce the file enough, especially with a long 4K recording. Instead of repeating the same approach, try a stronger or different reduction method. Here’s how to reduce video file size on iPhone on a second pass:
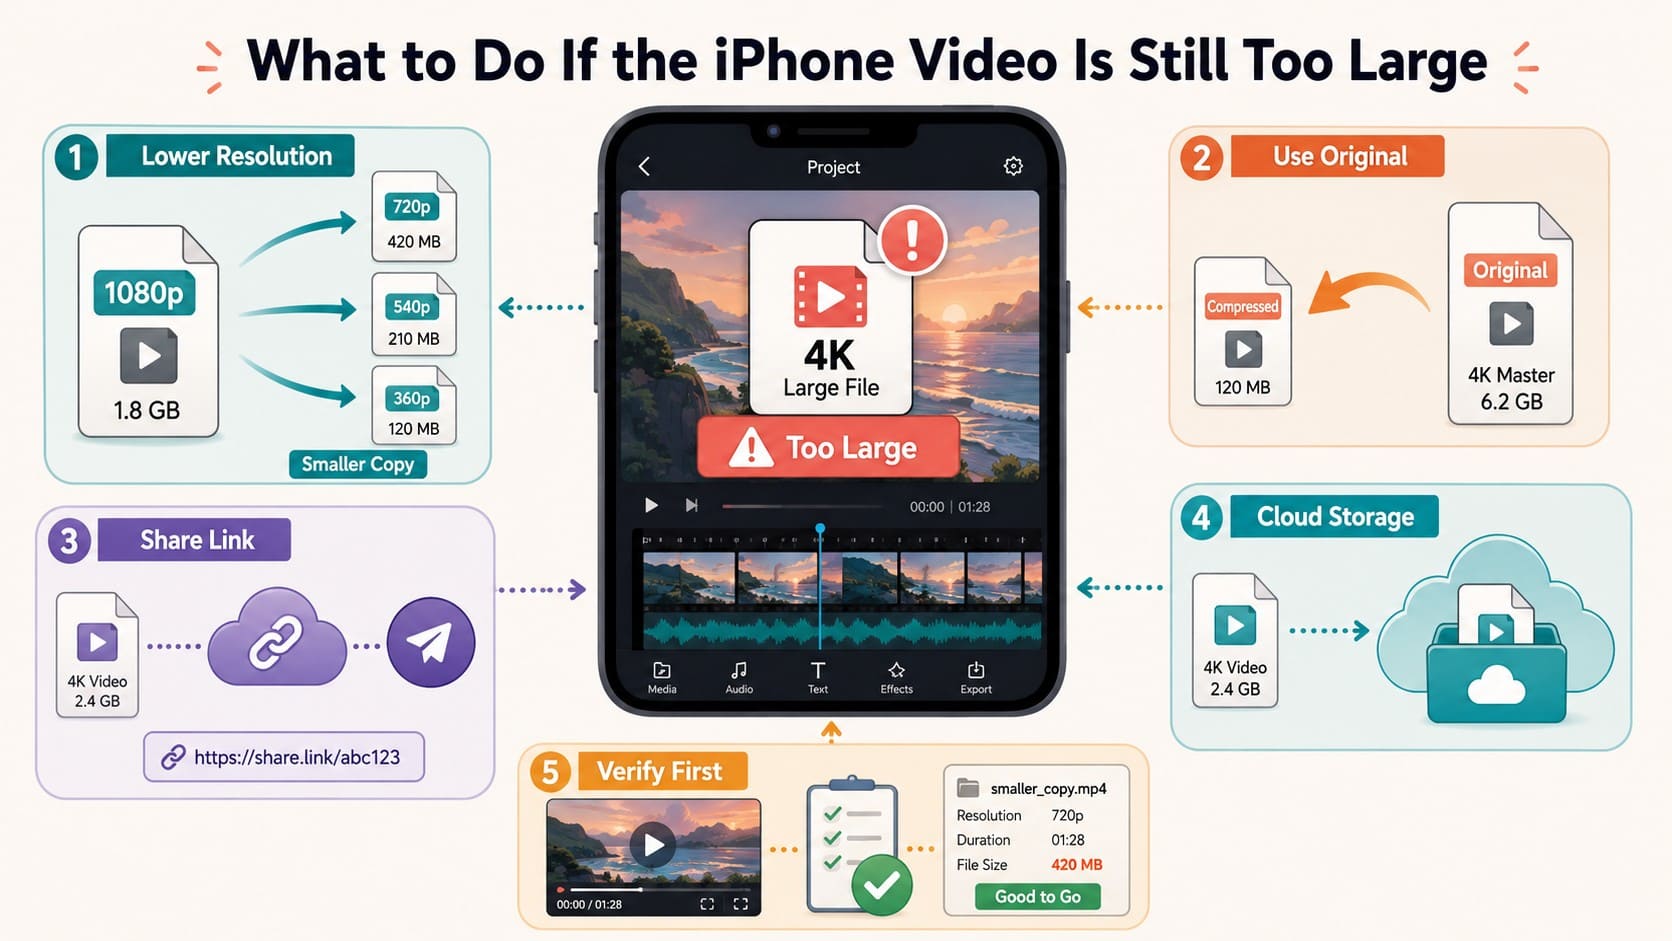
- Export at a Lower Resolution: Return to the original project and choose a lower export resolution, such as 720p, 540p, or 360p. Apple confirms that lower resolutions produce smaller files, although reducing resolution can also decrease visible detail.
- Create a Fresh Export from the Original: Avoid repeatedly compressing an already reduced video because additional encoding can further affect quality. Instead, reopen the original project and create a fresh export using your new settings. Apple explains how to return to an iMovie project and change the export resolution.
- Share a Link Instead: If compression would reduce quality too much, check whether the destination accepts a shared link. Apple recommends options such as iCloud Links or Mail Drop for videos that are too large to send as regular attachments.
- Use Cloud Storage for Large Videos: Upload the original video to iCloud Drive or another cloud storage service and share access instead of compressing it further. This can avoid attachment-size restrictions while preserving the original quality, although individual cloud services still have their own limits.
- Check the Result Before Deleting: Compare the compressed video’s file size and visual quality with the original before removing anything. Keep the original until the new version meets the destination’s size limit and looks acceptable on the screen where it will be viewed.
Part 7. How to Record Smaller Videos on iPhone in the Future
So far, we’ve covered how to compress a video on an iPhone after recording it. You can also prevent oversized files by adjusting your Camera settings before recording. Here are the key changes to make:
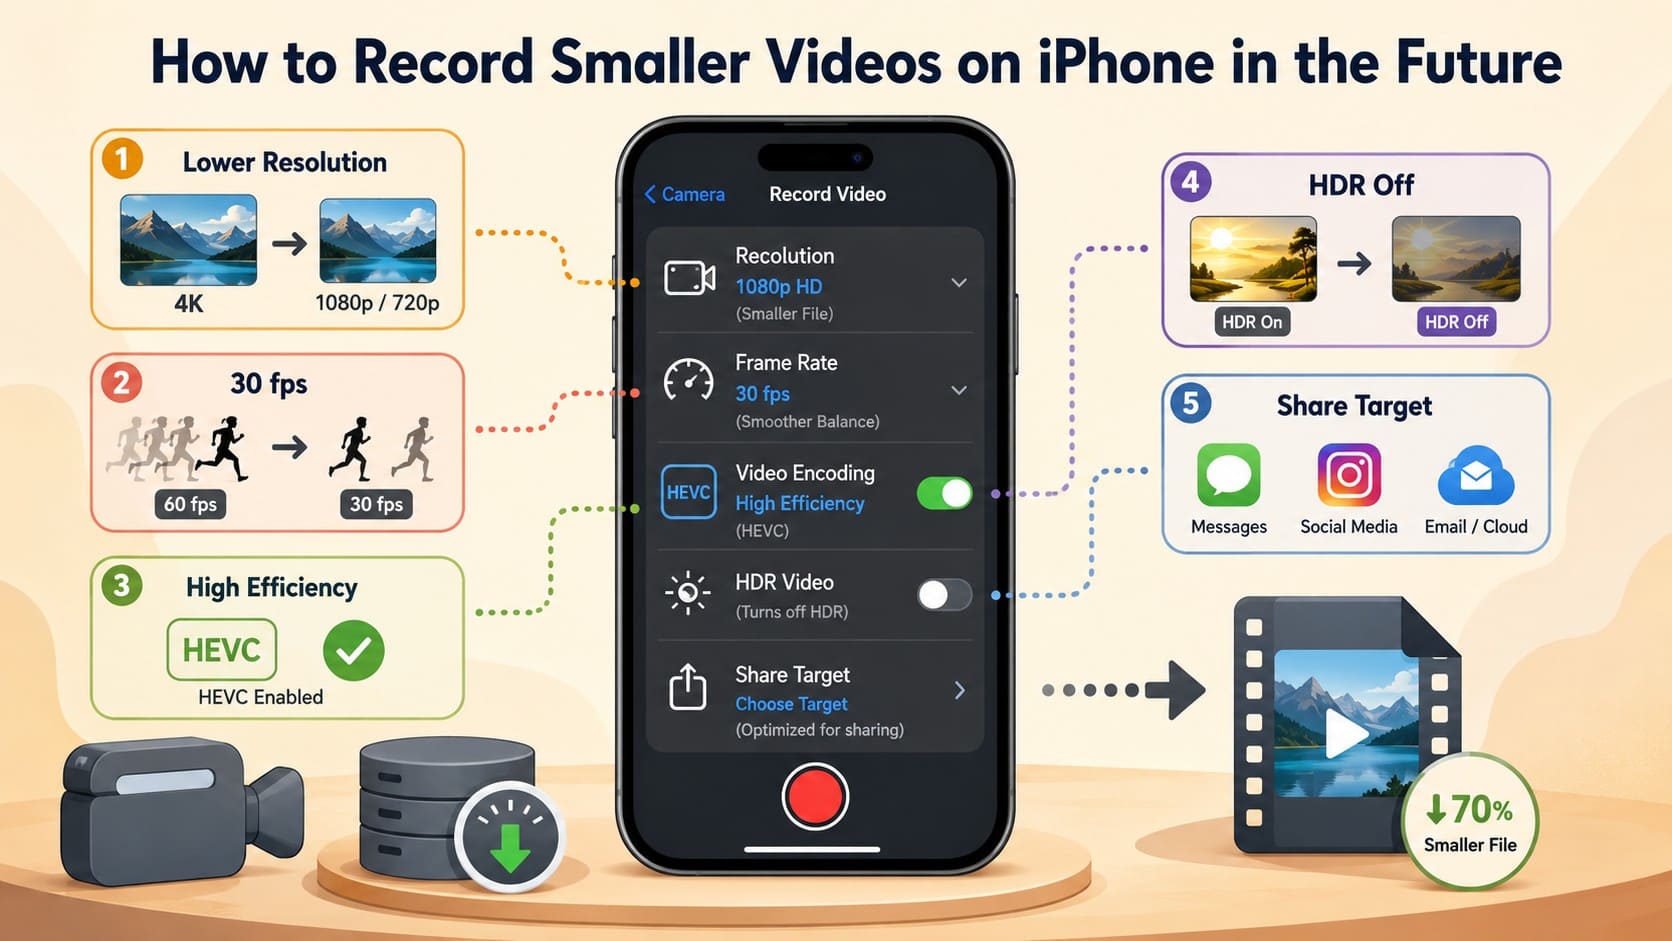
- Use Lower Recording Resolution: Record below 4K when the video is intended for regular viewing, social media, or messaging. Higher resolutions generally create larger files, so 1080p can be more practical for everyday recording.
- Choose Lower Frame Rates: Record at a lower frame rate when smoother high-frame-rate motion is unnecessary. For example, 30 fps generally requires less video data than 60 fps at the same resolution.
- Enable High Efficiency Format: Select High Efficiency under Camera format settings to record compatible videos using HEVC. This format provides more efficient compression than H.264, helping reduce storage requirements while maintaining similar visual quality.
- Turn Off Unnecessary HDR: Disable HDR Video when you do not need high dynamic range for the intended viewing or sharing platform. This can help keep future video files smaller and simplify compatibility with some devices.
- Match Settings to the Share Target: Choose recording quality based on how you plan to use the video instead of always selecting maximum settings. A casual messaging clip usually does not need the same recording quality as footage intended for professional editing.
Part 8. How to Compress an iPhone Video Without Making It Look Bad?
Reducing video size while preserving quality requires the right approach. Repeated compression can gradually introduce visible artifacts and soften details. These 6 practices can help keep a compressed iPhone video file looking good:
| Best Practice | What to Do | Why It Helps |
|---|---|---|
| Start From the Original | Create every new export from the original recording. | Prevents additional quality loss caused by repeatedly compressing an already compressed video. |
| Lower Resolution Gradually | Choose the lowest resolution that still meets your sharing needs. | Reduces file size without sacrificing more visual detail than necessary. |
| Trim Before Stronger Compression | Remove unwanted footage before applying heavier compression. | Shortens the video and reduces file size without lowering the resolution of the footage you keep. |
| Inspect Important Details | Check faces, text, motion, and fine edges after compression. | These areas can reveal blur, blocking, softness, and other compression artifacts more clearly. |
| Judge at the Final Viewing Size | Preview the compressed video on the type of screen where it will be viewed. | Quality loss that looks obvious on a large monitor may be less noticeable on a phone. |
| Keep the Original File | Preserve the source if you may edit, archive, or export the video again. | Provides a clean master for future exports without relying on an already compressed copy. |
Conclusion
Choose the right method based on what needs to change. Trimming removes unnecessary footage, while lower-resolution exports reduce dimensions and file size. Direct compression reduces the file through re-encoding without necessarily requiring a shorter clip. Keep the original and reduce only as much as your sharing limit requires.
When you need the same video in a smaller file, Dr.Fone App provides a direct way to compress video iPhone files on the device. For future recordings, adjusting resolution, frame rate, and format in Settings > Camera can help prevent unnecessarily large video files.
FAQ
-
1. Can I compress a video directly in the iPhone Photos app?
Not directly. The Photos app lets you trim unwanted footage, which can reduce the video’s file size, but it has no dedicated compression control. For direct compression, Dr.Fone App provides a Video Compressor that lets you select a video, check the estimated size reduction, compress it, and preview the result. -
2. Does lowering video resolution reduce file size on iPhone?
Yes. Lowering the resolution can significantly reduce an iPhone video’s file size. Apple estimates about 70–105 MB per minute at 1080p compared with 19–27 MB at 720p. This means a 720p export can be roughly 75% smaller, although the exact reduction varies by video. -
3. What is the best resolution for making an iPhone video smaller?
It depends on your sharing needs. Apple suggests 540p for social media and 360p for messaging, while 720p retains more detail. Dr.Fone App can also compress videos without manually selecting a lower export resolution. -
4. Does trimming an iPhone video reduce its file size?
Yes. Trimming removes unwanted footage and usually reduces file size. The remaining video keeps its original resolution and frame rate, although the final size may not decrease exactly in proportion to the footage removed.


Selena Lee
staff Editor
Generally rated4.5(105participated)