

 TL;DR:
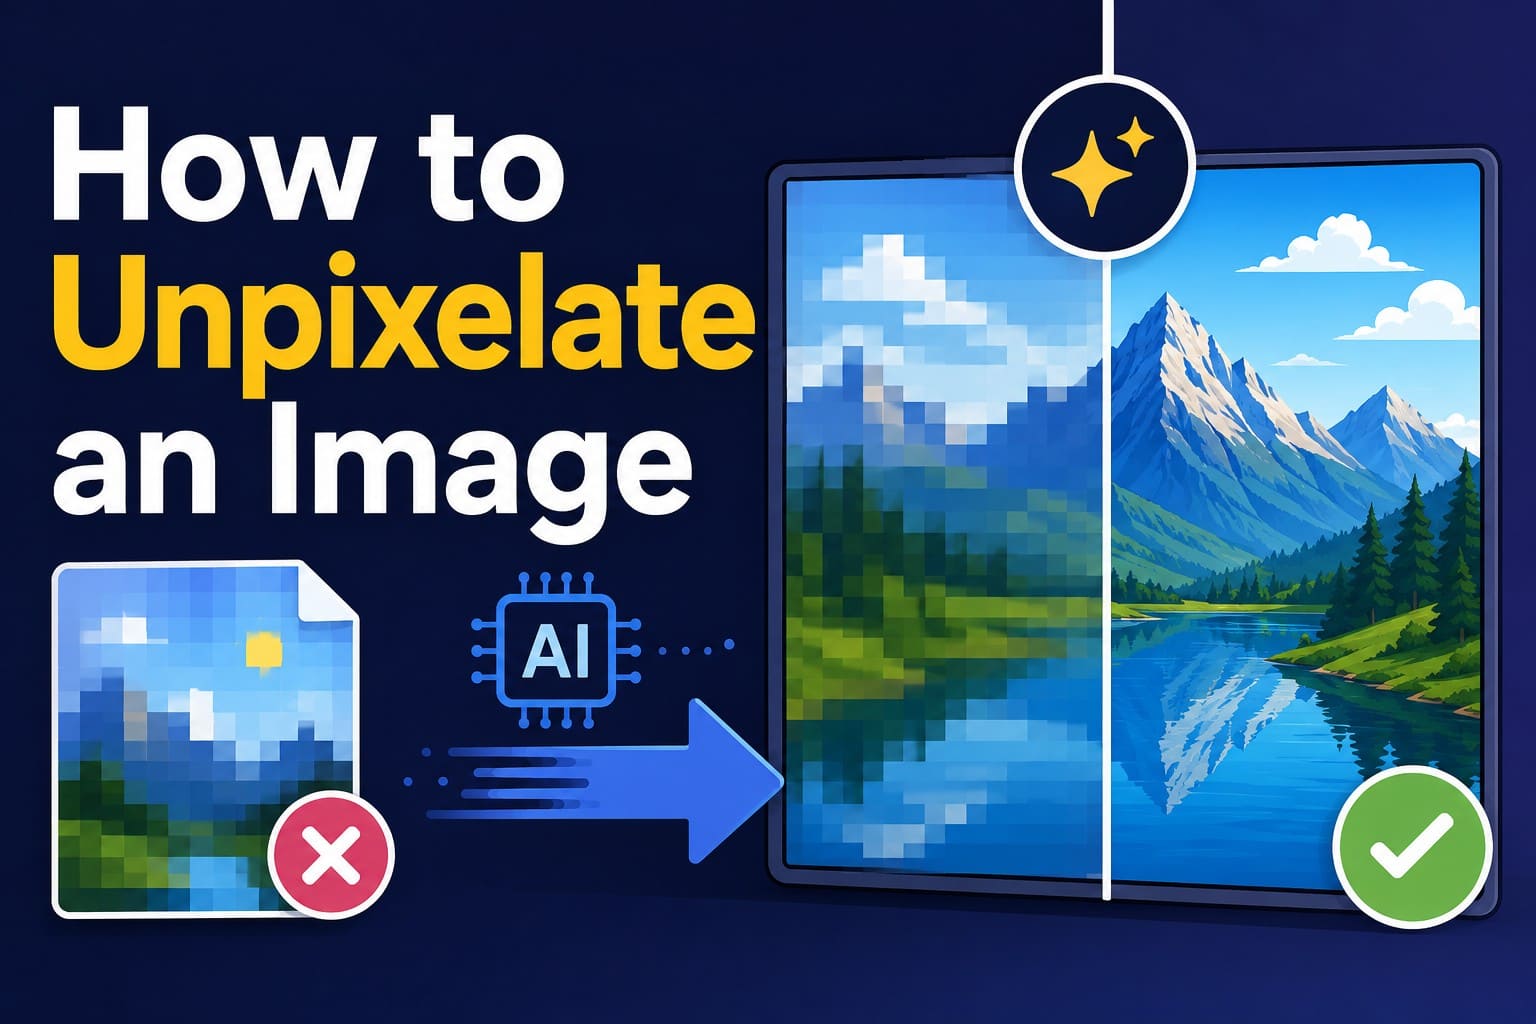
Use the highest-resolution original first, then reduce compression artifacts and apply AI enhancement or upscaling to make a pixelated image clearer.
- Best mobile option: Dr.Fone App provides Auto, Portrait, and Ultra HD modes with 2x, 4x, and 8x upscaling on iOS and Android.
- Best desktop option: Photoshop Preserve Details 2.0 can enlarge images more effectively than basic resizing and includes a Reduce Noise control.
- Important limitation: AI estimates missing detail, so heavily compressed, cropped, tiny, facial, or text-based images cannot always be restored accurately.
Ask AI for a summary
 ChatGPT
 Perplexity
 Gemini
 Claude
 Grok
Grok
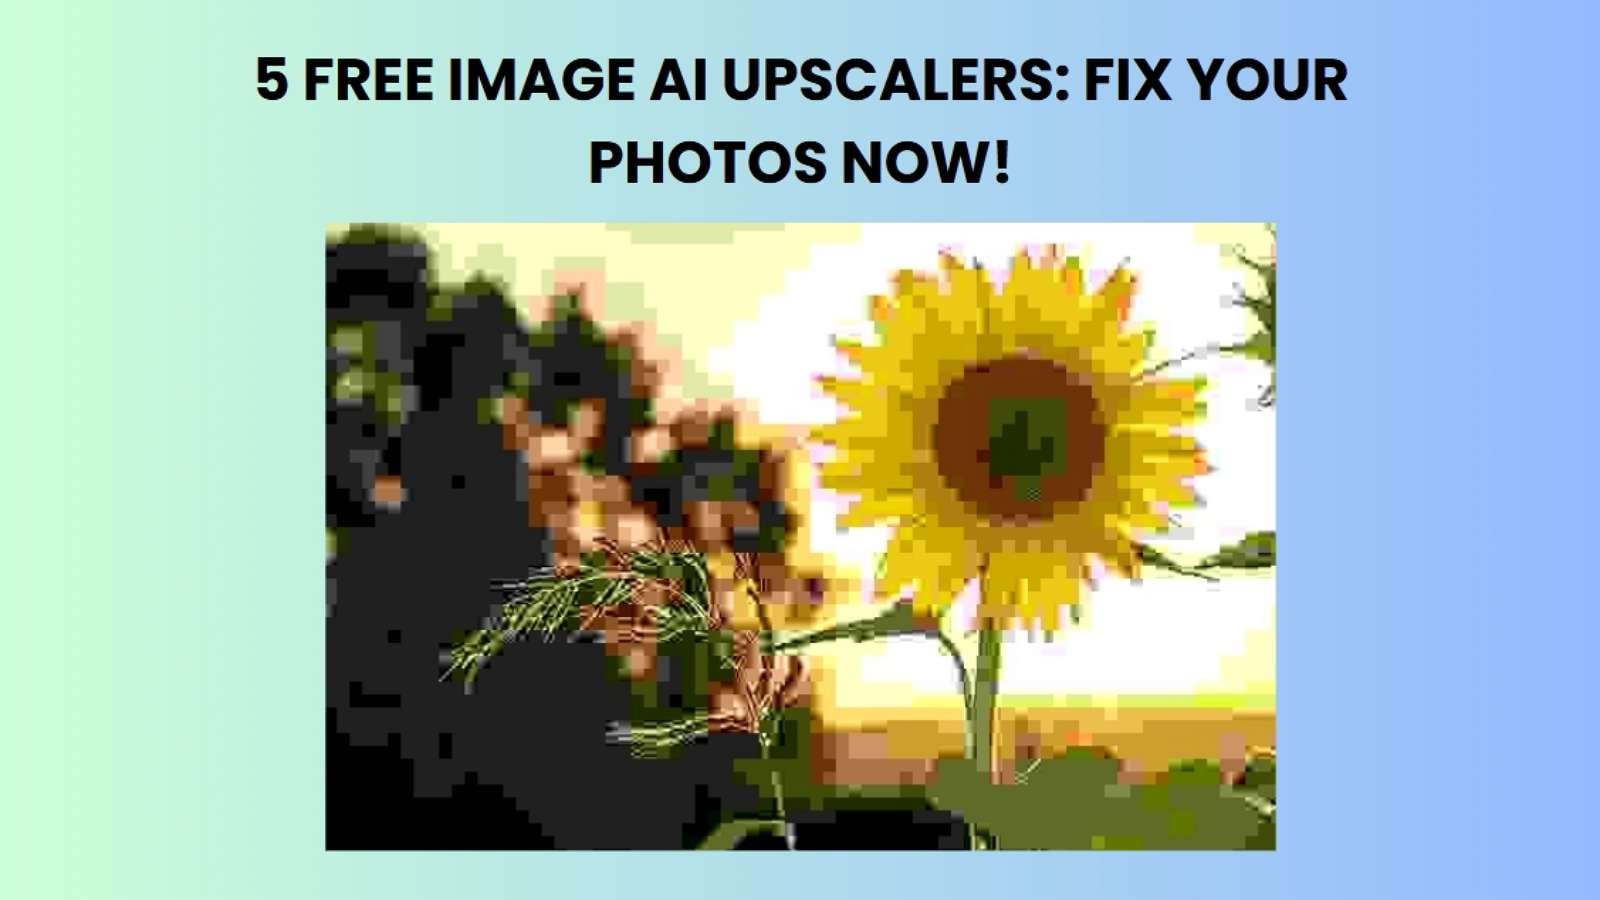
Opening a favorite photo and seeing jagged square blocks instead of smooth details can be frustrating. Pixelation usually appears when an image has too few pixels for its display size. Heavy compression can also create similar blocky artifacts. Simply stretching the file often makes the problem more noticeable.
To unpixelate image files effectively, you need the right method for the type of damage involved. This guide explains how to identify pixelation and choose between upscaling, enhancement, resizing, and sharpening. It also covers Photoshop and Dr.Fone App for improving image clarity without making photos look overly blurry or artificial.
- Part 1. Is Your Image Pixelated, Blurry, or Compressed?
- Part 2. Why Does an Image Become Pixelated?
- Part 3. How to Unpixelate an Image with Dr.Fone App
- Part 4. Sharpen, Upscale, or Resize: Which One Fixes Pixelation?
- Part 5. Other Ways to Make a Picture Less Pixelated
- Part 6. When Should You Enhance First and Upscale Second?
- Part 7. When Pixelation Cannot Be Fully Recovered?
- Part 8. How to Prevent Images from Becoming Pixelated Again?
Part 1. Is Your Image Pixelated, Blurry, or Compressed?
Pixelated images show visible square blocks when a picture lacks enough pixels for its display size. Blurry photos appear soft or smeared without a regular grid pattern. JPEG compression can also create blocky artifacts, halos, or distorted details around edges and text. Identifying the problem matters because each issue needs a different fix.
Before you fix a pixelated image, compare these image problems, their common causes, and the best first solution in the table below:
| Image Problem | What It Looks Like | Common Cause | Best First Step |
|---|---|---|---|
| Pixelation | Visible square pixels or jagged, blocky edges. | Image displayed much larger than its available pixel dimensions. | Find a higher-resolution original or consider AI upscaling. |
| Low Resolution | Limited fine detail for the intended output size; pixelation may appear when enlarged. | Small source dimensions, deep cropping, or thumbnail-sized files. | Find the largest or original file first. |
| Blur | Soft, smeared, or unfocused details without a regular square-pixel pattern. | Camera movement, missed focus, subject motion, or optical blur. | Apply deblurring or careful sharpening based on the cause. |
| Compression Artifacts | Blocks, ringing, smearing, or distorted details, especially around edges and text. | Heavy JPEG compression or repeated lossy saves. | Reduce compression artifacts before enlarging the image. |
Telling Pixelation from Compression
Pixelation and JPEG compression artifacts can both look blocky, but they have different causes and may require different treatment. So, go through the mentioned points to learn when to unpixelate a photo after identification:
- Find Enlarged Pixels: Pixelation from stretching exposes visible square pixels or jagged edges. Adobe explains that upsampling adds pixels but cannot restore missing original detail.
- Spot JPEG Artifacts: Compression damage can appear as blocks, halos, color distortion, or damaged text. Adobe explains that JPEG uses lossy compression, which can reduce image detail.
- Match the Fix: Use a higher-resolution original whenever possible. Otherwise, apply AI upscaling after reducing visible compression artifacts so enlargement does not make those flaws more noticeable.
Part 2. Why Does an Image Become Pixelated?
While some users search for how to unpixelate an image, understanding why pixelation happens is just as important. The following 6 causes explain why images become pixelated:
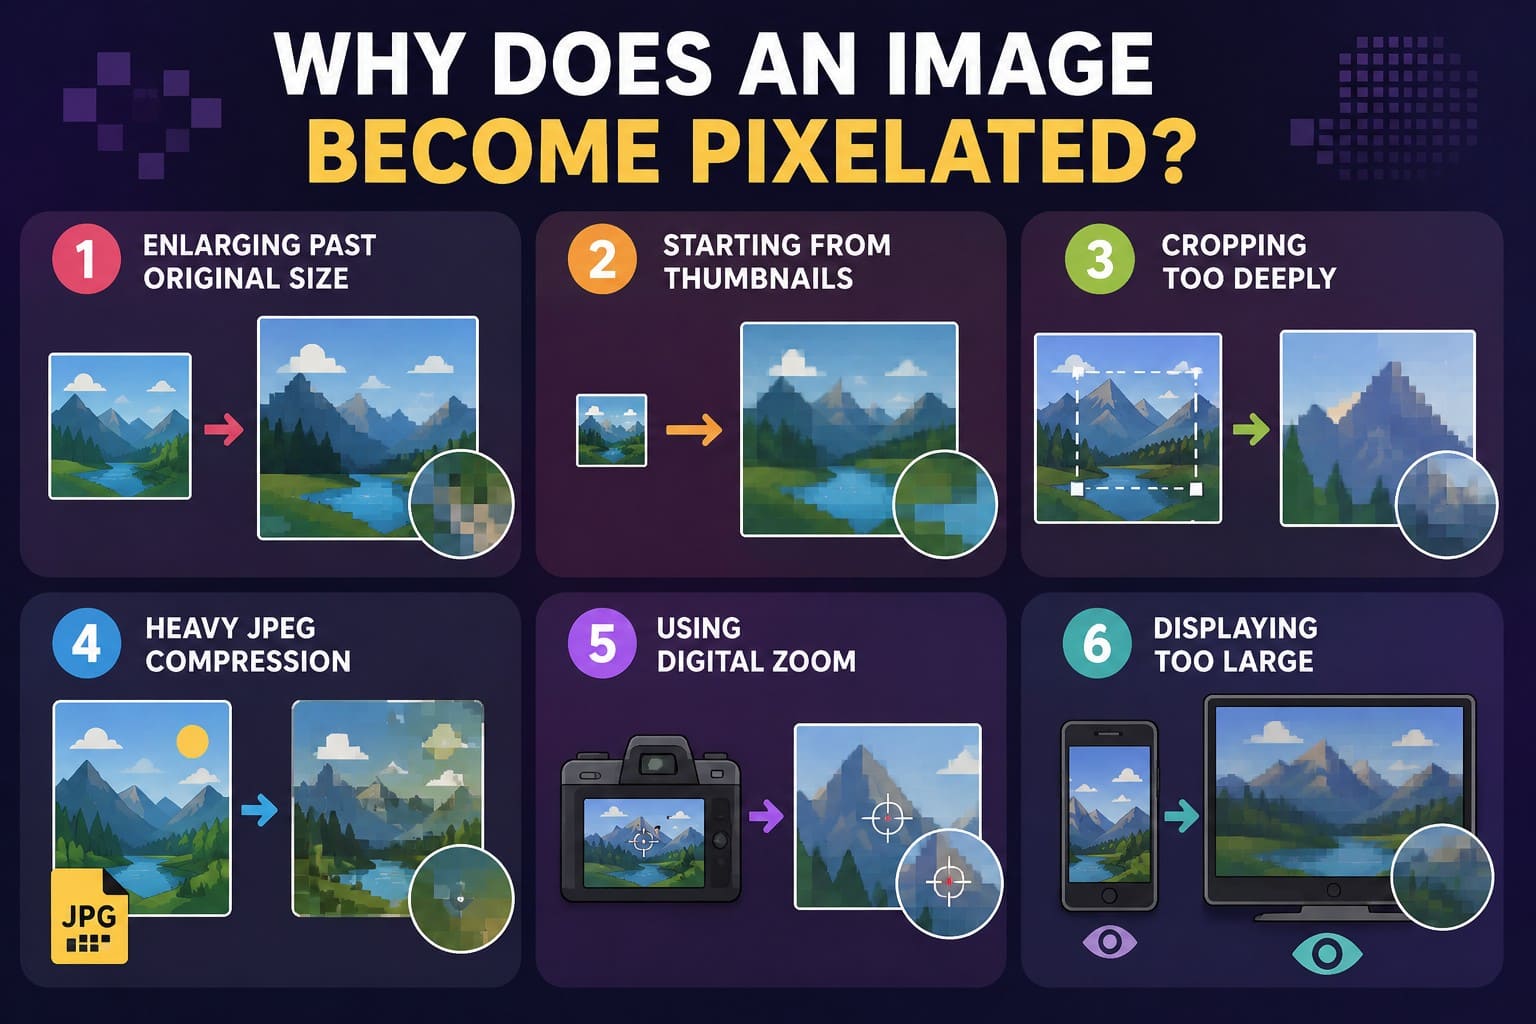
- Enlarging Past Original Size: Enlarging a small image beyond its original dimensions forces software to estimate new pixels. This can make existing blocks and softness more noticeable.
- Starting from Thumbnails: Thumbnails contain much less image data than full-size originals. Enlarging them gives AI or editing tools fewer details to work with.
- Cropping Too Deeply: Heavy cropping removes a large portion of the original pixels. The remaining area can become visibly pixelated when enlarged for screens or prints.
- Heavy JPEG Compression: Strong JPEG compression removes image data to reduce file size. Repeated saving can add blocky artifacts and make image recovery less effective.
- Using Digital Zoom: Digital zoom crops and enlarges captured image data instead of using optical magnification. This leaves fewer real pixels available for the final enlarged image.
- Displaying Too Large: A photo may look clear at a small size but become pixelated when stretched beyond its available resolution. This often leads users to search for how to unpixelate an image.
Part 3. How to Unpixelate an Image with Dr.Fone App
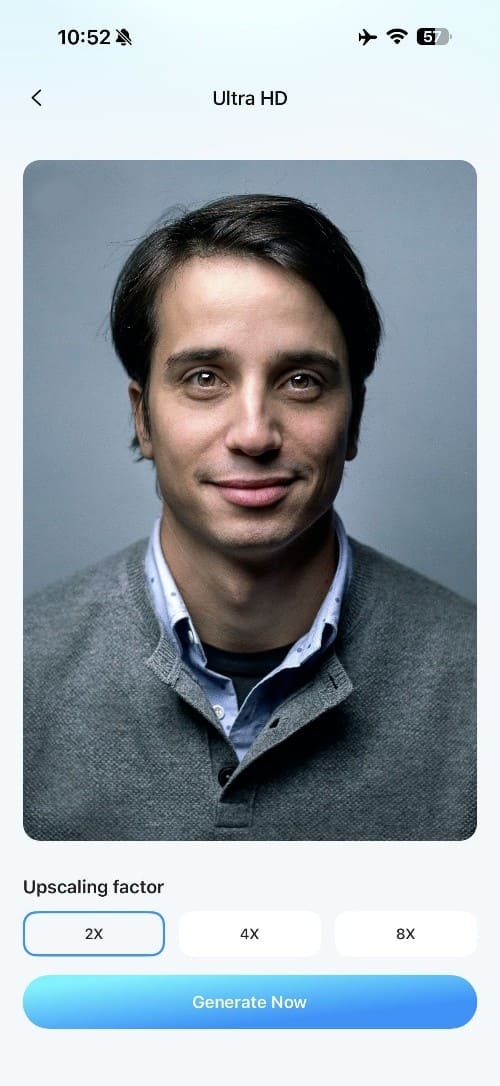
Adding pixels helps address limited image data by estimating what should appear between existing details. AI tools handle this more effectively than simply stretching the original pixels. Dr.Fone App offers AI Photo Enhancer on iOS and Android to improve image detail while enlarging photos. It includes 3 modes, while Ultra HD supports 2x, 4x, and 8x upscaling.
This makes heavily pixelated photos more suitable for larger use while improving overall clarity. Auto and Portrait modes can also help remove pixelation by enhancing visible details and image quality. Processing usually takes less than 5 minutes, and the mobile workflow lets you edit photos directly from your camera roll without transferring them to a computer.
Dr.Fone App - AI Photo Restorer & Enhancer (iOS & Android)
Restore, Colorize, Enhance, and Upscale Photos with AI
- Restore Old Photos by Fixing Creases, Tears, and Scratches
- Colorize Black-and-White Photos with AI
- Auto-Enhance Photos and Improve Portrait Details to HD Quality
- Upscale Images to 2x, 4x, or 8x for Clearer Results



Guide to Fix a Pixelated Image with Dr.Fone App
Install Dr.Fone App on your Android or iOS device, then follow these steps to learn how to fix a pixelated image:
-
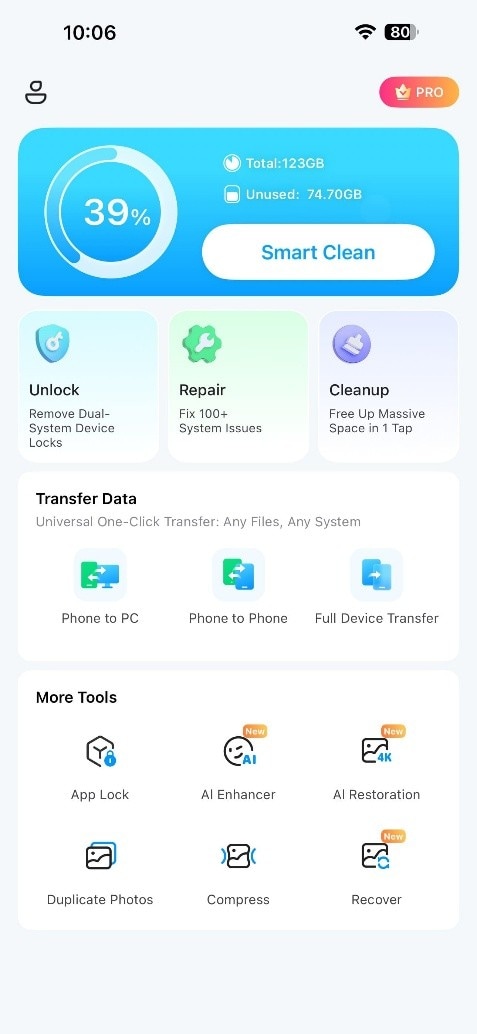
Step 1 Access the Required AI Tool
Launch Dr.Fone App and tap “AI Enhancer” to view the available enhancement modes.
-
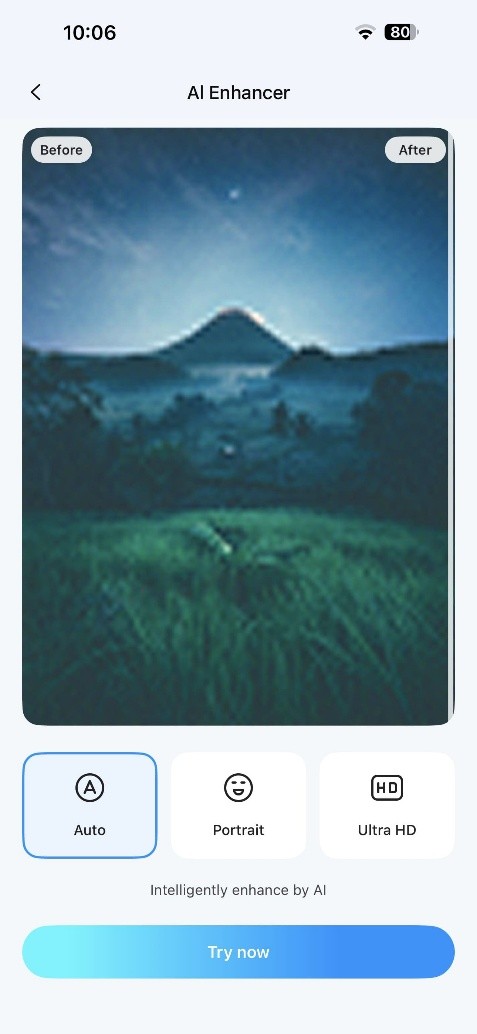
Step 2 Choose Modes and Add the Photo
Select “Auto” or “Portrait” based on the photo, then tap “Try Now.” Choose the image you want to enhance and start processing.
-
Step 3 Upscale and Save the Result
For the upscale factor, tap “Ultra HD,” choose your preferred option, and select “Generate Now.” Once processing is complete, review the result and tap “Save” to export it to the camera roll.
Part 4. Sharpen, Upscale, or Resize: Which One Fixes Pixelation?
Dr.Fone App provides the mobile option, but different editing methods handle pixelation in different ways. Review the table below to understand how to make a picture less pixelated and choose the right approach.
| Method | What It Does | When to Use It | Main Limitation |
|---|---|---|---|
| Sharpening | Increases contrast around existing edges | Slightly soft images that still contain usable detail | Can make visible pixel blocks look harsher |
| AI Upscaling | Adds inferred pixels while increasing image dimensions | Small or pixelated images that need enlargement | New detail is estimated, not truly recovered |
| Standard Resizing | Changes image dimensions using interpolation | Small increases or reductions in image size | Cannot restore missing source detail |
| AI Enhancement | Reduces noise, blur, and compression-related artifacts | Damaged or artifact-heavy images before enlargement | May improve clarity without greatly increasing dimensions |
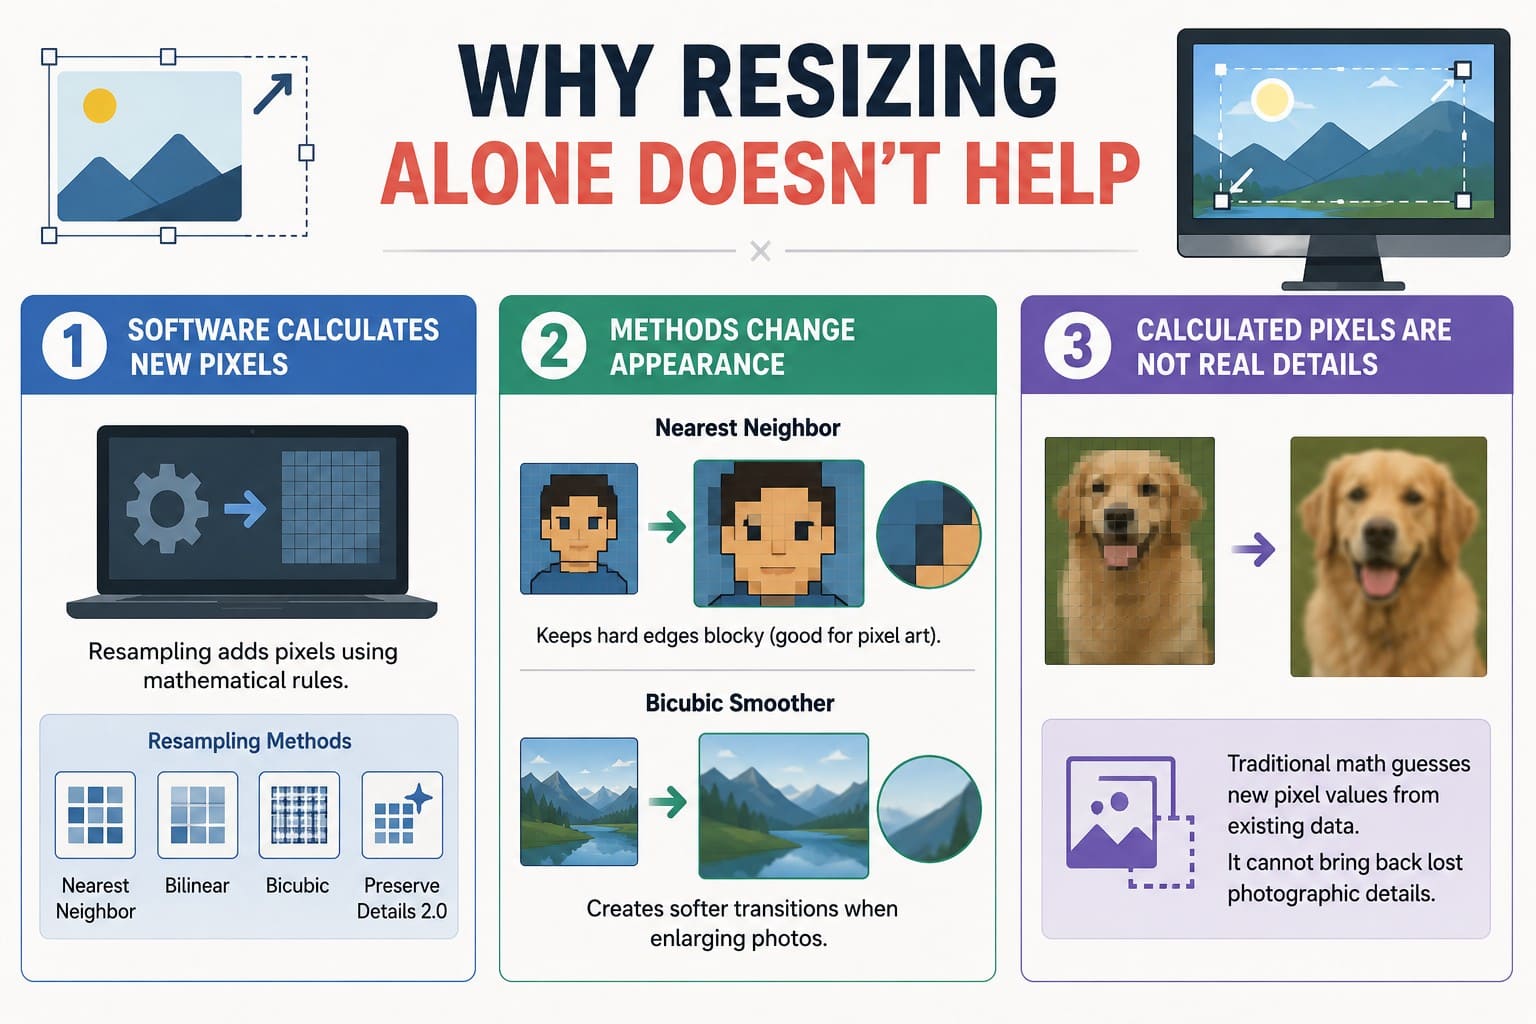
Why Resizing Alone Doesn't Help
Standard resizing can change image dimensions, but it does not truly restore missing detail. Here is why resizing alone is not enough when you unpixelate a photo:
- Software Calculates New Pixels: Resampling adds pixels by estimating new values from the image data already available in the original file.
- Methods Change Appearance: Different resizing methods produce different results. Some preserve hard edges, while others create smoother transitions that work better for photographs.
- Calculated Pixels Are Not Real Details: Traditional resizing can smooth an enlarged image, but it cannot recover photographic details that were missing from the original source.
Part 5. Other Ways to Make a Picture Less Pixelated
Beyond the mobile option, this section explains how to unpixelate an image using 3 alternative methods for improving clarity and reducing visible pixelation.
Use a Higher-Resolution Original
Start with the original image before trying any enhancement tool. A better source gives you more real detail to work with, so check these options first:
- Go Back to the Camera Original: Check the original photo captured by your phone or camera. Shared copies may be compressed, while the original usually keeps more pixels and detail.
- Replace Downloaded Copies: Avoid thumbnails, screenshots, or compressed downloads when a larger original is available. These copies often contain fewer pixels and less usable detail.
- Re-Crop from the Full File: If the image came from a tight crop, return to the full-resolution original and crop it again. This preserves more source pixels for later enlargement.
Fix Pixelation in Photoshop
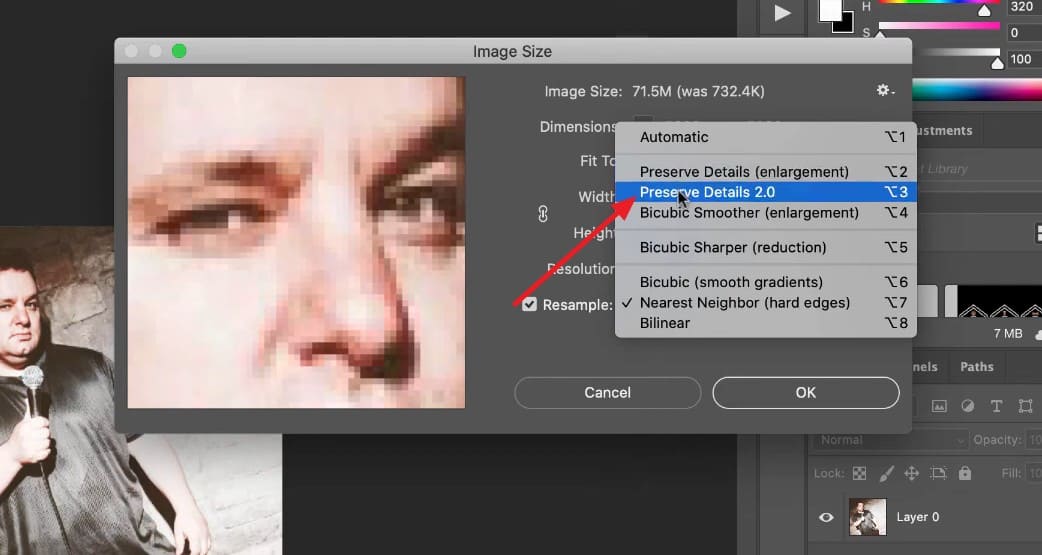
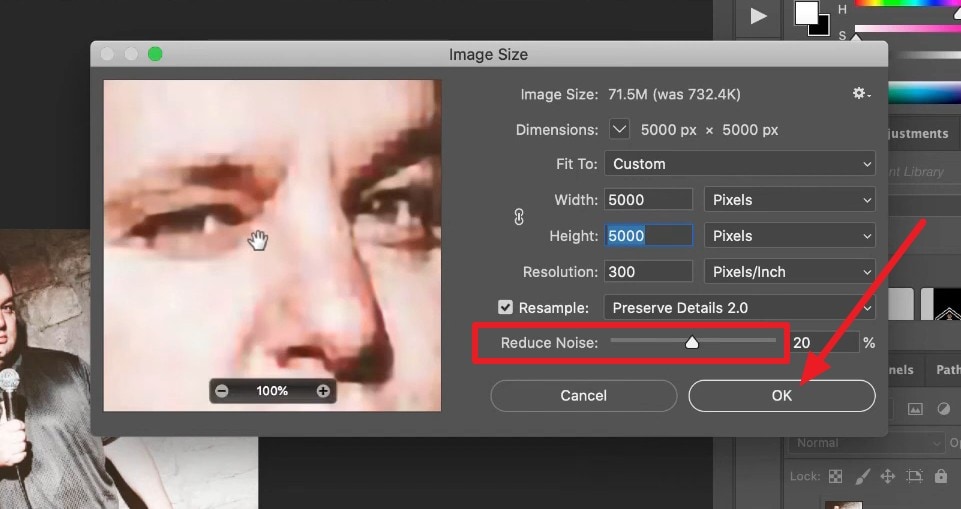
If you don't have a higher-resolution original, Photoshop can enlarge the image by resampling it. Its Preserve Details 2.0 method helps increase resolution while maintaining sharper edges and reducing visible artifacts. It is designed specifically for image enlargement and works better than basic resizing methods. So, if you want to know how to make a picture less pixelated, follow these detailed steps:
-
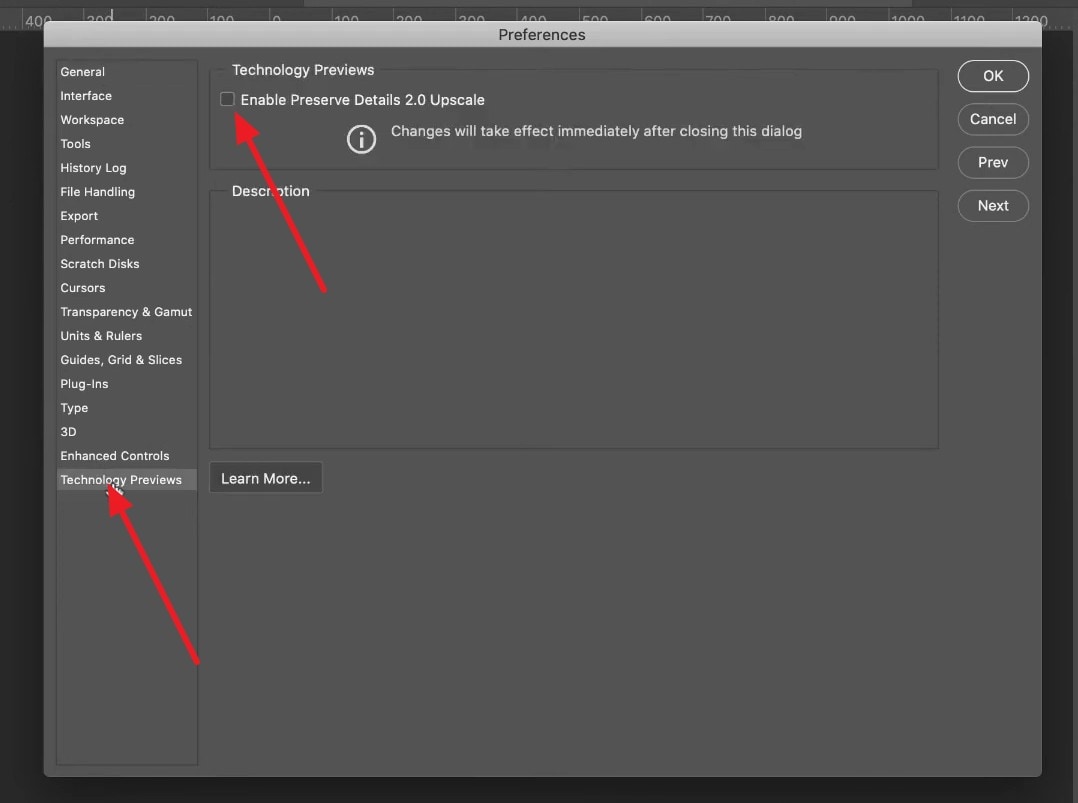
Step 1 Enable Preserve Details 2.0 Upscale
Go to “Preferences > Technology Previews” and enable “Preserve Details 2.0 Upscale.” This feature is available in Photoshop CC 2018 and later.
-
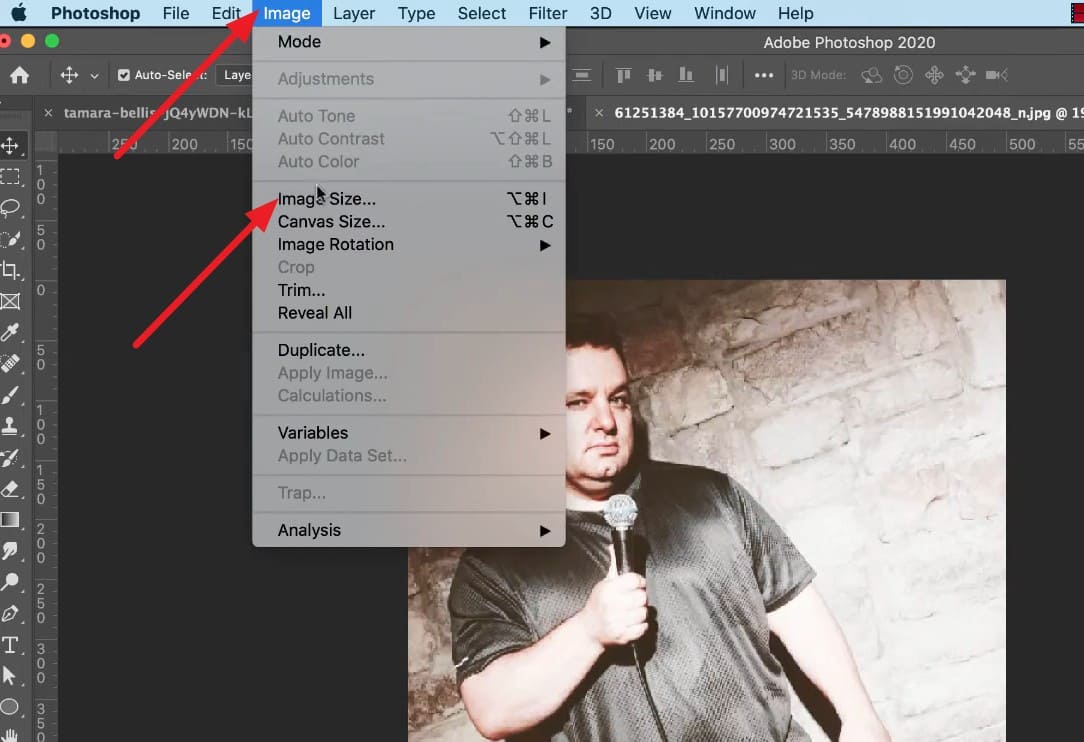
Step 2 Open Image Size
Navigate to the top menu and select “Image > Image Size” to change your photo's pixel dimensions.
-
Step 3 Choose Preserve Details 2.0
In the “Resample” drop-down menu, choose “Preserve Details 2.0” instead of standard resampling methods to enlarge the image intelligently.
-
Step 4 Reduce Noise and Confirm
After that, use the “Reduce Noise” slider to fine-tune smoothness, and press “OK.”
Use an Online AI Unpixelate Tool
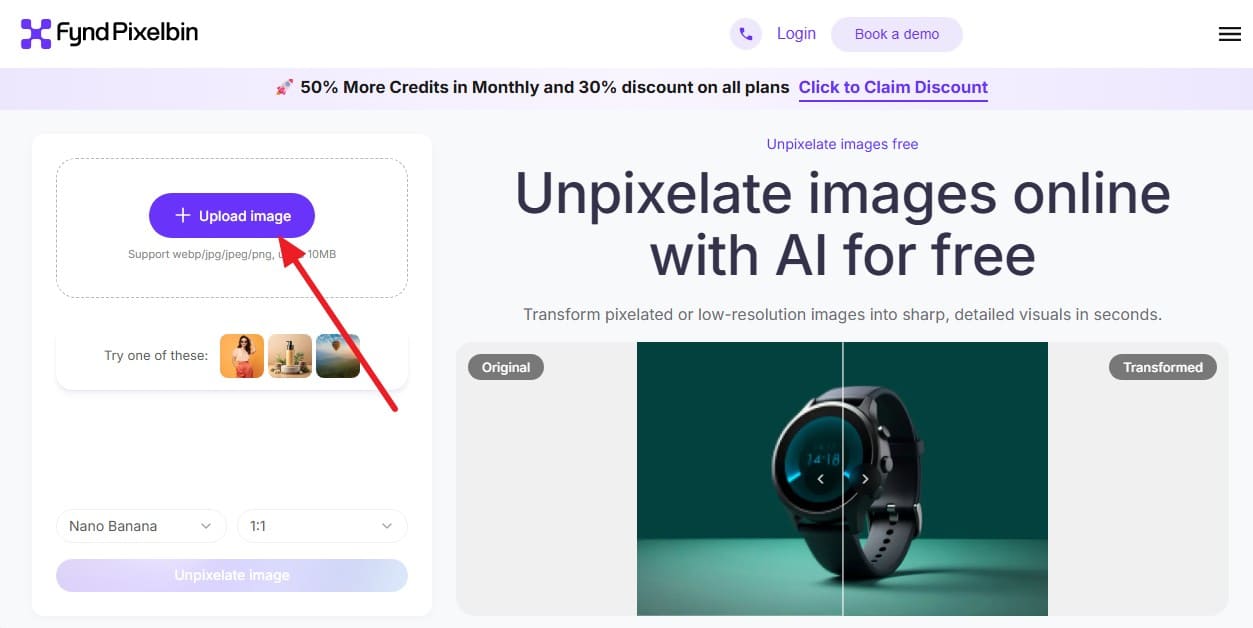
For another option, you can use an online tool to unpixelate an image for free without installing additional software. PixelBin works directly in web browsers on computers, tablets, and phones. It supports JPG, JPEG, PNG, and WEBP files up to 10 MB per upload. Follow the steps below to process your image:
-
Step 1 Upload the Image
Press the “+Upload Image” button on the main interface and add the source file.
-
Step 2 Select the Model and Aspect Ratio
After that, select the model and aspect ratio, and tap on the “Unpixelated Image” button.

-
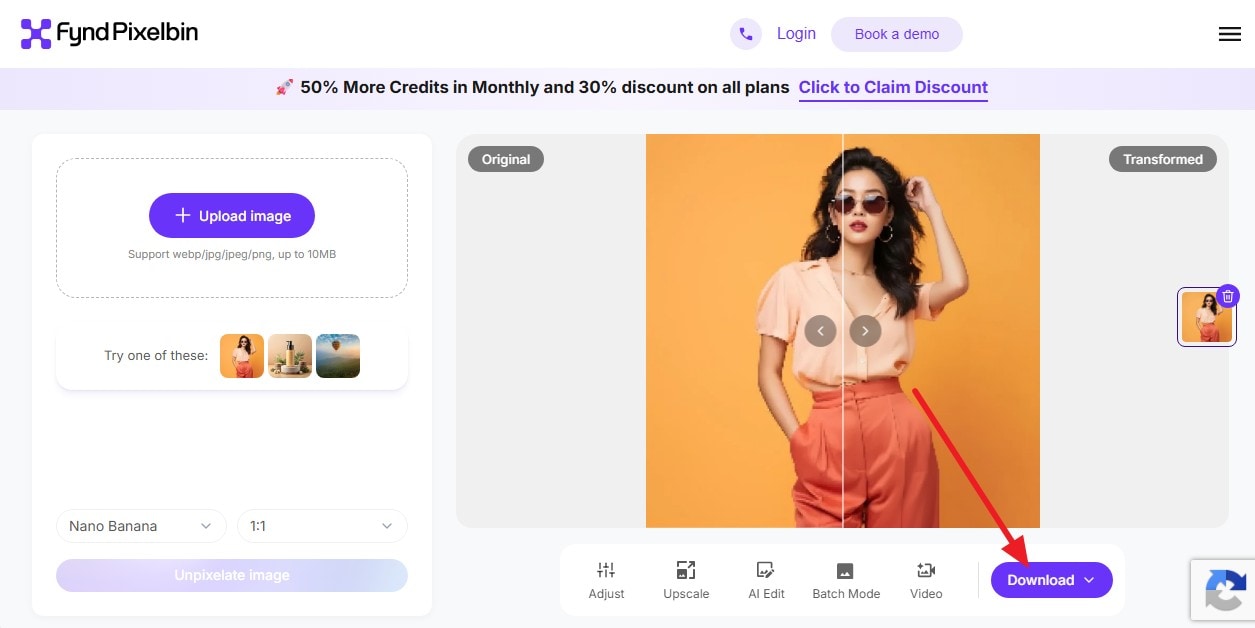
Step 3 Compare and Download
Compare the final results, edit the image if you want, and tap “Download” to export.
Part 6. When Should You Enhance First and Upscale Second?
If an image already has blur, noise, or compression artifacts, clean those problems before making it larger. Upscaling can also magnify existing flaws. Follow these 5 rules to remove pixelation while keeping the final image clear and natural:
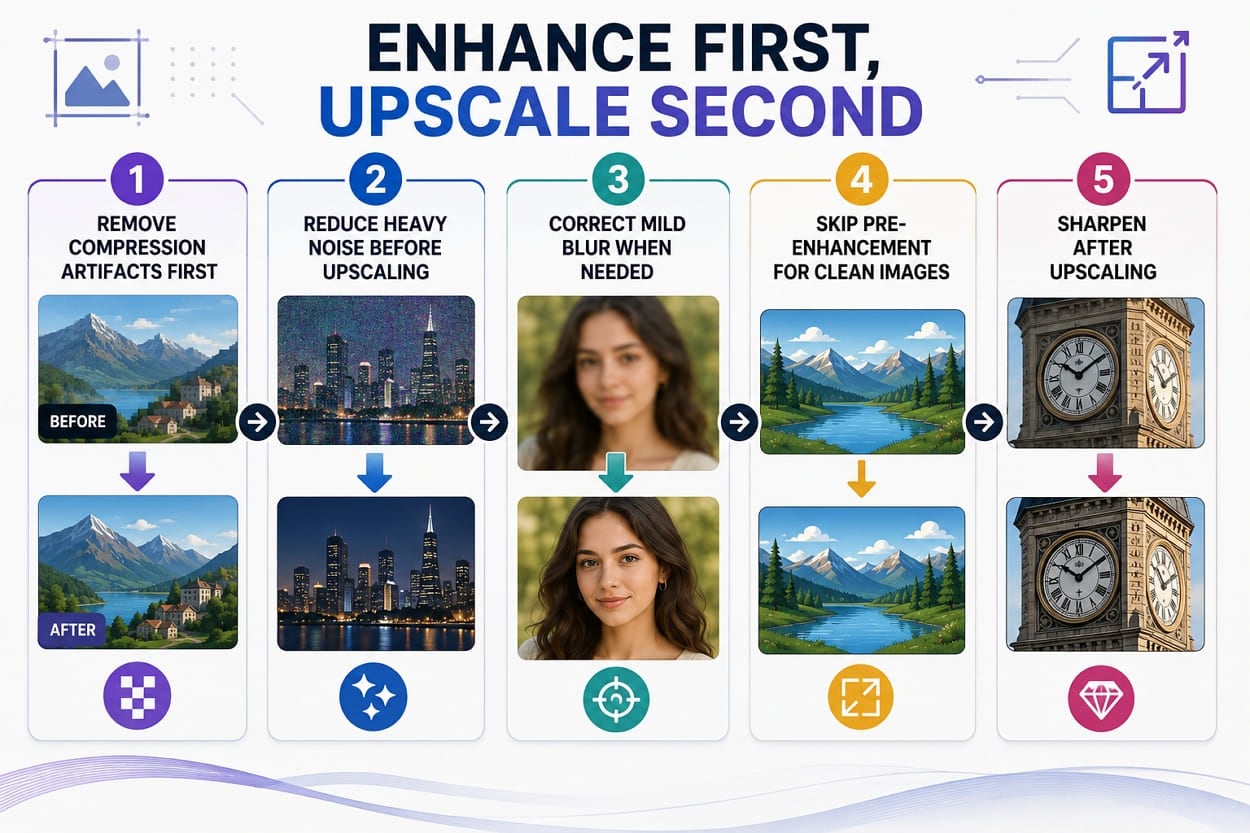
- Remove Compression Artifacts First: Clean visible JPEG blocks, ringing, or compression damage before enlargement. Upscaling these defects can make them more noticeable.
- Reduce Heavy Noise Before Upscaling: Denoise grainy images before increasing their dimensions. Otherwise, the upscaler may enlarge noise along with useful image detail.
- Correct Mild Blur When Needed: Apply controlled deblurring when the source is noticeably soft. Starting with a cleaner source helps the upscaler produce a more usable result.
- Skip Pre-Enhancement for Clean Images: If the source is already clear and free from major artifacts, upscale it directly. Unnecessary enhancement can remove useful texture or detail.
- Sharpen After Upscaling: Apply light sharpening after enlargement to refine edges. Sharpening too early can exaggerate noise, blocks, and other defects before they are enlarged.
Part 7. When Pixelation Cannot Be Fully Recovered?
When you remove pixelation, the result still depends on how much original image data remains. The following 5 cases explain when lost details cannot be fully restored:
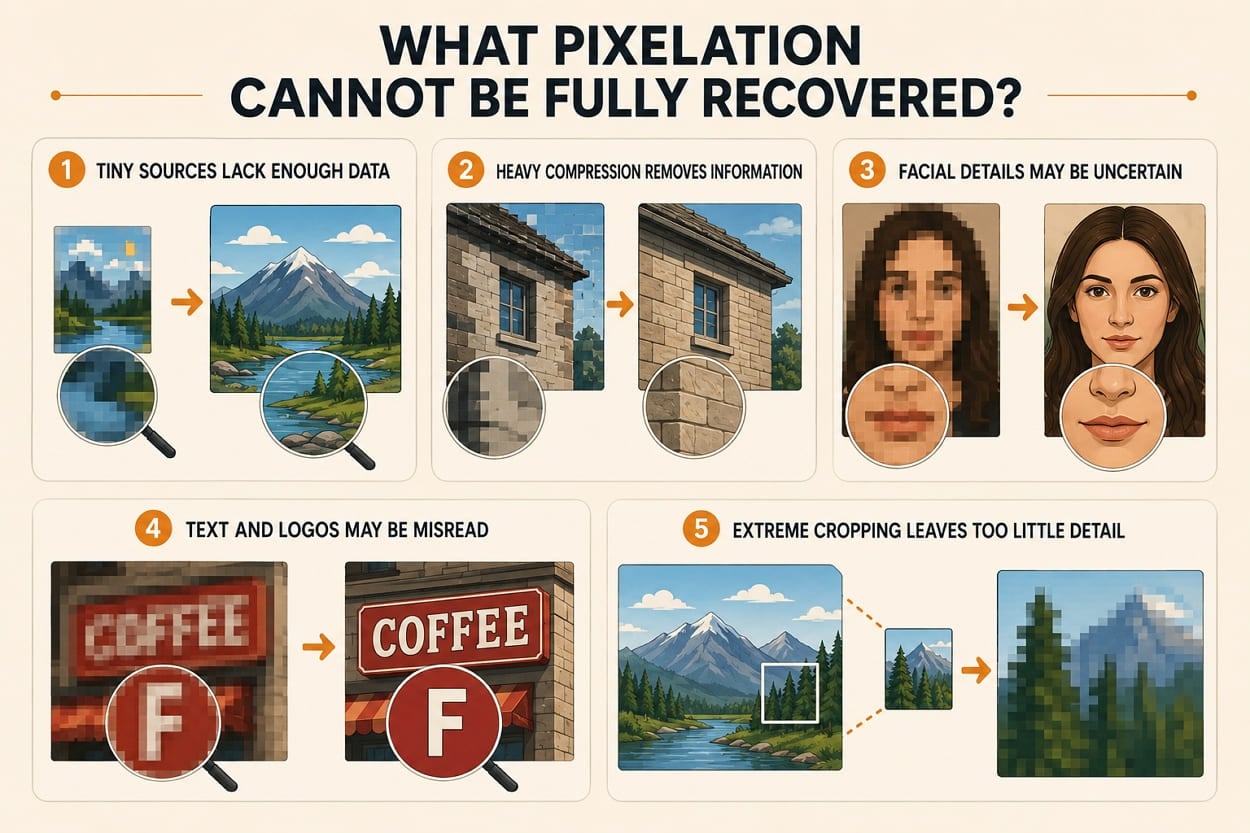
- Tiny Sources Lack Enough Data: Very small images contain too little original information for accurate reconstruction. AI may create plausible details, but they are only estimates.
- Heavy Compression Removes Information: Strong JPEG compression permanently discards image data. Once those details are lost, enhancement tools cannot restore the exact original pixels.
- Facial Details May Be Uncertain: Severely pixelated faces lack enough information for accurate reconstruction. AI may sharpen features, but the result may differ from the original person.
- Text and Logos May Be Misread: When letters or logos are heavily pixelated, AI may generate incorrect shapes. Reconstructed text should not be treated as fully accurate.
- Extreme Cropping Leaves Too Little Detail: A heavily cropped image may contain too few pixels for reliable recovery. Upscaling can enlarge it but cannot restore removed source information.
Part 8. How to Prevent Images from Becoming Pixelated Again?
After you fix a pixelated image, a few simple habits can help prevent the same problem from happening again. Use these practices to preserve image quality:
| What To Do | Why It Helps Prevent Pixelation |
|---|---|
| Keep the Highest-Resolution Original | Preserves the most source detail for future editing, cropping, and enlargement. |
| Avoid Repeated JPEG Saves | Repeated lossy saving can add compression artifacts and gradually reduce image quality. |
| Export for the Intended Size | Using suitable pixel dimensions reduces the need to enlarge a small image later. |
| Limit Heavy Cropping and Digital Zoom | Both can leave fewer original pixels available for the final image. |
| Use PNG for Screenshots and Text | Lossless PNG keeps text, interface elements, and sharp edges clearer. |
| Upscale Before Large-Size Use | If an image must appear much larger, upscale it deliberately instead of stretching it in a layout. |
Conclusion
Fix compression artifacts first, then enlarge the image and apply light sharpening only when needed. To unpixelate image files more easily on mobile, Dr.Fone App offers AI-powered enhancement and upscaling in one workflow. Its tools can improve clarity, reduce visible flaws, and make pixelated photos more suitable for larger use. For the most natural result, always start with the highest-resolution original when available.
FAQ
-
1. Does changing DPI fix a pixelated digital image?
No, DPI affects print size, not the file's pixel count. Changing it without resampling redistributes the same pixels across a different physical area and adds no detail. -
2. Can pixelated text be restored accurately?
Rarely. AI may estimate character shapes from surrounding context, so reconstructed text can look convincing while still being incorrect. Treat restored text as unverified, especially on documents, signs, or license plates. -
3. Does making an image smaller reduce visible pixelation?
Yes. Reducing the image dimensions can make pixel blocks less noticeable because the same pixels are displayed across a smaller area. -
4. Is PNG better than JPG for preventing pixelation?
PNG suits screenshots, text, and interface graphics because it preserves sharp edges. High-quality JPG is usually better for photographs because it keeps file sizes smaller.







Selena Lee
staff Editor
Generally rated4.5(105participated)